- Company Articles
- Products and Technology
- Installation And Maintenance
- Free Flow Chain Conveyor Installation Guide: Best Practices for Your Facility

Free Flow Chain Conveyor Installation Guide: Best Practices for Your Facility
Related Product
Free Flow Chain Conveyor
The free flow conveyor system uses a free flow chain that can increase the speed of the tooling board that supports the products. This can improve the efficiency and quality of the production process, as well as reduce the wear and tear of the system.
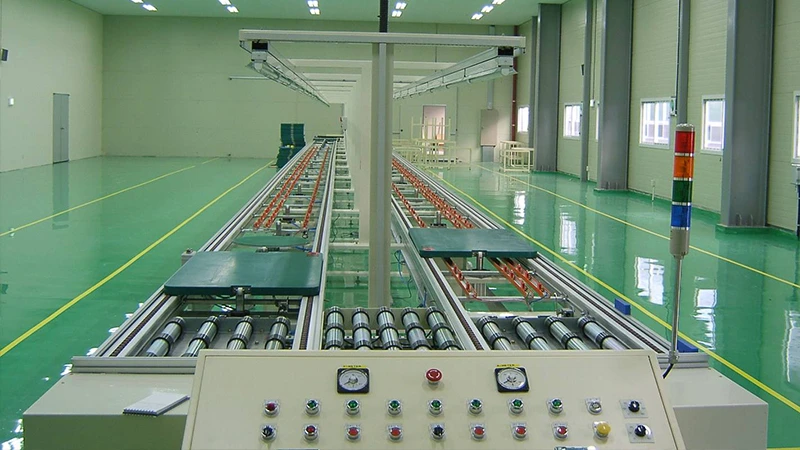
Walk into any well-run manufacturing plant, warehouse, or assembly facility, and you'll notice a quiet hero keeping operations moving: the free flow chain conveyor. These unassuming systems are the backbone of efficient material handling, seamlessly transporting parts, products, and components from one workstation to the next without manual lifting or pushing. Whether you're setting up a new production line or upgrading an existing one, installing a free flow chain conveyor isn't just about bolting parts together—it's about building a foundation for lean system efficiency, reducing waste, and empowering your team to work smarter, not harder.
But here's the thing: a poorly installed conveyor can become a bottleneck faster than you can say "production delay." Misaligned tracks, wobbly frames, or overlooked safety gaps can lead to jams, damaged goods, and even workplace injuries. That's why we've put together this guide—part technical manual, part field-tested wisdom—to walk you through installing a free flow chain conveyor the right way. We'll cover everything from pre-planning your layout to testing the final system, with a focus on practical steps, common pitfalls to avoid, and how to integrate your conveyor with other essential tools like aluminum profile workbenches and roller track setups. Let's dive in.
1. Pre-Installation Planning: Lay the Groundwork for Success
Before you unbox a single part, take a step back and plan. Installation day will go 10x smoother if you've mapped out the details upfront. Think of this phase as "measuring twice, cutting once"—but for conveyor systems.
Assess Your Space and Workflow
Start by grabbing a tape measure, a notepad, and maybe even a sketchpad (or a digital tool like CAD if you're tech-savvy). Walk the area where the conveyor will go and ask: Where does material enter the line? Where does it need to exit? Are there obstacles like pillars, doorways, or existing equipment that could block the path? For example, if your facility uses aluminum profile workbenches along the conveyor route, you'll need to ensure the conveyor's height aligns with the workbench surface—typically 34–36 inches for ergonomic access. Misalignment here means operators will strain to reach items, defeating the purpose of "free flow."
Also, consider future growth. Will you need to extend the conveyor later? Leave 1–2 feet of extra space at the ends if possible. And don't forget about power sources: if your conveyor has motorized components (some free flow models do, though many are gravity-fed), note where electrical outlets are located to avoid messy extension cords.
Check the Floor: Flatness Matters
Free flow chain conveyors rely on gravity or gentle slopes to move items, so a level floor is non-negotiable. Use a 4-foot spirit level to check for dips or bumps in the installation area. Even a 1/4-inch slope over 10 feet can cause items to move too fast (risking spills) or too slow (causing backups). If your floor is uneven, you may need shims or adjustable feet—pro tip: many conveyor frames use caster wheel bases with leveling screws, which can help compensate for minor irregularities.
Gather Your Team and Tools
Installing a conveyor is a team sport. You'll need at least 2–3 people: one to hold parts in place, one to fasten bolts, and a third to double-check measurements. As for tools, here's a quick checklist to avoid last-minute trips to the hardware store:
| Tool/Item | Purpose | Pro Tip |
|---|---|---|
| Socket set (10mm–19mm) | Tightening frame bolts and roller track connectors | Magnetic sockets save time—no more dropping nuts in hard-to-reach spots! |
| Level (4-foot and 2-foot) | Ensuring frame and track alignment | Use the 4-foot level for long sections; the 2-foot for tight corners. |
| Tape measure (25-foot minimum) | Measuring conveyor length and spacing between supports | Mark measurements with painter's tape on the floor to visualize the layout. |
| Rubber mallet | Gently tapping roller track sections into place (avoid damaging aluminum profile edges) | Wrap the mallet head in a cloth to prevent scratches on aluminum parts. |
| Safety gear: gloves, goggles, steel-toe boots | Protecting hands, eyes, and feet during assembly | Make it mandatory—even a dropped bolt can cause a stubbed toe. |
2. Building the Frame: The "Skeleton" of Your Conveyor
With planning done, it's time to start building. The frame is the skeleton of your conveyor—sturdy, square, and level are the three rules here. Most free flow chain conveyors use aluminum profile frames for their lightweight strength, corrosion resistance, and easy customization. If you're using aluminum profile (and you should—they're a game-changer for modular setups), here's how to assemble it right.
Step 1: Lay Out the Frame Rails
Unpack the aluminum profile rails (typically 40mm or 80mm wide, depending on your conveyor's weight capacity) and lay them flat on the floor along your pre-marked guidelines. If your conveyor is longer than 10 feet, add support legs every 3–4 feet to prevent sagging. Pro tip: Use a string line stretched between the end supports to ensure all legs are aligned in a straight line—this avoids the "snake effect" where the conveyor curves slightly, leading to jams.
Step 2: Attach the Legs and Level the Frame
Bolt the support legs to the aluminum profile rails using the manufacturer's recommended fasteners (usually M8 or M10 bolts with T-slot nuts that slide into the profile's grooves). Once all legs are attached, adjust the leveling feet (or caster wheels if you need mobility) to raise the frame to your desired height—remember, this should match the height of adjacent workbenches for seamless material transfer. Use your 4-foot level on top of the rails to check for level in both directions (left-right and front-back). Twist the leveling feet up or down until the bubble is centered, then lock them in place with the jam nuts.
Warning: Don't skip the locking step! A leg that slowly sinks over time will throw off the entire conveyor's alignment. We've seen facilities where a single loose leveling foot caused a 6-inch dip in the track after a month of use—costing hours of downtime to fix.
3. Installing the Free Flow Chain and Roller Track
Now comes the heart of the system: the free flow chain and roller track. This is where the "free flow" magic happens—items glide along the track with minimal friction, thanks to the chain's rotating rollers and smooth rail surfaces.
Prep the Track Rails
First, clean the roller track rails with a dry cloth to remove dust, oil, or debris from shipping. Even a tiny speck of dirt can cause a roller to bind later. Then, attach the track rails to the frame using roller track placon mounts—these are small brackets that secure the track to the aluminum profile. Make sure the mounts are spaced evenly (check the manufacturer's specs, but 12–18 inches apart is standard) to prevent the track from flexing under load.
Lay the Free Flow Chain
Free flow chain comes in pre-cut lengths or reels; if it's a reel, unspool it carefully to avoid tangling (this is where a second person comes in handy—one to hold the reel, one to guide the chain onto the track). Start at one end of the conveyor and lay the chain into the track's grooves, ensuring each roller sits flush with the track surface. If your conveyor has curves (yes, they can be custom-bent!), take extra time to align the chain in the curved sections—kinks here will cause items to get stuck.
Once the chain is in place, connect the ends using the chain connector (usually a small pin or clip provided by the manufacturer). Pull the chain tight—there should be minimal slack, but not so tight that it stretches. A good rule of thumb: lift the middle of the chain; it should only rise 1–2 inches above the track. Too loose, and it will sag and jam; too tight, and it will wear out the rollers prematurely.
Test the Rollers
Before moving on, give each roller a gentle spin with your finger. They should rotate smoothly, with no grinding or sticking. If a roller feels stiff, check for debris in the bearing or misalignment in the track. A quick spray of dry lubricant (avoid heavy oils—they attract dust) can help loosen stubborn rollers, but if the problem persists, replace the roller entirely. It's better to fix a single faulty roller now than to deal with a line-down situation later.
4. Integrating with Workstations and Material Handling Tools
A free flow chain conveyor rarely works in isolation—it's part of a larger ecosystem of workbenches, material racks, and trolleys. Integrating these tools properly ensures that items flow in and out of the conveyor without bottlenecks.
Aligning with Workbenches
Most facilities position workbenches alongside the conveyor so operators can load/unload items without stepping away. Use your 2-foot level to match the workbench height to the conveyor track—even a 1-inch difference will force operators to lift items, increasing fatigue and slowing down production. If your workbench has a wooden or metal top, add a small lip (1–2 inches) along the edge facing the conveyor to prevent items from sliding off accidentally.
Adding Side Guides (If Needed)
For small or irregularly shaped items, side guides keep them centered on the conveyor. These are typically plastic or aluminum strips attached to the track rails using brackets. Measure the width of your largest item and set the guides 1/2 inch wider than that measurement to allow for easy movement. Avoid making the gap too tight—items with slight variations in size (common in manufacturing) will get stuck.
5. Safety First: Don't Overlook the Basics
We've saved the most important step for last: safety. A conveyor might seem harmless, but moving parts and heavy loads pose real risks. Here's how to keep your team safe:
- Guard moving parts: If your conveyor has motorized components or exposed chains, install plastic or metal guards to prevent fingers, clothing, or hair from getting caught. Even gravity-fed conveyors with fast-moving items need guards at the ends to stop items from falling off and hitting someone.
- Mark the conveyor zone: Use floor tape to outline the area around the conveyor where operators should stand—this prevents trips and keeps people clear of moving items.
- Train your team: Hold a quick training session to show operators how to load/unload items safely, what to do if a jam occurs (always turn off power first, even for gravity-fed systems!), and how to report issues like strange noises or loose parts.
- Test the emergency stop: If your conveyor has an emergency stop button (required for motorized models), test it weekly to ensure it cuts power immediately. Post clear signs showing where the button is located.
6. Testing, Maintenance, and Troubleshooting
You're almost done! But before you declare victory, run a full test cycle:
Test Loads and Speeds
Start with empty runs to check for unusual noises (grinding, squeaking) or sticking rollers. Then, add test loads—use actual products or weighted boxes that match your typical load size. Run them through the conveyor at different speeds (if motorized) to ensure smooth movement. If items tip or slide, adjust the side guides or add anti-slip mats to the chain (some manufacturers sell adhesive-backed mats for this purpose).
Maintenance: Keep It Running Smoothly
Like any equipment, your free flow chain conveyor needs regular love to stay efficient. Here's a quick maintenance checklist to add to your calendar:
- Daily: Wipe down the track and chain to remove dust and debris; check for loose bolts or brackets.
- Weekly: Lubricate the chain with a lightweight, food-grade oil (if your facility handles food products) or general-purpose lubricant (avoid over-lubricating—excess oil attracts dirt).
- Monthly: Check roller alignment and replace any rollers that are cracked, chipped, or no longer spin freely. Tighten any loose leveling feet or caster wheels.
- Quarterly: Inspect the entire frame for rust (especially if using steel components) or aluminum profile damage; touch up with paint or replace parts as needed.
Troubleshooting Common Issues
Even with perfect installation, problems can pop up. Here's how to fix the most common ones:
Items jam frequently
Check for misaligned track rails or a sagging frame—use your level to realign. Clean debris from the chain rollers and apply a small amount of lubricant.
Noises (grinding/squeaking)
Tighten loose bolts on the frame or track mounts. replace worn rollers—if a roller is making noise, it's usually because the bearing is failing.
Items move too slowly
Check the conveyor slope—gravity-fed systems need a slight incline (1–2 degrees) to keep items moving. Clean the track and chain to reduce friction.
Conclusion: Your Conveyor, Your Efficiency Partner
Installing a free flow chain conveyor isn't just a one-time project—it's an investment in your facility's future. When done right, it becomes an invisible force multiplier, reducing manual labor, cutting down on errors, and keeping production flowing like water. Remember: the key is in the details—taking the time to level the frame, align the track, and train your team will pay off in smoother operations, fewer headaches, and a safer workplace.
So go ahead—fire up that conveyor, load the first item, and watch as your lean system starts to hum. And if you hit a snag? Refer back to this guide, or reach out to your supplier (a good lean pipe supplier will offer installation support). Here's to faster production, happier teams, and a conveyor that works as hard as you do.