- Company Articles
- Products and Technology
- Product knowledge
- How Is Two Way Lean Pipe Joint Chrome Manufactured? Production Process

How Is Two Way Lean Pipe Joint Chrome Manufactured? Production Process
Related Product
Two Way Lean Pipe Joint Chrome
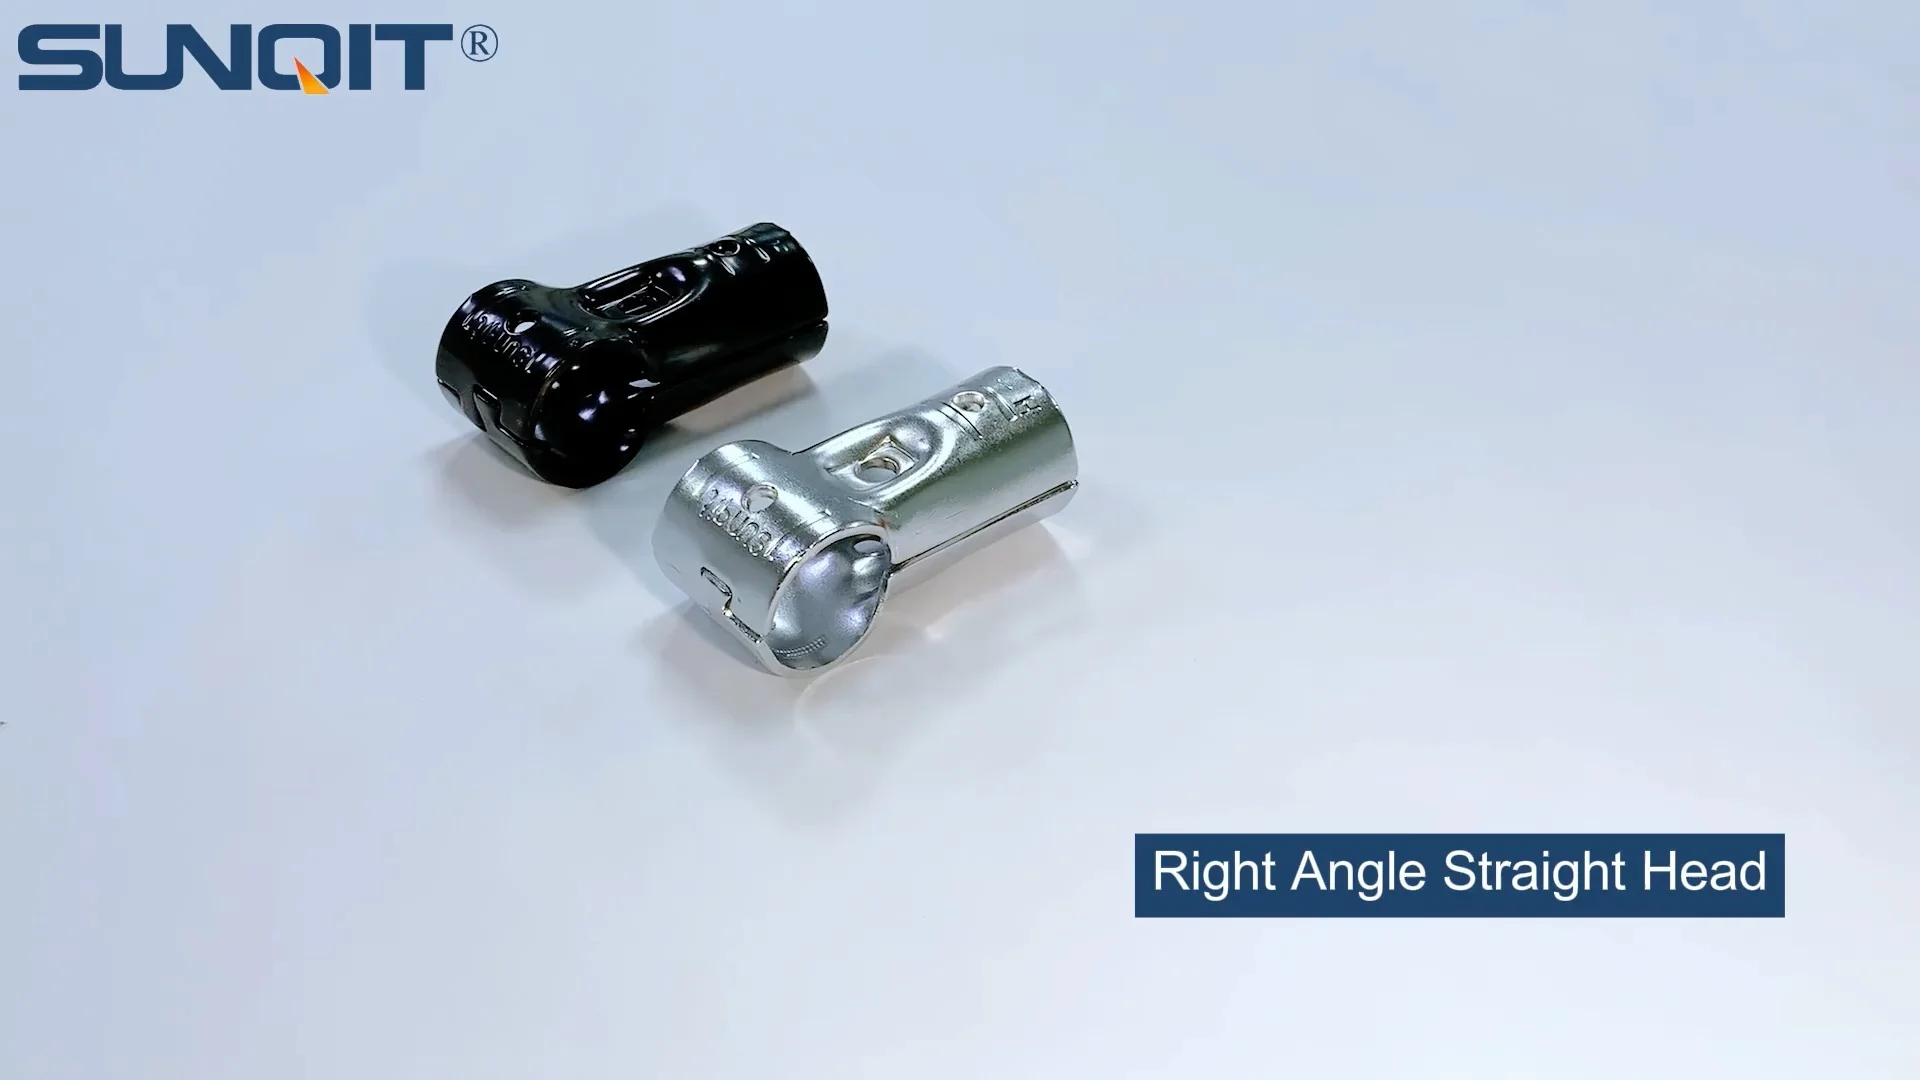
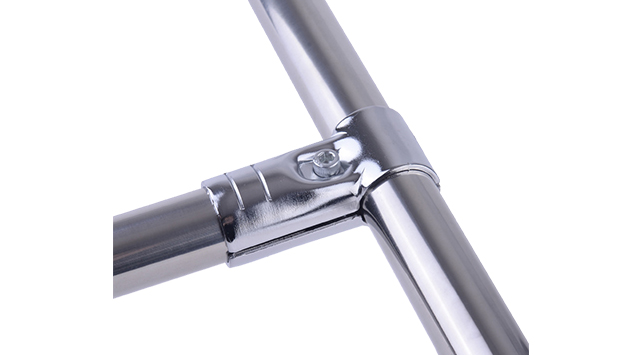
Two way lean pipe joint for 2 pcs 28MM lean pipe connection in straight angle, which used widely in workbench, flow rack, hand trolley frame connection.
Introduction: The Unsung Hero of Lean Manufacturing
In the bustling world of manufacturing, where efficiency and adaptability reign supreme, there's a small but mighty component that holds everything together—literally. Meet the two way lean pipe joint chrome, a unassuming yet critical part of lean pipe and accessories that forms the backbone of modular workbenches, flow racks, turnover trolleys, and countless other setups in lean production lines. If lean manufacturing is the symphony of efficiency, then these joints are the sheet music, ensuring every "note" (or pipe, in this case) stays in harmony.
But what exactly is a two way lean pipe joint chrome? Simply put, it's a connector designed to link two lean pipes at a fixed angle (often 90 degrees), allowing manufacturers to build customizable, modular structures. Unlike rigid, one-size-fits-all systems, lean pipe setups rely on these joints to adapt to changing production needs—whether that means reconfiguring a workbench for a new product or expanding a flow rack to handle higher volumes. And the "chrome" in its name? That's not just for show. The chrome plating adds a layer of durability and corrosion resistance, making the joint tough enough to withstand the daily grind of factory floors, warehouses, and assembly lines.
As part of the broader family of lean pipe joint components, the two way variant is a workhorse. It's often paired with stainless steel pipe series or aluminum lean pipe, two materials prized for their strength and versatility in lean systems. Together, these components form the building blocks of lean solutions—tools that help businesses cut waste, streamline workflows, and respond quickly to market demands. But how does this small but vital part go from raw metal to a finished, ready-to-use joint? Let's dive into the step-by-step production process that brings it to life.
But what exactly is a two way lean pipe joint chrome? Simply put, it's a connector designed to link two lean pipes at a fixed angle (often 90 degrees), allowing manufacturers to build customizable, modular structures. Unlike rigid, one-size-fits-all systems, lean pipe setups rely on these joints to adapt to changing production needs—whether that means reconfiguring a workbench for a new product or expanding a flow rack to handle higher volumes. And the "chrome" in its name? That's not just for show. The chrome plating adds a layer of durability and corrosion resistance, making the joint tough enough to withstand the daily grind of factory floors, warehouses, and assembly lines.
As part of the broader family of lean pipe joint components, the two way variant is a workhorse. It's often paired with stainless steel pipe series or aluminum lean pipe, two materials prized for their strength and versatility in lean systems. Together, these components form the building blocks of lean solutions—tools that help businesses cut waste, streamline workflows, and respond quickly to market demands. But how does this small but vital part go from raw metal to a finished, ready-to-use joint? Let's dive into the step-by-step production process that brings it to life.
Step 1: Material Selection – The Foundation of Strength
Every great product starts with the right materials, and the two way lean pipe joint chrome is no exception. The goal here is to balance strength, durability, and cost—after all, these joints need to support heavy loads (think stacks of materials on a flow rack or the weight of tools on a workbench) without bending or breaking. For most manufacturers, the material of choice is
mild steel
, though higher-end variants may use steel from the stainless steel pipe series for enhanced corrosion resistance.
Why steel? Unlike aluminum lean pipe, which is lightweight and excellent for applications where portability is key, steel offers superior tensile strength—critical for joints that bear structural weight. Mild steel, in particular, is malleable enough to be shaped into complex forms (like the joint's curved or angular design) while still retaining rigidity. It's also more affordable than stainless steel, making it a practical choice for high-volume production. That said, some specialized joints (used in food processing or pharmaceutical facilities, for example) may opt for stainless steel from the stainless steel pipe series to meet strict hygiene standards, as stainless steel resists rust and bacterial growth.
Before production begins, the steel undergoes rigorous testing. Suppliers check for impurities, consistency in thickness, and mechanical properties like yield strength (the point at which the metal starts to deform) and ultimate tensile strength (the maximum stress it can handle before breaking). Only steel that meets these criteria moves on to the next stage—because a weak joint isn't just a faulty part; it's a risk to the entire lean system it supports.
Why steel? Unlike aluminum lean pipe, which is lightweight and excellent for applications where portability is key, steel offers superior tensile strength—critical for joints that bear structural weight. Mild steel, in particular, is malleable enough to be shaped into complex forms (like the joint's curved or angular design) while still retaining rigidity. It's also more affordable than stainless steel, making it a practical choice for high-volume production. That said, some specialized joints (used in food processing or pharmaceutical facilities, for example) may opt for stainless steel from the stainless steel pipe series to meet strict hygiene standards, as stainless steel resists rust and bacterial growth.
Before production begins, the steel undergoes rigorous testing. Suppliers check for impurities, consistency in thickness, and mechanical properties like yield strength (the point at which the metal starts to deform) and ultimate tensile strength (the maximum stress it can handle before breaking). Only steel that meets these criteria moves on to the next stage—because a weak joint isn't just a faulty part; it's a risk to the entire lean system it supports.
Step 2: Shaping the Joint – Forging vs. Casting
Once the steel is approved, it's time to shape it into the familiar two way joint form. There are two primary methods for this:
forging
and
casting
. Each has its pros and cons, and the choice often depends on the joint's design complexity and required strength.
For two way lean pipe joints, forging is ideal because it produces joints that can withstand heavy loads and repeated stress. The downside? Forging is best for simpler shapes. If the joint has intricate details (like unusual angles or extra holes), casting might be a better fit.
However, cast joints are generally less dense than forged ones, which can make them slightly weaker under heavy loads. For most standard two way joints, though, casting is sufficient—and more cost-effective for mass production. After casting, the joint is removed from the mold, and any excess metal (called "flash") is trimmed off with grinders or cutting tools.
Forging: For Strength and Durability
Forging is the old-school, muscle-powered method (though these days, it's more likely done with hydraulic presses than blacksmith hammers). Here's how it works: The steel is heated to extreme temperatures (around 1,100°C to 1,250°C) until it's red-hot and pliable. Then, it's placed into a die—a mold shaped like the final joint—and pressed or hammered into form. The pressure forces the metal's grains to align with the shape of the die, creating a denser, stronger structure than cast metal.For two way lean pipe joints, forging is ideal because it produces joints that can withstand heavy loads and repeated stress. The downside? Forging is best for simpler shapes. If the joint has intricate details (like unusual angles or extra holes), casting might be a better fit.
Casting: For Complex Designs
Casting is like making a metal sculpture from a mold. Molten steel (or sometimes iron) is poured into a sand or metal mold shaped like the joint. As the metal cools and solidifies, it takes on the mold's form. This method is great for joints with complex geometries—say, a two way joint with additional notches or threaded holes—because the mold can capture fine details that forging might miss.However, cast joints are generally less dense than forged ones, which can make them slightly weaker under heavy loads. For most standard two way joints, though, casting is sufficient—and more cost-effective for mass production. After casting, the joint is removed from the mold, and any excess metal (called "flash") is trimmed off with grinders or cutting tools.

Step 3: Machining – Precision is Everything
After forging or casting, the joint is starting to look like the finished product, but it's still rough around the edges—literally. Machining is where precision takes center stage. The goal here is to ensure the joint fits perfectly with lean pipe and accessories, so every hole, groove, and surface must meet exact measurements. Even a fraction of a millimeter off could mean a loose fit, which could compromise the entire structure.
The first stop is the lathe , a machine that spins the joint while a cutting tool shapes its outer surface. This smooths out any bumps from forging/casting and ensures the joint has a uniform diameter. Next, drilling : The joint needs holes to insert the lean pipes, so CNC drills (computer-controlled machines) bore precise holes through the joint's arms. These holes must match the diameter of standard lean pipes—typically 28mm or 30mm for steel pipes—to create a snug, secure fit.
Threading is another critical step. Many joints have threaded holes for bolts or set screws, which lock the pipes in place once inserted. CNC tapping machines cut these threads with incredible accuracy, ensuring that bolts from lean pipe and accessories will screw in smoothly without stripping. Finally, the joint's edges are deburred—smoothed out with abrasive tools to remove sharp corners that could cut workers or damage pipes during assembly.
Throughout machining, operators use calipers, micrometers, and coordinate measuring machines (CMMs) to check dimensions. Tolerances are tight—often within ±0.05mm for critical features like hole alignment. Why? Because if two pipes connected by a joint are even slightly misaligned, it could throw off the entire structure's stability, leading to wobbly workbenches or jammed flow racks. In lean manufacturing, where efficiency depends on seamless workflows, that's a risk no one can afford.
The first stop is the lathe , a machine that spins the joint while a cutting tool shapes its outer surface. This smooths out any bumps from forging/casting and ensures the joint has a uniform diameter. Next, drilling : The joint needs holes to insert the lean pipes, so CNC drills (computer-controlled machines) bore precise holes through the joint's arms. These holes must match the diameter of standard lean pipes—typically 28mm or 30mm for steel pipes—to create a snug, secure fit.
Threading is another critical step. Many joints have threaded holes for bolts or set screws, which lock the pipes in place once inserted. CNC tapping machines cut these threads with incredible accuracy, ensuring that bolts from lean pipe and accessories will screw in smoothly without stripping. Finally, the joint's edges are deburred—smoothed out with abrasive tools to remove sharp corners that could cut workers or damage pipes during assembly.
Throughout machining, operators use calipers, micrometers, and coordinate measuring machines (CMMs) to check dimensions. Tolerances are tight—often within ±0.05mm for critical features like hole alignment. Why? Because if two pipes connected by a joint are even slightly misaligned, it could throw off the entire structure's stability, leading to wobbly workbenches or jammed flow racks. In lean manufacturing, where efficiency depends on seamless workflows, that's a risk no one can afford.
Step 4: Chrome Plating – The Finishing Touch
Now that the joint is shaped and machined, it's time for the "chrome" in "two way lean pipe joint chrome." Chrome plating isn't just about aesthetics (though that shiny finish does look sharp); it's a functional coating that adds durability, corrosion resistance, and a smooth surface that makes cleaning easier. Here's how it's done:
Operators monitor the current, temperature, and solution concentration closely—too much current can cause uneven plating, while too little results in a thin, weak layer. After plating, the joint is rinsed again to remove excess solution, then dried in an oven to prevent water spots. The result? A mirror-like finish that's 50% more resistant to corrosion than unplated steel, and tough enough to withstand scratches from tools or heavy pipes.
Cleaning: The First (and Most Critical) Step
Before plating, the joint must be spotlessly clean. Any oil, dirt, or rust will prevent the chrome from adhering properly, leading to peeling or bubbling later. The cleaning process starts with a degreasing bath —a hot, soapy solution that dissolves machine oils and grease from machining. Next, the joint is dipped in an acid bath (usually hydrochloric or sulfuric acid) to etch the surface slightly, creating tiny pores that help the chrome bond. Finally, it's rinsed thoroughly in deionized water to remove any remaining acid.Electroplating: Applying the Chrome Layer
Now for the magic: electroplating. The joint is suspended in a tank filled with a chromic acid solution, along with lead anodes. When an electric current is applied, chromium ions in the solution are attracted to the joint (which acts as the cathode), depositing a thin layer of chrome on its surface. The process takes 30 minutes to an hour, depending on how thick the chrome layer needs to be (typically 5-15 microns for lean pipe joints).Operators monitor the current, temperature, and solution concentration closely—too much current can cause uneven plating, while too little results in a thin, weak layer. After plating, the joint is rinsed again to remove excess solution, then dried in an oven to prevent water spots. The result? A mirror-like finish that's 50% more resistant to corrosion than unplated steel, and tough enough to withstand scratches from tools or heavy pipes.
Step 5: Quality Control – Testing for Perfection
By now, the two way lean pipe joint chrome looks ready to go—but it's not leaving the factory until it passes a battery of tests. Quality control (QC) is where manufacturers separate the good joints from the ones that could cause problems down the line. Here's what happens during QC:
To put these specs in context, let's compare the two way joint with another common type: the three way lean pipe joint. The table below highlights key differences in their design and performance:
Visual Inspection
First, inspectors check for surface defects: pits, cracks, or uneven chrome plating. A magnifying glass or microscope may be used to spot tiny flaws. Any joint with visible defects is rejected immediately.Dimensional Checks
Remember those tight tolerances from machining? QC teams verify them using CMMs and gauges. They measure hole diameters, arm lengths, and thread pitch to ensure they match the design specs. A joint that's too small won't fit the pipe; one that's too large will be loose. Both are deal-breakers.Load Testing
The joint's job is to hold weight, so it must pass load tests. Inspectors mount the joint to two steel pipes and apply increasing weights until the joint deforms or fails. For standard two way joints, the minimum load capacity is usually around 200kg—more than enough to support typical materials like boxes, tools, or components on a workbench or flow rack.Chrome Thickness and Adhesion
Using a magnetic thickness gauge, inspectors measure the chrome layer to ensure it's within the 5-15 micron range. They also perform a "bend test": bending the joint slightly to see if the chrome cracks or peels. If it does, the plating process is adjusted, and the batch is rechecked.To put these specs in context, let's compare the two way joint with another common type: the three way lean pipe joint. The table below highlights key differences in their design and performance:
| Feature | Two Way Lean Pipe Joint Chrome | Three Way Lean Pipe Joint Chrome |
|---|---|---|
| Material | Mild steel (or stainless steel) | Mild steel (or stainless steel) |
| Chrome Thickness | 5-15 microns | 5-15 microns |
| Load Capacity | Up to 200kg | Up to 150kg (due to extra arm) |
| Typical Use Case | Right-angle connections (e.g., workbench legs) | Branching connections (e.g., flow rack dividers) |
| Weight | ~150g | ~200g |
Step 6: Packaging and Distribution – Ready for the Factory Floor
After passing QC, the two way lean pipe joint chrome is finally ready to leave the factory. But first, it needs to be packaged properly to avoid damage during shipping. Most joints are wrapped in anti-rust paper or plastic to prevent corrosion, then packed into cardboard boxes or plastic crates. Bulk orders (common for lean pipe supplier clients) are palletized for easy transport.
Each package is labeled with the part number, batch code, and quantity—critical for traceability. If a customer reports a defect, the batch code allows manufacturers to track down when and where the joint was made, making it easier to fix issues in the production process.
From there, the joints are shipped to lean pipe supplier warehouses, where they're stored alongside other lean pipe and accessories like pipes, casters, and workbench components. When a manufacturer needs to build a new workbench or reconfigure a flow rack, they order a kit of joints, pipes, and accessories—and the two way lean pipe joint chrome gets to work, holding it all together.
Each package is labeled with the part number, batch code, and quantity—critical for traceability. If a customer reports a defect, the batch code allows manufacturers to track down when and where the joint was made, making it easier to fix issues in the production process.
From there, the joints are shipped to lean pipe supplier warehouses, where they're stored alongside other lean pipe and accessories like pipes, casters, and workbench components. When a manufacturer needs to build a new workbench or reconfigure a flow rack, they order a kit of joints, pipes, and accessories—and the two way lean pipe joint chrome gets to work, holding it all together.
Conclusion: Small Part, Big Impact
The two way lean pipe joint chrome may be small, but its role in lean manufacturing is enormous. From the careful selection of steel to the precision of machining and the durability of chrome plating, every step in its production is designed to create a component that's strong, reliable, and adaptable. It's a testament to the idea that in lean systems, even the smallest parts matter.
Next time you walk through a factory or warehouse, take a closer look at the workbenches, flow racks, or trolleys. Chances are, you'll spot these shiny chrome joints holding everything together. They may not get the same attention as high-tech robots or automated conveyors, but without them, the flexibility and efficiency that make lean manufacturing so powerful would simply fall apart.
So the next time you see a two way lean pipe joint chrome, remember: it's more than just a metal connector. It's a symbol of the thought, precision, and care that goes into building systems that help businesses thrive. And that, in the end, is the true magic of lean manufacturing—turning small parts into big results.
Next time you walk through a factory or warehouse, take a closer look at the workbenches, flow racks, or trolleys. Chances are, you'll spot these shiny chrome joints holding everything together. They may not get the same attention as high-tech robots or automated conveyors, but without them, the flexibility and efficiency that make lean manufacturing so powerful would simply fall apart.
So the next time you see a two way lean pipe joint chrome, remember: it's more than just a metal connector. It's a symbol of the thought, precision, and care that goes into building systems that help businesses thrive. And that, in the end, is the true magic of lean manufacturing—turning small parts into big results.