How to replace a Worn-Out One Side Rotatory Parallel Lean Pipe Joint
Related Product
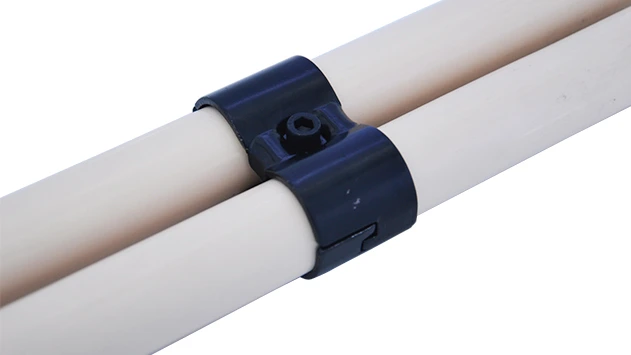
Parallel Lean Pipe Joint
Parallel lean pipe joint used for 2 pcs 28MM lean pipe connection in parallel direction to enhance frame structure, usually for heavy payload requirement for workbench. flow rack, hand trolley.
Parallel Lean Pipe Joint
It's 7:30 AM on a Tuesday at PrecisionWorks Manufacturing, and the shop floor is already humming with activity. Maria, the production line supervisor, is making her rounds when she notices something off. The main assembly workbench—where her team assembles small electronic components—has started to wobble. A quick glance underneath reveals the culprit: the one side rotatory parallel lean pipe joint connecting the workbench's vertical and horizontal pipes is loose. It's not just loose, actually—it's cracked. Over the past six months, this joint has borne the brunt of daily adjustments, as the team rotates parts trays and shifts tools around. Now, its plastic housing is split, and the metal core is rusted. "If this gives way completely," Maria mutters, "we'll lose an hour of production at least."

For anyone who works with lean systems—whether in manufacturing, warehousing, or even small-scale workshops—this scenario is all too familiar. Lean pipe joints are the unsung heroes of these setups, holding together everything from workbenches to material racks. When they wear out, they don't just cause inconvenience; they disrupt workflows, compromise safety, and eat into profits. The good news? Replacing a worn-out one side rotatory parallel lean pipe joint isn't rocket science. With the right tools, a little patience, and a step-by-step approach, you can have your lean system back in shape in under an hour. Let's walk through how to do it, from identifying the problem to testing the new joint.

Understanding the One Side Rotatory Parallel Lean Pipe Joint

Before diving into the replacement process, let's take a minute to appreciate what this joint actually does. Lean pipe systems (often called "flexible pipe systems") are built on the idea of adaptability. Unlike fixed metal frames, they use lightweight pipes and modular joints to create customizable workspaces. The one side rotatory parallel lean pipe joint is a star player here. As the name suggests, it connects two parallel pipes and allows one side to rotate—think of it as a hinge that lets you adjust angles or swing components like tool holders, part bins, or even entire sections of a workbench.

These joints are designed to handle repetitive motion and moderate weight (usually up to 50 lbs per joint, depending on the material). But like any hardworking component, they wear out over time. Common causes of wear include constant rotation (the joint's plastic or metal parts rub against each other), exposure to oil or coolant (which can degrade plastic), debris buildup (sawdust, metal shavings, or grime that jams the mechanism), and overloading (using the joint to support more weight than it's rated for).

The one side rotatory parallel lean pipe joint is part of a broader family of lean pipe and accessories, which includes everything from straight connectors to swivel joints. What makes it unique is its "one side rotatory" feature: one end locks firmly to a pipe, while the other rotates 180 degrees, allowing for flexibility in positioning. When it's working well, you barely notice it. When it's worn? You'll notice—whether through wobbling, squeaking, or a joint that refuses to stay in place.

Signs Your Joint Needs Replacing

Not sure if your joint is just loose or truly worn out? Here are the red flags to watch for:

1. Visible damage: Cracks in the plastic housing, rust on metal components, or bent prongs are dead giveaways. Even small cracks can spread quickly under pressure.

2. Excessive play: If the joint wobbles more than 10 degrees when you gently push on the connected pipe, it's no longer secure. A healthy joint should have minimal movement—just enough to rotate smoothly.

3. Stiff rotation: On the flip side, if the joint is hard to rotate (or gets stuck halfway), it's likely gummed up with debris or the internal bearings are worn. This can strain the pipes over time.

4. Squeaking or grinding: Unusual noises during rotation mean parts are rubbing where they shouldn't—another sign of wear.

If you spot any of these, don't delay. A failing joint is a safety hazard: a sudden collapse could injure someone or damage equipment. Plus, the longer you wait, the more stress you put on adjacent pipes and joints, turning a simple fix into a bigger problem.

Tools You'll Need

Before you start, gather these tools. Most are standard in any workshop, but if you're missing something, your local hardware store or lean pipe supplier should have them in stock.
Tool Name Purpose
Replacement one side rotatory parallel lean pipe joint The star of the show—make sure it matches your existing joint's size (most are 28mm or 30mm in diameter) and material (plastic, metal, or aluminum).
Hex key set (metric) To loosen and tighten the joint's set screws. Most lean pipe joints use 4mm or 5mm hex screws.
Aluminum pipe clamp To hold the pipes steady while you remove the old joint and install the new one—prevents pipes from shifting or falling.
Cleaning cloth or wire brush To wipe down the pipes and remove debris, rust, or oil before installing the new joint.
Rubber mallet (optional) For gently tapping the new joint into place if it's a tight fit.
Work gloves To protect your hands from sharp edges on worn joints or metal pipes.
Level (optional) To ensure the pipes are straight after installing the new joint—critical for workbench stability.
Pro tip: If you're unsure about the joint's size or type, take the old one to your lean pipe supplier. They can match it exactly, saving you the hassle of returns.

Step-by-Step: Replacing the Joint

Now, let's get to work. We'll break this down into 7 simple steps. Take your time—rushing increases the risk of mistakes, like cross-threading screws or misaligning pipes.
Step 1: Safety First—Power Down and Clear the Area
Before touching anything, ensure the workbench or structure connected to the joint is powered down (if it has electrical components like lights or tools). Unplug any nearby machinery, and clear the area around the joint—move tools, parts bins, or other obstacles. If the joint is holding up a heavy load (like a material rack), temporarily support the weight with a sturdy block or a helper holding the pipe. The last thing you want is for the pipe to crash down when you remove the old joint.
Step 2: Assess the Damage (Again)
Now that the area is safe, take a closer look at the worn joint. Is it only the outer plastic that's cracked, or is the metal core damaged too? If the metal is bent or rusted through, you'll need to check the pipes for damage as well. Run your hand along the pipes connected to the joint—are there dents, scratches, or rust spots? Minor scratches are fine, but deep dents or rust that flakes off could weaken the pipe. If the pipes are damaged, you may need to cut and replace a section (we'll touch on that later, but for now, let's assume the pipes are in good shape).
Step 3: Remove the Old Joint
Most one side rotatory parallel lean pipe joints are secured with two set screws: one on the fixed end (the side that doesn't rotate) and one on the rotatory end. Grab your hex key and start with the fixed end. insert the key into the screw and turn counterclockwise to loosen it. Go slowly—if the screw is rusted, apply a drop of penetrating oil (like WD-40) and let it sit for 5 minutes. Once loose, remove the screw completely and set it aside (you'll reuse it if it's not stripped).

Next, move to the rotatory end. Loosen its set screw the same way. Now, here's the tricky part: the joint might be stuck to the pipes due to rust or debris. Gently wiggle the joint back and forth while pulling it away from the pipes. If it's really stuck, wrap a cloth around the joint and use pliers to grip it (be careful not to squeeze too hard—you don't want to crack the pipes). If you're using an aluminum pipe clamp, now's the time to clamp it onto the horizontal pipe (a few inches from the joint) to keep it from sliding. Once the joint is free, set it aside—you can dispose of it later.
Step 4: Clean the Pipes and Prep the Area
With the old joint removed, you'll see the ends of the pipes that were inside it. Chances are, there's a layer of grime, oil, or rust here. Take your cleaning cloth and wipe the pipes thoroughly. For stubborn rust, use a wire brush—scrub in small circles until the metal (or plastic, if you're using coated lean pipe) is clean and smooth. Why does this matter? A dirty pipe won't let the new joint grip properly, leading to looseness down the line.

While you're cleaning, inspect the pipe ends for burrs (sharp metal edges). If you find any, file them down with a metal file—burrs can tear the new joint's internal components. Once the pipes are clean and smooth, dry them with a fresh cloth. Now, take a moment to check the alignment of the pipes. Are they parallel? If the vertical pipe is leaning, now's the time to adjust it (you can prop it up with a level or have a helper hold it straight).
Step 5: Install the New Joint
Unpack the new one side rotatory parallel lean pipe joint. Take a quick look at its design—most have a "fixed end" (marked with a small "F" or a solid arrow) and a "rotatory end" (marked with "R" or a circular arrow). Align the fixed end with the vertical pipe and the rotatory end with the horizontal pipe (or whatever orientation your setup uses—just match the old joint's positioning).

Slide the fixed end onto the vertical pipe first. Push it until it's seated about 1 inch from the pipe's end (this ensures a secure fit). Now, take the set screw you removed earlier (or a new one if the old was stripped) and thread it into the fixed end's screw hole. Tighten it clockwise with the hex key—snug, but not too tight (overtightening can crack the joint or strip the screw). You'll feel resistance when it's tight enough; stop there.

Next, slide the rotatory end onto the horizontal pipe. Again, push it 1 inch from the end. Thread the second set screw into the rotatory end and tighten it just like the first. Now, test the rotation: gently turn the rotatory end back and forth. It should move smoothly, with no sticking or grinding. If it's stiff, check if the pipes are misaligned—adjust them slightly and try again. If it's still stiff, loosen the rotatory screw a quarter-turn; sometimes over-tightening restricts movement.
Step 6: Test the Joint (And the Workbench)
Now comes the moment of truth: testing the new joint. Start with a gentle push: place one hand on the horizontal pipe and push down lightly. The joint should hold firm—no wobbling. Next, test the rotation: rotate the joint to its full 180-degree range. Does it stay in place when you let go? Good—that means the internal friction mechanism is working. Now, add some weight. Place a 20-lb toolbox on the workbench (or whatever load the joint usually supports) and check again. Still stable? Great.

If you're using the joint on a mobile structure—like a turnover trolley with caster wheels—give it a quick roll. The joint should absorb the movement without shifting. If the workbench or trolley leans, double-check the joint's tightness and pipe alignment. A level can help here: place it on the workbench surface to ensure it's flat. If it's not, adjust the joint's position slightly until the level reads even.
Step 7: Clean Up and Document
You're almost done! Remove the aluminum pipe clamp (if you used one) and tidy up the area. Dispose of the old joint, and put away your tools. Before you call it a day, make a quick note in your maintenance log: "Replaced one side rotatory parallel lean pipe joint on Assembly Workbench #3—2025-11-20." This helps you track when joints were last replaced, so you can schedule proactive checks (more on that later).

Back at PrecisionWorks, Maria finishes up the replacement around 8:15 AM. She gives the workbench a final shake—solid as a rock. "Nice work," she tells her team, who've been watching (and offering moral support). "Let's get back to it—we've got orders to fill." The line restarts, and by 9 AM, they're back on track. No delays, no drama—just a quick fix that kept the workflow smooth.

Troubleshooting Common Issues

Even with careful work, things can go wrong. Here's how to fix the most common hiccups:

Issue 1: The new joint won't slide onto the pipes. This usually happens if the pipes are slightly bent or the joint's internal diameter is too small. If the pipes are bent, use a pipe straightener (or gently tap them with a rubber mallet) to straighten. If the joint is too small, double-check that you bought the right size—most lean pipe joints are 28mm for standard lean pipe and 30mm for aluminum pipe.

Issue 2: The joint is loose after tightening. If the set screws won't grip, the pipe might be too smooth (common with new aluminum pipe). Wrap a small piece of sandpaper around the pipe and rub it gently—this creates texture for the screw to bite into. Alternatively, replace the set screws with longer ones (your lean pipe supplier can help with this).

Issue 3: The pipes are damaged. If a pipe is dented or rusted through, cut out the damaged section with a pipe cutter. Measure the remaining pipe and cut a new section to match (use the same material as the original pipe). Deburr the new ends, then install the new joint as usual.

Preventing Future Wear: Maintenance Tips

Replacing a joint is a quick fix, but preventing wear in the first place is even better. Here are three habits that will extend the life of your lean pipe joints:

1. Clean them regularly. Once a month, wipe down your lean pipe joints with a damp cloth to remove debris. For joints that rotate frequently, apply a drop of silicone lubricant (not oil—it attracts dust) to the rotatory mechanism.

2. Check tightness quarterly. Use your hex key to give each joint's set screws a light tighten. They loosen over time with vibration, so a quick quarter-turn can prevent wobbling.

3. Don't overload them. Every lean pipe joint has a weight rating (usually 50-100 lbs). Check the manufacturer's specs and stick to it. If you need to support more weight, use a heavy-duty joint or add extra supports.

Final Thoughts

Lean systems are all about efficiency—and that efficiency starts with the smallest components, like the one side rotatory parallel lean pipe joint. By taking the time to replace a worn joint properly, you're not just fixing a wobble; you're investing in your team's productivity, safety, and peace of mind.

Remember: Maria's story isn't unique. Every day, small issues with lean pipe and accessories cause big disruptions. But with the steps outlined here, you can turn a potential crisis into a 45-minute task. So the next time you spot a loose joint, don't wait—grab your hex key, a replacement joint, and get to work. Your workbench (and your team) will thank you.


Get In Touch with us

Hey there! Your message matters! It'll go straight into our CRM system. Expect a one-on-one reply from our CS within 7×24 hours. We value your feedback. Fill in the box and share your thoughts!