- Company Articles
- Products and Technology
- Installation And Maintenance
- How to Adjust Height on Flat Adjustable Swivel Castor Wheels: Step-by-Step

How to Adjust Height on Flat Adjustable Swivel Castor Wheels: Step-by-Step
Related Product
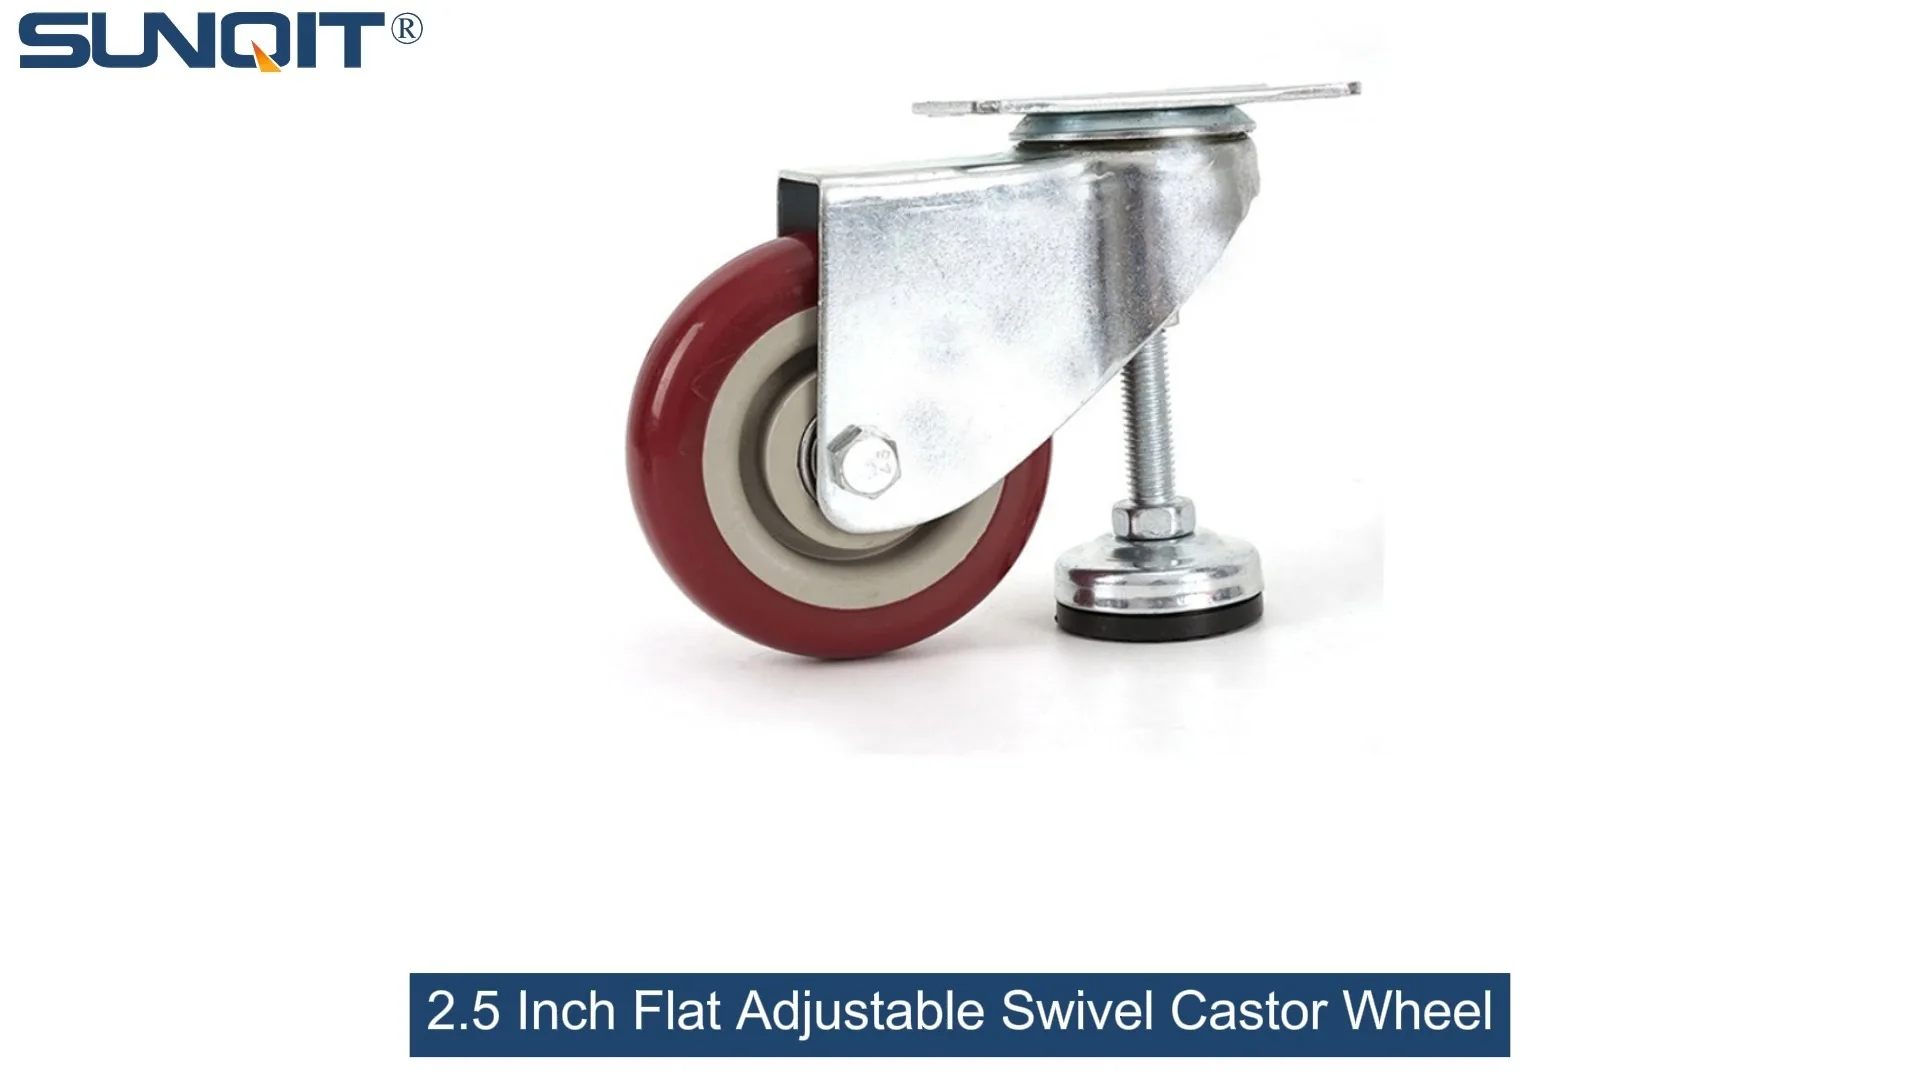
Flat Adjustable Swivel Castor Wheel
Swivel Chair Casters Ball Bearing Wheels Rubber Base with adjustable height function. Resistant to abrasion, impact and corrosion. Heavy payload can hold 80Kgs per pcs,which can make it works at a stable and smooth status.
If you've ever pushed a wobbly workbench across the shop floor, watched materials slide off a tilted turnover trolley, or struggled to align a rack with uneven legs, you know how frustrating unstable equipment can be. That's where flat adjustable swivel castor wheels come in—these unsung heroes of the workspace combine mobility with precision, letting you tweak height to match your needs, your floor, and your workflow. But if you've never adjusted one before, the process might seem a bit intimidating. Don't worry—we're breaking it down into simple, actionable steps that anyone can follow, even if you're not a seasoned handyman. By the end, you'll have steady, level equipment that glides smoothly and stays put when you need it to.
Why Height Adjustment Matters (Spoiler: It's Not Just About "Looking Nice")
Before we dive into the "how," let's talk about the "why." You might think adjusting the height of your castor wheels is just about making your equipment look neat, but it's actually critical for safety, efficiency, and longevity. Here's why:
Safety First: A wobbly workbench or trolley is an accident waiting to happen. Uneven weight distribution can cause equipment to tip, spilling tools or materials. Over time, constant can loosen bolts or damage the frame—costing you time and money in repairs.
Efficiency Boost: When your turnover trolley sits level with your workbench, loading and unloading materials becomes a breeze. No more bending awkwardly or lifting heavier than necessary. Even a small height mismatch can slow you down over a full workday.
Protect Your Equipment: Misaligned castors put extra stress on wheels, axles, and mounting brackets. By keeping them level, you reduce wear and tear, extending the life of both the castors and the equipment they're attached to (yes, even that trusty workbench you've had for years).
Now that we're on the same page about why this matters, let's gather what you'll need to get the job done.
Tools You'll Need (Most People Already Have These Lying Around)
You don't need a fully stocked toolbox for this—just a few basic items. Grab these before you start, and you'll sail through the process:
- Adjustable Wrench or Socket Set: For loosening and tightening nuts on the castor stem or base. A 10-14mm socket usually works, but check your castor first—some use metric, others standard sizes.
- Spirit Level: To check if your equipment is level after adjustment. A small 2-foot level is perfect for most workbenches and trolleys.
- Tape Measure: Optional but helpful if you need precise height matching (e.g., aligning a trolley with a specific shelf height).
- Rubber Mallet: For gently tapping stuck components (use this sparingly—we don't want to damage the castor or your equipment).
- Clean Cloth and Brush: To wipe away dirt, dust, or rust from the adjustment mechanism—gunk can make turning the stem or bolts tough.
- Lubricant (WD-40 or Silicone Spray): If the adjustment mechanism is stuck, a little lubricant goes a long way. Avoid heavy oils, which can attract more dirt over time.

Step-by-Step: Adjusting Your Flat Adjustable Swivel Castor Wheels
Okay, tools in hand? Great. Let's walk through the process step by step. We'll use a turnover trolley as our example, but these steps work for any equipment with flat adjustable swivel castor wheels—think workbenches, racks, or even mobile tool chests.
Step 1: Secure the Equipment (No Rolling Away!)
First things first: Make sure your trolley (or workbench, or rack) isn't going to roll away while you're working. Even with the brakes on, it's smart to block the wheels with chocks (a 2x4 or heavy book works) or have a helper hold it steady. You don't want to be mid-adjustment when the whole thing lurches—safety first, remember?
If your castors have brakes, engage them now. Most flat adjustable swivel castors have a simple brake lever on the side—flip it down to lock the wheel in place. If there's no brake, the chocks are non-negotiable.
Step 2: Identify the Adjustment Mechanism (Not All Castors Are Created Equal)
Flat adjustable swivel castor wheels use one of three main adjustment mechanisms. Take a close look at the base of your castor (where it attaches to the equipment) to figure out which type you have. Here's what to look for:
Threaded Stem: The most common type. You'll see a metal stem with threads (like a bolt) coming out of the top of the castor, screwed into a mounting plate or the equipment's frame. Turning the stem clockwise or counterclockwise raises or lowers the height.
Bolt-Adjustable Base: Some castors have a flat base with bolts that secure it to the equipment. To adjust height, you loosen these bolts, slide the castor up or down a slotted bracket, then retighten the bolts.
Cam-Lock Lever: Less common but handy for quick adjustments. A lever on the side of the castor releases a locking cam—lift or lower the castor, then flip the lever back to lock it in place. No tools needed for this one!
Not sure? Take a photo of the castor and compare it to the table below—we've broken down the pros and cons of each mechanism to help you identify yours.
| Mechanism Type | How to Spot It | Adjustment Method | Best For | Pros | Cons |
|---|---|---|---|---|---|
| Threaded Stem | Visible threaded metal stem above the wheel | Turn stem clockwise (lower) or counterclockwise (raise) | Workbenches, light-to-medium trolleys | Precise adjustments, holds height well, no brackets needed | Can be slow for big height changes; stem can get stuck if dirty |
| Bolt-Adjustable Base | Flat metal base with bolts through slotted holes | Loosen bolts, slide castor, retighten bolts | Heavy-duty racks, industrial trolleys | Sturdy for heavy loads, quick to adjust in large increments | Less precise; bolts can strip if overtightened |
| Cam-Lock Lever | Lever on the side of the castor housing | Flip lever, lift/lower castor, flip lever back | Mobile workstations, quick-change setups | Tool-free, super fast adjustments | Not as stable for heavy loads; lever can slip if worn |
Step 3: Measure the Current Height (Know Where You're Starting)
Before you start turning stems or loosening bolts, measure the current height of each castor. Why? Because if you adjust one castor without checking the others, you might end up with a trolley that's level on one side but lopsided on the other. Here's how:
1. Place your spirit level on top of the trolley (or workbench) and check for levelness side-to-side and front-to-back. Note which corners are higher or lower—this tells you which castors need adjusting.
2. Use your tape measure to find the height of each castor. Measure from the floor to the bottom of the equipment frame (where the castor attaches). Write these numbers down: Castor 1: 4.5 inches, Castor 2: 4.2 inches, etc. This gives you a baseline.
Pro tip: If your goal is to align the trolley with a specific surface (like a workbench that's 36 inches high), measure the distance from the floor to that surface first. Then adjust the castors so the top of the trolley matches that height.
Step 4: Adjust the Height (Finally, the "Fun" Part!)
Now, let's get adjusting. We'll walk through each mechanism type separately—pick the one that matches your castor.
For Threaded Stem Castors:
1. Clean the stem: Use your cloth and brush to wipe away dirt, rust, or debris from the threads. If there's heavy rust, spray a little lubricant and let it sit for 5 minutes—this makes turning easier.
2. Hold the castor wheel: With one hand, hold the wheel steady (so it doesn't spin while you turn the stem). With your other hand, grab the stem with an adjustable wrench. If there's a lock nut (a small nut just below the mounting plate), loosen it first by turning it counterclockwise—this nut keeps the stem from unscrewing on its own.
3. Turn to adjust: To raise the castor, turn the stem counterclockwise (lefty-loosey). To lower it, turn clockwise (righty-tighty). Turn slowly—small increments (1/4 turn at a time) are easier to control than big ones.
4. Check the height: After a few turns, measure again with your tape measure. Compare it to your baseline numbers. Keep adjusting until you hit your target height.
5. Tighten the lock nut: Once you're happy with the height, hold the stem steady and tighten the lock nut by turning it clockwise until it's snug against the mounting plate. Don't overtighten—you could strip the threads!
For Bolt-Adjustable Base Castors:
1. Loosen the bolts: Use your wrench to loosen the bolts on the castor base. You don't need to remove them completely—just loosen enough that the castor can slide up or down the slotted bracket.
2. Slide to adjust: Lift or lower the castor to the desired height. Some brackets have hash marks or holes to help you align it evenly—use those if available. If not, use your tape measure to check the height from the floor.
3. Tighten the bolts: Once aligned, tighten the bolts back up. Tighten them in a crisscross pattern (like tightening lug nuts on a car) to ensure even pressure—this prevents the base from warping.
4. Double-check: Give the castor a gentle tug to make sure it's secure. If it wiggles, the bolts might need a little more tightening.
For Cam-Lock Lever Castors:
Lucky you—this is the easiest type! 1. Flip the cam-lock lever up (this releases the lock). 2. Lift or lower the castor to the desired height. 3. Flip the lever back down to lock it in place. 4. Give it a shake to make sure it's locked—done!
Step 5: Check Levelness (The "Does It Actually Work?" Test)
You've adjusted one castor—now it's time to check if the whole trolley (or workbench) is level. Place your spirit level on top of the equipment, both side-to-side and front-to-back. The bubble should sit dead center in the vial. If it's leaning to one side, adjust the corresponding castor:
- If the bubble is to the left, the left side is higher—lower the left castors or raise the right ones.
- If it's to the right, do the opposite.
Repeat this for all four castors until the bubble stays centered no matter where you place the level. This might take a little back-and-forth—patience is key!
Step 6: Test Stability (Give It a Wiggle!)
Now, the moment of truth: Test the equipment to make sure it's steady. Push it gently from the side—if it rocks, one of the castors is still too high or low. Try rolling it across the floor—does it glide smoothly, or does it pull to one side? If it pulls, check the alignment of the castors (they should all point the same direction) and adjust the height of the "pulling" side until it tracks straight.
If you're adjusting a workbench, place a heavy object (like a toolbox) on one corner—does the bench stay level, or does that corner sink? If it sinks, the castor might not be holding the height—check the lock nut (for threaded stems) or bolts (for bolt-adjustable bases) and tighten them a little more.
Step 7: Repeat for All Castors (Yes, All of Them!)
Don't stop at one! Adjust each castor using the same steps. Even if one side seems level, the others might need tweaking to keep the whole setup steady. Remember: Consistency is key. All castors should be at roughly the same height (within 1/8 inch) for optimal stability.

Troubleshooting: When Things Go Wrong (And How to Fix Them)
Even with the best intentions, things can go sideways. Here are the most common issues and how to solve them:
Problem: The stem won't turn, no matter how hard you try.
Solution: First, check for debris—use a wire brush to clean the threads. If it's rusted, soak the stem in lubricant for 10 minutes, then tap the wrench gently with a rubber mallet while turning (the vibration helps break up rust). Avoid using a pipe wrench or hitting hard—you could bend the stem.
Problem: The castor adjusts, but then slowly sinks back down.
Solution: This is usually a loose lock nut (for threaded stems) or worn bolts (for bolt-adjustable bases). Tighten the lock nut until it's snug against the mounting plate. For bolt-adjustable castors, replace stripped bolts with new ones—cheap hardware store bolts work fine, just match the size and thread type.
Problem: The equipment is still wobbly, even after adjusting all castors.
Solution: Your floor might be uneven! Use your level to check the floor itself—if it slopes, adjust the castors to compensate. For example, if the floor dips 1/4 inch on the left side, raise the left castors by 1/4 inch. You can also use shims (small pieces of wood or metal) under the castors, but that's a temporary fix—adjusting the castors is better long-term.
Problem: The cam-lock lever won't stay locked.
Solution: The cam (the metal piece that locks the castor) might be dirty or worn. Clean it with a cloth and lubricant. If it's still loose, the lever spring might be broken—this is a job for replacement caster accessories. Most hardware stores carry universal cam-lock springs, or you can contact the manufacturer for parts.

Maintenance Tips: Keep Your Castors Adjusting Smoothly for Years
Adjusting your castors is a one-time task, but a little maintenance goes a long way in keeping them working like new. Here's how to care for them:
Clean regularly: Wipe the stems, bolts, and wheels with a damp cloth every month—especially if you work in a dusty or oily environment. Gunk buildup is the number one enemy of smooth adjustment.
Lubricate quarterly: Spray silicone lubricant on the threads (for threaded stems), pivot points (for swivel action), and wheel bearings. This prevents rust and keeps everything moving freely.
Inspect for wear: Every 6 months, check the wheels for cracks, flat spots, or uneven tread. If the wheels are worn, replace them—worn wheels cause more vibration, which loosens the adjustment mechanism. The same goes for caster accessories like lock nuts or bolts—if they're stripped or bent, swap them out.
Tighten as needed: Give the lock nuts and bolts a quick check every few weeks—vibration from rolling can loosen them over time. A 30-second tighten now saves you from a wobbly trolley later.
Final Thoughts: You've Got This!
Adjusting flat adjustable swivel castor wheels might seem like a small task, but it's one that makes a huge difference in your workspace. With a little patience, the right tools, and these steps, you'll have steady, level equipment that works for you, not against you. Whether you're tweaking a workbench, a turnover trolley, or a rack, remember: slow and steady wins the race. Small adjustments, regular checks, and a little maintenance will keep your castors rolling smoothly for years to come.
Now go forth and level up your workspace—your back, your tools, and your sanity will thank you.