- Company Articles
- Products and Technology
- Installation And Maintenance
- How to Adjust Two Way Aluminum Pipe Joints for Perfect Alignment During Assembly

How to Adjust Two Way Aluminum Pipe Joints for Perfect Alignment During Assembly
Related Product
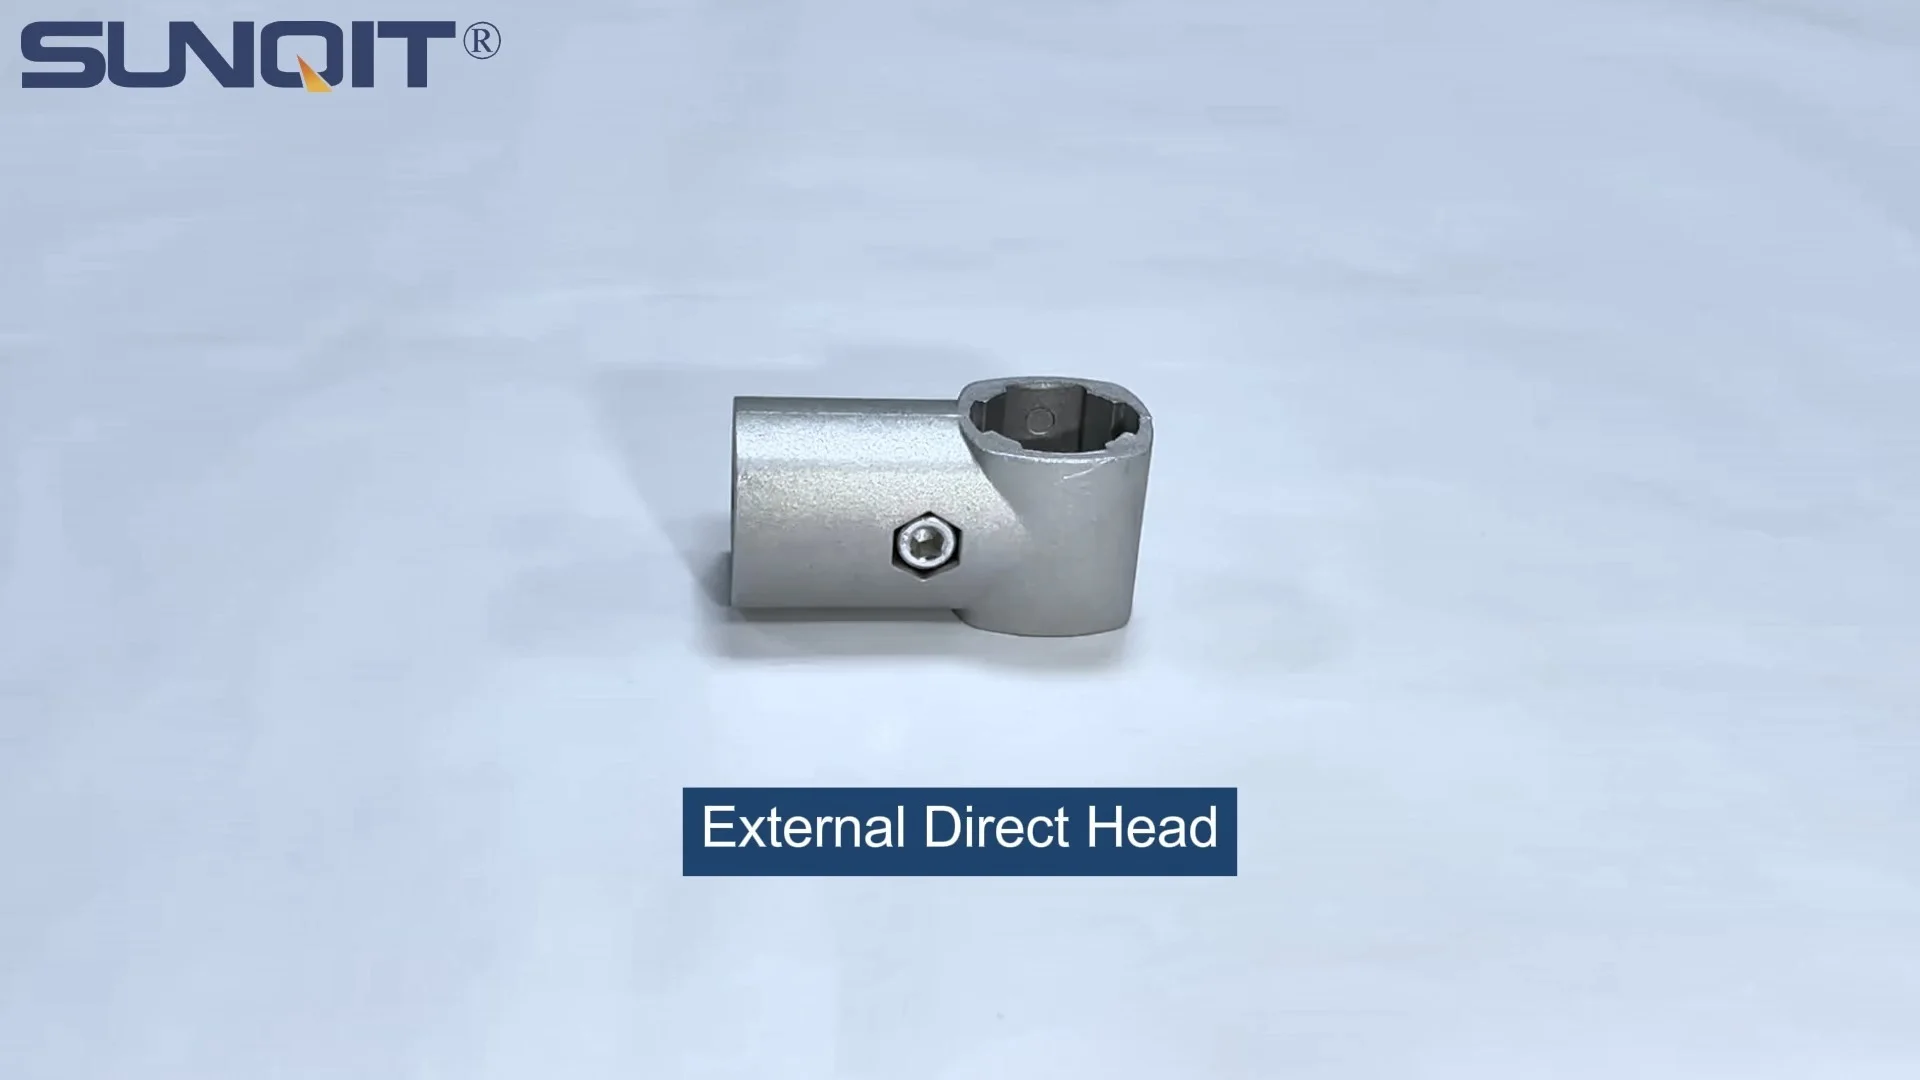
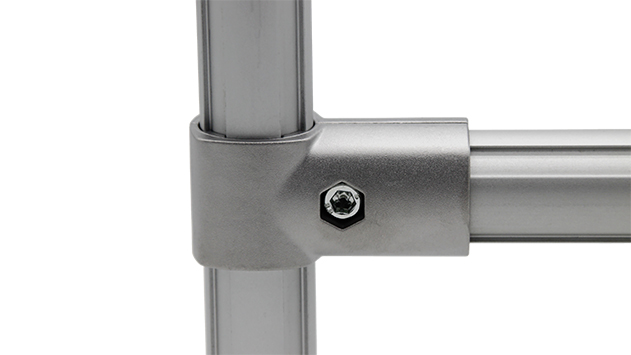
Two Way Aluminum Pipe Joint
Aluminum 2 way pipe joint for 28mm aluminum pipe connection in 2 direction.
If you've ever spent hours building a workstation, material rack, or production line only to step back and notice a wobbly frame, uneven shelves, or pipes that just don't "line up right," you know the frustration of misaligned joints. In lean manufacturing and workshop setups, where precision directly impacts efficiency, even a tiny misalignment in a two way aluminum pipe joint can throw off an entire system. Whether you're a seasoned facility manager, a small business owner setting up a new assembly area, or a DIY enthusiast building a custom workbench, getting those joints perfectly aligned isn't just about aesthetics—it's about creating a stable, functional space that stands the test of time. In this guide, we'll walk through the ins and outs of adjusting two way aluminum pipe joints, from understanding their design to troubleshooting common issues, so you can achieve that "just right" fit every time.
Understanding the Two Way Aluminum Pipe Joint: More Than Just a Connector
Before diving into adjustments, let's start by getting to know the star of the show: the two way aluminum pipe joint. These unassuming components are the backbone of modular assembly systems, used to connect aluminum pipes (or aluminum profiles) at—you guessed it—two points, typically forming a straight line or a 90-degree angle, depending on the joint's design. Unlike rigid, one-size-fits-all connectors, aluminum pipe joints are engineered for flexibility, allowing you to customize configurations without welding or complex tools. But that flexibility comes with a catch: they require careful adjustment to ensure the connected pipes stay aligned under stress, whether from heavy tools, constant material movement, or the daily wear and tear of a busy workshop.
Most two way aluminum pipe joints consist of a central body with two openings (or "ports") where the aluminum pipes insert, secured by set screws, bolts, or friction-fit mechanisms. Some are fixed-angle (like 90-degree or straight), while others offer limited rotation for fine-tuning. What makes them unique is their compatibility with aluminum pipe accessories—think end caps, clamps, or brackets—that extend their functionality. For example, a two way joint might connect a vertical support pipe to a horizontal shelf beam on a workbench, with a bracket attached to hold tools. If that joint is misaligned, the shelf could sag, the bracket might not mount flush, or the entire structure could rock when weight is applied.
"Aluminum pipe systems are popular because they're lightweight, corrosion-resistant, and easy to reconfigure," says Maria Gonzalez, a production engineer with 15 years of experience in lean system design. "But their modularity means each joint is a potential weak point if not adjusted properly. I've seen shops where a single loose two way joint caused a material rack to tilt, leading to damaged inventory and even safety hazards. Taking the time to align these joints during assembly saves so much time (and money) down the line."
Common Alignment Issues: Why Joints Go "Off-Kilter"
Misalignment in two way aluminum pipe joints rarely happens for no reason. More often than not, it's a combination of small oversights during assembly—rushing through steps, using worn tools, or underestimating how pipe tolerance and joint fit interact. Let's break down the most common culprits:
1. Over-Tightening (or Under-Tightening) the Joint
Aluminum is a softer metal than steel, and the threads or set screws in two way joints are designed to grip without warping the pipe. Over-tightening a joint can bend the pipe slightly or distort the joint's internal mechanism, pulling the pipes out of alignment. On the flip side, under-tightening leaves room for the pipes to shift as the structure is used, leading to gradual misalignment over time. It's a delicate balance—think of it like tightening a jar lid: too much force and the lid cracks; too little and it leaks.2. Pipe Tolerance Variations
Even high-quality aluminum pipes have slight diameter variations (usually within 0.1-0.2mm), thanks to manufacturing processes like extrusion. If you're using pipes from different batches or suppliers, one pipe might be slightly thicker than another, making it harder to insert evenly into the joint. This can cause one side of the two way joint to sit "proud" of the other, creating a visible (and functional) offset.3. Improper Pipe Cutting or Deburring
If the ends of your aluminum pipes are uneven, jagged, or not cut at a perfect 90-degree angle, they won't seat flush in the joint. A pipe with a slanted end, for example, will push against one side of the joint's internal wall, tilting the entire connection. Similarly, burrs (those rough, raised edges left after cutting) can prevent the pipe from inserting fully, leaving gaps that throw off alignment.4. Joint Orientation
Some two way aluminum pipe joints are designed for specific orientations—for example, one port might be meant for a vertical pipe and the other for a horizontal one, with internal guides to ensure alignment. If you rotate the joint 180 degrees during assembly, those guides won't engage, and the pipes may sit at a slight angle instead of straight. Always check the joint's markings or manufacturer diagrams to confirm orientation before tightening.| Alignment Issue | Common Cause | Visible Symptom |
|---|---|---|
| Vertical pipe leans to one side | Uneven insertion depth in the joint | Pipe is not perpendicular to the connected beam |
| Horizontal pipes don't form a straight line | Over-tightened joint warping the pipe | Visible "bend" or curve in the pipe run |
| Joint feels loose even after tightening | Debris or burrs blocking full pipe insertion | Pipe can be wiggled slightly in the joint |
| 90-degree angle is "off" (more/less than 90°) | Incorrect joint orientation or uneven set screw tension | Shelf or beam sits at a slant relative to the support |
Step-by-Step: Adjusting Two Way Aluminum Pipe Joints for Perfect Alignment
Aligning two way aluminum pipe joints isn't about brute force—it's about patience and precision. Follow these steps, and you'll be well on your way to a rock-solid assembly:
Step 1: Prepare Your Workspace and Tools
Before you start turning screws, set yourself up for success. Clear the area around your assembly project to avoid tripping hazards, and lay out the tools you'll need:- A hex key set (most two way joints use metric sizes like 4mm, 5mm, or 6mm)
- A spirit level (24-inch or longer for checking straight lines)
- A rubber mallet (for gentle tapping to adjust pipe position)
- Deburring tool or fine-grit sandpaper (to smooth pipe ends)
- A tape measure (to check insertion depth)
- Clean cloth (to wipe away dust or debris from joints and pipes)
Pro tip: If you're working on a large structure like a material rack or production line, enlist a helper. Having someone hold the level or steady the pipes while you adjust the joint can save time and reduce frustration.
Step 2: Disassemble and Inspect the Joint
If you're dealing with an existing misalignment (not a new assembly), start by disassembling the joint. Loosen the set screws or bolts completely (but don't remove them—you don't want to lose small parts!) and pull the pipes out. Inspect both the joint and the pipe ends for:- Burrs, dents, or scratches on the pipe ends (these can prevent flush seating)
- Debris inside the joint (dust, metal shavings, or old lubricant)
- Worn or stripped threads on set screws (a common culprit for loose joints)
- Cracks or damage to the joint body (if the joint is bent or broken, replace it—don't try to "fix" it)
Use the clean cloth to wipe out the joint's ports and the pipe ends. If you find burrs, gently sand them down with fine-grit sandpaper until the pipe end is smooth to the touch. For stubborn debris, a can of compressed air can blow out dust from tight spots.
Step 3: Set Initial Insertion Depth
One of the biggest alignment killers is uneven insertion depth—when one pipe is pushed farther into the joint than the other. Most two way aluminum pipe joints have a "stop" inside each port, a small ridge that prevents the pipe from being inserted too far. Check the manufacturer's specs (or the joint itself—some have markings) to see the recommended insertion depth (usually 15-20mm for standard 28mm diameter pipes).Mark the pipe ends with a pencil at the recommended depth. For example, if the joint requires 18mm insertion, measure 18mm from the end of each pipe and draw a faint line. When inserting the pipes, stop when the line is flush with the joint's outer edge. This ensures both pipes seat equally, creating a balanced connection.
Quick Check:
If your joint doesn't have a stop or markings, insert one pipe until it hits the internal wall, then mark the depth. Do the same for the second pipe and align the marks before inserting both. Consistency here is key!
Step 4: Loosely Assemble and Check Alignment
With clean, deburred pipes and marked insertion depths, it's time for a "dry fit." insert both pipes into the two way joint until they hit the stops (or your pencil marks), then tighten the set screws just enough to hold the pipes in place —you want them secure enough to stay put but loose enough to adjust. Now, grab your spirit level. For straight joints (connecting two pipes in a straight line), place the level along the top of the pipes—if the bubble is centered, you're good to go. For 90-degree joints (connecting vertical and horizontal pipes), place the level on the horizontal pipe to check for level, then rotate it to check the vertical pipe for plumb (straight up and down). If the bubble is off-center, gently tap the pipe with the rubber mallet to nudge it into place. For example, if the horizontal pipe dips to the right, tap the right end upward until the level bubble centers. If the vertical pipe leans forward, push it back slightly while holding the level against it."I always tell my team to 'look with their hands' during this step," says Jason Lee, a workshop foreman who builds custom lean systems for electronics manufacturers. "Your eyes can trick you—what looks straight might not be. The level doesn't lie. Take the time to adjust until that bubble is dead center. It's 30 seconds now versus hours of rework later."
Step 5: Tighten the Joint (Gradually and Evenly)
Once the alignment is spot-on, it's time to tighten the joint. Here's where many people go wrong: cranking down on one set screw first, which can pull the pipe out of alignment. Instead, tighten the screws gradually and evenly . For a joint with two set screws per port (common in heavier-duty models), tighten one screw a quarter-turn, then the other, alternating until both are snug. How tight is "snug"? You want enough tension to hold the pipe firmly, but not so much that the aluminum pipe deforms. A good rule of thumb: stop when you feel resistance, then give the screw one final quarter-turn. If you hear a "creaking" sound or see the pipe bend slightly, you've gone too far—loosen it a bit. After tightening, double-check the alignment with the level. Sometimes tightening can shift the pipes slightly, so a quick verification ensures you didn't undo your hard work.Step 6: Test Stability and Make Micro-Adjustments
The final step is to test the joint's stability. Gently shake the connected pipes—there should be no wobble or movement in the joint. If it feels loose, check the set screws again (they may have backed off slightly during testing) or inspect for debris you might have missed. For larger structures like workbenches or material racks, add weight to the system (e.g., place a toolbox on the shelf, stack empty boxes on a rack) and check alignment again. Weight can reveal hidden misalignments that light testing misses. If the structure sags or shifts under load, revisit the joint—you may need to loosen, readjust, and retighten.
Troubleshooting: When "Perfect" Alignment Feels Out of Reach
Even with careful steps, you might run into stubborn alignment issues. Here's how to troubleshoot the most common problems:
Problem: The Joint Won't Stay Aligned, Even After Tightening
Possible Cause: Worn or stripped set screws. Over time, set screws can wear down, especially if they're made of softer metal than the aluminum pipe. If the screw spins freely without tightening, or if the threads look flattened, it's time to replace them.
Solution: Swap out the old screws for new ones (match the size and thread pitch to the joint). For extra grip, apply a tiny drop of thread-locking compound (like Loctite Blue) to the screw threads before tightening—it prevents loosening from vibration without making future disassembly impossible.
Problem: Pipes Are Bent, Making Straight Alignment Impossible
Possible Cause: Pipe was bent during shipping, storage, or previous use. Aluminum is flexible, but it's not unbreakable—dropping a heavy object on a pipe or leaning on it incorrectly can cause a slight bend.
Solution: If the bend is minor, you can try straightening it gently with a rubber mallet (tap the convex side of the bend against a flat surface). For more severe bends, replace the pipe—trying to work with a bent pipe will only lead to ongoing alignment issues.
Problem: Joints on a Long Pipe Run Keep Misaligning
Possible Cause: Cumulative error. If you're assembling a long line of pipes (e.g., a conveyor rail or production line), small misalignments in each joint can add up, creating a visible curve or "wave" in the entire run.
Solution: Use a string line or laser level to guide alignment across the entire run, not just individual joints. Tie a string between two end supports, then align each joint to the string. This ensures the entire system stays straight, even with multiple connections.
Pro Troubleshooting Hack:
If you're working with a two way joint that connects to an aluminum profile (common in workbench frames), check the profile's T-slot alignment. Sometimes the slot itself is slightly off-center, which can pull the joint out of line. Use a T-slot ruler to verify the slot is straight before attaching the joint.

Why Alignment Matters: Beyond "Looking Nice"
You might be thinking, "Does it really matter if the joint is off by a millimeter or two?" In short: yes. Here's why precision alignment in two way aluminum pipe joints impacts more than just how your setup looks:
1. Safety First
A misaligned joint creates weak points in a structure. A wobbly workbench can cause tools to slide off, an uneven material rack might tip over under load, and a crooked conveyor rail can jam or damage products. In worst-case scenarios, structural failure can lead to injuries. "I've seen a leaning material rack collapse because a single two way joint was misaligned, spilling heavy parts onto the floor," says Gonzalez. "Luckily no one was hurt, but it was a wake-up call: alignment isn't optional—it's a safety requirement."2. Efficiency in Lean Systems
In lean manufacturing, every second counts. A misaligned joint can slow down workflows: a tilted workbench might make it harder to position parts, uneven shelves could require extra time to sort materials, or a crooked conveyor might cause products to get stuck, halting production. Aligned joints create smooth, predictable systems where materials and tools move seamlessly—exactly what lean principles aim for.3. Longevity of Your Setup
Misaligned joints put extra stress on pipes and other components. When a joint is off-kilter, the weight of the structure isn't distributed evenly, leading to premature wear on pipes, brackets, and even casters. Over time, this can cause cracks, bends, or complete failure. A properly aligned system, on the other hand, distributes weight evenly, extending the life of your aluminum pipes and accessories by years.4. Cost Savings
Rework, replacements, and downtime add up. Fixing a misaligned joint after assembly takes time away from other tasks. Replacing bent pipes or broken joints costs money. And downtime due to a jammed production line? That's lost revenue. Investing 10 extra minutes in alignment during assembly saves far more in the long run.Final Thoughts: Aligning Joints, Aligning Success
Adjusting two way aluminum pipe joints might seem like a small step in the grand scheme of building a workshop or production line, but it's a step that echoes through every aspect of your setup—from safety to efficiency to cost. By taking the time to understand the joint's design, troubleshoot carefully, and follow the step-by-step process, you're not just building a structure—you're building a foundation for success.
Remember, even the most experienced pros deal with misalignments. What sets them apart is patience and attention to detail. So the next time you're tightening a two way joint, take a breath, grab your level, and aim for that perfect bubble. Your future self (and your perfectly aligned workbench) will thank you.