- Company Articles
- Products and Technology
- Installation And Maintenance
- How to Assemble 4040B EU Standard Aluminum Profile: Step-by-Step Guide for Beginners

How to Assemble 4040B EU Standard Aluminum Profile: Step-by-Step Guide for Beginners
Related Product
4040B EU Standard Aluminum Profile
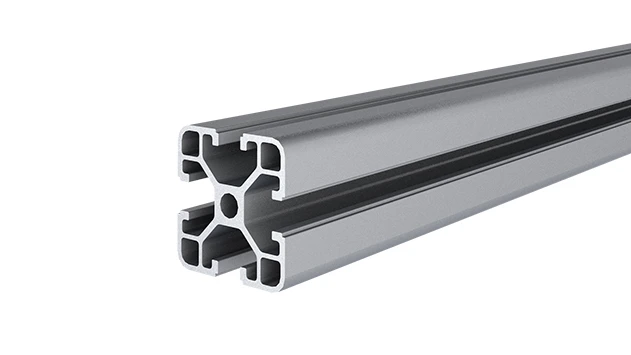
4040B is a 4.00x4.00 CM fractional 40 series square extrusion T-slot profile with four open T-slots, each side with 4.00cm face. The profile has align-a-grooves to assist in aligning connecting profiles.
Introduction: Why Start with 4040B Aluminum Profile?
If you've ever wanted to build something sturdy, customizable, and professional-looking—whether it's a workbench for your garage, a storage rack for your workshop, or even a custom machine frame—aluminum profiles are your new best friend. And among the many options out there, the 4040B EU standard aluminum profile stands out as the perfect starting point for beginners. Why? Because it's strong enough to handle everyday projects, versatile enough to adapt to almost any design, and surprisingly easy to assemble without welding, heavy tools, or advanced DIY skills.
Maybe you've seen these profiles in factories or workshops: sleek, silver, with T-shaped slots running along their length. Those slots are the magic—they let you attach aluminum profile accessories like connectors, brackets, and panels with just a few screws and a hex key. No drilling, no glue, no guesswork. Just simple, modular building blocks that click together (literally) to create something functional and durable.
In this guide, we'll walk you through assembling a basic structure with 4040B aluminum profile, using common parts like 90° aluminum profile connectors and aluminum foot bases . By the end, you'll have the confidence to build your own workbench, shelf, or whatever project you've been dreaming up. Let's dive in!
What You Need to Know First: The Basics of 4040B
Before we grab our tools, let's get familiar with what makes 4040B special. First, the "4040" refers to its dimensions: 40mm wide and 40mm tall. That square shape gives it excellent stability, whether you're building vertical legs or horizontal supports. The "B" in 4040B is part of the EU standard classification, which means it's designed to work seamlessly with a huge range of standardized aluminum profile accessories —so you won't have to worry about parts from different brands not fitting together.
The surface is usually anodized, which gives it a smooth, corrosion-resistant finish—great for indoor or outdoor use (though if you're keeping it outside, you might want to add end caps to prevent water from getting inside the profile). And those T-slots we mentioned? They're not just for show. They let you slide in connectors, bolts, or brackets at any point along the profile, so you can adjust your design on the fly without re-cutting or re-drilling. It's like building with giant, metal Legos!
Common projects for 4040B include workbenches, material racks, machine guards, and even 3D printer frames. Today, we'll focus on a simple but practical project: a basic workbench frame. It's a classic beginner project that uses all the essential skills you'll need for future builds.

Tools and Materials: What You'll Need to Get Started
One of the best things about 4040B assembly is that you don't need a garage full of tools. Here's a breakdown of what you'll need to gather before you start:
| Category | Items | Why You Need Them |
|---|---|---|
| Tools |
Hex key set (Allen wrenches)
Tape measure Pencil or marker Rubber mallet Spirit level Square (for 90° angles) Work gloves |
Hex keys tighten connectors; tape measure for accuracy; rubber mallet gently taps parts into place; level ensures your build isn't wobbly. |
| Materials |
4040B EU standard aluminum profile (cut to length)
90° aluminum profile connectors Aluminum foot base Aluminum profile accessories (e.g., end caps, brackets) (Optional) Top panel (plywood, metal, or plastic) |
Profiles are the "bones" of your build; 90° connectors join profiles at corners; foot bases stabilize vertical legs; accessories add finishing touches. |
Pro Tip: If you're buying profiles online or from a supplier, ask them to cut the 4040B aluminum profile to your desired lengths. Most suppliers offer this service for free or a small fee, and it saves you from buying a saw (and struggling with straight cuts) as a beginner.
Safety First: A Quick Note Before You Begin
Before we start screwing and connecting, let's talk safety. Aluminum profiles are generally safe to work with, but a few simple precautions will make the process smoother (and injury-free):
- Wear work gloves: The edges of aluminum profiles can be sharp, especially if they're freshly cut. Gloves protect your hands while handling parts.
- Clear your workspace: You'll need a flat, level surface (like a table or workbench) to assemble on. Clutter can lead to misaligned parts or tripping hazards.
- Don't overtighten: Aluminum is strong, but its threads (on connectors) can strip if you crank down too hard. Tighten until snug, not until the tool bends.
- Check for damage: Before assembling, inspect your profiles and connectors for dents, cracks, or bent parts. Damaged pieces can weaken your build.
Step-by-Step Assembly: Building a Basic Workbench Frame
Let's put this into practice by building a simple workbench frame. We'll use four vertical 4040B profiles as legs, connect them with horizontal profiles at the top and bottom, add aluminum foot bases for stability, and secure everything with 90° aluminum profile connectors. By the end, you'll have a sturdy frame ready to add a top panel (like plywood) and start using!
Step 1: Unbox and Sort Your Parts
First, unbox all your materials and lay them out on your flat workspace. Sort them into piles: profiles in one area, 90° connectors in another, aluminum foot bases, and accessories (like end caps) in a separate container. This might seem tedious, but it saves you from hunting for a connector halfway through assembly.
Take a moment to inspect each 4040B aluminum profile. They should be straight, with clean T-slots (no debris or burrs). If you see any rough edges, gently sand them with fine-grit sandpaper—this will make sliding in connectors smoother.
Step 2: Measure and Mark Your Connection Points
Now, let's plan where the horizontal profiles will attach to the vertical legs. For our workbench, we'll use:
- 4 vertical legs: 80cm long (adjust this to your desired workbench height—standard is 75-85cm)
- 4 horizontal "side rails": 120cm long (the width of the workbench)
- 4 horizontal "front/back rails": 60cm long (the depth of the workbench)
On each vertical leg, mark where the horizontal rails will connect. For stability, we'll add two horizontal rails per side: one near the top (5cm from the top edge) and one near the bottom (10cm from the bottom edge, leaving space for the aluminum foot base). Use your tape measure and pencil to mark these spots on all four vertical legs. Pro Tip: Use a square to draw straight, perpendicular lines across the profile—this ensures your 90° connectors will align perfectly later.
Step 3: Attach the Aluminum Foot Base to Vertical Legs
The aluminum foot base is what keeps your workbench from sinking into the floor or wobbling. Each vertical leg gets one foot base, attached to the bottom end. Here's how:
- Take one vertical leg and flip it so the bottom end is facing up.
- Slide the aluminum foot base onto the bottom of the profile. Most foot bases have a slot or hole that fits snugly over the end of the 4040B profile.
- Look for the small set screw on the side of the foot base (it should align with the T-slot of the profile). insert the Allen wrench into this screw and tighten it until the foot base is secure—snug, but not so tight that you strip the screw.
- Repeat this for all four vertical legs. Stand each leg upright to check that the foot base sits flat (no rocking). If it's wobbly, loosen the screw, adjust the foot base, and retighten.
Step 4: Connect Horizontal Rails with 90° Aluminum Profile Connectors
Now comes the fun part: joining the profiles with 90° aluminum profile connectors. These connectors are the "glue" of your build—they slide into the T-slots of the profiles and lock them together at perfect right angles. Here's how to use them:
- Start with the bottom frame: Take two vertical legs (with foot bases) and lay them parallel on your workspace, foot bases facing outward. These will be the left and right legs of one side of the workbench.
- Add a horizontal rail: Take a 60cm horizontal rail (front/back rail) and place it between the two vertical legs, aligning it with the bottom marks you made earlier (10cm from the bottom). Now, grab two 90° aluminum profile connectors.
- insert the connectors: Slide one connector into the T-slot of the horizontal rail, near one end. Align the connector so its "arm" (the part that sticks out) points toward the vertical leg. Repeat with the other connector on the opposite end of the horizontal rail.
- Attach to the vertical leg: Slide the arm of the 90° connector into the T-slot of the vertical leg, aligning it with your mark. You might need to wiggle it a bit to get it started—gentle pressure with your hand should work. Once aligned, use the Allen wrench to tighten the set screw on the connector. Do this loosely at first—just enough to hold the parts together—so you can adjust the angle later.
- Check for square: Use your square to make sure the horizontal rail and vertical leg form a 90° angle. If it's off, loosen the set screw, adjust the position, and retighten. Repeat this for the other end of the horizontal rail, connecting it to the second vertical leg.
- Tighten fully: Once the angle is square, go back and fully tighten the set screws on both connectors. Remember: snug, not stripped!
Repeat this process to add the top horizontal rail (5cm from the top) to the same two vertical legs. Now you have one "side frame" of your workbench. Build a second identical side frame with the remaining two vertical legs and two horizontal rails.
Step 5: Connect the Two Side Frames with Long Rails
Now you have two side frames (left and right sides of the workbench). It's time to connect them with the longer horizontal rails (120cm side rails) to form the full frame. Here's how:
- Stand the two side frames upright, parallel to each other, with the foot bases on the floor. The distance between them should be equal to the length of your front/back rails (60cm), so the workbench is 120cm wide and 60cm deep.
- Take a 120cm horizontal rail and place it across the top of the two side frames, aligning it with the top marks. Attach 90° connectors to both ends of this rail, just like you did earlier.
- Connect one end of the rail to the top of the left side frame, then the other end to the top of the right side frame. Use your square to check that the rail is perpendicular to both side frames, then tighten the set screws.
- Repeat this with a second 120cm rail at the bottom, connecting the lower rails of the two side frames.
Now you have a complete rectangular frame! Give it a gentle shake—if it wobbles, check your connections: are the 90° connectors tight? Are the foot bases sitting flat? Use your spirit level to ensure the top rails are level (left to right and front to back). If not, adjust the foot bases (some have adjustable screws) or loosen and realign the connectors until it's stable.
Step 6: Add Finishing Touches with Aluminum Profile Accessories
Your workbench frame is functional, but let's make it look polished with a few aluminum profile accessories:
- End caps: Snap or screw end caps into the open ends of the 4040B aluminum profile. This hides sharp edges and gives a clean, professional look.
- Cable management clips: If you plan to use power tools on your workbench, add cable clips (another type of aluminum profile accessory) to the T-slots to keep cords organized.
- Top panel brackets: If your top panel (plywood, etc.) isn't thick enough to sit directly on the rails, use brackets to support it. Slide the brackets into the T-slots of the top rails, tighten them, and rest the panel on top.
Troubleshooting: Fixing Common Beginner Mistakes
Even with careful planning, things can go wrong. Here's how to fix the most common issues:
- Wobbly frame: Check if all 90° connectors are tight. If the frame still wobbles, add diagonal braces (using shorter 4040B profiles and 45° connectors) between the top and bottom rails for extra stability.
- Connectors won't slide into T-slots: Debris in the slot? Use a dry cloth or compressed air to clean it out. If the connector is bent, replace it—damaged connectors won't hold properly.
- Profiles don't align: Did you measure twice? If marks are off, loosen the connectors, re-mark, and realign. Using a square during marking prevents this!
- Foot base won't stay tight: Ensure the set screw is biting into the T-slot. If the slot is stripped, add a small piece of tape over the screw hole (temporarily) to give the screw more grip, or replace the foot base.
Pro Tips for Future Builds
Now that you've assembled your first 4040B aluminum profile project, here are some tips to take your skills to the next level:
- Plan with software: Use free online tools like Tinkercad or SketchUp to design your project before buying parts. This helps you avoid overbuying or cutting profiles to the wrong length.
- Mix and match connectors: 90° connectors are just the start! Try 45° connectors for angled builds, or three-way connectors for adding shelves.
- Invest in a hex key set with a handle: A long-handled Allen wrench gives more leverage than tiny foldable sets, making it easier to tighten connectors.
- Buy extra connectors: It's frustrating to run out mid-project. Buy 10-20% more connectors than you think you need—they're cheap and reusable.
Conclusion: You're Now an Aluminum Profile Builder!
You did it! You've assembled a sturdy, functional workbench frame using 4040B EU standard aluminum profile, 90° aluminum profile connectors, and aluminum profile accessories. What started as a pile of metal parts is now a custom piece you can be proud of—and this is just the beginning.
With the skills you've learned, you can build almost anything: a tool rack, a 3D printer enclosure, a storage shelf, or even a custom cart. The modularity of 4040B aluminum profile means you can take apart and rebuild projects as your needs change. And best of all, you didn't need fancy tools or years of experience—just patience, a few basic tools, and this guide.
So go ahead: dream up your next project, grab some 4040B profile, and start building. The only limit is your imagination!