- Company Articles
- Products and Technology
- Installation And Maintenance
- How to Assemble a T Slot Aluminum Pipe with Board Holder Without Welding

How to Assemble a T Slot Aluminum Pipe with Board Holder Without Welding
Related Product
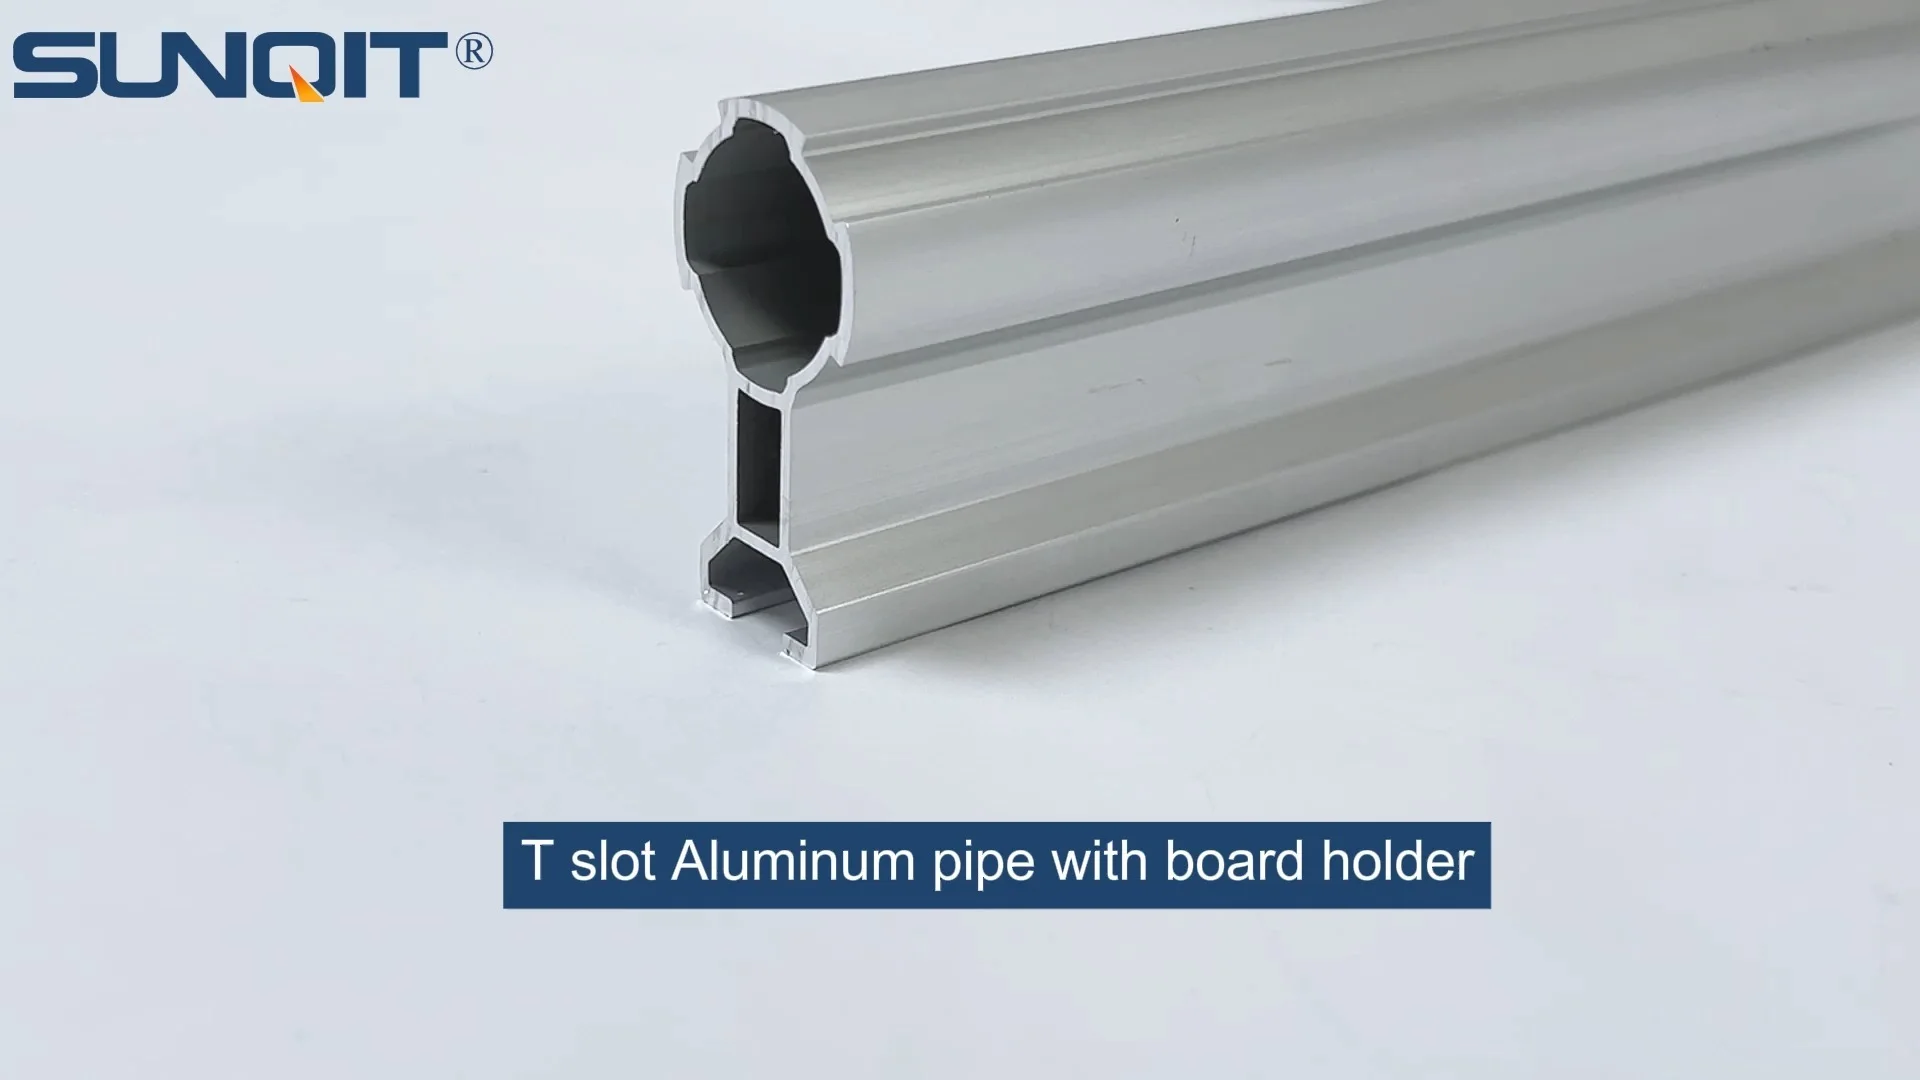
T Slot Aluminum Pipe with Board Holder
T slot Aluminum pipe with board holder,the pipe one side connected by a joint, the other side with a slot which can hold a tray or a aluminum pannel
There's something deeply satisfying about building something with your own two hands—especially when it doesn't involve sparks, fumes, or the fear of melting metal. If you've ever wanted to create a custom storage solution, workbench, or material rack, T slot aluminum pipe might just be your new best friend. Today, we're diving into how to assemble a T slot aluminum pipe with a board holder, no welding required. Whether you're a seasoned DIYer or a curious beginner, this guide will walk you through the process step by step, using simple tools and modular components that make customization a breeze.
1. Why T Slot Aluminum? The Joy of No-Weld Assembly
Before we get our hands dirty, let's talk about why T slot aluminum pipe is such a game-changer. Unlike traditional steel pipes or wood, T slot aluminum is designed for modularity. Picture this: instead of cutting, welding, and painting, you can simply slide accessories into the T-shaped grooves along the pipe, tighten a few screws, and voilà—your structure is built. It's like adult Lego, but for functional projects.
The no-weld aspect isn't just convenient; it's revolutionary for anyone who wants to adjust their setup later. Need to add a shelf? Swap out a joint. Move the board holder up a few inches? Just loosen the bolts and reposition. This flexibility is why T slot aluminum is a staple in lean systems, workshops, and even home garages. It grows with your needs, and you don't need a professional's help to make changes.
Another perk? Durability. Aluminum is lightweight but surprisingly strong, resistant to rust, and easy to clean. Whether you're using it indoors or in a covered outdoor space, it holds up. Plus, the sleek, industrial look adds a modern touch to any project—no more clunky, homemade eyesores.
2. Understanding Your Materials: T Slot Aluminum Pipe and Accessories
To build your T slot aluminum pipe with board holder, you'll need a few key components. Let's break down the basics so you know exactly what to grab from your supplier (or online store).
What is T Slot Aluminum Pipe?
At its core, T slot aluminum pipe is a hollow aluminum extrusion with a T-shaped groove running along its length. This groove is where all the magic happens—it's where you insert connectors, brackets, and other accessories. Most T slot pipes come in standard lengths (like 1m, 2m, or 3m) and diameters (common sizes include 20mm, 30mm, or 40mm). For this project, we'll use a 30mm diameter pipe, which is sturdy enough for most home and light industrial uses without being too heavy.
Key Aluminum Pipe Accessories You'll Need
The real stars of the show are the aluminum pipe accessories. These small but mighty pieces turn plain pipes into a functional structure. Here are the essentials for our board holder project:
- T Slot Aluminum Pipe: The main "bones" of your structure. We'll need several lengths—for the base, vertical supports, and cross-braces.
- Internal Straight Aluminum Joints: These connectors slide into the ends of two pipes to join them in a straight line. Think of them as the "extenders" for your pipes.
- 90° Aluminum Pipe Joints (Internal or External): Used for corner connections, like where the base meets the vertical supports. Internal joints sit inside the pipe for a clean look; external joints wrap around the outside for extra strength.
- Board Holder Brackets: These specialized brackets attach to the T slot and hold your board (plywood, MDF, or even aluminum honeycomb panel) in place. They usually have adjustable clamps to fit different board thicknesses.
- Allen Wrenches (Hex Keys): Most T slot accessories use hex screws, so you'll need a set of these. Pro tip: Get a set with ball ends—they make tightening screws at odd angles much easier.
- Rubber Mallet: For gently tapping joints into place without damaging the aluminum.
Pro Tip:
Always buy a few extra accessories—especially joints and screws. It's frustrating to run out mid-project, and having spares means you can experiment with adjustments later.
Table: Essential Joints and Their Uses
| Joint Type | Purpose | Installation Tip |
|---|---|---|
| Internal Straight Aluminum Joint | Connect two pipes in a straight line (e.g., extending the length of a base rail). | Apply a small amount of lubricant (like WD-40) to the joint before sliding into the pipe for easier insertion. |
| 90° Internal Aluminum Joint | Create right-angle corners (e.g., base frame corners or vertical support connections). | Hand-tighten the set screw first to align the pipes, then use the Allen wrench to secure—over-tightening can strip the threads. |
| 45° External Aluminum Joint | Add angled supports for stability (e.g., bracing a tall vertical frame). | Mark the pipe ends at 45° if cutting is needed—use a miter box for clean cuts. |
| Flange Base Joint | Anchor vertical pipes to the floor or a workbench surface. | Use screws (included with the joint) to secure the flange to your base—pre-drill holes if attaching to wood to prevent splitting. |

3. Tools You'll Need: A DIYer's Toolkit
You don't need a workshop full of power tools for this project. Here's what you'll need to have on hand:
- Measuring Tape: A retractable 25-foot tape works best for measuring pipe lengths and distances between supports.
- Carpenter's Square: To ensure your corners are perfectly 90°—no wobbly frames allowed!
- Level: A 2-foot or 4-foot spirit level will help keep vertical supports straight and horizontal rails even.
- Hacksaw or Pipe Cutter: If your pipes are longer than needed, you'll need to cut them. A pipe cutter (the kind with a rotating blade) is cleaner and easier than a hacksaw for aluminum.
- Deburring Tool: After cutting pipes, use this to smooth the edges—aluminum burrs are sharp and can scratch the T slot grooves if left untrimmed.
- Pencil and Straightedge: For marking cut lines and design sketches.
- Clamps (Optional): Helpful for holding pipes steady while you attach joints, especially if you're working alone.
That's it! No welding torch, no angle grinder, no expensive machinery. Just basic tools you might already have in your garage or toolbox.

4. Step-by-Step Assembly: Building Your T Slot Aluminum Pipe with Board Holder
Now, let's get to the fun part: building! We'll start with a simple design: a vertical frame with a board holder that's 3 feet wide and 4 feet tall—perfect for holding tools, materials, or even as a small workbench backstop. Feel free to adjust the dimensions to fit your space.
Step 1: Sketch Your Design and Measure Twice
I know, I know—sketches feel like extra work, but trust me: a 5-minute drawing can save you hours of frustration. Grab a piece of paper and sketch your frame. Label the lengths of each pipe: for our example, we'll need:
- 2 base rails: 36 inches each (horizontal, on the bottom)
- 2 top rails: 36 inches each (horizontal, on the top)
- 4 vertical supports: 48 inches each (connect base to top rails)
- 2 cross-braces: 30 inches each (diagonal, for stability—optional but recommended)
- Board holder: 34 inches (to fit between the vertical supports)
Double-check your measurements. If you're working in a tight space (like a garage corner), measure the area again to ensure your finished frame will fit. It's better to realize "this is too tall" on paper than after you've assembled half the frame.
Step 2: Gather and Prep Your Materials
Lay out all your pipes and accessories on a flat surface (a clean floor or workbench works). If you need to cut pipes to length, now's the time. Measure and mark each pipe with a pencil, then use your pipe cutter or hacksaw to cut. After cutting, use the deburring tool to smooth the edges—run it around both the inside and outside of the pipe end to remove any sharp bits.
Sort your joints by type (e.g., all 90° joints in one pile, straight joints in another). This might seem trivial, but when you're in the middle of assembly, you won't want to hunt for the right connector.
Step 3: Build the Base Frame
Start with the base—it's the foundation of your structure, so it needs to be square and stable. Take your two 36-inch base rails and connect them with two shorter pipes (we'll use 24-inch pipes for the sides, making a rectangle). Wait, you didn't see those in the list earlier? Oops—my mistake! The base should be a rectangle, so you'll need two more pipes for the short sides. Let's adjust: add 2 short base pipes, 24 inches each. Now, your base is 36 inches long (front and back) and 24 inches wide (left and right).
To assemble the base rectangle:
- Take one 36-inch rail and one 24-inch rail. Slide a 90° internal joint into one end of the 36-inch rail.
- Slide the end of the 24-inch rail into the other side of the 90° joint. The joint should now connect the two pipes at a right angle.
- Hand-tighten the set screw on the joint to hold the pipes in place. Don't fully tighten yet—we'll adjust for squareness later.
- Repeat this process for the other three corners, connecting all four base pipes into a rectangle.
Once the rectangle is assembled, use your carpenter's square to check the corners. If a corner isn't 90°, gently push or pull the pipes until the square fits snugly. Then, go around and fully tighten all the joint screws with your Allen wrench. A good rule of thumb: tighten until you feel resistance, then give it a tiny extra turn—over-tightening can strip the aluminum threads.
Quick Check:
To ensure your base is square, measure the diagonals. Both diagonals should be the same length. If not, adjust the corners until they match.
Step 4: Add Vertical Supports
Now, we'll add the legs—our 48-inch vertical supports. Flip the base frame so the top is facing up (it doesn't matter which side is top, since it's a rectangle). At each corner of the base, you'll attach a vertical support using a 90° joint (this time, the joint will connect the base rail to the vertical pipe).
Here's how: Slide a 90° internal joint into the end of a vertical support. Then, position the joint over the corner of the base frame, aligning the vertical pipe so it stands straight up. The joint should grip both the base rail and the vertical support. Hand-tighten the screws, then use your level to make sure the vertical support is perfectly straight (both side-to-side and front-to-back). Once it's level, fully tighten the joint screws.
Repeat this for all four vertical supports. Take your time here—crooked legs will make the entire frame wobbly. If you're working alone, lean the vertical support against a wall or have a friend hold it while you adjust and tighten.
Step 5: Add Cross-Braces for Stability (Optional but Smart)
For a frame this size, cross-braces aren't strictly necessary, but they'll make it much sturdier—especially if you plan to load the board holder with heavy items. Cut two 30-inch pipes for diagonal braces. Attach one brace from the top of the front-left vertical support to the bottom of the back-right support, and the other from the top of the front-right to the bottom of the back-left. Use 45° external joints for these connections.
To attach a brace: Hold the pipe diagonally across the frame, mark where it meets the vertical supports, then cut the ends at 45° angles (use your miter box for accuracy). Slide 45° joints onto both ends of the brace, then attach the joints to the vertical supports. Tighten the screws, and you'll immediately feel the frame stiffen up.
Step 6: Install the Board Holder
Now for the star of the show: the board holder. Most board holders come as a kit with two brackets and a crossbar. The brackets slide into the T slot of the vertical supports, and the crossbar connects them, creating a shelf or ledge for your board.
Decide how high you want the board holder—for our example, we'll place it 30 inches from the bottom. Mark this height on both front vertical supports. Slide the board holder brackets into the T slot at your marked height. Tighten the bracket screws to lock them in place. Then, attach the crossbar between the two brackets (it should slide into slots on the brackets or be secured with screws). Finally, place your board (we're using a 34x18-inch plywood sheet) on top of the crossbar and secure it with the bracket clamps. Most clamps have a knob that tightens against the board—hand-tighten until the board doesn't wiggle.
Step 7: Test, Adjust, and Secure
Stand back and admire your handiwork! Now, give the frame a gentle shake. It should feel solid—no wobbling or creaking. If it does wobble, check the following:
- Are all joint screws tight? Loose screws are the most common culprit.
- Is the base level? Use your level on the base rails—if one side is higher, adjust the vertical supports (you can add shims under the base if needed).
- Are the cross-braces (if used) tight? Diagonal braces should be taut, not sagging.
Once everything checks out, do a final pass with your Allen wrench to ensure all screws are tight. You're done! Your T slot aluminum pipe with board holder is assembled—no welding, no fuss.
5. Troubleshooting Common Hiccups
Even with careful planning, things can go wrong. Here are fixes for the most common issues:
- Joints won't slide into the pipe: Aluminum can have slight variations in size. Try gently tapping the joint with a rubber mallet (don't use a steel hammer—it will dent the pipe). If that doesn't work, check for burrs inside the pipe end and deburr if needed.
- Pipes are bent or warped: Aluminum is flexible, but if a pipe is badly bent, it will throw off your frame. replace it—don't try to bend it back (you'll weaken the metal).
- Board holder is wobbly: Make sure the brackets are fully tightened in the T slot. If the board itself is wobbly, add a second board holder bracket in the middle for extra support.
- Screws keep stripping: Stop! Stripped threads are a pain to fix. Use a slightly larger Allen wrench (but not too large—you want a snug fit) and avoid over-tightening. If a thread is already stripped, you can try a thread repair kit or replace the joint.
6. Beyond the Basics: Customizing Your Setup
Now that you've mastered the basics, let's talk upgrades. T slot aluminum is all about customization, so here are a few ideas to make your setup even more useful:
Adding Casters for Mobility
Want to roll your frame around? Attach casters (wheels) to the base using flange base joints. Look for casters with locks—they'll keep the frame stationary when you need it to stay put. Just replace four of the base corner joints with flange joints, then screw the casters into the flanges.
Incorporating a Workbench Surface
Turn your frame into a full workbench by adding a top shelf. Use the same T slot aluminum pipe to build a second frame (the same size as the base) and attach it to the top vertical supports. Then, add a plywood or aluminum honeycomb panel top. Instant workbench!
Expanding with Additional Accessories
The T slot grooves are endless opportunities. Add tool hooks, cup holders, or even small shelves by sliding accessories into the grooves. Many suppliers sell specialized holders for drills, screwdrivers, or tape measures—perfect for a workshop setup.
7. Real-World Applications: Where This Setup Shines
So, what can you actually use this for? Here are a few ideas to spark your creativity:
- Garage Workbench Organizer: Use the board holder for tools, and add shelves above for storage bins. Perfect for car enthusiasts or DIY mechanics.
- Small-Scale Production Lean System: In a home workshop or small business, this frame can be part of a lean system—holding materials at eye level for assembly, or as a flow rack for parts.
- Craft Room Storage: Paint the aluminum pipes a fun color (yes, you can paint aluminum—just sand lightly and use spray paint for metal) and use the board holder for fabric, yarn, or craft supplies.
- Outdoor Plant Stand: With a weather-resistant board (like pressure-treated plywood), this frame makes a sturdy plant stand for a patio or balcony.
8. Maintenance Tips: Keeping Your Assembly Strong for Years
T slot aluminum is low-maintenance, but a little care goes a long way:
- Clean regularly: Wipe down the pipes with a damp cloth to remove dust and grime. For stubborn spots, use mild soap and water—avoid abrasive cleaners, which can scratch the aluminum.
- Tighten screws seasonally: Temperature changes can cause joints to loosen over time. Every 6 months, do a quick check and tighten any loose screws.
- Protect from heavy impacts: Aluminum is strong, but it can dent if hit with heavy objects. Keep your frame away from high-traffic areas where it might get bumped.
- Disassemble and reconfigure: The best part of T slot aluminum is its reusability! If you move or need a different setup, take it apart and rebuild—no waste, no extra cost.
Final Thoughts: Your Turn to Build
Assembling a T slot aluminum pipe with board holder without welding is more than a project—it's a gateway to endless DIY possibilities. With modular materials, simple tools, and a little patience, you can build custom structures that fit your space and needs perfectly. Whether you're organizing your workshop, creating a lean system for small production, or just adding a functional piece to your home, the satisfaction of saying "I built that" is priceless.
So, grab your measuring tape, sketch your design, and let's get building. The world of T slot aluminum is waiting—and it's weld-free, frustration-free, and full of potential.