- Company Articles
- Products and Technology
- Product knowledge
- How to Calculate Material Requirements for 4080A EU Standard Aluminum Profile Projects

How to Calculate Material Requirements for 4080A EU Standard Aluminum Profile Projects
Related Product
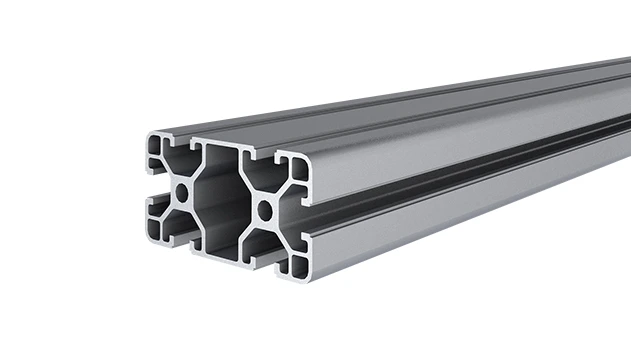
4080A EU Standard Aluminum Profile
4080A is a 4.00x8.00 CM fractional 40 series square extrusion T-slot profile with two side open T-slots, each side with 4.00cm face, two side with 8.00cm face. The profile has align-a-grooves to assist in aligning connecting profiles.
Let's start with a familiar scenario: Meet Maria, a production supervisor at a mid-sized electronics manufacturer. Last week, her team finally got approval to upgrade their aging workstations to sleek, modular setups using 4080A EU standard aluminum profiles. Excitement aside, Maria's now staring at a mountain of catalogs, Excel sheets, and a deadline that feels way too close. "How do I even know how many aluminum pipes I need?" she mutters, scrolling through a list of terms like "aluminum profile accessories" and "roller track connectors." If this sounds like you—whether you're building a workbench, a material rack, or a full production line—you're in the right place. Calculating material requirements for aluminum profile projects doesn't have to be a headache. With a systematic approach, you'll avoid overordering, prevent costly delays, and ensure every nut, bolt, and aluminum guide rail A is accounted for. Let's break it down step by step.
Step 1: Define Your Project Scope—Start with the "Why" and "What"
Before you even touch a calculator, you need to get crystal clear on your project's goals. Are you building a single aluminum workbench for assembly tasks? A multi-tier material rack B (3 row and 3 floor) for storage? Or maybe a roller track system to move parts between stations? Each project has unique needs, and skipping this step is like baking a cake without a recipe—you might end up with extra flour or missing sugar.
Key Questions to Answer:
- Function: What will the finished structure do? Hold tools? Support heavy equipment? Allow parts to slide smoothly (hello, roller track!)?
- Dimensions: Exact length, width, and height. For a workbench, measure the available floor space and the height comfortable for your team (typically 750-800mm for standing setups).
- Load Capacity: Will it hold 10kg or 100kg? This determines the thickness of aluminum profiles and the type of connectors (e.g., reinforced 90° aluminum profile connectors for heavier loads).
- Modularity: Might you expand later? If so, leave room for adding more aluminum guide rail A or extra shelves down the line.
For Maria's project, the goal was clear: replace 5 outdated wooden workbenches with durable, ESD-safe aluminum workbench setups. Each needed to be 1800mm long, 800mm deep, and 800mm tall, with a lower shelf for tool storage and a sliding material tray using aluminum guide rail A. Load capacity? Around 50kg per shelf. With this info, she could finally stop guessing and start planning.
Step 2: Build a Detailed Bill of Materials (BOM)—Leave No Nut Behind
Think of a Bill of Materials (BOM) as your project's "ingredient list." It's a comprehensive list of every single component you'll need, from the 6-meter 4080A aluminum profiles down to the tiny M5 screws. Skipping even one item—like a single roller track connector—can bring your project to a grinding halt when you're halfway through assembly.
What to Include in Your BOM:
- Main Structural Profiles: These are the "bones" of your project. For Maria's workbench, this meant 4080A EU standard aluminum profiles for the frame. Note their lengths (most suppliers sell them in 3m or 6m stock lengths).
- Accessories & Connectors: This is where things get detail-oriented. Aluminum profile accessories like joints (90° connectors, 45° connectors), brackets, and end caps ensure your structure stays sturdy. For sliding trays, Maria needed aluminum guide rail A and matching roller track placon mounts to attach the rail to the profile.
- Panels & Surfaces: Workbench tops (e.g., aluminum honeycomb panels for lightweight strength), shelf boards, or side panels. Specify thickness and dimensions here.
- Hardware: Screws, bolts, washers, and t-slot nuts (critical for securing panels to aluminum profiles). Don't forget specialized items like caster wheels if your design is mobile (though Maria's workbench E was a fixed "single deck-without caster" model).
- Specialty Components: If your project includes moving parts—like a roller track for material flow—list every component: roller wheels, axles, roller track connectors, and even plastic roller track guide rails (yellow or grey, depending on your color code).
Pro Tip: Use a spreadsheet with columns for "Item Description," "Quantity," "Unit of Measure," "Supplier Part Number," and "Notes." This will save you hours when ordering and help track what's in stock.

Step 3: Calculate Aluminum Profile Lengths—Measure Twice, Cut Once
Now for the math part—but don't worry, it's simpler than it looks. The goal here is to figure out how many meters (or stock lengths) of 4080A aluminum profile you need for each structural part of your project. Let's use Maria's workbench as a real-world example to walk through this.
Example: Calculating for a Workbench Frame
Maria's workbench specs: 1800mm (L) x 800mm (D) x 800mm (H), with a lower shelf at 400mm height. The frame will have:
- 4 vertical legs (height = 800mm each)
- 4 upper horizontal rails (2x length, 2x depth: 1800mm and 800mm each)
- 4 lower shelf rails (2x length, 2x depth: 1800mm and 800mm each)
First, calculate the total length needed for each part:
- Vertical legs: 4 legs x 800mm = 3200mm (3.2 meters)
- Upper rails: (2 x 1800mm) + (2 x 800mm) = 3600mm + 1600mm = 5200mm (5.2 meters)
- Lower rails: Same as upper rails = 5200mm (5.2 meters)
- Total frame profiles needed: 3.2m + 5.2m + 5.2m = 13.6 meters
Next, convert this to stock lengths. Most suppliers sell 4080A profiles in 6m lengths. So, how many 6m profiles does 13.6 meters require? 13.6m ÷ 6m = 2.266… → You can't order a fraction, so round up to 3 profiles (3 x 6m = 18m total). But wait—don't forget cutting allowances ! Every time you cut a profile, you lose ~1-2mm to the saw blade. For 12 cuts (4 legs + 8 rails), that's 12 x 2mm = 24mm (0.024m) lost. Adding that to 13.6m gives 13.624m, which still fits in 3x6m profiles with room to spare. Phew.
Pro Tip: If you're cutting multiple pieces from one stock profile, optimize the layout to minimize waste. For example, a 6m profile can yield three 1800mm rails (3 x 1800mm = 5400mm) with 600mm left over—perfect for shorter parts like shelf supports.
Step 4: Count Accessories & Connectors—The "Glue" of Your Project
Aluminum profiles are strong, but they're nothing without the right accessories. A single missing 90° aluminum profile connector can turn a sturdy frame into a wobbly mess. Let's break down how to count these critical components.
Connectors: Where Every Joint Matters
For Maria's workbench, every corner where two profiles meet needs a connector. Let's count:
- Vertical legs + upper rails: 4 legs x 2 connections (front/back and left/right) = 8 connections → 8x 90° aluminum profile connectors.
- Vertical legs + lower rails: Another 8 connections → 8x 90° aluminum profile connectors.
- Shelf supports: 4 small profiles (400mm tall) to hold the lower shelf, each needing 2 connectors (top and bottom) → 4 x 2 = 8 connections → 8x 90° aluminum profile connectors.
- Total 90° connectors: 8 + 8 + 8 = 24.
But connectors aren't one-size-fits-all. If your design has angles other than 90°, you'll need 45° or 135° connectors. For sliding parts, like Maria's aluminum guide rail A tray, she needed roller track placon mounts (flat, for attaching the rail to the workbench frame) and roller track connectors to join rail sections. She counted 2 placon mounts per meter of rail, plus 1 connector for every rail joint—simple once she mapped it out.
Small But Mighty: Don't Forget Fasteners
T-slot nuts, bolts, and washers might seem trivial, but running out mid-assembly is frustrating. A good rule: For every connector, you'll need 2-4 bolts (depending on size). Maria used M8 bolts for her 4080A profiles, so 24 connectors x 4 bolts = 96 bolts, plus 10% extra (106 total) to account for dropped or stripped ones.
Step 5: Add Wastage & Spare Parts—Plan for the Unexpected
Even the best-laid plans hit snags. A profile might arrive bent. A saw might slip, ruining a cut. That's why adding a "buffer" for wastage and spares is non-negotiable.
Wastage: How Much is Enough?
For most projects, aim for 5-10% extra on main materials like aluminum profiles. For small parts (connectors, screws), 10-15% is safer since they're easy to misplace. Maria added 5% to her 13.6m of aluminum profiles (0.68m, rounding up to 1m) and 10% to her connector count (24 connectors → 27 total). This small buffer saved her when one of her 6m profiles arrived with a dent—she could cut around it without reordering.
Spares: Think Long-Term
Consider keeping a few extra parts on hand for future repairs or modifications. A couple of extra 90° connectors or a meter of aluminum guide rail A might seem unnecessary now, but when a shelf starts wobbling six months later, you'll be glad you have them.
Putting It All Together: Sample Material List for Maria's Workbench
| Item Category | Description | Quantity Needed | Calculation Notes |
|---|---|---|---|
| Main Profiles | 4080A EU standard aluminum profile (6m length) | 3 | Total frame length: 13.6m + 5% wastage (0.68m) = 14.28m. 3x6m = 18m covers this with 3.72m leftover. |
| Connectors | 90° aluminum profile connector | 27 | 24 needed for frame joints + 10% spares (2.4 → 3 extra) = 27. |
| Accessories | Aluminum guide rail A (1800mm length) | 2 | 1 rail per side of the sliding tray, 1800mm each. |
| Accessories | Roller track placon mount for aluminum profile flat | 8 | 4 mounts per rail (1 every 450mm) x 2 rails = 8. |
| Hardware | M8 x 20mm bolts with washers | 106 | 24 connectors x 4 bolts = 96 + 10% spares (9.6 → 10 extra) = 106. |
| Panels | Aluminum honeycomb panel (1800x800mm, 10mm thick) | 2 | 1 top panel + 1 lower shelf panel. |
*All quantities based on a single workbench; multiply by 5 for Maria's full project.
Step 6: Validate & Adjust—Double-Check Before Ordering
Before hitting "submit" on your order, take an hour to review your BOM and calculations. Ask a colleague to spot-check your math—fresh eyes catch mistakes you might miss. Maria had her intern, Jake, verify the connector count, and sure enough, he noticed she'd forgotten the 4 small shelf support profiles (adding 8 more 90° connectors to her list). Oops—glad he caught that!
Also, check with your supplier: Do they have all items in stock? Some specialty parts like aluminum guide rail A might have lead times, so factor that into your timeline. If a part is backordered, ask if a similar alternative (like aluminum guide rail B) can work—suppliers often have compatible options.
Final Thoughts: From Chaos to Confidence
Calculating material requirements for 4080A aluminum profile projects might seem intimidating at first, but it's really just a matter of breaking the project into small, manageable steps: defining scope, building a BOM, calculating lengths, counting accessories, and adding buffers for the unexpected. Maria, for one, is now confident enough to tackle not just the workbenches, but also the material rack B (3 row and 3 floor) her team needs next month.
Remember: Accurate material planning isn't just about saving money (though that's a big plus). It's about respecting your team's time, meeting deadlines, and building structures that work as hard as you do. So grab your measuring tape, fire up Excel, and start planning—your perfect aluminum project is waiting.