- Company Articles
- Products and Technology
- Product knowledge
- How to Calculate the Number of Aluminum Profile 3 Way Connectors Needed

How to Calculate the Number of Aluminum Profile 3 Way Connectors Needed
Related Product
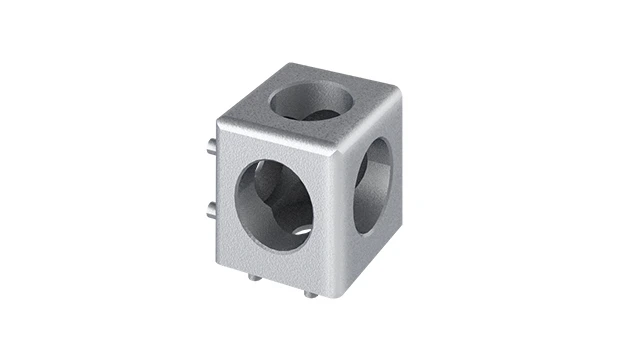
Aluminum Profile 3 Way Connector
The 3 way - squared corner connector is an external fastening method that is typically used to create a corner connection between three profiles. It is a heavy-duty connection that is simple to use and provides a polished look.
If you've ever tackled a project involving aluminum profiles—whether it's setting up a workbench in your garage, assembling a material rack B (3 row and 3 floor) for your warehouse, or building a custom storage system—you know that the little parts often make the biggest difference. Among these, aluminum profile 3 way connectors are the unsung heroes. These small, unassuming pieces hold your structure together, ensuring stability, flexibility, and longevity. But get the count wrong, and you'll find yourself mid-project, scrambling to order more connectors (and delaying progress). Get it right, and you'll save time, money, and frustration. Let's walk through how to accurately calculate the number of 3 way connectors you need for your next project.
What Are Aluminum Profile 3 Way Connectors, Anyway?
First, let's make sure we're on the same page. Aluminum profile 3 way connectors are specialized hardware designed to join three aluminum extrusion profiles at a single point. Unlike 2 way connectors (which link two profiles) or 4 way connectors (which handle four), 3 way connectors are perfect for corners, T-junctions, or any spot where three profiles meet—think the legs of a workbench meeting the top frame, or the vertical supports of a material rack intersecting with horizontal shelves.
These connectors are typically made from die-cast aluminum or high-strength plastic, and they come in various designs to accommodate different profile sizes (like 2020, 3030, or 4040 aluminum profiles ) and angles (90°, 45°, or adjustable). Their modular nature is what makes aluminum extrusion systems so popular: you can reconfigure your structure later by simply loosening the connectors and rearranging the profiles. But that flexibility starts with knowing how many connectors you need in the first place.
Key Factors That Influence Your Connector Count
Before diving into calculations, let's consider what affects how many 3 way connectors you'll use. It's not just about "counting corners"—several factors play a role:
- Structure Complexity: A simple, single-level workbench will need far fewer connectors than a multi-tiered material rack with cross-bracing and adjustable shelves.
- Profile Layout: Are your profiles arranged in a basic square frame, or do they include diagonal supports, angled sections, or overlapping layers? Each intersection adds potential connection points.
- Load Requirements: If your structure will hold heavy items (like industrial tools on a workbench or bulk materials on a rack), you might need extra connectors or reinforced joints to distribute weight. For example, a shelf supporting 500 lbs might use two 3 way connectors per corner instead of one.
- Profile Size: Larger profiles (e.g., 4080 aluminum extrusion profiles) often require sturdier connectors, and their thicker walls might affect how many connectors fit at a single joint.

Step-by-Step: Calculating Your 3 Way Connectors
Let's break this down into a clear, actionable process. Even if you're not a math whiz, these steps will help you nail the count.
Step 1: Map Out Your Structure
Start with a detailed plan. This doesn't have to be a professional CAD drawing—even a rough sketch on graph paper works. Include every vertical, horizontal, and diagonal profile, and note their lengths and positions. For example, if you're building a workbench, your sketch might show: 4 vertical leg profiles (30 inches tall), 4 horizontal top-frame profiles (60 inches long), 4 horizontal shelf-frame profiles (58 inches long), and 4 diagonal braces (for stability).
Pro tip: Label each profile with a letter or number (e.g., "Leg A," "Top Front B") to avoid confusion later. This will make it easier to track which profiles connect where.
Step 2: Identify All Connection Points
Now, go through your sketch and mark every spot where two or more profiles meet. These are your connection points. For 3 way connectors, we're only interested in points where exactly three profiles intersect. (If four profiles meet, you'll need a 4 way connector; two profiles, a 2 way connector.)
Let's take our workbench example again. At the top corner of each leg (Leg A), three profiles meet: the vertical leg, the top front horizontal profile (Top Front B), and the top side horizontal profile (Top Side C). That's a 3 way connection point. Similarly, if there's a shelf halfway up the legs, each shelf corner will have another 3 way connection (leg, shelf front, shelf side).
Don't forget hidden connections! For example, diagonal braces might meet the legs and top frame at 45°, creating 3 way joints that aren't immediately obvious in a 2D sketch.
Step 3: Classify Each Connection Point
Not all connection points use 3 way connectors. Create a list or table where you note each connection point and the type of connector needed. For example:
| Connection Point | Profiles Involved | Connector Type |
|---|---|---|
| Top Corner (Leg A) | Leg A (vertical), Top Front B (horizontal), Top Side C (horizontal) | 3 way |
| Shelf Corner (Leg A) | Leg A (vertical), Shelf Front D (horizontal), Shelf Side E (horizontal) | 3 way |
| Diagonal Brace (Leg A, Top Front B) | Leg A (vertical), Top Front B (horizontal), Brace F (diagonal) | 3 way |
| Top Frame Middle (Top Front B, Top Back G) | Top Front B (horizontal), Top Back G (horizontal), Crossbar H (horizontal) | 4 way |
Step 4: Count the 3 Way Connections
Now, tally up all the connection points labeled "3 way" in your table. For our workbench example, let's say we have:
- 4 top corners (one per leg) = 4 connections
- 4 shelf corners (one per leg) = 4 connections
- 4 diagonal brace joints (one per leg) = 4 connections
Total so far: 4 + 4 + 4 = 12 3 way connectors.
Step 5: Add a Spare Buffer
Even the most careful planners make mistakes. Maybe a connector gets lost, stripped, or damaged during assembly. To avoid project delays, add a 10-15% buffer to your total. For our workbench example, 12 connectors + 15% (1.8) = 13.8, so we'd round up to 14 connectors. This ensures you have extras without overspending.

Real-World Example: Material Rack B (3 Row and 3 Floor)
Let's apply this process to a more complex structure: material rack B (3 row and 3 floor) , a common industrial storage solution with three vertical columns (rows) and three horizontal shelves (floors). Here's how the calculation might look:
Step 1: Sketch the Rack
The rack has: 9 vertical profiles (3 rows × 3 columns), 18 horizontal shelf profiles (3 floors × 3 rows × 2 per shelf: front and back), 6 horizontal crossbeam profiles (3 floors × 2 per floor: top and bottom, connecting rows), and 12 diagonal braces (3 floors × 4 per floor).
Step 2 & 3: Identify and Classify Connections
Each shelf corner (where a vertical column meets a front shelf profile and a back shelf profile) is a 3 way connection. With 3 floors, 3 rows, and 2 corners per row (front and back), that's 3 × 3 × 2 = 18 shelf corner connections. Additionally, crossbeams connecting the rows meet vertical columns and shelf profiles, adding 6 more 3 way connections. Diagonal braces add another 12 connections (one at each end of the brace, meeting vertical columns and shelf profiles).
Step 4 & 5: Calculate and Add Buffer
Total 3 way connections: 18 (shelf corners) + 6 (crossbeams) + 12 (braces) = 36. Adding 15% buffer: 36 + 5.4 = 41.4 → 42 connectors needed.
See? Even with a complex structure, breaking it down step by step makes the math manageable.
Common Mistakes to Avoid
Even seasoned builders can slip up. Here are three pitfalls to watch for:
- Forgetting Adjustable Joints: If your structure needs to be adjustable (e.g., shelves that can move up or down), you might need extra 3 way connectors to allow for repositioning. For example, a rack with adjustable shelves might have 2-3 extra connection points per column to accommodate different heights.
- Ignoring Load Distribution: A heavy load on a single shelf can pull on the connectors, leading to instability. If a shelf will hold more than 200 lbs, consider adding an extra 3 way connector per corner (e.g., 2 connectors instead of 1) to spread the weight.
- Overlooking Profile Compatibility: Not all 3 way connectors fit all aluminum profiles. A connector designed for 2020 profiles won't work with 4040 profiles. Check the connector's specs to ensure it matches your profile size—this avoids last-minute substitutions that throw off your count.
Sourcing Quality Connectors: Why Your Supplier Matters
Once you know how many 3 way connectors you need, the next step is ordering them. This is where choosing a reliable lean system supplier pays off. Reputable suppliers don't just sell parts—they offer technical support to help you verify your connector count, and they provide high-quality, durable connectors that won't fail under stress.
Look for suppliers who:
- Stock a wide range of 3 way connectors for different aluminum profile sizes (2020, 3030, 4040, etc.).
- Provide detailed product specs, including load ratings and material composition (aluminum vs. plastic).
- Offer bulk pricing (since you'll likely need multiple connectors, buying in bulk can save 10-20%).
- Have positive reviews mentioning on-time delivery and responsive customer service (no one wants to wait two weeks for a missing connector).
Final Thoughts: Confidence in Every Connection
Calculating 3 way connectors might seem tedious, but it's the foundation of a strong, stable structure. By mapping your design, identifying connection points, and accounting for load and complexity, you'll avoid the frustration of running out of parts mid-project. And when you source those connectors from a trusted lean system supplier , you can rest easy knowing your workbench, material rack, or custom setup will stand the test of time.
Remember: Every connector counts. Invest a little time in planning, and your finished structure will be safer, more efficient, and built to last.