- Company Articles
- Products and Technology
- Installation And Maintenance
- How to Clean 4040 Aluminum Profile End Caps: Maintenance Best Practices

How to Clean 4040 Aluminum Profile End Caps: Maintenance Best Practices
Related Product
4040 Aluminum Profile End Cap
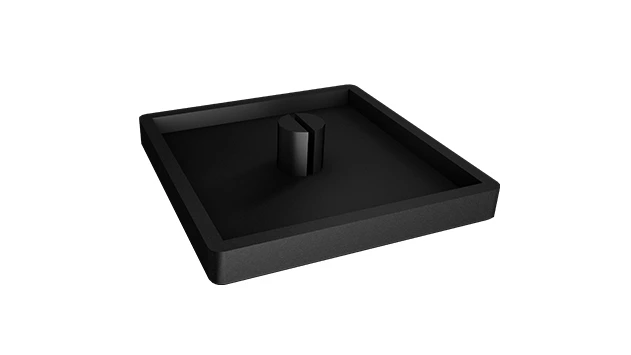
The aluminum profile end cap adds a finishing touch to your project and closes off profile ends to limit dust and debris buildup, also it can avaid some scratch for material and labor during the assemble work.
Introduction: The Unsung Heroes of Your Aluminum Setup
Walk into any workshop, factory floor, or even a well-organized garage, and you'll likely spot structures built with aluminum profiles. These sleek, durable frames form the backbone of workbenches, material racks, and assembly lines—quietly supporting daily operations. But if you take a closer look at the ends of these profiles, you'll notice small, often-overlooked components: end caps. Specifically, 4040 aluminum profile end caps, designed to fit the popular 40mm x 40mm aluminum extrusion profiles, are the unsung heroes here. They seal the open ends of the profiles, keeping out dust, debris, and moisture, while also giving the setup a polished, professional look.
Over time, though, these end caps can accumulate grime. Oils from hands, dust from the air, and even spills from nearby workstations can leave them looking dull or sticky. At first glance, this might seem like a minor cosmetic issue. But neglecting to clean and maintain 4040 aluminum profile end caps can lead to bigger problems: clogged profile channels, corrosion inside the aluminum, or even loose end caps that fail to protect the profile. And when the end caps suffer, the entire aluminum setup—whether it's a lean pipe workbench or a material rack—starts to show signs of wear, too.
In this guide, we'll dive into everything you need to know about cleaning and maintaining 4040 aluminum profile end caps. From understanding their role in protecting your aluminum profiles to step-by-step cleaning techniques and long-term maintenance habits, we'll cover it all. By the end, you'll have the tools and knowledge to keep these small but critical components in top shape, ensuring your aluminum setup stays functional, safe, and looking great for years to come.
Why 4040 Aluminum Profile End Caps Matter
Before we jump into cleaning, let's take a moment to appreciate why these end caps are so important. 4040 aluminum profiles are a staple in industrial and workshop settings because of their versatility—they're strong yet lightweight, easy to assemble with aluminum profile accessories, and compatible with everything from workbenches to conveyor systems. But the open ends of these profiles are vulnerable. Without end caps, here's what can happen:
- Dust and debris buildup: The hollow interior of aluminum profiles can act like a magnet for dust, dirt, and small particles. Over time, this buildup can clog the T-slots (the grooves that run along the profile), making it hard to attach accessories like brackets or shelves.
- Moisture damage: Spills, humidity, or even condensation can seep into open profile ends, leading to internal corrosion. Aluminum is resistant to rust, but prolonged exposure to moisture can still cause pitting or discoloration, weakening the profile over time.
- Safety hazards: Sharp, exposed profile ends pose a risk of cuts or scrapes, especially in busy work areas. End caps blunt these edges, making the setup safer for anyone working nearby.
- Aesthetic decline: Dirty, cracked, or missing end caps make even the most well-built aluminum structure look unprofessional. In settings where presentation matters—like customer-facing workshops or cleanrooms—this can hurt your brand image.
In short, 4040 aluminum profile end caps are more than just "caps." They're a protective barrier, a safety feature, and a key part of your setup's overall longevity. That's why keeping them clean and well-maintained isn't just about appearances—it's about preserving the integrity of your aluminum profiles and the systems they support.

Tools You'll Need: Gather Your Cleaning Kit
Cleaning 4040 aluminum profile end caps doesn't require fancy or expensive tools. In fact, you probably already have most of these items in your workshop or kitchen. The key is to use gentle, non-abrasive materials to avoid scratching the end caps or the aluminum profile itself. Here's what you'll need:
- Soft, lint-free cloths: Microfiber towels work best here—they're gentle, absorbent, and won't leave behind fibers. Avoid rough fabrics like paper towels, which can scratch the end cap's surface.
- Mild detergent: A small amount of dish soap (like Dawn) or a pH-neutral cleaner (avoid bleach or ammonia-based products) will help cut through grease and grime without damaging the end cap's finish.
- Warm water: For mixing with detergent to create a cleaning solution. Avoid hot water, as extreme temperatures can warp plastic end caps (most 4040 end caps are made of durable plastic, though some are metal).
- Soft-bristled brush: An old toothbrush or a small paintbrush with soft bristles is perfect for reaching into crevices, like the edges where the end cap meets the profile. This helps dislodge stubborn dust or debris.
- Isopropyl alcohol (70% or higher): For tough stains, like oil or adhesive residue. Alcohol evaporates quickly, so it won't leave water spots, and it's safe for most plastic and aluminum surfaces.
- Toothpicks or cotton swabs: These are handy for picking out dirt from tiny gaps, such as the T-slot openings around the end cap.
- Bucket or bowl: To mix your detergent solution.
- Rubber gloves (optional): If you have sensitive skin or are using alcohol, gloves can protect your hands.
Pro tip: Avoid abrasive tools like steel wool, scouring pads, or harsh chemicals (like oven cleaner). These can scratch the end cap's surface or react with the plastic, causing discoloration or brittleness. The goal is to clean, not damage!

Step-by-Step Cleaning Process: From Grime to Shine
Now that you have your tools ready, let's walk through the cleaning process. Depending on how dirty your end caps are, this might take 10–15 minutes per end cap, but the effort is well worth it. We'll break it down into six simple steps:
Step 1: Prepare the Area (and the End Cap)
Start by clearing the area around the aluminum profile. If the end cap is on a workbench, remove any tools, materials, or equipment that might get in the way. If the end cap is in a hard-to-reach spot (like under a shelf), you may need to move the entire structure temporarily—just make sure to do this safely, especially if it's heavy.
Next, decide whether to clean the end cap in place or remove it. In most cases, you can clean it without removing it, but if the end cap is very dirty or loose, taking it off might make the job easier. To remove a 4040 aluminum profile end cap, gently pry it off with a flathead screwdriver (wrapped in a cloth to avoid scratching the profile) or your fingers. Most end caps are press-fit, so they should pop off with a little pressure. Set the end cap aside on a clean surface, like a paper towel or plate.
Step 2: Dry Cleaning First
Before introducing water, start with dry cleaning to remove loose dust and debris. Take your soft-bristled brush and gently sweep across the surface of the end cap, focusing on the edges and any textured areas (some end caps have grip patterns or logos). Use the brush to dislodge dust from the gap between the end cap and the profile (if you're cleaning in place). For tiny crevices, like the corners of the end cap, use a toothpick or cotton swab to pick out any trapped dirt—be careful not to push the dirt further into the profile!
If the end cap is very dusty, you can also use a can of compressed air (the kind used for cleaning keyboards) to blow away loose particles. Hold the can a few inches from the end cap to avoid damaging it with high pressure.
Step 3: Wet Cleaning with Detergent Solution
Now it's time to tackle the grime. Fill your bucket or bowl with warm water and add a drop or two of mild detergent—just enough to create a slightly soapy solution (you don't need a lot). Dip your soft cloth into the solution, wring it out so it's damp (not soaking wet), and gently wipe the surface of the end cap. Use circular motions to lift dirt, focusing on areas that look greasy or sticky (like where hands often touch the end cap).
If you're cleaning the end cap in place, be careful not to let excess water drip into the profile. Wipe the area around the end cap, too—dirt here can transfer back onto the end cap once it's dry. For the edges where the end cap meets the profile, use the damp cloth wrapped around your finger to gently clean the seam.
Step 4: Tackling Tough Stains with Alcohol
If there are stubborn stains—like oil from machinery, adhesive residue from stickers, or discoloration—grab your isopropyl alcohol. Dampen a corner of your microfiber cloth with alcohol (don't soak it) and gently rub the stained area. The alcohol will break down the oil or adhesive without harming the end cap or aluminum profile. Let it sit for 10–15 seconds, then wipe away with a clean, damp cloth.
Pro tip: Test the alcohol on a small, inconspicuous part of the end cap first (like the back) to make sure it doesn't cause discoloration. Most plastic end caps are alcohol-resistant, but it's better to be safe!
Step 5: Thorough Drying
Water spots are the enemy of a clean end cap, so drying is just as important as cleaning. Use a dry microfiber towel to wipe the end cap thoroughly, removing all moisture. Pay extra attention to crevices and edges, where water can hide. If you removed the end cap, set it on a clean towel to air-dry for 5–10 minutes before reinstalling—this ensures no moisture gets trapped between the end cap and the profile.
If you cleaned the end cap in place, use the dry towel to wipe the surrounding area of the aluminum profile, too. Moisture left on the profile can lead to corrosion, so take your time here.
Step 6: Reinstall and Inspect
If you removed the end cap, it's time to put it back on. Align it with the open end of the 4040 aluminum profile, making sure it's centered, then press firmly around the edges until it clicks into place. It should fit snugly—if it feels loose, check for dirt or debris on the profile end (you might need to clean that, too) or inspect the end cap for cracks (a cracked end cap won't stay in place and should be replaced).
Once the end cap is back on, give it a final inspection. Run your finger along the edges to ensure it's secure, and wipe away any fingerprints you might have left during reinstallation. Stand back and admire your handiwork—the end cap should look clean, shiny, and ready to protect your profile for another round of hard work.
Maintenance Best Practices: Keeping End Caps in Top Shape
Cleaning is important, but regular maintenance is what will keep your 4040 aluminum profile end caps (and your entire aluminum setup) in great condition long-term. Here are some habits to adopt:
Stick to a Cleaning Schedule
How often you clean your end caps depends on the environment. A workshop with heavy dust or oil will need more frequent cleaning than an office-based setup. As a general rule:
- Weekly: Do a quick dry wipe with a microfiber cloth to remove surface dust. This takes 30 seconds per end cap and prevents buildup.
- Monthly: Do a full wet cleaning with detergent, especially if the end caps look dull or sticky.
- Quarterly: Remove the end caps (if possible) to clean the inside of the profile ends and inspect for corrosion or debris. This is also a good time to check the end caps themselves for cracks or wear.
Inspect for Damage Regularly
During your weekly wipe-down, take a moment to inspect each end cap. Look for:
- Cracks or chips: Even small cracks can let moisture in or cause the end cap to fall off. replace cracked end caps immediately—they're inexpensive and easy to find at aluminum profile suppliers.
- Looseness: If an end cap wiggles or falls off easily, it may be worn out or the profile end may be damaged. Clean the profile end and try reinstalling; if it still won't stay, replace the end cap.
- Discoloration: Yellowing or dark spots could be a sign of chemical exposure (like harsh cleaners) or UV damage (if the setup is near a window). If discoloration is severe, replace the end cap to maintain a uniform look.
Use Compatible Aluminum Profile Accessories
When replacing end caps, always choose ones designed for 4040 aluminum profiles. Generic or ill-fitting end caps won't seal the profile properly and may fall off. Look for end caps made from durable materials like ABS plastic or nylon—these are resistant to impact and chemicals, making them ideal for industrial settings. You can find these at most aluminum profile suppliers, often alongside other aluminum profile accessories like brackets and connectors.
Avoid Harsh Chemicals and Abrasives
We mentioned this earlier, but it's worth repeating: never use abrasive tools (steel wool, scouring pads) or harsh chemicals (bleach, acetone, ammonia) on end caps or aluminum profiles. These can scratch, discolor, or weaken the materials. Stick to mild detergent, water, and isopropyl alcohol for tough stains—they're effective and safe.
Protect End Caps During Setup Changes
If you're reconfiguring your aluminum setup—adding shelves, moving a workbench, or disassembling a rack—be careful with the end caps. They can get knocked off or cracked during heavy lifting or shifting. Remove end caps before moving large structures, and store them in a safe place (like a small box) to avoid losing them. When reassembling, double-check that all end caps are reinstalled securely.
Troubleshooting Common End Cap Issues
Even with regular cleaning and maintenance, you might run into a few common issues with your 4040 aluminum profile end caps. Here's how to solve them:
Issue: End Cap Sticks or Is Hard to Remove
Cause: Dirt or debris has built up between the end cap and the profile, acting like glue. Over time, this can make the end cap stick fast.
Solution: Use a soft-bristled brush to gently loosen the dirt around the edges of the end cap. Then, spray a small amount of isopropyl alcohol into the gap (from a distance) to dissolve any sticky residue. Let it sit for 1–2 minutes, then use a flathead screwdriver wrapped in cloth to carefully pry the end cap off. Clean both the end cap and the profile end before reinstalling.
Issue: End Cap Discoloration (Yellowing or Dark Spots)
Cause: Exposure to UV light, oils, or chemicals (like engine oil or cleaning solvents) can discolor plastic end caps over time.
Solution: For mild discoloration, try cleaning with a paste of baking soda and water (gentle enough to avoid scratching). Apply the paste with a soft cloth, rub gently, then rinse and dry. If the discoloration is severe, replace the end cap—new ones are affordable and will make the setup look fresh.
Issue: End Cap Won't Stay On
Cause: The end cap may be cracked, the profile end may be bent or damaged, or there's debris preventing a snug fit.
Solution: First, inspect the end cap for cracks—if it's cracked, replace it. If the end cap is intact, check the profile end for dents or bends (use a rubber mallet to gently straighten minor dents). Clean the profile end thoroughly with alcohol to remove any oil or debris, then reinstall the end cap. If it still won't stay, try a new end cap—sometimes the tabs that hold it in place wear out, even if the cap looks fine.
Issue: Corrosion Inside the Profile
Cause: Moisture got inside the profile, likely because an end cap was missing or loose for an extended period.
Solution: Remove the end caps and use a dry cloth or cotton swab to wipe out any visible corrosion. If the corrosion is light, you can clean the inside with a cloth dampened with alcohol, then dry thoroughly. For heavy corrosion, you may need to replace the profile section—corroded aluminum weakens the structure, which can be unsafe. To prevent this in the future, ensure all end caps are secure and clean regularly.
Maintenance Schedule Table: A Quick Reference
| Maintenance Task | Frequency | Tools Needed | Notes |
|---|---|---|---|
| Dust end caps with dry cloth | Weekly | Microfiber cloth | Focus on high-dust areas (near fans, open windows) |
| Wet cleaning with detergent | Monthly | Detergent, water, soft cloth, soft brush | Avoid excess water on in-place end caps |
| Inspect for cracks/looseness | Monthly | Your eyes, finger (to test snugness) | replace cracked or loose end caps immediately |
| Deep clean profile ends (remove end caps) | Quarterly | Same as wet cleaning + screwdriver (to remove caps) | Check for corrosion inside profiles |
| replace worn/damaged end caps | As needed | New end caps (compatible with 4040 profiles) | Buy spares to avoid delays—aluminum profile suppliers often stock them |
Conclusion: Small Efforts, Big Results
Cleaning and maintaining 4040 aluminum profile end caps might seem like a small task, but it's one that pays off in big ways. By taking the time to wipe away dust, remove grime, and inspect for damage, you're protecting your aluminum profiles from corrosion, ensuring your setup stays functional, and keeping your workspace looking professional. These small components play a critical role in the longevity of your aluminum structures—whether it's a lean pipe workbench, a material rack, or a custom assembly line.
Remember, the key is consistency. A quick weekly wipe-down takes almost no time, but it prevents dirt from building up and becoming a bigger problem. And when it's time for a deeper clean, the tools and steps we've outlined are simple and effective. By following these best practices, you'll extend the life of your aluminum profiles, reduce the need for costly repairs, and keep your workspace safe and efficient.
So the next time you walk past your aluminum setup, take a second to look at those end caps. Give them a quick wipe, check for cracks, and appreciate the job they're doing. Your future self (and your aluminum profiles) will thank you.