- Company Articles
- Products and Technology
- Installation And Maintenance
- How to Clean Aluminum Workbench B: Removing Grease, Dust, and Manufacturing Residues

How to Clean Aluminum Workbench B: Removing Grease, Dust, and Manufacturing Residues
Related Product
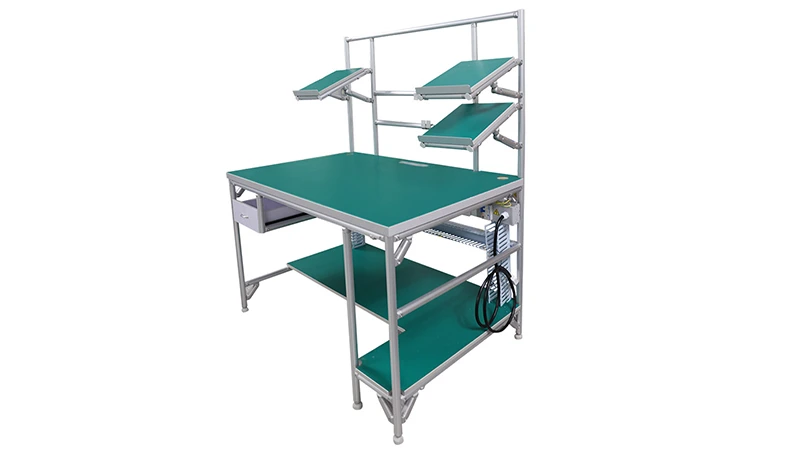
Aluminum Workbench B
Aluminum tube workbench is more flexible and durable, compared with traditional PE/ABS coated steel tube. It is easy to assemble, anti corrosion, rust protection, and recycle use after disassemble.
Walk into any workshop, and the first thing that catches your eye (after the hum of machinery) is usually the workbench. It's where ideas turn into prototypes, where parts get assembled, where tools rest between tasks. But if that workbench is smudged with grease, dust caked in its corners, and manufacturing residues clinging to its edges? Suddenly, it's not just a surface—it's a silent roadblock. I've seen it too many times: a team excited to tackle a project, only to lose momentum because their aluminum workbench b feels more like a (oily) obstacle than a partner in productivity. The good news? Cleaning it doesn't have to be a chore. With a little know-how and the right approach, you can turn that grimy workbench into a spotless, shining centerpiece of your workspace. Let's dive in.
Why Aluminum Workbench B Deserves Extra Care
First, let's talk about what makes aluminum workbench b unique. Unlike wooden benches that absorb spills or steel ones prone to rust, aluminum brings durability and lightweight convenience to the table. Its smooth, non-porous surface should repel messes—so why does it still get so dirty? Blame the workshop environment. Grease from tools, dust carried by air vents, and sticky residues left over from manufacturing (like protective films or metal shavings) all love to settle in. And here's the kicker: aluminum might be tough, but neglecting its cleanliness can lead to bigger issues. Grease buildup can corrode the surface over time; dust in crevices around aluminum pipe accessories can wear down moving parts; even leftover adhesive from manufacturing can trap moisture, leading to unsightly spots. In short, a clean workbench isn't just about looks—it's about protecting your investment and keeping your workflow smooth.
Prep Work: Gather Your Tools (and Your Patience)
Before you grab a sponge and start scrubbing, let's get organized. Rushing into cleaning often leads to missed spots or, worse, accidental scratches on that sleek aluminum profile. Here's what you'll need:
- Soft-bristle brush (think old toothbrush or a small paintbrush—stiff bristles will scratch the aluminum).
- Microfiber cloths (lint-free is key—paper towels leave behind fuzz).
- Mild dish soap (avoid anything with bleach or abrasive additives).
- Degreaser (go for a citrus-based one if possible—it's gentler on aluminum and smells better than industrial solvents).
- Isopropyl alcohol (70% or higher works best for sticky residues).
- Non-abrasive sponge (the kind with a soft side—save the scouring pad for your sink).
- Cotton swabs (for tight spots like lean pipe joints).
- Bucket of warm water (not hot—extreme heat can warp aluminum over time).
- Lint-free towel (for drying—microfiber works here too).
Pro tip: Clear the workbench first. Remove tools, parts, and any aluminum pipe accessories that aren't permanently attached. I once tried cleaning around a half-assembled fixture and ended up smearing grease onto a brand-new component—lesson learned. Take 5 minutes to relocate items to a temporary surface; your future self (and your project) will thank you.

The Enemy: What You're Actually Cleaning (and Why It Matters)
Not all messes are created equal. Grease, dust, and manufacturing residues each have their own quirks, and treating them the same way is a recipe for frustration. Let's break them down:
| Residue Type | What It Looks Like | Common Causes | Why It's a Problem |
|---|---|---|---|
| Grease/Oil | Sticky, often yellowish or brownish smudges; may feel tacky to the touch. | Tool lubricants, machine leaks, fingerprints with oil from hands. | Attracts dust (creating a grimy paste), can corrode aluminum over time, and makes tools slip during use. |
| Dust | Fine, dry particles; visible in corners or when wiped with a cloth. | Airflow from vents, open windows, or debris from cutting/grinding nearby. | Gets trapped in crevices (like around lean pipe joints), wears down moving parts, and looks unprofessional. |
| Manufacturing Residues | Adhesive film (clear or cloudy), metal shavings, or leftover protective coatings. | From the factory—protective films to prevent scratches during shipping, metal debris from cutting aluminum profile, or glue from assembly. | Adhesive can trap moisture; shavings can scratch surfaces; leftover film looks unpolished and traps dirt. |
Now that you know your enemy, let's fight back—step by step.

Step 1: Dry Dusting—Start with the Basics
Dust might seem harmless, but it's the foundation of all workbench grime. Let it build up, and it mixes with grease or moisture to form a paste that's twice as hard to remove. So grab your soft-bristle brush or microfiber cloth and start here:
Top to bottom, left to right. This might sound like a cleaning cliché, but it works. Start at the highest point of the workbench (like the back edge or any mounted aluminum pipe accessories) and brush downward. Dust falls, so you don't want to clean a lower section only to have dust from above rain down on it. I learned this the hard way after spending 10 minutes wiping the front edge, only to brush the top and watch dust cascade onto my "clean" area. Oops.
Pay attention to crevices. Aluminum workbench b is built with precision, which means it has plenty of nooks and crannies. The corners where the aluminum profile meets the tabletop, the gaps around lean pipe joints, and the spaces between attached aluminum pipe accessories—these are dust magnets. Use the brush to gently dislodge dust, or wrap a microfiber cloth around your finger to reach tight spots. For extra-stubborn dust in lean pipe joints, a dry cotton swab works wonders—twist it slightly as you pull it out to collect all the debris.
Don't forget the legs. It's easy to focus on the tabletop, but the legs of your aluminum workbench b collect dust too—especially if they're near the floor or in a high-traffic area. A quick wipe with your cloth here prevents dust from being kicked up and re-settling on your clean surface later.
Step 2: Degreasing—Tackle the Sticky Stuff
Grease is the bane of any workbench owner's existence. It's invisible at first, then suddenly—*poof*—there's a giant smudge where you set your wrench. The key to degreasing is to break down the oil without scratching the aluminum. Here's how:
Test your cleaner first. Not all degreasers are aluminum-friendly. Grab a hidden spot (like the bottom of the workbench or the back of a leg) and apply a small amount of degreaser. Let it sit for 5 minutes, then wipe it off. If there's no discoloration or dulling, you're good to go. If you're using dish soap (a budget-friendly alternative), mix 1-2 teaspoons with warm water in a bucket—no need for suds; a mild solution works better than a frothy one.
Apply, wait, then scrub (gently). Dip your microfiber cloth into the degreaser or soapy water and wring it out—you want it damp, not dripping. Wipe the greasy areas in small, circular motions, making sure to cover the entire spot. Then, here's the secret: let it sit. Grease needs time to break down—5-10 minutes should do it. I once rushed this step and ended up scrubbing for 20 minutes; patience pays off. After waiting, take your non-abrasive sponge (soft side!) and gently scrub the area. The grease should lift easily—if it doesn't, apply a bit more degreaser and wait another 5 minutes.
Rinse and dry immediately. Once the grease is gone, dampen a clean microfiber cloth with plain water and wipe the area to remove any leftover cleaner. Then, dry it right away with a lint-free towel. Aluminum loves to show water spots, so don't let it air-dry—those spots will turn into stubborn marks that take extra effort to remove later.
Step 3: Banish Manufacturing Residues for Good
New workbench? Or maybe one that's been in storage? Chances are, it still has leftover residues from manufacturing. These can be tricky—adhesive films, metal shavings, or even bits of protective coating that didn't come off during unboxing. Let's tackle them one by one:
Adhesive residues (the sticky, clear kind). These are usually from protective stickers or tapes applied at the factory. Grab your isopropyl alcohol and a microfiber cloth. Soak a corner of the cloth with alcohol (don't drench it—you don't want it dripping into aluminum pipe accessories) and press it onto the residue. Let it sit for 30 seconds to 1 minute—this dissolves the adhesive. Then, gently rub the area in a circular motion. The residue should peel away; if it's stubborn, use a plastic scraper (like an old credit card) to lift the edge, then wipe again with alcohol. Avoid metal scrapers—they'll scratch the aluminum profile.
Metal shavings (tiny, sharp, and annoying). These are leftover from cutting or drilling the aluminum profile during manufacturing. They're small, but they can scratch the surface if you rub them around. Start with a dry soft brush—sweep the shavings into a pile, then use a piece of tape (sticky side out) to pick them up. For extra-fine shavings that the brush misses, try a magnet (the kind from your fridge works in a pinch!). Run it gently over the surface, and the shavings will cling to it. Just be careful not to drag the magnet—lift it slowly to avoid scratching.
Protective film remnants (cloudy or streaky). Some aluminum workbenches come with a thin plastic film to prevent scratches during shipping. If it didn't peel off cleanly, you're left with a sticky, cloudy mess. Warm soapy water is your friend here. Dip a cloth in warm (not hot) soapy water and lay it over the film for 2-3 minutes—the moisture softens the adhesive. Then, slowly peel the film back, pulling at a 45-degree angle. If it tears, apply more soapy water to the remaining piece and repeat. Once the film is off, wipe the area with a clean, damp cloth to remove any leftover adhesive, then dry immediately.
Step 4: Deep Clean the Hard-to-Reach Spots
By now, the main surface of your aluminum workbench b should be looking pretty good—but the real test is in the details. The edges of the aluminum profile, the lean pipe joints, and the nooks around aluminum pipe accessories are where dust and grime hide. Let's make sure they're spotless:
Aluminum profile edges. The edges of the aluminum profile are often slightly raised or beveled, creating tiny grooves that trap dust. Take a cotton swab, dampen it with a little isopropyl alcohol, and run it along the edge. Twist the swab as you go to collect debris—you'll be surprised how much gunk comes out. For longer edges, use multiple swabs—no need to reuse a dirty one.
Lean pipe joints. If your workbench has lean pipe joints (the connectors that hold the frame together), they're probably covered in dust or even a little grease. A soft toothbrush (old, clean one!) works best here. Dip the brush in warm soapy water, shake off excess, and gently scrub around the joint. The bristles will reach into the crevices, dislodging dust. Wipe away the loosened grime with a damp cloth, then dry with a towel.
Aluminum pipe accessories. Things like tool holders, shelf brackets, or small bins attached to the workbench are prime spots for buildup. If they're detachable (most aluminum pipe accessories are, thanks to their modular design), take them off and clean them separately. Soak them in warm soapy water for 10 minutes, then scrub with a sponge and rinse. For non-detachable accessories, use a cotton swab or toothbrush to clean around their bases—this prevents dust from building up and making them hard to adjust later.
Step 5: Dry, Polish, and Protect
You're almost done! Now it's time to dry thoroughly and add a little shine (optional, but satisfying). Grab your lint-free towel and go over the entire workbench, paying extra attention to corners and crevices where water might pool. If you notice any water spots, dampen a cloth with a tiny bit of isopropyl alcohol and rub them gently—they should disappear.
For an extra shine (and a protective layer), consider using an aluminum polish. Apply a small amount to a clean microfiber cloth and rub it into the surface in circular motions. Let it sit for 1-2 minutes, then buff it off with another clean cloth. The result? A mirror-like finish that repels dust and makes future cleanups easier. Just remember to test the polish on a hidden spot first—some polishes can darken aluminum slightly, and you don't want any surprises on your main surface.
Maintenance: Keep It Clean (Without the Hassle)
Cleaning your aluminum workbench b is one thing—keeping it clean is another. But it doesn't have to take hours. Here are a few habits that'll keep your workbench looking fresh:
- Wipe down daily. Spend 30 seconds at the end of each shift wiping the surface with a dry microfiber cloth. This catches dust before it settles and prevents grease from building up.
- Deal with spills immediately. If you spill oil, coolant, or any liquid, wipe it up right away. The longer it sits, the harder it is to remove.
- Inspect monthly. Once a month, take 5 minutes to check for loose lean pipe joints or aluminum pipe accessories. Tighten them if needed—but clean around them first! Dust trapped under a joint can wear down the threads over time.
- Avoid harsh chemicals. Bleach, ammonia, and abrasive cleaners (like steel wool or scouring pads) can scratch or discolor aluminum. Stick to mild soap, degreaser, and isopropyl alcohol.
Troubleshooting: When Things Go Wrong (and How to Fix Them)
Even with the best intentions, cleaning can hit a snag. Here are a few common issues and how to solve them:
Stubborn grease stains that won't budge. If degreaser alone isn't working, mix a paste of baking soda and water (1:1 ratio) and apply it to the stain. Let it sit for 15 minutes, then scrub gently with a soft sponge. Baking soda is a mild abrasive that breaks down tough grease without scratching aluminum.
Water spots that just won't disappear. Mix equal parts white vinegar and water in a spray bottle, spritz the spots, and let sit for 5 minutes. Wipe with a microfiber cloth, then dry. The vinegar's acidity dissolves mineral deposits in the water spots.
Scratches from overzealous scrubbing. Oops—we've all been there. For light scratches, try using 0000-grade steel wool (the finest available). Rub it gently over the scratch in the direction of the grain (aluminum has a subtle grain—follow it to avoid making the scratch worse). Then, apply a small amount of aluminum polish and buff to blend the area.
Final Thoughts: A Clean Workbench, a Clear Mind
At the end of the day, cleaning your aluminum workbench b isn't just about aesthetics. It's about respect—for your tools, your projects, and the work you do. I'll never forget the time I spent an afternoon deep-cleaning a neglected workbench in our shop. When I finished, the team kept stopping by to stare—"Is that the same bench?" they asked. That week, we finished our project a day early. Coincidence? Maybe. But I like to think that a clean, organized space cleared our heads as much as it cleared the bench.
So grab your brush, your cloth, and a little patience. Your aluminum workbench b isn't just a piece of equipment—it's the heart of your workshop. Treat it well, and it'll return the favor, project after project.