- Company Articles
- Products and Technology
- Installation And Maintenance
- How to Clean & Lubricate One Way Rotatory Straight Lean Pipe Joints

How to Clean & Lubricate One Way Rotatory Straight Lean Pipe Joints
Related Product
One Way Rotatory Straight Lean Pipe Joint
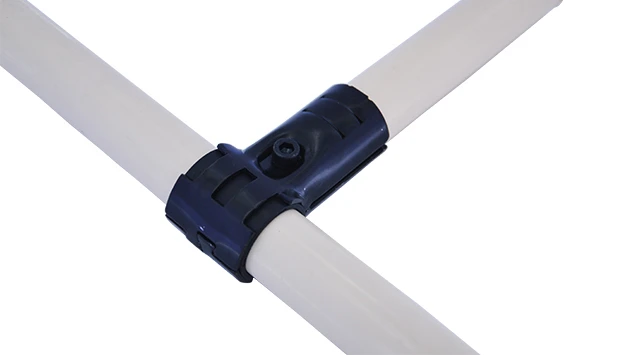
Two way lean pipe joint for 2 pcs 28MM lean pipe connection in straight angle with rotatory fucntion, which used widely in workbench, flow rack, hand trolley frame connection.
The Unsung Hero of Your Lean System: Why This Joint Matters
Let's start with a scenario we've all lived (or cringed) through: It's a busy Tuesday on the production floor. Your team is halfway through a tight order, and the assembly line is humming—until it isn't. A faint squeak turns into a grinding noise, and suddenly, the flow of materials along your workbench grinds to a halt. You kneel down, follow the sound, and there it is: a small, shiny component where two lean pipes meet, seized up like a rusted gate hinge. That, my friend, is a one way rotatory straight lean pipe joint. And in that moment, you realize just how much your entire operation relies on these tiny, hardworking parts.
In the world of lean manufacturing, every second counts. A lean system thrives on efficiency—eliminating waste, streamlining workflows, and keeping production assemble lines moving like well-choreographed dances. But here's the thing: even the most sophisticated lean setup can fall apart if the small stuff is neglected. And these joints? They're the "small stuff" that holds everything together. Literally.
Think about it: Your flow racks, workbenches, and turnover trolleys all depend on these joints to connect lean pipes, allow smooth rotation, and maintain structural stability. A one way rotatory straight lean pipe joint isn't just a connector—it's a precision tool. It's designed to let pipes rotate in one direction (hence "one way") while staying locked firm in the other, ensuring materials glide where they need to go without slipping backward. When it's working right, you don't notice it. But when it's dirty, dry, or damaged? It becomes the bottleneck that turns a productive day into a frustrating one.
I've spent years working with manufacturers, from small workshops to large-scale facilities, and I've seen firsthand how overlooked maintenance on these joints leads to bigger problems. A stuck joint might slow down a single workstation today, but tomorrow, that could mean missed deadlines, overtime costs, or even damaged products. And let's not forget the human cost: a squeaky, unreliable line demotivates teams, making even routine tasks feel like a struggle.
The good news? Keeping these joints in top shape isn't rocket science. It just takes a little know-how, some basic tools, and a commitment to regular care. In this guide, we're going to walk through exactly how to clean and lubricate your one way rotatory straight lean pipe joints—step by step, no jargon, just practical advice that'll keep your lean system running smoother than ever. Because when these little heroes are happy, your whole operation is happy.
First Things First: Know Your Joint
Before we dive into cleaning and lubricating, let's make sure we're all on the same page about what a one way rotatory straight lean pipe joint actually is. Picture a small, often chrome-plated connector (you might see "one way rotatory straight lean pipe joint chrome" in supplier catalogs) with a cylindrical body, a rotating collar, and internal components that allow it to pivot in one direction while resisting movement in the other. It's the kind of part that, if you saw it on a shelf, you might dismiss as "just a metal widget." But up close, it's a marvel of simplicity—designed to handle repeated motion, support weight, and stand up to the daily grind of a production environment.
These joints are typically made from high-strength steel with a chrome finish (hence the "chrome" in the name) to resist corrosion and wear. Inside, you'll find a spring-loaded mechanism or a series of ball bearings that create that "one way" action. When you rotate the joint in its allowed direction, it moves smoothly; try to twist it backward, and it locks into place, keeping your structure stable. This is critical for applications like flow racks, where materials need to slide forward without slipping back, or workbenches where tools or components are positioned at specific angles.
Now, why do they fail? Let's break it down. Over time, two main enemies attack these joints: contamination and dryness . Contamination comes in many forms: metal shavings from nearby cutting operations, dust from the air, oil leaks from machinery, even fingerprints (yes, the oils from your skin can attract dirt). These particles work their way into the joint's internal mechanisms, acting like sandpaper every time it rotates. Dryness, on the other hand, happens when the lubricant that keeps the moving parts sliding smoothly wears off or gets washed away. Without it, metal rubs against metal, causing friction, heat, and eventually, seizing.
Here's a pro tip: Take a minute today to inspect a few of these joints on your equipment. Run your finger along the chrome surface—do you feel grit? Try rotating it; does it move freely, or is there resistance? If you hear a squeak or feel a catch, that's your joint screaming for help. The good news is, with a little cleaning and lubrication, you can bring it back to life. And the even better news? Doing this regularly will extend its lifespan by years, saving you the hassle (and cost) of replacing it.

Gearing Up: Tools You'll Need (No Fancy Equipment Required)
You don't need a fully stocked industrial workshop to care for these joints. In fact, most of the tools you'll need are probably already in your maintenance closet or even your kitchen drawer. Let's round them up:
- Microfiber cloths : These are a must. Avoid paper towels—they leave lint behind, which is just more contamination. Microfiber is gentle, lint-free, and great for trapping dust and grime.
- Soft-bristled brush : Think an old toothbrush (make sure it's clean!) or a small paintbrush. You'll use this to dislodge stubborn debris from crevices without scratching the chrome finish.
- Degreaser : Look for a mild, non-corrosive degreaser (avoid harsh solvents like acetone, which can damage the chrome). A citrus-based degreaser works well—effective on oil and gentle on metal.
- Lubricant : Not just any oil! You need a lightweight, high-quality lubricant designed for moving parts. Lithium-based grease or a dry film lubricant (like Teflon spray) are excellent choices. Avoid WD-40 as a long-term lubricant—it's more of a cleaner; it will dry out quickly and leave residue.
- Small container : For soaking the brush or applying degreaser (a disposable cup works fine).
- Toothpicks or wooden skewers : These are perfect for gently prying out stuck debris from tight spaces without scratching metal.
- Gloves : Nitrile or latex gloves to protect your hands from degreaser and keep fingerprints off the clean joint.
- Flashlight : To peer into the joint's nooks and crannies—you'd be surprised how much gunk hides in the shadows.
Optional extras? If you're dealing with heavily corroded joints (we'll cover that later), a small wire brush (very soft bristles!) or a can of compressed air (to blow out dust) might come in handy. But for 90% of cases, the list above is all you need. The key here is to keep it simple—no need to overcomplicate things. This is maintenance, not brain surgery.

Step-by-Step Cleaning: Giving Your Joint a Fresh Start
Now, let's get our hands dirty (and then clean again). Cleaning a one way rotatory straight lean pipe joint is like giving it a spa day—remove the grime, unclog the pores, and leave it refreshed. Follow these steps, and you'll be shocked at how much smoother it moves afterward.
Step 1: Safety First—Disconnect and Secure
Before you start, always make sure the joint is not under load. If it's part of a flow rack holding materials, empty the rack. If it's on a workbench, clear the area. You don't want parts shifting or falling while you're working. If the joint is easily removable (some are secured with set screws or bolts), consider taking it off the structure entirely—it'll make cleaning easier. If not, just make sure the surrounding area is clear of tools, materials, or bystanders who might bump into you.
Step 2: Dry Brush to Remove Loose Debris
Grab your soft-bristled brush and gently sweep the outside of the joint. Focus on the crevices where the joint meets the pipe and around the rotating collar. You're not trying to scrub yet—just loosen and remove any loose dust, dirt, or metal shavings. Imagine you're brushing a delicate pastry; you want to dislodge crumbs without pressing too hard. A toothbrush works great here for tight spots.
Step 3: Degrease the Exterior
Dampen a microfiber cloth with degreaser (don't soak it—you don't want drips). Wipe down the entire exterior of the joint, paying extra attention to areas with visible oil or grease buildup. Chrome finishes show fingerprints and smudges easily, so take your time here. If there's a stubborn spot, let the degreaser sit for 30 seconds, then wipe again. Avoid getting degreaser into the joint's moving parts just yet—we'll tackle that next.
Step 4: Target the Moving Mechanism
Now, the tricky part: cleaning the inside. Dip your brush into the degreaser (or spray a small amount directly onto the brush—be careful not to overdo it). Gently insert the brush into the gap between the rotating collar and the fixed base of the joint. Rotate the joint slowly in its allowed direction as you brush—this will help work the degreaser into the internal components. You might see black or brown gunk coming out—that's a good sign! Keep brushing and rotating until the brush comes out clean.
For really tight spaces, use a toothpick or wooden skewer wrapped in a microfiber cloth (to avoid scratching) to gently scrape out debris. Think of it like flossing—you're getting into the tiny spaces a brush can't reach. If you have compressed air, a quick blast (from a few inches away) can help blow out loosened particles, but be careful not to blow debris into other parts of the joint.
Step 5: Wipe and Dry Thoroughly
Once you're satisfied the joint is clean, take a fresh microfiber cloth and wipe away all traces of degreaser. Any leftover degreaser can mix with lubricant later and reduce its effectiveness. Pay special attention to the rotating surfaces—you want them to feel smooth and dry to the touch. If you removed the joint, set it aside on a clean cloth to air-dry for 5–10 minutes (moisture and metal don't mix well, even with chrome).
Pro move: After drying, rotate the joint a few times by hand. You should feel it moving more freely already—though it might still feel a bit "dry" (we'll fix that in the next step).
Lubrication 101: Keeping It Smooth for the Long Haul
Cleaning removes the gunk, but lubrication is what keeps the joint moving smoothly for months to come. Think of it like adding oil to a bicycle chain—without it, you get friction, noise, and wear. But here's the secret: how you lubricate matters just as much as what you use. Too little, and it dries out; too much, and it attracts dirt like a magnet. Let's do this right.
Step 1: Choose the Right Lubricant (Yes, It Matters)
Earlier, we mentioned lithium-based grease or dry film lubricant. Let's dive deeper. Lithium grease is a classic choice—it's water-resistant, temperature-stable, and sticks well to metal. It's ideal for joints that see heavy use or are exposed to moisture. Dry film lubricants (like those with Teflon or molybdenum disulfide) are better for clean environments (think electronics assembly) where oil or grease might attract dust or contaminate products. They dry to a thin, invisible film that reduces friction without the mess.
Avoid these common mistakes: Using motor oil (too thick, attracts dirt), cooking oil (spoils and gums up), or WD-40 as a lubricant (it's a solvent, not a lube—use it to clean, not to protect). When in doubt, check the joint's manufacturer specs—they often recommend a specific type.
Step 2: Apply Lubricant Sparingly
Less is more here. For lithium grease, apply a tiny amount (about the size of a pea) to the joint's moving surfaces. Use a toothpick or a gloved finger to work it into the gap between the rotating collar and the base. For spray lubricants, hold the can 6–8 inches away and give it a quick, 1-second burst—any more, and you'll have excess running down the pipe.
The goal is to coat the internal mechanisms (bearings, springs, contact points) without leaving a messy residue. If you see excess lubricant oozing out, wipe it away with a clean microfiber cloth—you don't want it dripping onto your workbench or attracting dust.
Step 3: Work the Lubricant In
Now, rotate the joint back and forth (in its allowed direction) 10–15 times. This spreads the lubricant evenly across all internal surfaces, ensuring every moving part is coated. You should feel it get smoother with each rotation—like a stiff door hinge loosening up after a drop of oil. If you hear any squeaks or feel resistance, stop and check: Did you miss a spot? Is there still debris inside? If it's still not smooth, you might need to repeat the cleaning step (sometimes a second pass removes stubborn gunk).
Step 4: Wipe Away Excess (Again!)
After working the lubricant in, take another clean microfiber cloth and wipe the exterior of the joint. Even if you applied sparingly, some lubricant might have migrated to the surface. A clean exterior prevents dust from sticking and keeps your lean system looking (and working) professional.
If you removed the joint earlier, now's the time to reattach it. Tighten any set screws or bolts to the manufacturer's recommended torque—over-tightening can damage the joint or restrict movement.
Troubleshooting: When "Stuck" Becomes "Serious"
Sometimes, even after cleaning and lubricating, a joint might still act up. Let's troubleshoot the most common issues and how to fix them:
Issue 1: The Joint Still Won't Rotate
If it's completely seized, there might be rust or a bent internal component. Try soaking the joint in degreaser for 30 minutes (if removable) to dissolve rust, then gently tap the joint with a rubber mallet (don't use a metal hammer—you'll damage it) while rotating. If that doesn't work, it might be time to replace it. Remember: A stuck joint is a safety hazard—don't force it.
Issue 2: It Rotates Both Ways (Losing the "One Way" Lock)
This means the internal locking mechanism (spring, ball bearings) is worn or broken. Unfortunately, this isn't fixable with cleaning or lubrication—you'll need to replace the joint. Check with your lean pipe supplier for a replacement; most carry these joints as standard lean pipe accessories.
Issue 3: Excessive Play or Wobble
If the joint feels loose or wobbly, check the connection to the lean pipe. It might be that the pipe is bent, or the joint's set screw (if it has one) is loose. Tighten the set screw with a hex key—if that doesn't help, the joint's internal threads might be stripped, requiring replacement.
Preventive Maintenance: Making It a Habit, Not a Chore
Here's the golden rule of maintenance: It's always cheaper to prevent a problem than to fix one. A little regular care for your one way rotatory straight lean pipe joints will save you time, money, and headaches down the line. Let's create a schedule that works for your operation.
How Often Should You Clean and Lubricate?
It depends on usage. A joint on a high-traffic flow rack that moves materials 100+ times a day needs more love than one on a rarely used storage shelf. Use this guide to tailor your schedule:
| Usage Intensity | Cleaning Frequency | Lubrication Frequency | Quick Inspection (Daily) |
|---|---|---|---|
| High (e.g., main assembly line flow rack) | Weekly | Biweekly | Check for squeaks, looseness, or debris buildup |
| Medium (e.g., workbench used 3–5x/day) | Monthly | Monthly | Check for visible dirt or resistance when rotating |
| Low (e.g., storage rack, occasional use) | Quarterly | Quarterly | Visual check for rust or corrosion |
Involve Your Team: Eyes on the Line
Your frontline workers are the first to notice when something's off. Train your team to spot early warning signs: squeaking, resistance, or visible dirt on joints. Create a simple log (digital or paper) where they can note issues—this turns maintenance into a team effort, not just a "maintenance department" task. Trust me, when everyone feels responsible for keeping the line running, small problems get fixed before they become big ones.
Track It: The Power of a Maintenance Log
Keep a log for each critical joint (or group of joints). Note when you cleaned it, lubricated it, or replaced it. Over time, you'll spot patterns—maybe joints near a specific machine get dirtier faster, or a certain brand wears out quicker. This data helps you refine your process, order replacement lean pipe accessories proactively, and budget for upkeep.
Wrapping Up: Small Joints, Big Impact
As we wrap up, let's circle back to that scenario from the beginning. Imagine that same busy Tuesday, but this time, your one way rotatory straight lean pipe joints are clean, lubricated, and silent. The assembly line keeps moving, the order ships on time, and your team high-fives at the end of the day instead of sighing over a broken joint. That's the power of caring for the small stuff.
In the world of lean systems, efficiency isn't just about big machines or fancy software. It's about the details—the joints, the rollers, the little components that keep the wheels turning. By taking 10 minutes every week or month to clean and lubricate these joints, you're not just maintaining equipment—you're investing in your team's productivity, your company's bottom line, and the success of your production assemble goals.
So grab your microfiber cloth, your lubricant, and get started. Your lean system (and your future self) will thank you.