- Company Articles
- Products and Technology
- Installation And Maintenance
- How to Clean and Care for Aluminum Profile 3 Way Connectors

How to Clean and Care for Aluminum Profile 3 Way Connectors
Related Product
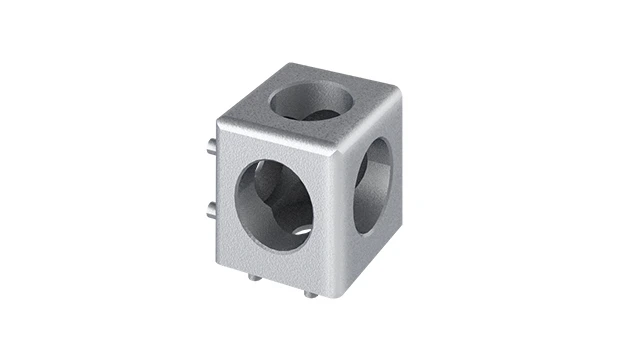
Aluminum Profile 3 Way Connector
The 3 way - squared corner connector is an external fastening method that is typically used to create a corner connection between three profiles. It is a heavy-duty connection that is simple to use and provides a polished look.
Introduction: The Unsung Heroes of Aluminum Profile Systems
If you've ever assembled an aluminum profile structure—whether it's a workbench, a material rack, or a custom production line—you know that the strength of the whole depends on the quality of its parts. Among these parts, aluminum profile 3 way connectors stand out as quiet workhorses. These small, often overlooked components are the linchpins that join aluminum profiles at critical junctions, enabling the creation of stable, multi-directional structures. From the simple workbench E (single deck-without caster) in a workshop to the complex material rack B (3 row and 3 floor) in a warehouse, aluminum profile 3 way connectors play a vital role in holding everything together.
But here's the thing: even the sturdiest connectors can underperform if they're not properly cleaned and maintained. Over time, dust, grease, moisture, and debris can build up on their surfaces, seep into their threads, and compromise their functionality. Loose connections, corroded parts, or stuck mechanisms aren't just minor inconveniences—they can lead to wobbly structures, safety hazards, and costly downtime. That's why learning how to care for these connectors isn't just about prolonging their lifespan; it's about ensuring the reliability and safety of the entire aluminum profile system they support.
In this guide, we'll walk you through everything you need to know about cleaning and maintaining aluminum profile 3 way connectors. We'll cover why care matters, the tools and materials you'll need, step-by-step cleaning instructions, maintenance best practices, troubleshooting common issues, and long-term care tips. Whether you're a seasoned facility manager, a DIY enthusiast, or someone new to aluminum profile systems, this article will help you keep your connectors—and your structures—in top shape.
Why Proper Care Matters: Beyond Just "Looking Clean"
You might be thinking, "Do I really need a whole guide for cleaning a small metal connector?" The short answer: yes. Aluminum profile 3 way connectors are more than just pieces of metal—they're precision-engineered components designed to distribute weight, absorb stress, and maintain structural integrity. When they're neglected, the consequences can ripple through your entire operation.
1. Preserving Structural Integrity
Aluminum profile systems rely on tight, secure connections to stay stable. Dirt and debris can act like tiny wedges between the connector and the profile, preventing a snug fit. Over time, this can cause bolts to loosen or threads to wear down, weakening the joint. In a material rack B (3 row and 3 floor), for example, a single loose connector could compromise the stability of the entire rack, putting stored materials at risk of falling. Regular cleaning ensures that connections remain tight and stress is evenly distributed across the structure.
2. Preventing Corrosion
Aluminum is naturally resistant to corrosion, thanks to its thin oxide layer. But when that layer is compromised by dirt, moisture, or chemicals, corrosion can take hold. White rust (a powdery, white substance) or pitting (small holes in the metal) are common signs of corrosion in aluminum connectors. Left unchecked, corrosion weakens the metal, making connectors brittle and prone to breaking. In high-moisture environments—like factories with steam or outdoor workshops—corrosion can accelerate quickly. Proper cleaning removes the substances that eat away at the oxide layer, keeping your connectors strong and rust-free.
3. Ensuring Smooth Adjustability
One of the biggest advantages of aluminum profile systems is their flexibility. Need to reconfigure a workbench? Adjust a shelf height? Aluminum profile 3 way connectors are designed to be disassembled and reassembled with ease— if they're well-maintained. Grime and dried grease can make connectors stick or seize up, turning a quick adjustment into a frustrating, time-consuming task. By keeping connectors clean, you preserve their ability to rotate, tighten, and release smoothly, maintaining the flexibility that makes aluminum profiles so versatile.
4. Saving Time and Money
Replacing a corroded or damaged connector might seem like a small expense, but those costs add up—especially if multiple connectors fail at once. Factor in downtime while structures are repaired or replaced, and the price tag grows even larger. Regular cleaning and maintenance are far more cost-effective than replacing parts or dealing with accidents. Think of it as an investment: a few minutes of care each month can extend the lifespan of your connectors by years, saving you from costly replacements and disruptions.
5. Safety First
At the end of the day, the most important reason to care for your aluminum profile 3 way connectors is safety. A loose connector on a workbench could cause tools to fall, injuring someone below. A weakened material rack B (3 row and 3 floor) could collapse, damaging inventory and endangering workers. By keeping connectors clean and well-maintained, you're not just protecting your equipment—you're protecting the people who use it every day.

Tools and Materials: What You'll Need to Get the Job Done
Cleaning and maintaining aluminum profile 3 way connectors doesn't require fancy or expensive tools, but having the right supplies on hand will make the process easier and more effective. Below is a list of essential tools and materials, along with why they're needed and how to use them.
| Tool/Material | Purpose | Tips for Use |
|---|---|---|
| Soft-bristle brush (toothbrush or small paintbrush) | Removing loose dirt, dust, and debris from crevices and threads | Use a toothbrush for small, tight spaces (like connector threads); a small paintbrush works well for larger surfaces. |
| Microfiber cloths | Wiping surfaces clean without scratching or leaving lint | Use separate cloths for dry dusting and wet cleaning to avoid spreading dirt. |
| Mild detergent (e.g., dish soap) | Cleaning grease and oil without damaging aluminum | Mix 1-2 teaspoons of detergent with warm water; avoid harsh chemicals like bleach or ammonia. |
| Isopropyl alcohol (70% or higher) | Degreasing and drying surfaces quickly | Use a cloth dampened with alcohol to wipe away stubborn grease; ideal for final cleaning before reassembly. |
| Distilled water | Rinsing soap residue without leaving mineral deposits | Tap water can leave spots; distilled water ensures a streak-free finish, especially important for polished aluminum. |
| Plastic bucket or basin | Holding cleaning solutions | Use a small bucket to avoid wasting water; label it for "aluminum cleaning only" to prevent chemical contamination. |
| Torque wrench or hex key set | Tightening or loosening connector bolts during disassembly/reassembly | Use the correct size hex key to avoid stripping bolts; refer to manufacturer specs for torque settings. |
| Anti-corrosion spray (aluminum-safe) | Protecting connectors from moisture and rust | Choose a spray specifically designed for aluminum (e.g., WD-40 Specialist Long-Term Corrosion Inhibitor); avoid oil-based sprays that attract dust. |
| Rubber gloves | Protecting hands from detergents and chemicals | Nitrile gloves are durable and resistant to most cleaning solutions; latex works too if you're not allergic. |
| Flashlight or headlamp | Inspecting hard-to-see areas for dirt or damage | Use to check threads, crevices, and hidden parts of the connector for signs of wear or corrosion. |
Optional extras: For heavily corroded connectors, you might need a non-abrasive aluminum cleaner (like Mothers Mag & Aluminum Polish) or a soft sponge. Avoid steel wool, wire brushes, or abrasive pads—these can scratch the aluminum surface and remove the protective oxide layer. If you're dealing with stuck bolts, a penetrating oil (like PB Blaster) can help loosen them, but use it sparingly and clean thoroughly afterward to avoid attracting dirt.

Step-by-Step Cleaning Guide: From Dusty to Like-New
Now that you have your tools and materials ready, let's walk through the process of cleaning aluminum profile 3 way connectors. This step-by-step guide applies to both connectors that are still installed in a structure and those that have been removed for maintenance. For installed connectors, you may need to work around the aluminum profiles, so take your time and be gentle to avoid disturbing the structure.
Step 1: Pre-Cleaning Inspection
Before you start cleaning, take a few minutes to inspect the connector. Use a flashlight to check for signs of damage, corrosion, or wear. Look for:
- Stripped or damaged threads (common if bolts were over-tightened)
- White rust, pitting, or discoloration (signs of corrosion)
- Bent or deformed parts (could indicate structural stress)
- Loose bolts or components (may need tightening after cleaning)
If you notice severe damage (like cracked metal or stripped threads beyond repair), it's best to replace the connector rather than clean it. For minor issues, cleaning and maintenance should suffice.
Step 2: Removing Loose Dirt and Debris
Start by using a soft-bristle brush to gently dislodge loose dirt, dust, and debris. Focus on crevices, threads, and the areas where the connector meets the aluminum profile. For example, if the connector has a bolt that screws into the profile, brush around the bolt head and the threading to remove any caked-on dust. A toothbrush works great for small, tight spaces, while a small paintbrush can sweep dust off larger surfaces.
If the connector is installed in a structure, be careful not to brush dirt into other parts of the system (like roller tracks or workbench surfaces). Wipe away dislodged dust with a dry microfiber cloth as you go to prevent it from resettling on the connector.
Step 3: Surface Cleaning with Mild Detergent
Next, it's time to tackle grease, oil, and stubborn grime. Fill a small bucket with warm water and add 1-2 teaspoons of mild dish soap, stirring until it's mixed well. Dip a microfiber cloth into the soapy water, wring it out so it's damp (not soaking), and gently wipe the connector's surfaces. Pay special attention to areas that come into contact with hands or tools, as these are often greasy.
For threaded parts or hard-to-reach areas, dip the soft-bristle brush into the soapy water and scrub gently. Avoid using excessive force—aluminum is a soft metal, and scrubbing too hard can scratch the surface or damage the oxide layer. If you're cleaning an installed connector, be careful not to let soapy water drip onto sensitive components (like electronic parts or bearings in roller tracks).
Step 4: Rinsing and Drying
After cleaning with soapy water, rinse the connector to remove any soap residue. If the connector is removed from the structure, you can rinse it under a gentle stream of distilled water. For installed connectors, dampen a clean microfiber cloth with distilled water and wipe away the soap. Soap residue can attract dust, so it's important to remove all traces.
Once rinsed, dry the connector immediately with a clean microfiber cloth. Pay extra attention to crevices and threads, as trapped moisture can lead to corrosion. For added thoroughness, you can use a cloth dampened with isopropyl alcohol to wipe the surfaces—alcohol evaporates quickly, ensuring no moisture is left behind. This step is especially important if you're cleaning connectors in a humid environment.
Step 5: Deep Cleaning for Stubborn Stains or Corrosion
If the connector has stubborn stains (like dried grease) or light corrosion (white rust), you may need to take extra steps. For grease, apply a small amount of isopropyl alcohol to a cloth and rub the stained area gently—the alcohol will dissolve the grease without damaging the aluminum. For light corrosion, mix a paste of baking soda and water (1:1 ratio) and apply it to the corroded area with a cloth. Let it sit for 5-10 minutes, then wipe it away with a damp cloth. Baking soda is a mild abrasive that will remove rust without scratching the metal.
For more severe corrosion (pitting or dark spots), you may need to use a commercial aluminum cleaner. Follow the manufacturer's instructions carefully, and test the cleaner on a small, inconspicuous area first to ensure it doesn't discolor the metal. After using a commercial cleaner, rinse thoroughly with distilled water and dry immediately.
Step 6: Reassembly and Testing (If Removed)
If you removed the connector from the structure for cleaning, now is the time to reassemble it. Before reattaching, inspect the aluminum profile for dirt or debris—wipe it clean with a microfiber cloth if needed. Apply a small amount of anti-corrosion spray to the connector's threads (if applicable) to prevent future rust. Then, reattach the connector using the torque wrench or hex key, tightening bolts to the manufacturer's recommended torque (usually printed on the connector or in the product manual).
Once reassembled, give the connector a gentle tug or shake to ensure it's secure. If it feels loose, check that the bolts are tight and the connector is aligned properly with the aluminum profile. For installed connectors that weren't removed, use the torque wrench to tighten any loose bolts—over time, vibration can cause bolts to loosen, so this is a good opportunity to double-check.
Maintenance Best Practices: Keeping Connectors in Top Shape Long-Term
Cleaning is just one part of caring for aluminum profile 3 way connectors. Regular maintenance ensures they continue to perform well over time. Below are key practices to incorporate into your routine.
1. Establish a Regular Inspection Schedule
How often you inspect and clean your connectors depends on how they're used. In high-traffic areas (like a busy workshop with a workbench E) or dusty environments (like a manufacturing floor), inspect connectors monthly. In low-use areas (like a storage rack), quarterly inspections should suffice. During inspections, check for loose bolts, signs of corrosion, and wear—catching issues early prevents them from becoming bigger problems.
2. Tighten Bolts Regularly
Vibration from daily use can cause connector bolts to loosen over time. During each inspection, use a torque wrench or hex key to tighten bolts to the manufacturer's specifications. Avoid over-tightening—this can strip threads or warp the connector. A good rule of thumb: tighten until you feel resistance, then give the bolt a quarter-turn more.
3. Lubricate Moving Parts (If Applicable)
Some aluminum profile 3 way connectors have moving parts (like swivel joints or adjustable angles). These parts benefit from occasional lubrication to keep them moving smoothly. Use a dry lubricant (like silicone spray) or a light machine oil—avoid heavy greases, which attract dust. Apply a small amount to the moving parts, then work the joint back and forth to distribute the lubricant evenly. Wipe away any excess to prevent dust buildup.
4. Protect Against Corrosion
Even with regular cleaning, aluminum connectors can be vulnerable to corrosion in humid or chemical-rich environments. To add an extra layer of protection, apply a thin coat of aluminum-safe anti-corrosion spray after cleaning. Hold the spray 6-8 inches from the connector and apply a light, even coat. Let it dry completely before reassembling—this will create a barrier against moisture and chemicals.
5. Store Spare Connectors Properly
If you keep spare aluminum profile 3 way connectors on hand, store them in a cool, dry place. Avoid leaving them in garages or basements where humidity is high, and don't stack heavy items on top of them—this can bend or deform the connectors. Consider storing them in a plastic container with a desiccant packet to absorb moisture. Label the container clearly so you can find the right connector when you need it.
Troubleshooting Common Issues: What to Do When Things Go Wrong
Even with the best care, aluminum profile 3 way connectors can run into problems. Below are common issues, how to identify them, and solutions to fix them.
Issue 1: Loose Connections Despite Tightening
Signs: The connector feels wobbly even after tightening the bolts; bolts loosen quickly after being tightened.
Causes: Stripped threads on the connector or aluminum profile; dirt or debris preventing a snug fit; worn or damaged connector parts.
Solution: First, check for dirt or debris—clean the connector and profile as described earlier. If threads are stripped, you may need to replace the connector or use a thread repair kit (like a helicoil insert) for minor damage. For worn parts, replace the connector—safety should never be compromised for a worn component.
Issue 2: Corrosion (White Rust or Pitting)
Signs: White, powdery substance on the surface (white rust); small holes or indentations (pitting).
Causes: Trapped moisture; exposure to salt, chemicals, or high humidity; damaged oxide layer from abrasive cleaning.
Solution: For white rust, clean with a baking soda paste (as described in Step 5) and dry thoroughly. Apply anti-corrosion spray to prevent recurrence. For pitting, assess the severity—small pits can be cleaned and protected, but deep pits weaken the metal. If pitting is extensive, replace the connector to ensure structural integrity.
Issue 3: Stuck or Seized Connectors
Signs: The connector won't rotate or adjust; bolts are stuck and won't loosen.
Causes: Rust or corrosion in threads; dried grease or debris; over-tightening in the past.
Solution: Apply penetrating oil (like PB Blaster) to the stuck parts and let it sit for 10-15 minutes. Gently tap the connector with a rubber mallet to help the oil penetrate. Use a hex key or wrench to loosen the bolt—apply steady, even pressure, and avoid forcing it (this can break the bolt). If the connector still won't move, it may need to be replaced.
Issue 4: Bent or Deformed Connectors
Signs: The connector is visibly bent; it doesn't align properly with the aluminum profile.
Causes: Excessive weight or stress; impact (e.g., dropping a heavy object on the structure); over-tightening bolts.
Solution: Bent or deformed connectors cannot be safely repaired—they should be replaced immediately. A bent connector can compromise the entire structure, leading to instability or collapse. When replacing, check the aluminum profile for damage as well—if the profile is bent, it may need to be replaced too.
Long-Term Care: Protecting Your Investment for Years to Come
Caring for aluminum profile 3 way connectors isn't a one-time task—it's an ongoing commitment. By incorporating the following long-term care tips into your routine, you can extend the lifespan of your connectors and ensure they remain reliable for years to come.
1. Choose the Right Connector for the Job
Not all aluminum profile 3 way connectors are created equal. When selecting connectors for a project, consider the weight they'll need to support, the environment they'll be in, and how often they'll be adjusted. For heavy-duty applications (like the material rack B (3 row and 3 floor)), choose connectors made from thick, high-quality aluminum with reinforced joints. For humid environments, look for connectors with anodized finishes, which offer extra corrosion resistance. Using the right connector for the job reduces wear and tear from the start.
2. Train Your Team on Proper Handling
If you work in a team environment, ensure everyone who interacts with aluminum profile structures knows how to handle connectors properly. Teach them to avoid over-tightening bolts, to clean up spills or debris near connectors promptly, and to report damaged or loose connectors immediately. A little knowledge goes a long way in preventing accidental damage.
3. Monitor Environmental Factors
Environmental conditions have a big impact on connector lifespan. High humidity, extreme temperatures, and exposure to chemicals (like oils, solvents, or cleaning agents) can all accelerate wear and corrosion. If possible, keep aluminum profile structures away from direct sources of moisture (like leaky pipes) or chemicals. In humid areas, use a dehumidifier to keep the air dry. For structures near chemical storage, consider applying a protective coating to connectors (like clear lacquer) to create a barrier.
4. Keep Spare Connectors on Hand
Even with the best care, connectors will eventually need to be replaced. Keeping a small stock of spare aluminum profile 3 way connectors ensures you can make repairs quickly, minimizing downtime. Store spares in a labeled container (as mentioned earlier) so you can find the right size and type when you need it.
5. Document Maintenance Activities
Maintaining a simple log of when you clean, inspect, or replace connectors can help you spot patterns (e.g., connectors in a certain area corrode faster) and stay on top of maintenance schedules. Note the date, the connector's location, any issues found, and the actions taken. This log can also be helpful if you need to troubleshoot recurring problems or demonstrate compliance with safety standards.
Conclusion: Small Steps, Big Results
Aluminum profile 3 way connectors may be small, but their role in building strong, reliable structures is enormous. By taking the time to clean, inspect, and maintain these unassuming components, you're investing in the safety, efficiency, and longevity of your aluminum profile systems—whether it's a simple workbench E or a complex material rack B (3 row and 3 floor).
Remember, caring for connectors isn't just about avoiding breakdowns—it's about creating a workspace where you can trust your equipment to perform when you need it most. With the right tools, a little know-how, and a commitment to regular maintenance, you can keep your aluminum profile 3 way connectors—and the structures they support—in top shape for years to come.
So the next time you walk past that material rack or workbench, take a moment to appreciate the aluminum profile 3 way connectors holding it all together. Then, grab your brush, cloth, and detergent—and give those hardworking connectors the care they deserve. Your future self (and your bottom line) will thank you.