- Company Articles
- Products and Technology
- Installation And Maintenance
- How to Clean and Lubricate Roller Track Placon Mount Center Support Bracket Properly

How to Clean and Lubricate Roller Track Placon Mount Center Support Bracket Properly
Related Product
Roller Track Placon Mount Center Support Bracket
Roller track placon mount work as a connector for roller track and pipe or aluminum profile in rack syetem, it is a necessary parts in rack system which widely used in industrial plant and logistic,warehouse storage.
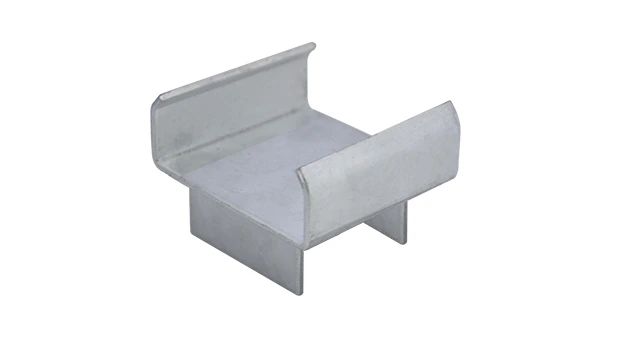
In the busy rhythm of a manufacturing workshop, where every second counts towards meeting production targets, there's a silent hero working behind the scenes: the roller track system. From the smooth glide of components on a lean pipe workbench to the steady flow of materials on a conveyor, these systems keep the heartbeat of production alive. Yet, even the most reliable equipment can stumble when overlooked—especially a small but critical part like the roller track placon mount center support bracket . A build-up of dust, a lack of lubrication, or a tiny misalignment here can turn a seamless workflow into a frustrating cycle of jams, delays, and even unplanned downtime. Let's dive into how to keep this "backbone" of your lean system in top shape, ensuring your production line runs as smoothly as the day it was installed.
Why This Bracket Deserves Your Attention
Before grabbing a cloth and lubricant, let's clarify why this specific bracket matters. The roller track placon mount center support bracket isn't just another metal piece—it's the structural anchor that holds the roller track in place, evenly distributing the weight of materials as they slide across. Whether you're moving delicate 3C assembly parts or heavy automotive components, this bracket absorbs vibrations, reduces friction, and ensures alignment. Over time, though, factory environments throw all sorts of challenges at it: metal shavings from nearby machining, oil residues from conveyor lubricants, and even tiny plastic fragments from packaging materials. Left unchecked, this debris can:
- Create uneven wear on roller wheels, leading to noisy operation
- Cause the track to tilt, risking product damage during transport
- Increase friction, forcing motors (if powered) to work harder and shortening their lifespan
In short, neglecting this bracket isn't just about maintenance—it's about protecting your lean system's efficiency and your team's productivity.
Step-by-Step Cleaning: More Than Just Wiping Down
Cleaning might seem straightforward, but doing it right requires attention to detail. Here's how to ensure you're removing grime without causing accidental damage:
1. Prep Work: Safety First, Then Tools
Start by powering down the roller track system and locking it out (following your facility's LOTO procedures) to prevent accidental startup. Then gather your tools: a soft-bristled brush (a clean paintbrush works well), lint-free microfiber cloths, a small container of isopropyl alcohol (70-90% concentration), and a pair of nitrile gloves to protect your hands from chemicals and sharp edges. Avoid using harsh solvents like acetone—they can degrade plastic components or strip away protective coatings on aluminum parts.
2. Dry Cleaning: Brush Away Loose Debris
Begin with dry cleaning to avoid smearing wet debris into hard-to-reach areas. Gently brush the bracket's surface, focusing on the joint where it connects to the roller track and the mounting points on the aluminum profile. Pay special attention to the crevices around the bolt heads and the area where the bracket meets the track's rails—this is where dust and metal particles love to hide. For stubborn clumps, use a toothpick (wrapped in cloth to avoid scratching) to dislodge them, but never apply excessive force—aluminum profiles and brackets are durable, but their finishes can scratch easily.
3. Wet Cleaning: Tackle Grease and Oil
Next, dampen a microfiber cloth with isopropyl alcohol (don't soak it—you want it slightly moist, not dripping). Wipe the bracket in small, circular motions, focusing on oily spots or caked-on grime. Alcohol evaporates quickly, so it won't leave residue, and it's effective at cutting through light oils without harming the bracket's material. If you're dealing with heavy grease (common in automotive or machinery workshops), mix a drop of mild dish soap with warm water, test it on an inconspicuous area first, then use it sparingly. Rinse with a clean, damp cloth afterward and dry immediately to prevent water spots.
4. Post-Cleaning Inspection: Check for Hidden Issues
Once the bracket is clean and dry (give it 5-10 minutes for alcohol to evaporate), take a closer look. Are there any cracks in the metal? Bent edges from heavy impacts? Loose bolts or signs of rust (especially if your facility uses water-based coolants)? These aren't just cosmetic issues—they're red flags that the bracket might need repair or replacement. For example, a cracked bracket could fail under load, putting operators and products at risk. If you spot such issues, pause maintenance and consult your lean pipe supplier for a replacement part—don't compromise on safety.

Lubrication: The Key to Smooth Operation
Cleaning removes the "bad" stuff, but lubrication adds the "good"—reducing friction between moving parts and preventing premature wear. But not all lubricants are created equal, and using the wrong one can do more harm than good. Here's how to get it right:
Choosing the Right Lubricant
The goal is to use a lubricant that stays in place, repels dust, and doesn't degrade plastic or rubber components (like the roller wheels). Avoid heavy greases—they attract dirt and can gum up the works over time. Instead, opt for a light machine oil (3-in-1 oil works well) or a dry PTFE spray (ideal for environments where oil residue could contaminate products, such as medical device assembly lines). For ESD workbench or ESD workstation areas, ensure the lubricant is ESD-safe to prevent static buildup.
Where and How to Apply
Focus lubrication on the bracket's pivot points and contact areas with the roller track. These include:
- The slot where the bracket attaches to the track (if adjustable)
- The bolt threads (to prevent seizing during future disassembly)
- The edges that rub against the roller track during movement
Apply a tiny amount—think 1-2 drops per point or a light mist from a spray. More isn't better! Excess lubricant will drip onto the track or attract dust, undoing your cleaning efforts. After applying, manually move the bracket (if adjustable) back and forth a few times to distribute the lubricant evenly. For fixed brackets, gently tap the track to help the oil seep into tight spaces.

Creating a Maintenance Schedule That Works
One-off cleaning and lubrication will help, but consistency is what keeps your lean system performing long-term. The frequency depends on your workshop's environment—here's a general guide to tailor to your needs:
| Workshop Environment | Cleaning Frequency | Lubrication Frequency |
|---|---|---|
| Low-dust (e.g., medical device assembly, cleanrooms) | Every 8 weeks | Every 12 weeks |
| Moderate-dust (e.g., 3C assembly, electronics production) | Every 4 weeks | Every 6 weeks |
| High-dust (e.g., automotive manufacturing, metalworking) | Every 2 weeks | Every 4 weeks |
Pro tip: Assign this task to the operators who use the equipment daily—they're most likely to notice early signs of trouble (like unusual noises) and can integrate maintenance into their pre-shift checks. This not only keeps the bracket in shape but also fosters a culture of ownership over equipment care.
Quick Fix for Unexpected Jams: If you encounter a sudden jam during production and don't have time for a full clean, grab a can of compressed air (used for cleaning electronics) and blast away loose debris from the bracket. Follow up with a drop of lubricant on the contact points—this will tide you over until your next scheduled maintenance.
Troubleshooting Common Issues
Even with regular maintenance, you might run into problems. Here's how to diagnose and solve them:
Issue 1: Persistent noise after cleaning/lubrication
Possible cause: The bracket is misaligned, or the roller track itself is warped. Check if the bracket sits flush against the track—loose bolts or bent mounting holes can cause wobbling. Tighten bolts evenly (don't over-tighten, as this can strip threads) or replace bent brackets.
Issue 2: Lubricant attracting too much dust
Possible cause: Using a heavy grease or applying too much. Switch to a dry PTFE spray or reduce the amount of oil. Wipe away excess with a clean cloth after application.
Issue 3: Bracket feels "sticky" despite lubrication
Possible cause: Old lubricant mixed with debris has formed a sludge. Clean the bracket again with alcohol to remove the old residue, then reapply fresh lubricant.
Final Thoughts: Small Steps, Big Impact
In the world of lean manufacturing, "continuous improvement" isn't just a buzzword—it's about optimizing every detail, no matter how small. The roller track placon mount center support bracket might not be the most glamorous part of your production line, but its role in keeping your lean pipe workbench, conveyor, and overall lean system running smoothly is undeniable. By taking 15-20 minutes every few weeks to clean, lubricate, and inspect it, you're not just maintaining equipment—you're investing in the efficiency, safety, and reliability that make your operation stand out.
Remember, a well-maintained lean system isn't just about avoiding downtime; it's about creating an environment where your team can focus on what they do best: building quality products, meeting deadlines, and driving your business forward. So grab that brush, that bottle of oil, and give your bracket the care it deserves—your production line (and your team) will thank you.