- Company Articles
- Products and Technology
- Installation And Maintenance
- How to Clean and Maintain Aluminum Profile Rubber Strips for Longevity

How to Clean and Maintain Aluminum Profile Rubber Strips for Longevity
Related Product
Aluminum Profile Rubber Strip
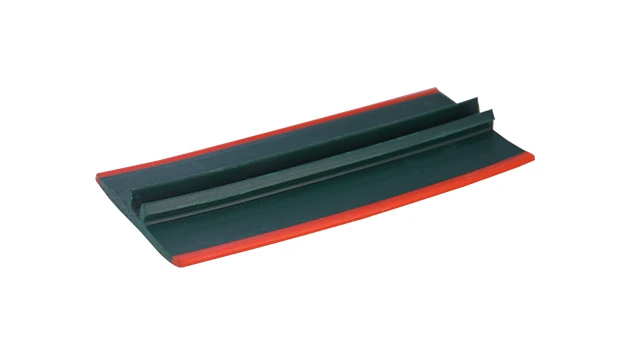
The tread strip fits into a T-slot channel and provides an anti-slip ribbed surface. It has a key pad that presses into a T-slot and is commonly used for adding traction on steps or as padding for doors. Tread strip can be ordered by rolls. The high quali
Aluminum profiles are the unsung backbone of countless industries—from the workbenches in your local workshop to the conveyor systems humming in manufacturing plants. But even the sturdiest aluminum extrusion profile relies on a small, often overlooked component to perform at its best: rubber strips. These flexible, unassuming pieces seal gaps, dampen noise, block dust, and protect the edges of aluminum profiles from wear. Think of them as the "gaskets of organization"—quietly ensuring everything runs smoothly. Yet, like any hardworking part, they need care to last. In this guide, we'll walk through how to clean and maintain these critical components, ensuring your aluminum profiles (and their accessories) stand the test of time.
What Are Aluminum Profile Rubber Strips, Anyway?
Before diving into maintenance, let's get familiar with the star of the show. Aluminum profile rubber strips are narrow, flexible strips made from materials like EPDM, silicone, or neoprene, designed to fit snugly into the grooves or edges of aluminum profiles. You've probably seen them without realizing it: the soft, black strip lining the edge of a workbench to prevent tools from slipping, or the weather-resistant seal on a conveyor frame that keeps dust from clogging moving parts.
One common type you might encounter is the T-slot rubber seal cover —a specialized strip that fits into the T-slots of aluminum profiles. These slots are where aluminum profile accessories like brackets, shelves, or lights attach, and the seal cover keeps debris out while cushioning the connection. Without it, dirt builds up, making adjustments tricky, and metal-on-metal contact can scratch the profile's finish.
Why does material matter? EPDM strips, for example, handle extreme temperatures well, making them ideal for outdoor or industrial settings. Silicone strips excel at resisting UV rays and chemicals, perfect for labs or food processing areas. Knowing what your strips are made of helps tailor your care routine—more on that later.
Signs Your Rubber Strips Need Some Love
Rubber strips don't shout when they're struggling—they whisper. Here are the subtle (and not-so-subtle) clues that it's time to step in:
Cracking or Splitting
Run your finger along the strip. If you feel tiny cracks or see splits, that's a red flag. Cracks start small, often from dryness or age, but they quickly grow, letting dust, water, or pests sneak into gaps. On a workbench, this might mean sawdust getting into T-slots; on a window frame, it could lead to drafts.
Brittleness or Stiffness
Healthy rubber strips should bend slightly when pressed. If yours feels hard, rigid, or crumbles when you flex it, it's lost its elasticity. This often happens when strips are exposed to prolonged sunlight, heat, or harsh chemicals—common in warehouses with unshaded windows or near cleaning stations.
Discoloration or Mold
Yellowing, dark spots, or a fuzzy white/green film are signs of trouble. Discoloration usually comes from UV damage or chemical exposure (like harsh cleaners), while mold or mildew thrive in damp environments—think a basement workshop or a conveyor near a power washer. Left unchecked, mold can eat away at the rubber and spread to the aluminum profile itself.
Gaps or Looseness
If the strip is pulling away from the profile, leaving gaps, it's no longer sealing effectively. This might happen if the adhesive backing has worn off or if the strip was improperly installed. Gaps let in debris and reduce the strip's ability to cushion impacts—bad news if you're sliding tools across a workbench or moving packages along a conveyor.

Step-by-Step Cleaning: How to Keep Rubber Strips Fresh
Cleaning rubber strips isn't rocket science, but doing it right prevents damage and extends their life. Here's a simple, foolproof routine:
Step 1: Gather Your Supplies
You don't need fancy tools—just household items: a soft microfiber cloth (avoid paper towels; they scratch), a small soft-bristled brush (an old toothbrush works), mild dish soap (unscented is best), warm water, and a bucket. For tough mold or grease, add white vinegar (1 part vinegar to 3 parts water) or rubbing alcohol (in moderation—too much dries rubber).
Step 2: Dry Wipe First
Start by wiping the strip with a dry microfiber cloth to remove loose dirt, dust, or debris. This prevents scratching the rubber when you add water. Pay extra attention to crevices, like where the strip meets the aluminum profile—use the dry toothbrush to dislodge trapped dirt here.
Step 3: Gentle Washing
Mix a few drops of mild dish soap into warm water (about 1 teaspoon per liter). Dip the cloth into the soapy water, wring it out well (you want damp, not soaking), and gently wipe the rubber strip. Use circular motions to lift grime, but don't scrub hard—rubber is delicate and can tear if abraded.
For T-slot rubber seal covers, slide the brush into the T-slot along the strip to clean out hidden dust. Be careful not to push the strip out of place—apply light pressure only.
Step 4: Rinse (If Needed)
Most of the time, wiping with a damp, soapy cloth is enough. But if you used vinegar or alcohol, rinse the cloth in clean water, wring it out, and wipe the strip again to remove residue. Soap residue can attract dirt later, so this step is key for long-term cleanliness.
Step 5: Dry Thoroughly
Pat the strip with a dry microfiber cloth to remove excess moisture. Let it air-dry completely before using the aluminum profile—especially if it's near electrical components or in a damp area. Moisture trapped under the strip can lead to mold or adhesive failure.
Pro Tips for Specific Scenarios
- Outdoor profiles: Add a capful of UV protectant (like those used for car tires) to the soapy water once a month to slow sun damage.
- Greasy environments (e.g., mechanic shops): Use a drop of degreaser (diluted 1:10 with water) instead of dish soap, but rinse thoroughly.
- Mold-prone areas: After cleaning, spray the strip with a 50/50 vinegar-water solution and let it air-dry to kill remaining spores.

Maintenance Routines to Prevent Damage
Cleaning is half the battle—regular maintenance keeps rubber strips flexible and effective for years. Here's how to make it a habit:
Stick to a Schedule
How often you maintain depends on the environment:
- Indoor, low-dust areas (e.g., office partitions): Clean every 2–3 months; inspect monthly.
- Moderate-dust areas (e.g., workshops, retail displays): Clean monthly; inspect biweekly.
- High-dust/harsh environments (e.g., warehouses, outdoor profiles): Clean weekly; inspect 2–3 times a week.
Condition to Keep Flexibility
Rubber dries out over time, especially in dry or heated spaces. Twice a year, apply a rubber conditioner (silicone-based works best) to keep strips supple. Avoid petroleum-based products—they break down rubber over time. Simply apply a small amount to a cloth and wipe the strip; excess can attract dirt, so less is more.
Protect from the Elements
Sunlight, extreme temperatures, and chemicals are rubber's worst enemies. If possible:
- Shield outdoor aluminum profiles with awnings or UV-blocking films on windows.
- Keep profiles away from direct heat sources (heaters, radiators) or cold drafts.
- Use only rubber-safe cleaners (more on that below) and avoid spilling solvents, oils, or fuels near strips.
Check Adhesion
Many rubber strips are attached with adhesive. During inspections, gently press along the strip to ensure it's firmly stuck. If you feel lifting or hear a "peeling" sound, reattach it with rubber-specific adhesive (available at hardware stores). Clean the area with rubbing alcohol first to remove old adhesive residue for better bond.
Cleaning Agents: What to Use (and What to Avoid)
Not all cleaners are created equal—some can destroy rubber strips faster than neglect. Use this table to choose wisely:
| Cleaner Type | Examples | Pros | Cons | Safe for Rubber Strips? |
|---|---|---|---|---|
| Mild Detergents | Unscented dish soap, baby shampoo | Gentle, removes grease/dirt, affordable | Requires rinsing to avoid residue | Yes |
| White Vinegar | 50/50 vinegar-water solution | Kills mold, natural, deodorizes | Strong smell; can dull aluminum if left on | Yes (rinse after use) |
| Rubbing Alcohol | Isopropyl alcohol (70%) | Disinfects, evaporates quickly | Dries rubber if overused; strips oils | Yes (use sparingly) |
| UV Protectant | Car tire protectant, silicone spray | Prevents sun damage, adds shine | Can attract dust if overapplied | Yes (follow instructions) |
| Acetone/Nail Polish Remover | — | Removes tough adhesives | Dissolves rubber; causes cracking | No |
| Ammonia-Based Cleaners | Window cleaners, oven cleaners | Strong degreaser | Breaks down rubber; fades color | No |
| Pressure Washers | — | Fast for large areas | High pressure tears rubber; loosens adhesion | No |
Troubleshooting Common Rubber Strip Issues
Even with care, problems happen. Here's how to fix the most common issues:
Small Cracks or Tears
For cracks less than 1 inch long: Clean the area with alcohol, then apply a thin layer of rubber repair glue (e.g., E6000). Press the crack closed and let it dry 24 hours. For longer tears, or if the strip is more than 50% cracked, replace it—repairs won't hold long-term.
Brittleness
If the strip is stiff but not cracked, try conditioning first. Apply a silicone-based rubber conditioner and let it sit overnight. If it's still hard after 24 hours, replacement is needed—brittleness is irreversible.
Mold/Mildew
Scrub with vinegar-water solution using a soft brush, then rinse. For stubborn mold, mix 1 tablespoon baking soda with enough water to make a paste, apply, let sit 10 minutes, then wipe. Repeat until mold is gone, then dry thoroughly.
Loose or Detached Strips
Remove old adhesive residue with rubbing alcohol. Apply rubber adhesive to the back of the strip (follow product instructions for drying time), then press firmly into place. Use masking tape to hold it while drying (24 hours for best bond).
Long-Term Care: Pairing with Aluminum Profile Accessories
Rubber strips don't work alone—they rely on aluminum profile accessories to stay protected. Here's how to pair care for maximum longevity:
End Caps and Edge Protectors
Aluminum profile end caps cover sharp edges, preventing tears in rubber strips from accidental bumps. Make sure end caps are securely in place—loose caps leave edges exposed, risking damage to strips.
T-Slot Covers
For T-slot rubber seal covers, use T-slot plugs or fillers when slots aren't in use. This keeps debris out and reduces stress on the strip, as it won't need to seal gaps where accessories are missing.
Weather Stripping for Outdoor Use
If your aluminum extrusion profile is outdoors, add secondary weather stripping over the rubber strip for extra protection. Look for UV-resistant options—they'll take the brunt of sun and rain, extending the life of the primary strip.
Real-Life Success Stories
Don't just take our word for it—these stories show how maintenance pays off:
Case 1: The Workshop Workbench
Mark, a small-business owner, uses an aluminum profile workbench in his woodshop. He noticed the T-slot rubber seal cover was turning gray and hard, but ignored it—until sawdust started jamming the T-slots, making it impossible to adjust his clamps. After a quick clean with mild soap and a silicone conditioner, the strip softened, and the slots cleared. Six months later, the workbench still looks new, and Mark estimates he saved $200 by not replacing the strip or workbench.
Case 2: The Warehouse Conveyor
A warehouse with aluminum extrusion profile conveyors was losing 2 hours weekly to package jams. The maintenance team realized the rubber guide strips along the conveyor edges were brittle from sunlight. They started cleaning the strips weekly and applying UV protectant monthly. Within 3 months, jams dropped by 60%, and the strips lasted 2 years longer than the previous set—saving $1,200 in replacement costs.
Conclusion: Small Efforts, Big Rewards
Aluminum profile rubber strips might seem like minor components, but they're critical to the performance and longevity of the systems we rely on. With regular cleaning, simple maintenance, and smart use of aluminum profile accessories, you can keep these strips flexible, effective, and working for years. The best part? It's easy—10–15 minutes a month is all it takes to avoid costly replacements and keep your aluminum profiles running smoothly. So grab that microfiber cloth, set a reminder, and give your rubber strips the care they deserve—your future self (and wallet) will thank you.