- Company Articles
- Products and Technology
- Installation And Maintenance
- How to Clean Chrome Four Way Straight Lean Pipe Joints Properly

How to Clean Chrome Four Way Straight Lean Pipe Joints Properly
Related Product
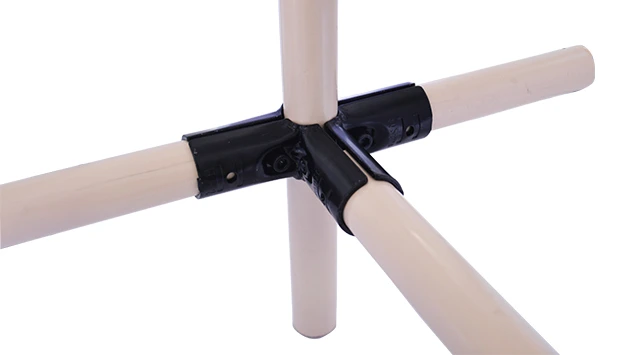
Four Way Straight Lean Pipe Joint
Four way lean pipe joint for 4 pcs 28MM lean pipe connection in straight angle, which used widely in workbench, flow rack, hand trolley frame connection.
Introduction: The Unsung Heroes of Your Lean System
Let's start with a scenario we've all encountered in busy production environments: You're rushing to meet a deadline, sliding a bin of components along your flow rack, and suddenly—*grind*. The bin catches, jolting to a halt. You mutter under your breath, give it a hard push, and it finally moves, but the moment sticks in your mind. Later, when you have a minute to inspect, you notice something: the metal joints connecting the pipes of the flow rack are covered in a grimy mix of dust, oil, and who-knows-what. Sound familiar?
If you work with lean systems—whether you're building workbenches, assembling flow racks, or maintaining conveyors—you know that the smallest components often have the biggest impact. Today, we're zeroing in on one of those unsung heroes: the chrome four way straight lean pipe joint. These unassuming connectors are the backbone of your lean setup, holding together the aluminum or steel pipes that form everything from your daily workbench to the intricate roller tracks that keep production moving. But here's the thing: even the sturdiest joints can fail if they're not properly cleaned and maintained.
In this guide, we're going to walk through exactly how to clean these critical components the right way. We'll cover why cleaning matters (spoiler: it's not just about looks), the tools you'll need, a step-by-step process that even a beginner can follow, and pro tips to keep your joints (and your entire lean system) running smoothly for years. Whether you're a seasoned plant manager or someone just starting to tinker with lean solutions, this is the kind of practical knowledge that saves time, reduces frustration, and keeps your production line humming. Let's dive in.
What Are Chrome Four Way Straight Lean Pipe Joints, Anyway?
Before we grab the cleaning supplies, let's make sure we're all on the same page about what we're actually cleaning. Chrome four way straight lean pipe joints are specialized connectors designed to link lean pipes (often aluminum, steel, or stainless steel) at precise angles—typically 90 degrees in four directions, hence the "four way" name. They're the building blocks of modular lean systems, allowing you to construct everything from simple workbenches to complex material racks and conveyors.
Picture this: You're setting up a new assembly station. You grab a length of aluminum lean pipe, slide a four way joint onto one end, then attach another pipe perpendicular to it. Add a few more joints and pipes, and suddenly you've got a sturdy frame for a workbench. These joints are engineered to be both strong and adjustable—tighten the bolts, and they hold firm; loosen them, and you can reconfigure the structure as your needs change. And that chrome plating? It's not just for shine. Chrome adds a layer of protection against corrosion, rust, and wear, which is why keeping that chrome finish intact is so important.
Now, think about where these joints live. They're often tucked into corners of workbenches, hidden under flow rack shelves, or exposed to the elements on factory floors. Over time, they collect dust, grease from machinery, metal shavings, and even spilled liquids. If left unchecked, that buildup can do more than just look messy. It can gum up the threads, making it hard to adjust or disassemble the joints when you need to reconfigure your setup. It can trap moisture against the metal, eating away at the chrome plating and leading to rust. And in the worst cases, it can weaken the joint's grip, turning a stable workbench into a wobbly hazard.
So, in short: These little joints might not get the spotlight, but they're critical to keeping your lean system—whether it's a single workbench or an entire production line—operating at peak efficiency. And keeping them clean? That's the first step to making sure they last.

Why Bother? The Real Impact of Clean Joints
You might be thinking, "I've got bigger fish to fry—my production targets, my team's safety training, my budget reports. Do I really need to add 'clean lean pipe joints' to my to-do list?" The short answer: Yes. Because clean joints aren't just about aesthetics—they directly affect your bottom line, your team's productivity, and even workplace safety. Let's break it down.
First, efficiency. Lean systems are all about reducing waste—whether that's wasted time, wasted motion, or wasted materials. If your flow rack's roller track is sticking because the supporting lean pipe joints are gummed up, your team spends extra seconds (or minutes) pushing bins instead of focusing on assembly. Multiply that by hundreds of bins a day, and suddenly you're looking at hours of lost productivity. Clean joints mean smooth adjustments, so when you need to reconfigure a workbench or shorten a conveyor, you're not fighting stuck bolts or corroded threads. You make the change quickly and get back to work.
Then there's durability. A well-maintained chrome four way joint can last for years, even in tough factory environments. But if you let grime build up, that chrome plating starts to chip. Once the underlying metal is exposed, rust sets in. Rust weakens the joint, which means you'll need to replace it sooner—and replacing parts costs money. A quick online search for "lean pipe joint supplier" will tell you that quality joints aren't cheap, so extending their lifespan with regular cleaning is a no-brainer for your budget.
Safety is another big one. Imagine a material rack loaded with heavy parts. If the joints holding it together are corroded or loose (thanks to buildup preventing proper tightening), that rack could shift or even collapse. That's a disaster waiting to happen—injuries, damaged goods, and downtime. Clean joints are tight joints, and tight joints mean stable structures. Plus, when joints are clean, it's easier to spot signs of wear—like cracks in the chrome or stripped threads—before they become dangerous.
Finally, let's talk about pride in your workspace. A clean, well-maintained area sends a message to your team: "We care about this work, and we care about you." When tools and equipment are in good shape, people feel more motivated to take care of them. It's a ripple effect—clean joints lead to a clean workbench, which leads to a cleaner production line, which leads to a more positive and productive work environment.
So, to sum up: Cleaning your chrome four way straight lean pipe joints isn't a "nice-to-have." It's an investment in efficiency, durability, safety, and team morale. And the best part? It's not complicated. With the right tools and a little know-how, you can make it a quick, painless part of your regular maintenance routine.

Gearing Up: Tools and Supplies You'll Need
Now that we're convinced of the "why," let's talk about the "how"—starting with what you'll need to get the job done right. The good news is, you probably already have most of these tools in your maintenance closet. If not, they're easy to find at your local hardware store or through a lean pipe and accessories supplier. Here's your checklist:
Pro Tip:
Always gather your supplies before you start. There's nothing more frustrating than mid-cleaning realizing you're out of rags or forgot the safety glasses!
Let's break down the essentials with a quick table to keep you organized:
| Tool/Supply | Purpose | Safety Notes |
|---|---|---|
| Soft-bristle brush (toothbrush-sized or larger) | Loosening dust, dirt, and debris from crevices and threads | Avoid metal brushes—they can scratch the chrome plating |
| Lint-free rags or microfiber cloths | Wiping away loosened grime and drying the joint | Use separate rags for cleaning and drying to avoid recontamination |
| Mild detergent (dish soap works well) or chrome cleaner | Cutting through grease and oil without damaging chrome | Skip abrasive cleaners (like steel wool or scouring pads) and harsh chemicals (like bleach) |
| Distilled water (or tap water, if it's not hard) | Rinsing off soap residue | Hard water can leave mineral spots—dry thoroughly if using tap water |
| Small bucket or bowl | Mixing soap and water | Label it for cleaning use only to avoid confusion with food or chemical containers |
| Adjustable wrench or hex key (depending on joint type) | Loosening/tightening bolts if disassembly is needed | Use the correct size to avoid stripping bolt heads |
| Compressed air can or air compressor (optional) | Blowing out hard-to-reach dust from threads or internal parts | Wear eye protection—air can blow debris into your eyes |
| White vinegar (for tough water spots or light rust) | Gently dissolving mineral deposits or rust without scratching | Dilute with water (1:1 ratio) and test on a small, hidden area first |
| Gloves (latex or nitrile) | Protecting hands from chemicals and sharp edges | Change gloves if they get punctured or heavily soiled |
| Safety glasses | Shielding eyes from flying debris (especially when using compressed air) | Non-negotiable—even a small metal shaving can cause injury |
Bonus tools, if you have them: A small pick or dental flosser (for really tight threads), a toothpick (for dislodging stubborn debris in crevices), or a degreaser (for heavy oil buildup, though test it on a hidden part of the joint first to ensure it doesn't harm the chrome). Now, a quick word on cleaning agents: Your best bet for most situations is a simple mix of warm water and dish soap. It's gentle, effective, and won't cost you a fortune. If you're dealing with heavy grease (common in automotive or machinery shops), a dedicated chrome cleaner (look for one labeled "non-abrasive") can help, but always follow the manufacturer's instructions. And if you spot light rust starting to form? A little white vinegar on a rag can work wonders—just make sure to rinse it off thoroughly and dry the joint right away to prevent further oxidation. The key here is to be gentle. The chrome plating is tough, but it's not indestructible. Scratches or chips in the chrome are like open doors for rust, so treat the surface with care.
Step-by-Step: Cleaning Your Chrome Four Way Straight Lean Pipe Joints
Now for the main event: actually cleaning the joints. We'll walk through this process step by step, with plenty of tips to make it go smoothly. Whether you're cleaning a single joint on a wobbly workbench or doing a full overhaul of your flow rack system, these steps apply. Let's get started.
Step 1: Prepare the Work Area
Before you touch a single joint, take a minute to set yourself up for success. If the joint is part of a larger structure (like a workbench or material rack), make sure the area around it is clear of tools, parts, or other obstacles. If the structure is holding materials, empty it first—you don't want to knock over a bin of screws while you're cleaning! If possible, position a drop cloth or old newspaper under the joint to catch any falling debris. This makes cleanup easier and prevents dirt from spreading to other parts of your workspace. And don't forget your PPE: gloves to protect your hands from grease and chemicals, and safety glasses to shield your eyes from flying dust.Step 2: Inspect the Joint (and Decide Whether to Disassemble)
Take a close look at the joint before you start cleaning. Is it loose? Are the threads clogged with gunk? Is there visible rust or damage to the chrome? This quick inspection will help you decide whether you can clean the joint in place or if you need to disassemble it. In most cases, you can clean a joint without taking it apart—especially if it's just surface dirt. But if the threads are completely blocked, or if the joint is stuck and you need to adjust it later, you may need to loosen the bolts and slide it off the pipe. To do that, use your adjustable wrench or hex key to gently loosen the set screws (be careful not to strip them!). Once the joint is off, you can clean it more thoroughly, including the inner surfaces that connect to the pipe.
Heads-Up:
If you do disassemble the joint, take a quick photo first or mark the position of the pipes. It's easy to forget how everything fits together when you're putting it back!
Step 3: Loosen Surface Debris with a Brush
Grab your soft-bristle brush and start by gently brushing the surface of the joint. Focus on crevices, around the bolts, and in the threads—these are where dust and dirt love to hide. Use small, circular motions to loosen the grime; you'll be surprised how much comes off with just a dry brush! For extra-tight spots (like the tiny gaps between the joint's arms), a toothbrush works wonders. Just make sure it's a clean, unused one—you don't want to introduce old toothpaste into the mix! If you have compressed air, now's the time to use it: a quick blast into the threads or bolt holes will blow out any remaining dust. Hold the air nozzle a few inches away from the joint to avoid scratching the chrome, and keep your safety glasses on—air pressure can send debris flying.Step 4: Mix Your Cleaning Solution and Scrub
Now it's time to tackle the grease and stuck-on grime. Fill your bucket or bowl with warm water and add a few drops of mild detergent (dish soap is perfect). Dip your lint-free rag into the soapy water, wring it out so it's damp (not soaking), and start wiping down the joint. Use gentle, circular motions to work the soap into any greasy areas. For stubborn spots (like dried oil), let the soapy rag sit on the area for 30 seconds to a minute—this gives the detergent time to break down the grease. If you're cleaning a disassembled joint, you can even soak it in the soapy water for a few minutes (just don't leave it too long, as prolonged exposure to water can promote rust). Pay special attention to the threads: run the damp rag along them, or use a soapy toothbrush to scrub away any buildup. Clean threads mean easier adjustments later, so take your time here.Step 5: Rinse (If Needed) and Dry Thoroughly
If you used soapy water, you'll need to rinse off the residue to prevent streaks. Dip a clean rag in plain water (distilled is best to avoid mineral spots) and wipe down the joint, or use a spray bottle to mist the area and then wipe it dry. Drying is crucial—moisture left on the chrome can lead to rust, especially if there are tiny scratches in the plating. Use a dry, lint-free rag to wipe the joint until it's completely dry. If you disassembled the joint, dry the inner surfaces too—run a rag through the pipe holes to soak up any water.Step 6: Polish (Optional, but Recommended)
For an extra shine and added protection, you can polish the chrome with a dedicated chrome polish (follow the manufacturer's instructions) or a small amount of baby oil on a dry rag. Rub the polish or oil into the chrome in circular motions, then buff it off with a clean rag. This leaves a protective layer that repels dust and moisture, keeping the joint cleaner for longer.Step 7: Inspect Again (and Reassemble if Needed)
Now that the joint is clean, take another look. Are the threads clear? Is the chrome plating intact, or did you notice any new scratches or rust spots? If you see damage (like deep scratches or pitting), it might be time to replace the joint—contact your lean pipe supplier to order a new one. If everything looks good, reassemble the joint if you took it apart. Slide it back onto the pipes, align it with your marks or photo, and tighten the set screws until it's snug (but don't over-tighten—you want to be able to adjust it later if needed). Give the joint a gentle wiggle to make sure it's secure.Step 8: Clean Up Your Work Area
Last but not least: tidy up! Dispose of dirty rags (or launder them if they're reusable), put away your tools, and throw away the drop cloth or newspaper. Take a step back and admire your handiwork—your clean joint should look shiny, and any structure it's part of should feel sturdier already.Troubleshooting: Common Issues and How to Fix Them
Even with the best intentions, you might run into snags while cleaning your chrome four way straight lean pipe joints. Let's talk about some common problems and how to solve them—because knowing how to handle these hiccups will save you time and frustration.
Problem: The Joint Is Stuck—Can't Loosen the Bolts!
We've all been there: you try to loosen the set screws, and they won't budge. Chances are, rust or grime has locked them in place. Try this: first, tap the head of the screw gently with a hammer (not too hard!) to loosen any corrosion. Then, apply a few drops of penetrating oil (like WD-40) to the threads and let it sit for 10–15 minutes. The oil will seep into the threads and help break up the rust. Try loosening the screw again—if it still sticks, use a pair of pliers to get a better grip on the wrench (but go slowly to avoid stripping the screw).Problem: There's Rust on the Chrome—How Do I Remove It?
Light surface rust can often be removed with a paste made from baking soda and water. Mix equal parts baking soda and water to form a thick paste, apply it to the rust spot, and let it sit for 10–15 minutes. Then, gently scrub with a soft-bristle brush and rinse. For more stubborn rust, try a vinegar soak (as mentioned earlier) or a rust remover specifically designed for chrome (test it on a hidden area first!). If the rust has eaten through the chrome plating and into the metal, though, cleaning won't fix it. That joint is compromised and should be replaced to avoid safety risks.Problem: The Chrome Is Scratched—Can I Fix That?
Minor scratches in the chrome can sometimes be buffed out with a chrome polish and a soft cloth. Apply a small amount of polish to the scratch, rub in circular motions, and buff until the scratch fades. Deeper scratches, however, are harder to repair—you can try a chrome repair kit (available at auto parts stores), but for structural joints, it's often better to replace the joint to ensure it's strong enough.Problem: After Cleaning, the Joint Still Wobbles
If the joint is clean but the structure still wobbles, the issue might not be the joint itself—it could be loose pipes or worn-out pipe ends. Check that the pipes are fully inserted into the joint (they should go all the way to the stop inside the joint). If the pipe ends are bent or damaged, cut them straight with a pipe cutter and reinsert. If the wobble persists, the joint might be worn out—look for cracks or stripped threads, and replace it if needed.Problem: Soap and Water Aren't Cutting the Grease
In heavy-industry settings (like automotive or machine shops), joints can get coated in thick, sticky grease that regular soap won't touch. In these cases, use a degreaser (again, test on a hidden area first!) or a solvent like mineral spirits (use in a well-ventilated area and wear gloves). Apply the degreaser with a rag, let it sit for a few minutes, then wipe away. Follow up with soapy water to remove any degreaser residue, then dry thoroughly.Pro Tips: Keeping Your Joints Clean for the Long Haul
Now that you know how to clean your chrome four way straight lean pipe joints, let's talk about how to keep them that way. A little proactive maintenance goes a long way toward preventing buildup and extending the life of your joints. Here are some pro tips to make cleaning easier and less frequent:
Stick to a Regular Cleaning Schedule
The biggest mistake people make is waiting until joints are caked in grime to clean them. Instead, set a regular schedule—monthly for high-traffic areas (like workbenches and flow racks near assembly lines), quarterly for less-used structures (like storage racks). Mark it on your calendar or add it to your team's maintenance checklist. Consistency is key!Wipe Down Joints During Routine Workbench Cleaning
Your team probably already cleans their workbenches at the end of each shift—turn that into a joint-checking opportunity. Have them quickly wipe down the joints with a dry rag while they're tidying up. This removes surface dust before it builds up, making deep cleaning faster later.Protect Joints from Excess Moisture
Moisture is the enemy of chrome, so keep joints away from standing water or heavy condensation. If your workspace is humid (like a food processing plant), consider adding a dehumidifier or using a rust inhibitor spray on joints (follow the manufacturer's instructions). In wet areas, opt for stainless steel lean pipe series joints instead of chrome—they're more corrosion-resistant.Train Your Team to Spot Issues Early
You don't have to be the only one watching for dirty or damaged joints. Train your team to recognize signs of trouble: a sticky joint, visible grime, or a wobbly structure. Encourage them to report issues as soon as they notice them, so you can address them before they become big problems.Stock Spare Joints (and Know Your Supplier)
Even with great maintenance, joints wear out. Keep a few spare chrome four way straight lean pipe joints in your tool room, along with other lean pipe accessories like bolts and washers. And make sure you know who your lean pipe supplier is—having their contact info handy means you can order replacements quickly when you need them.Use the Right Pipes and Accessories
The quality of your pipes and joints matters. Cheap, poorly made joints are more likely to corrode or wear out, even with regular cleaning. Invest in high-quality aluminum lean pipe or stainless steel pipe series from a reputable supplier—they'll last longer and clean up easier. Similarly, use the right accessories (like pipe end caps) to keep debris from getting inside the pipes and transferring to the joints.Wrapping Up: Small Effort, Big Rewards
Let's circle back to where we started: that stuck bin on the flow rack. After reading this guide, you now know that the solution might be as simple as cleaning the lean pipe joints holding the rack together. And that's the beauty of lean systems—they're built on small, modular components that are easy to maintain, if you know how.
Cleaning chrome four way straight lean pipe joints isn't glamorous work, but it's foundational. It's the kind of task that keeps your workbenches stable, your flow racks sliding smoothly, and your production line humming. It saves you time by preventing stuck adjustments and costly repairs. It keeps your team safe by ensuring structures stay sturdy. And it shows that you care about the details—the little things that add up to a well-run, efficient workspace.
So, the next time you walk past a workbench or flow rack, take a second to glance at the joints. If they're looking a little worse for wear, grab your brush and rag and give them some love. You'll be surprised at how much of a difference it makes. And remember: when it comes to lean systems, clean joints aren't just a maintenance task—they're a mindset. A mindset that says, "We do things right, from the ground up."
Now go out there and make those joints shine!