- Company Articles
- Products and Technology
- Installation And Maintenance
- How to Clean Plastic Pipe Covers in Food Processing Environments

How to Clean Plastic Pipe Covers in Food Processing Environments
Related Product
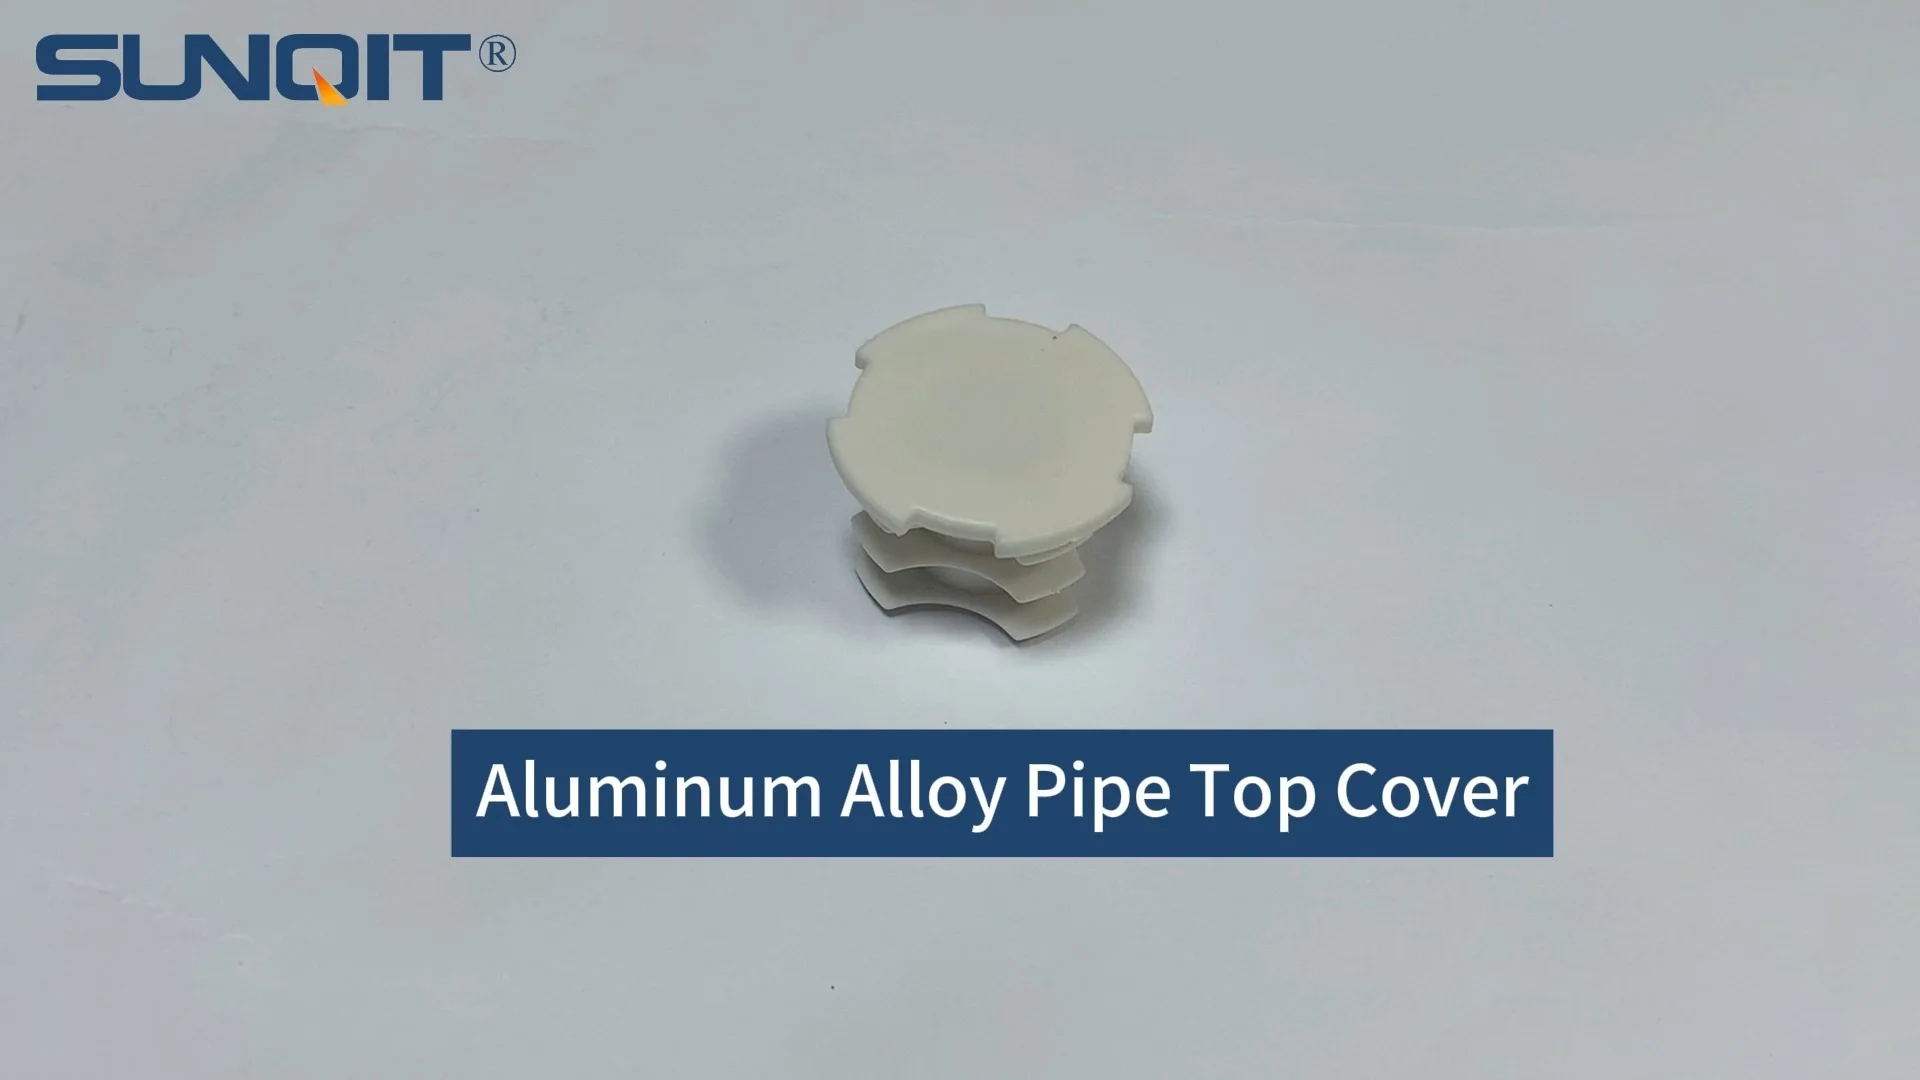
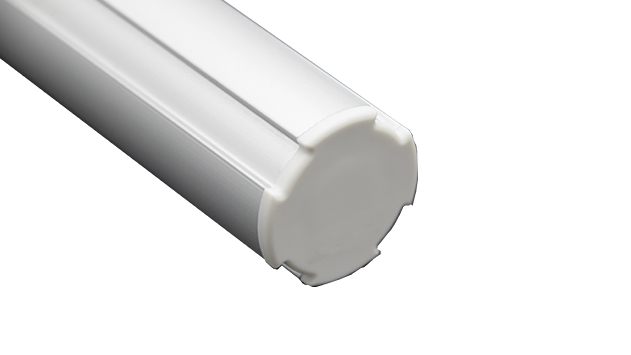
Plastic Pipe Cover
Plastic pipe cover to cover dia 28MM aluminum pipe end at workbench, flow rack, to prevent metal surface scratch material or worker.
Walk into any food processing facility, and you'll immediately sense the rhythm of precision: the steady hum of conveyor belts, the careful movements of workers in hairnets and gloves, and the unwavering focus on one non-negotiable goal—safety. Every surface, every tool, and every piece of equipment plays a role in keeping food products free from contamination. Yet, among the high-visibility players like stainless steel workbenches and sanitized roller tracks, there's a quiet hero that often flies under the radar: plastic pipe covers. These unassuming sleeves, which wrap around pipes carrying water, air, or other utilities, are critical for preventing dust, condensation, and debris from falling into production zones. But when was the last time your team gave them a thorough cleaning? In this guide, we'll break down why cleaning plastic pipe covers matters, how to do it effectively, and how to weave this task into your facility's lean system for consistent, long-term success.
Understanding Plastic Pipe Covers in Food Processing
Before diving into cleaning protocols, let's clarify what plastic pipe covers are and why they're non-negotiable in food environments. Unlike bare metal pipes, which can rust, collect grime, or sweat (release condensation), plastic covers act as a protective barrier. Made from food-grade materials like polyethylene (PE) or polypropylene (PP), they're designed to resist moisture, chemicals, and temperature fluctuations—all common in settings where ingredients are washed, cooked, or chilled. You'll typically find them snaking along ceilings, walls, or even under workbenches, running parallel to roller tracks that shuttle ingredients from prep stations to packaging lines. Their job? To keep pipes clean, prevent accidental contact with sharp edges, and most importantly, stop contaminants from dropping onto exposed food, equipment, or work surfaces.
But here's the catch: plastic pipe covers themselves can become contamination risks if neglected. Dust and grease from the air settle on their surfaces; splashes from cleaning nearby equipment can leave residue; and in humid areas, moisture can collect in crevices where the covers meet pipe joints. Over time, this buildup creates a breeding ground for bacteria like Listeria or Salmonella , or worse, becomes a source of physical contamination when particles dislodge and fall into product streams. For facilities aiming to meet FDA, USDA, or HACCP standards, this isn't just a cleanliness issue—it's a compliance one.
The Risks of Overlooking Plastic Pipe Cover Cleaning
Let's paint a scenario: A facility prides itself on spotless workbenches, regularly sanitized roller tracks, and rigorous employee hygiene protocols. But during an audit, an inspector notices a plastic pipe cover above a packaging line caked with dust and a small pool of dried liquid at its base. Suddenly, all those other efforts are overshadowed by a critical violation. Why? Because even the smallest oversight in a "hidden" area can undermine an entire food safety program. Here are the key risks of skipping plastic pipe cover cleaning:
- Bacterial Growth: Plastic is porous enough to trap moisture, especially if the cover has cracks or isn't properly sealed at joints. This creates ideal conditions for bacteria, mold, or yeast to thrive—microorganisms that can spread to food via air currents or direct contact.
- Physical Contamination: Dust, lint, or food particles that accumulate on covers can dislodge during equipment vibration or when workers brush against pipes. These particles then fall onto ingredients, packaging, or work surfaces, leading to product recalls or consumer illness.
- Regulatory Penalties: Food safety auditors don't just check high-touch surfaces. They look for "hard-to-reach" areas to assess a facility's commitment to hygiene. Dirty pipe covers can result in citations, fines, or even shutdowns until issues are resolved.
- Damage to Equipment: Grease or chemical residue on covers can degrade the plastic over time, causing cracks or brittleness. This means more frequent replacements, adding unnecessary costs to your operation.
Preparing for Effective Cleaning: Tools, Safety, and Setup
Cleaning plastic pipe covers isn't complicated, but it does require the right approach to avoid damaging the covers or compromising food safety. Let's start with preparation—this step ensures the process is efficient, safe, and thorough.
Step 1: Gather Food-Safe Cleaning Supplies
Not all cleaners are created equal, especially in food zones. Avoid harsh chemicals, abrasive scrubbers, or anything with strong fragrances, as these can leave toxic residues or scratch the plastic (creating more crevices for grime). Instead, stock these items:
- Microfiber cloths: Soft, lint-free, and reusable—perfect for dry dusting and wiping.
- Non-abrasive sponges or soft-bristle brushes: For gently scrubbing stuck-on residue without scratching.
- Food-grade detergent: pH-neutral (around 6-8) to avoid damaging plastic; look for options labeled "NSF Certified" or "Safe for Food Contact."
- Sanitizer: Approved for food surfaces, such as quaternary ammonium compounds (quats), chlorine-based solutions (100-200 ppm), or peracetic acid. Always follow the manufacturer's dilution and contact time instructions.
- Warm (not hot) water: Hot water can warp plastic; aim for 100-120°F (38-49°C) to help dissolve grease.
- Spray bottles: For applying detergent or sanitizer evenly.
- Extension pole with a soft brush attachment: For reaching high pipes without ladders (safer and more efficient).
- Flashlight: To inspect dark or shadowed areas for hidden residue.
Step 2: Prioritize Safety
Before you start, ensure the area is safe for cleaning. If pipes are near electrical equipment, water sources, or moving parts (like roller tracks), power down adjacent machinery and lock it out/tag it out (LOTO) to prevent accidental startup. Wear appropriate PPE: nitrile gloves (latex can leave powder residue), safety glasses to protect from splashes, and a hairnet or cap to keep loose hair from falling onto surfaces. If using ladders (for very high pipes), have a colleague spot you, and never stand on the top two rungs.
Step 3: Clear the Area and Protect Surfaces
Cover nearby workbenches, equipment, or open product containers with plastic sheeting or food-grade foil to catch falling debris during cleaning. This prevents cross-contamination and saves time on post-cleanup. If the pipes run above a production line, schedule cleaning during a shutdown or break to avoid interrupting operations—a key principle of lean system management, where minimizing downtime is critical.

Step-by-Step: How to Clean Plastic Pipe Covers
Now that you're prepared, let's walk through the cleaning process. Follow these steps to ensure covers are not just visually clean, but microbiologically safe.
Step 1: Dry Dusting (First Pass)
Start with a dry microfiber cloth or a soft brush attached to an extension pole. Gently wipe the entire surface of the plastic pipe cover, working from top to bottom to avoid pushing dust onto already cleaned areas. Pay extra attention to joints, where covers meet elbows or T-junctions—these are prime spots for dust buildup. For horizontal pipes, wipe in the direction of the pipe (not across it) to prevent debris from falling off the sides. If the cover has ridges or textured patterns, use a soft-bristle brush to dislodge trapped dust.
Step 2: Pre-Rinse (For Heavy Grime)
If the covers are visibly greasy or have sticky residue (e.g., from oil mist in a fryer area), follow dry dusting with a pre-rinse. Fill a spray bottle with warm water and mist the surface lightly—avoid soaking, as excess water can seep into pipe joints or drip onto equipment below. Let the water sit for 1-2 minutes to loosen grime, then blot with a clean microfiber cloth.
Step 3: Detergent Application and Scrubbing
Mix your food-grade detergent with warm water according to the label (typically 1-2 tablespoons per gallon). Transfer the solution to a spray bottle and apply a light, even coat to the plastic pipe cover. Let it sit for 3-5 minutes—this gives the detergent time to break down oils and residues without drying. Then, use a non-abrasive sponge or soft brush to scrub gently. Focus on problem areas: spots with dried liquid, sticky patches, or visible discoloration. For vertical pipes, scrub from bottom to top to prevent dirty water from running onto clean areas.
Pro tip: If you're cleaning a long stretch of pipe, work in small sections (2-3 feet at a time) to avoid letting the detergent dry on the surface. Dried detergent can leave streaks that are harder to rinse off.
Step 4: Thorough Rinsing
Rinsing is just as important as scrubbing—detergent residue can attract more dirt and may not be food-safe if left behind. Use a spray bottle with clean, warm water to rinse the cover, again working in small sections. After spraying, wipe immediately with a damp microfiber cloth to remove loosened grime and detergent. For hard-to-reach areas, use an extension pole with a damp cloth attachment. Repeat until the cloth comes away clean, with no soapy film or residue.
Step 5: Sanitizing (Critical for Food Safety)
Cleaning removes visible dirt, but sanitizing kills invisible pathogens. Prepare your sanitizer according to the manufacturer's instructions—for example, chlorine-based sanitizers often require dilution to 100-200 ppm, while quats may need 200-400 ppm. Use a fresh spray bottle (labeled clearly for sanitizer only) to apply the solution evenly to the plastic pipe cover. Ensure every inch is covered, including joints and edges. Let the sanitizer sit for the required contact time (usually 1-10 minutes, depending on the product)—set a timer to avoid cutting this step short. Do not rinse unless the label specifies (most food-safe sanitizers are "no-rinse" and air-dry safely).
Step 6: Drying and Final Inspection
After sanitizing, allow the plastic pipe cover to air dry completely, or wipe with a clean, dry microfiber cloth to speed up the process. Drying is crucial—moisture left on the surface can lead to mold or bacterial growth. Once dry, inspect the cover with a flashlight. Check for streaks, remaining residue, or damage like cracks or tears. If you spot damage, replace the cover immediately—even small cracks can trap bacteria. If residue remains, repeat the detergent and rinsing steps.

Integrating Plastic Pipe Cover Cleaning into Your Lean System
Cleaning plastic pipe covers shouldn't be a one-time "deep clean" project—it needs to be part of your facility's regular maintenance routine. This is where lean system principles come into play. Lean, at its core, is about eliminating waste (including the waste of time spent fixing preventable issues) and creating consistent, repeatable processes. Here's how to weave pipe cover cleaning into your lean workflow:
1. Map the "5S" Framework to Pipe Cover Care
The 5S methodology—Sort, Set in Order, Shine, Standardize, Sustain—provides a roadmap for keeping your workspace organized and clean. For plastic pipe covers:
- Sort: Identify all pipe covers in your facility and label them by zone (e.g., "Packaging Line A," "Prep Area Workbench 3") so they're easy to track.
- Set in Order: Store cleaning supplies (microfiber cloths, sanitizer, extension poles) in a designated, accessible location near the zones with the most pipe covers—this reduces time wasted searching for tools.
- Shine: Schedule regular cleaning (e.g., daily for high-traffic zones, weekly for low-traffic areas) and assign ownership to specific team members (e.g., the line lead for Packaging Line A is responsible for its pipe covers).
- Standardize: Create a checklist outlining the cleaning steps, frequency, and tools needed. Post it near the cleaning supplies or include it in your digital workflow system (e.g., Trello, Asana) for easy reference.
- Sustain: Conduct monthly audits to ensure the process is followed, and gather feedback from the team—maybe they've noticed a faster way to reach a high pipe or a more effective detergent. Adjust the process as needed to keep it practical.
2. Link Cleaning to Preventive Maintenance Schedules
Your facility already has preventive maintenance (PM) schedules for equipment like conveyors or mixers—add plastic pipe covers to this list. For example, if the Packaging Line undergoes PM every two weeks, include a pipe cover inspection and cleaning as part of that checklist. This ensures the task doesn't fall through the cracks and leverages existing routines.
Common Challenges and Solutions for Plastic Pipe Cover Cleaning
Even with a solid process, you'll likely hit snags. Here are the most common challenges food processors face when cleaning plastic pipe covers, and how to solve them:
Challenge: Pipes are in hard-to-reach areas (e.g., high ceilings, tight spaces between machinery).
Solution: Invest in extendable tools like telescoping microfiber dusters or spray bottles with long nozzles. For extremely high pipes, use a stable platform (not a ladder) with guardrails, and always have a spotter. If space is too tight for manual cleaning, consider installing removable plastic pipe covers that can be taken down, cleaned, and reattached—this is especially useful near complex machinery.
Challenge: Covers have stubborn, sticky residue (e.g., from syrup splatters or oil mist).
Solution: For organic residues, use an enzymatic cleaner (food-safe, of course) instead of standard detergent. Enzymes break down proteins, fats, and sugars more effectively than soap alone. Apply, let sit for 5-10 minutes, then scrub gently. Avoid using scrapers or abrasive pads—they'll scratch the plastic.
Challenge: Moisture buildup in pipe joints leads to mold or mildew.
Solution: After cleaning, use a small fan to blow air into joints for 1-2 minutes to ensure they're dry. If moisture is a recurring issue, check if the pipe is insulated—uninsulated cold pipes can sweat, causing condensation. Adding pipe insulation under the plastic cover can prevent this.
Best Practices: A Quick Reference Table
| Task | Frequency | Tools Needed | Key Tip |
|---|---|---|---|
| Dry dusting (high-traffic zones) | Daily | Microfiber cloth, extension pole | Work top-to-bottom to avoid re-contaminating clean areas. |
| Detergent cleaning (all zones) | Weekly | pH-neutral detergent, non-abrasive sponge, warm water | Scrub gently—abrasion weakens plastic over time. |
| Sanitizing (food contact zones) | After detergent cleaning | Food-safe sanitizer (quats, chlorine), spray bottle | Follow contact time strictly—most require 1-10 minutes. |
| Damage inspection | Monthly | Flashlight, checklist | replace covers with cracks/tears immediately—don't patch. |
Conclusion: Small Steps, Big Impact on Food Safety
Plastic pipe covers might not be the most glamorous part of your food processing facility, but they're a cornerstone of a safe, compliant operation. By taking the time to clean them regularly, using food-safe tools and methods, and integrating the task into your lean system, you're not just checking a box on an audit list—you're protecting your products, your customers, and your brand. Remember: food safety is a team sport. Train your staff to see pipe covers as part of their responsibility, celebrate small wins (like acing an audit with zero pipe cover issues), and keep refining your process. After all, in the world of food processing, the difference between good and great often lies in the details—and plastic pipe covers are one detail you can't afford to overlook.