- Company Articles
- Products and Technology
- Product knowledge
- How to Customize Aluminum Profile 3 Way Connectors for Your Industry

How to Customize Aluminum Profile 3 Way Connectors for Your Industry
Related Product
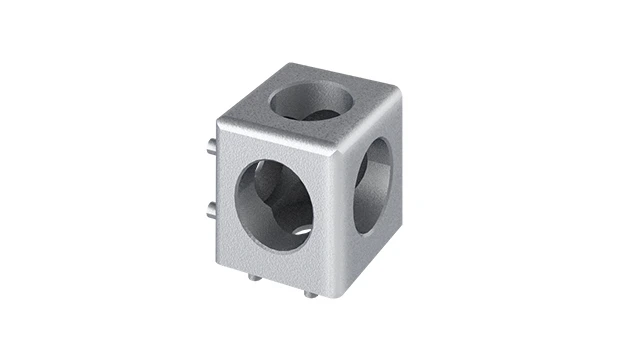
Aluminum Profile 3 Way Connector
The 3 way - squared corner connector is an external fastening method that is typically used to create a corner connection between three profiles. It is a heavy-duty connection that is simple to use and provides a polished look.
Introduction: The Backbone of Modular Systems
In the world of industrial design and manufacturing, the difference between a smooth, efficient workflow and a clunky, frustrating one often comes down to the smallest components. Take, for example, the aluminum profile 3 way connector—a part that plays a massive role in holding together everything from production workbenches to material racks. These connectors are the unsung heroes of modular systems, allowing businesses to build, adapt, and expand structures with ease. But here's the thing: no two industries (or even two workspaces) are exactly alike. What works for a small electronics workshop might fail miserably in a heavy-duty automotive plant, and vice versa. That's where customization comes in. By tailoring your aluminum profile 3 way connectors to your specific needs, you're not just buying a part—you're investing in a solution that fits your workflow like a glove. In this article, we'll walk through why customization matters, how to approach the process, and real-world examples of how it transforms industries. Whether you're a seasoned operations manager or just starting to explore modular systems, this guide will help you turn generic components into tools that drive efficiency.
Understanding Aluminum Profile 3 Way Connectors: More Than Just a "Joint"
Before diving into customization, let's start with the basics: what exactly is an aluminum profile 3 way connector, and why is it so crucial? At its core, this connector is a small, often T-shaped or Y-shaped component designed to join three pieces of aluminum extrusion profile at specific angles. Think of it as the "cornerstone" of modular structures—without it, you'd be limited to linear builds, unable to create the right angles, layers, or branches needed for complex setups like workbenches or material racks.
Most standard aluminum profile 3 way connectors are made from aluminum alloys (like 6063 or 6061), chosen for their lightweight strength, corrosion resistance, and machinability. They typically come in fixed angles (90°, 45°, etc.) or adjustable designs, with holes or slots to accommodate bolts, screws, or other aluminum profile accessories. But standard doesn't always mean "one-size-fits-all." For instance, a fixed 90° connector might work for a simple shelf, but if your workspace requires a 135° angle to fit around a conveyor belt, that standard part becomes useless. Similarly, a connector rated for 50kg might buckle under the weight of heavy automotive parts, risking damage or injury.
The key here is recognizing that aluminum profile 3 way connectors aren't just "joints"—they're load-bearing, precision-engineered components that directly impact the safety, durability, and functionality of your entire system. And when off-the-shelf options fall short, customization becomes necessary.

Why Customization Matters: Breaking Free from "Good Enough"
Let's be honest: standard components are convenient. They're readily available, affordable, and work for most basic setups. But in industries where precision, safety, or efficiency are non-negotiable, "good enough" can cost you time, money, and even reputation. Here's why customization is worth the investment:
1. Solving Unique Spatial Challenges
Every workspace has quirks—low ceilings, uneven floors, tight corners, or existing equipment that can't be moved. A standard 3 way connector with a fixed height might force you to redesign an entire workbench to fit, whereas a custom connector with a shorter base could let you work around that immovable machine. For example, a pharmaceutical lab with strict cleanroom requirements might need connectors with rounded edges to prevent dust buildup, or a food processing plant might require corrosion-resistant finishes to withstand daily washdowns. Standard connectors rarely account for these specifics.
2. Boosting Load Capacity and Safety
Load capacity is a make-or-break factor, especially in heavy industries. A standard connector rated for 100kg might seem sufficient until you realize your daily operations involve lifting 150kg components. Customization lets you beef up the connector's design—thicker walls, reinforced stress points, or high-strength alloys—to handle those heavier loads without compromising safety. In manufacturing, where worker safety is paramount, this isn't just an upgrade; it's a necessity.
3. Compatibility with Existing Systems
Many businesses already have investments in aluminum extrusion profiles, workbenches, or material racks. Switching to a new system because your current connectors don't fit can be costly and disruptive. Custom connectors, however, can be designed to work with your existing aluminum profile accessories—whether that means matching non-standard hole patterns, adapting to older profile sizes, or integrating with specialized tools like roller tracks or caster wheels. This compatibility ensures you get the benefits of a new component without ditching your current setup.
4. Enhancing Ergonomics and Workflow
A workspace that's ergonomically designed reduces fatigue, errors, and injuries. Custom connectors can help here, too. For example, a manufacturing plant might need a workbench with adjustable height, requiring 3 way connectors that can lock at multiple angles to raise or lower shelves. Or a logistics facility might need connectors with integrated roller track mounts to create a seamless flow from rack to conveyor. These small adjustments add up, turning a generic workspace into one that works
with
your team, not against them.
| Feature | Standard Connector | Custom Connector |
|---|---|---|
| Angle Options | Limited (90°, 45°, fixed) | Tailored to specific angles (e.g., 120°, 135°) |
| Load Capacity | Pre-set (e.g., 50kg, 100kg) | Engineered for your exact needs (e.g., 200kg, 500kg) |
| Material Finish | Basic (anodized, powder-coated) | Specialized (ESD-safe, chemical-resistant, anti-corrosive) |
| Compatibility | Fits standard aluminum extrusion profiles only | Works with existing profiles, accessories, or tools |

Step-by-Step: How to Customize Your Aluminum Profile 3 Way Connectors
Customizing a connector might sound intimidating, but it's a straightforward process when broken down into clear steps. Let's walk through each phase, from assessing your needs to finalizing the design.
Step 1: Audit Your Workspace and Workflow
The first rule of customization? Start with the end in mind. Before picking up a pen (or a CAD program), take a close look at your workspace and ask: What problem are we trying to solve? Is it a load issue? A spatial constraint? Incompatibility with tools? For example, if your team is struggling to move heavy bins from a material rack to a workbench, the issue might be that the current 3 way connectors can't support a roller track system. Or if your electronics assembly line needs ESD protection, standard connectors (which conduct static) could damage sensitive components.
Step 2: Define Your Requirements (Measure Twice, Customize Once)
Once you've identified the problem, it's time to get specific. List out your requirements, including:
-
Load capacity
: How much weight will the connector need to support? (Be honest—overestimating is better than underestimating.)
-
Angle and orientation
: Do you need a fixed angle (e.g., 90°) or an adjustable one? Will the connector join profiles in a T-shape, Y-shape, or another configuration?
-
Material and finish
: Will it be used in a wet environment (requiring corrosion resistance)? Does it need to be ESD-safe (common in electronics)? Or lightweight (for mobile structures like turnover trolleys)?
-
Compatibility
: What type of aluminum extrusion profile are you using? (e.g., 2020, 3030, 4040 series) What accessories (bolts, brackets, roller tracks) need to fit?
Write these down—preferably with measurements—and share them with your supplier. The more details you provide, the less room there is for mistakes.
Step 3: Choose the Right Material and Manufacturing Process
Aluminum is the go-to material for most connectors, but not all aluminum is created equal. For example, 6061 aluminum offers higher tensile strength (great for heavy loads), while 6063 is more malleable (better for complex shapes). If your industry requires extreme durability (like automotive or aerospace), you might even opt for a stainless steel or aluminum-stainless hybrid design.
The manufacturing process matters too. CNC machining is ideal for precision cuts and complex designs, while die casting works well for high-volume orders. For prototyping, 3D printing can help you test a design before committing to mass production. Discuss these options with your supplier to balance cost, quality, and lead time.
Step 4: Design and Prototyping (Don't Skip the Test Run)
Now comes the fun part: turning your requirements into a design. Many suppliers offer in-house design services, using CAD software to create a 3D model of your custom connector. Review this model carefully—check dimensions, angles, and compatibility with your aluminum extrusion profile and accessories. Once the design is finalized, ask for a prototype. A prototype lets you test the connector in real-world conditions: Does it fit? Can it handle the load? Is it easy to install? This step might add a few weeks to the process, but it's worth it to avoid costly mistakes later.
Step 5: Partner with a Supplier Who Gets Your Industry
Not all suppliers specialize in customization. Some focus on standard parts and see custom orders as a hassle. To avoid frustration, look for a supplier with experience in your industry. For example, a supplier who works with automotive plants will understand the need for high-load connectors, while one specializing in electronics will know ESD requirements inside out. Ask for references, check their portfolio, and make sure they're willing to collaborate (not just take orders). A good supplier will act as a partner, offering suggestions to improve your design—like a better angle or a lighter material—based on their expertise.
Example: Auditing a Small Electronics Workshop
A small electronics workshop was using standard 90° aluminum profile 3 way connectors to build their ESD workbench. Over time, they noticed two issues: (1) the connectors were too bulky, leaving little space for tool holders, and (2) static buildup on the connectors was occasionally damaging circuit boards. By auditing their workflow, they identified that they needed two customizations: a slimmer connector design to save space and an ESD-safe coating to protect components.
Industry-Specific Customization: From Factory Floors to Labs
Custom aluminum profile 3 way connectors aren't a one-trick pony—they adapt to nearly every industry. Let's look at how different sectors use customization to solve unique challenges:
1. Automotive Manufacturing: Heavy-Duty and Heat-Resistant
Automotive plants deal with heavy parts, high temperatures, and constant motion. Standard connectors often fail here because they can't handle the stress of lifting engines or withstanding the heat of welding areas. One automotive supplier we worked with needed a 3 way connector that could support a roller track system for moving engine blocks (each weighing ~200kg). We customized a connector with reinforced walls (using 6061 aluminum), heat-resistant powder coating, and larger bolt holes to fit heavy-duty fasteners. The result? A system that reduced material handling time by 30% and eliminated connector failures entirely.
2. Electronics: ESD-Safe and Space-Saving
In electronics manufacturing, static electricity is the enemy—it can fry circuit boards in an instant. Standard aluminum connectors conduct static, so many electronics firms opt for custom ESD-safe versions. For example, a smartphone assembly plant needed connectors for their ESD workbench that were both slimmer (to save space for tools) and static-dissipative. We designed a low-profile connector with a black ESD coating (resistivity: 10^6–10^9 ohms) and integrated cable management slots to keep wires organized. The slimmer design freed up 15% more workspace per bench, and the ESD coating reduced component damage by 40%.
3. Logistics and Warehousing: Mobile and Adaptable
Warehouses rely on turnover trolleys, material racks, and conveyor systems to keep goods moving. These structures need to be mobile (so they can be repositioned) and adaptable (to handle different-sized packages). One logistics company needed a 3 way connector for their turnover trolleys that could adjust angles on the fly—allowing the trolley to switch from a flat shelf to a tilted rack for better access. We customized an adjustable connector with a locking lever (to secure angles) and lightweight aluminum (to keep the trolley easy to push). The result? Workers could reconfigure the trolley in 30 seconds instead of 5 minutes, cutting downtime during shifts.
4. Food and Beverage: Corrosion-Resistant and Easy to Clean
Food processing plants are wet, messy environments—think daily washdowns with harsh chemicals. Standard connectors here rust or degrade quickly, risking contamination. A bakery we worked with needed connectors for their material racks (used to store flour and sugar bags). We customized a stainless steel 3 way connector (instead of aluminum) with a smooth, crevice-free design (to prevent flour buildup) and food-grade coating. The connectors now withstand daily washdowns and have lasted 3x longer than the previous aluminum versions.
Common Challenges in Customization (and How to Avoid Them)
Customization isn't always smooth sailing. Here are a few common pitfalls and how to steer clear of them:
Challenge 1: Overcomplicating the Design
It's easy to get carried away adding "nice-to-have" features (e.g., extra holes, fancy finishes) that don't actually solve a problem. This can drive up costs and extend lead times. Solution: Stick to your core requirements. Ask: "Does this feature make the connector stronger, safer, or more efficient?" If not, leave it out.
Challenge 2: Underestimating Lead Times
Custom connectors take longer to produce than standard ones—design, prototyping, and manufacturing all add time. Some businesses rush the process, leading to mistakes. Solution: Plan ahead. Give yourself 4–6 weeks (or more for complex designs) from initial inquiry to delivery. Build buffer time into your project timeline.
Challenge 3: Choosing the Wrong Supplier
Not all suppliers have the tools or expertise for customization. Working with an inexperienced supplier can result in poor quality, missed deadlines, or connectors that don't fit. Solution: Do your homework. Ask for samples of past custom work, check reviews, and ensure they have in-house design and prototyping capabilities. A good supplier will be transparent about their limits—if they say, "We can't do that," it's better to hear it upfront than after you've paid a deposit.
Challenge 4: Ignoring Testing
Skipping the prototype phase to save time is a risky move. A design might look perfect on paper but fail in real-world use (e.g., a connector that cracks under load). Solution: Insist on a prototype. Test it rigorously—simulate the load, environment, and daily use. If it fails, iterate and test again. It's better to spend a little extra on prototyping than to replace hundreds of faulty connectors later.
Conclusion: Customization as a Competitive Edge
At the end of the day, customizing your aluminum profile 3 way connectors isn't just about getting a "better part"—it's about building a system that works
for you
. In industries where efficiency, safety, and adaptability are key, generic components hold you back. Customization, on the other hand, lets you turn limitations into opportunities: a workspace that fits your team, a process that flows smoothly, and a bottom line that benefits from reduced downtime and increased productivity.
The process might seem daunting at first, but by following the steps outlined here—auditing your needs, defining requirements, choosing the right materials, and partnering with a reliable supplier—you'll be well on your way to connectors that are as unique as your industry. Remember: the best systems aren't built from off-the-shelf parts. They're built from solutions that are tailored, tested, and trusted. So don't settle for "good enough." Customize, adapt, and watch your workflow transform.