- Company Articles
- Products and Technology
- Product knowledge
- How to Customize Aluminum Workbench D for Your Specific Manufacturing Needs

How to Customize Aluminum Workbench D for Your Specific Manufacturing Needs
Related Product
Aluminum Workbench D
Aluminum tube workbench is more flexible and durable, compared with traditional PE/ABS coated steel tube. It is easy to assemble, anti corrosion, rust protection, and recycle use after disassemble.
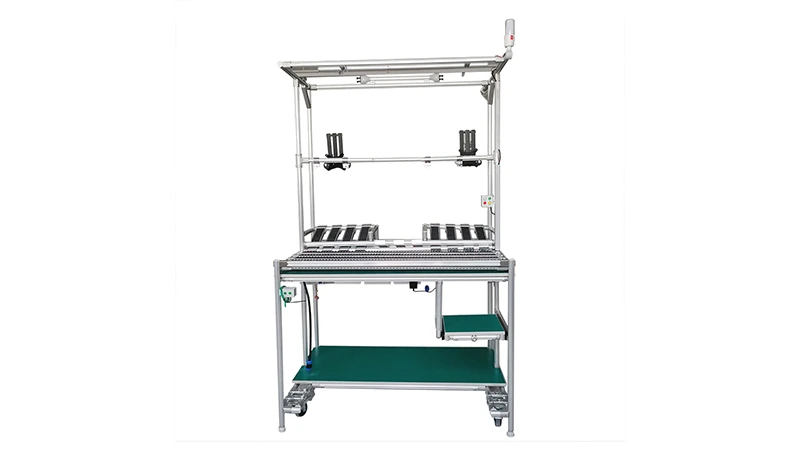
In the fast-paced world of manufacturing, the right tools can make or break your team's efficiency. Aluminum Workbench D has emerged as a favorite for its flexibility, but to truly unlock its potential, you need to tailor it to your unique workflow. Let's dive into how to transform this versatile workbench into a cornerstone of your production line.
Why One-Size-Fits-All Workbenches Fall Short
Walk into any manufacturing facility, and you'll likely spot workbenches that feel like afterthoughts. They're either too tall, too short, missing critical storage, or awkwardly shaped for the tasks at hand. These mismatches aren't just minor inconveniences—they translate to wasted time, increased fatigue, and even safety risks. For example, a workbench that's too low forces operators to hunch over, leading to back strain and slower assembly times. One that's too narrow might cause tools to pile up, creating clutter that slows down access to essential equipment.
This is where customization shines. Aluminum Workbench D, with its modular design and aluminum profile foundation, isn't just a table—it's a blank canvas. Whether you're assembling electronics, packaging parts, or testing machinery, tailoring it to your specific needs can turn a generic work surface into a productivity powerhouse.
Getting to Know Aluminum Workbench D: The Basics
Before diving into customization, let's start with the fundamentals. Aluminum Workbench D is built around a lightweight yet durable aluminum profile frame, which sets it apart from heavier steel alternatives. Its standard configuration typically includes a single deck (without casters, as referenced in many supplier catalogs) and a simple, clean design. But what really makes it special is its compatibility with a wide range of aluminum profile accessories—think tool holders, shelving, and even conveyor attachments. This modularity means you're never stuck with the "standard" version; you can add, remove, or reconfigure components as your needs evolve.
Aluminum, as a material, brings unique advantages to the table. It's resistant to corrosion, making it ideal for environments where moisture or chemicals are present. It's also easy to clean, a must for industries like food processing or electronics manufacturing where cleanliness is critical. Plus, aluminum's strength-to-weight ratio means the workbench is sturdy enough to support heavy tools and materials without being difficult to move (if you add casters later, that is).

Step 1: Map Out Your Workflow Needs (The Most Critical Step)
Customization starts with a question: What will this workbench actually do? To answer that, you need to map your workflow in detail. Grab a notebook (or a whiteboard—old school works!) and walk through a typical day at the workbench. Ask: What tasks are performed here? How much space do those tasks require? What tools or materials need to be within arm's reach? How heavy are the items being handled? And perhaps most importantly: Who will be using the workbench, and what are their ergonomic needs?
Let's break this down with an example. Suppose you're customizing Aluminum Workbench D for a small electronics assembly line. Your operators spend most of their time soldering components, testing circuit boards, and storing small parts. In this case, key needs might include: a heat-resistant surface for soldering, built-in storage bins for tiny screws and resistors, and a height that aligns with the average operator's elbow level (typically 36–40 inches for standing workbenches). Ignore any of these, and you'll end up with a workbench that fights against your team instead of supporting them.
Don't forget to consider future needs, too. If you're planning to expand production or add new tasks down the line, leave room for upgrades. Maybe you don't need a conveyor attachment now, but if your workflow might involve moving parts to the next station later, designing the workbench to accommodate that integration will save you time and money later.

Step 2: Choosing the Right Materials and Components
Aluminum Workbench D's versatility hinges on its components, and the star of the show is the aluminum profile. These extruded aluminum rails come in various sizes (like 2020, 3030, or 4040 series) and feature T-slots that let you attach accessories without drilling or welding. For most manufacturing tasks, a 4040 aluminum profile is a safe bet—it's strong enough to support heavy tools but lightweight enough to keep the workbench maneuverable if needed. If you're working with particularly heavy loads (like automotive parts), you might opt for a thicker 4080 profile, but for electronics or light assembly, 3030 could be more cost-effective.
Next, consider the work surface. The standard single deck of Aluminum Workbench D is a good starting point, but you can upgrade it based on your needs. For chemical-resistant environments, a phenolic resin top is ideal. If you need to dissipate static electricity (common in electronics manufacturing), an ESD (electrostatic discharge) surface is a must. For tasks that generate heat, like welding or soldering, a steel or aluminum honeycomb panel top can withstand high temperatures without warping.
Accessories are where customization gets fun—and functional. Here are a few key components to consider:
- Casters and Leveling Feet: If your workbench needs to move (e.g., to follow a mobile assembly line), add swivel casters with brakes for stability. For stationary setups, anti-slip adjustable leveling feet will keep the bench steady on uneven floors.
- Shelving and Racks: Use aluminum profile accessories like side brackets to add upper shelves for tool storage or lower racks for bins of materials. A material rack with 3 rows and 3 floors, for example, can keep frequently used parts organized and within reach.
- Tool Mounts: T-slots in the aluminum profile let you attach tool holders, monitor arms, or even small conveyor sections. Imagine having your screwdrivers, pliers, and torque wrenches mounted directly to the bench—no more rummaging through drawers.
- Roller Tracks: For workflows that involve moving parts across the bench (e.g., from assembly to inspection), adding a plastic roller track guide rail (yellow or grey, depending on your color-coding system) can turn the workbench into a mini conveyor, reducing manual lifting.
Step 3: Designing the Layout—Ergonomics First
Ergonomics isn't just a buzzword; it's the backbone of a sustainable, efficient workspace. A well-designed workbench reduces physical strain, which in turn boosts focus and productivity. Let's break down the key ergonomic considerations for Aluminum Workbench D:
Height: The workbench should be at elbow height when operators are standing (or seated, if using a seated setup). For standing work, this is typically 36–42 inches, but it varies based on your team's average height. If you have operators of different heights, consider an adjustable-height workbench—some models let you raise or lower the surface by a few inches using crank handles or hydraulic lifts.
Depth and Width: The workbench should be deep enough to accommodate your tasks without forcing operators to stretch. A depth of 24–30 inches is standard for most assembly work, but if you're working with large parts (e.g., appliance panels), you might need 36 inches or more. Width depends on how many operators will use the bench—2–3 feet per person is a good rule of thumb to avoid crowding.
Tool and Material Placement: The "golden zone" of a workbench is the area within arm's reach—about 18 inches from the operator's body. This is where frequently used tools and materials should live. Less often used items can go on upper shelves or lower racks. For example, if an operator uses a screwdriver 50 times an hour, it should be mounted in the golden zone; a manual torque wrench used once a shift can go on a shelf above.
To visualize this, sketch a rough layout of the workbench, marking where tools, materials, and the work surface will go. You might even use tape on the floor to outline the bench's footprint and simulate how operators will move around it. This simple step can reveal issues like blocked pathways or cramped work areas before you invest in components.
Aligning with Lean System Principles
If your facility follows lean manufacturing principles—focused on minimizing waste and maximizing value—customizing Aluminum Workbench D becomes even more critical. Lean systems thrive on efficiency, and a customized workbench can eliminate three common types of waste: motion (unnecessary movement), inventory (excess tools/parts), and waiting (time spent searching for items).
For example, adding a roller track to the edge of the workbench creates a "pull system" where parts flow to the operator only when needed, reducing inventory buildup. Mounting tools directly to the aluminum profile using T-slot accessories eliminates the need for toolboxes, cutting down on motion waste as operators no longer have to walk to a separate storage area. Even something as simple as color-coding bins (using yellow or grey plastic roller track guide rails to separate part types) can reduce errors and waiting time.
A lean system supplier can be a valuable partner here. They'll understand how to integrate your customized workbench with other lean tools like flow racks, kanban boards, or conveyor systems. For instance, if your workbench is part of a larger assembly line, a supplier might recommend adding a small conveyor section that feeds directly into a flow rack, ensuring parts arrive exactly when the operator is ready for them.
Case Study: How a Electronics Plant Cut Waste with Custom Aluminum Workbench D
A mid-sized electronics manufacturer was struggling with bottlenecks in their circuit board assembly line. Operators were spending 20% of their time walking to retrieve tools or parts, and the standard workbench's narrow surface caused frequent clutter. By customizing Aluminum Workbench D, they made three key changes:
- Added a 30-inch deep aluminum honeycomb panel top to increase work surface area.
- Mounted tool holders and a small parts bin rack using aluminum profile accessories, keeping essentials within arm's reach.
- Installed a plastic roller track guide rail along one edge to feed circuit boards from the previous station directly onto the workbench.
The result? A 15% increase in assembly speed and a 30% reduction in operator fatigue, according to post-implementation surveys. The workbench became so integral to their lean system that they rolled out the same customization across all 12 assembly stations.
Standard vs. Custom: A Quick Comparison
| Feature | Standard Aluminum Workbench D | Customized Version Example |
|---|---|---|
| Size | Fixed 48"L x 24"D x 36"H | Adjustable height (36"–42"), 60"L x 30"D for larger tasks |
| Mobility | No casters (stationary) | Locking swivel casters for easy movement between stations |
| Surface | Basic plywood or MDF top | ESD phenolic resin top for static-sensitive electronics |
| Integration | Standalone | Roller track guide rail to connect with conveyor system |
| Accessories | None included | Tool holders, upper shelf, and 3-row material rack |
Avoiding Common Customization Mistakes
Customizing a workbench is exciting, but it's easy to overcomplicate things. Here are a few pitfalls to steer clear of:
Over-customizing: Adding every bell and whistle might seem like a good idea, but unnecessary features can make the workbench bulky and expensive. For example, if you rarely move the workbench, skip the casters—they'll just add cost and potential instability. Focus on the 2–3 features that will have the biggest impact on your workflow.
Ignoring operator input: Who better to know what the workbench needs than the people using it every day? A quick interview or survey with your operators can reveal critical insights—like a need for a lower shelf to store personal tools or a cutout for a footrest during long shifts. Skipping this step often leads to well-intentioned but ultimately unhelpful customizations.
Forgetting scalability: Your manufacturing needs will change over time. A workbench that's perfectly tailored to today's tasks might become obsolete in a year. Choose modular components (like aluminum profile accessories that can be added or removed) to ensure you can adapt as your workflow evolves.
Sacrificing stability for flexibility: Casters are great for mobility, but if your workbench supports heavy equipment, make sure they're rated for the weight. Similarly, avoid overloading shelves—even strong aluminum profiles have limits. Check the load capacity of your aluminum profile and accessories (most suppliers list this in their specs) to prevent wobbling or collapse.
Working with Suppliers: Getting What You Need
Once you've mapped out your customization plan, it's time to partner with a supplier. Not all aluminum workbench suppliers are created equal—look for one with experience in manufacturing applications and a track record of working with lean systems. Here's how to ensure the process goes smoothly:
Be specific about your needs: Don't just say, "I need a bigger workbench." Provide details like: maximum weight capacity, required height range, types of tools/materials to be used, and any integration needs (e.g., "must connect to a 24-inch wide conveyor"). The more specific you are, the better the supplier can tailor their quote.
Ask about lead times: Customization takes time—typically 2–4 weeks, depending on the complexity. If you're on a tight schedule, discuss rush options, but be prepared for a premium. Some suppliers keep common components (like aluminum profiles or casters) in stock, which can speed up production.
Inquire about warranties: Aluminum profiles and accessories should come with a warranty (usually 1–5 years). Make sure the supplier covers both materials and labor for any defects. A lean system supplier who stands behind their products is more likely to help resolve issues quickly if they arise.
Request a prototype (if possible): For complex customizations, ask if you can test a small prototype first. This might cost a bit extra, but it's worth it to avoid investing in 10 workbenches only to realize the roller track is positioned incorrectly or the height adjustment mechanism is clunky.
Final Thoughts: Your Workbench, Your Way
Aluminum Workbench D isn't just a piece of furniture—it's a tool that can elevate your entire manufacturing process. By taking the time to assess your workflow, choose the right aluminum profile and accessories, and align with lean system principles, you can create a workbench that feels like it was designed specifically for your team. Remember, customization isn't about adding flashy features; it's about solving problems. Whether that means reducing motion waste, improving ergonomics, or integrating with other systems, the goal is to make your operators' jobs easier, faster, and safer.
So, take a walk through your production line, talk to your operators, and start sketching. Your customized Aluminum Workbench D is waiting—and it might just be the key to unlocking the next level of efficiency in your facility.