- Company Articles
- Products and Technology
- Product knowledge
- How to Cut 4040A EU Standard Aluminum Profile Without Damaging the Surface

How to Cut 4040A EU Standard Aluminum Profile Without Damaging the Surface
Related Product
4040A EU Standard Aluminum Profile
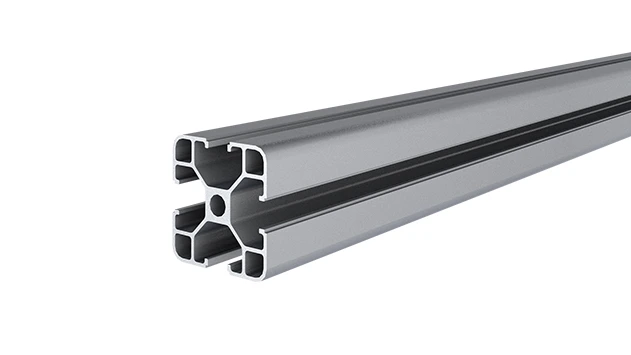
4040A is a 4.00x4.00 CM fractional 40 series square extrusion T-slot profile with four open T-slots, each side with 4.00cm face.
If you've ever stood in front of a stack of 4040A EU standard aluminum profiles, tape measure in hand and a cutting tool nearby, you know the feeling: excitement about building something functional—maybe a workbench, a material rack, or a custom conveyor frame—tinged with nervousness about ruining that smooth, anodized surface. Aluminum profiles like the 4040A are prized for their clean look and durability, but one slip with a saw can leave a scratch, a dent, or a jagged edge that turns a professional project into a frustrating mess. I've been there too—early in my career, I rushed a cut on a 4040A profile for a client's workbench and ended up with a deep gash along the edge. It took hours of sanding and touch-up to fix, and I vowed never to make that mistake again. Over the years, I've learned that cutting aluminum profiles without surface damage isn't about luck; it's about preparation, the right tools, and a little patience. Let's walk through the process step by step, so you can cut with confidence and keep those profiles looking as good as the day they arrived.
Why Surface Protection Matters for 4040A Aluminum Profiles
First, let's talk about why you should care so much about avoiding surface damage. The 4040A EU standard aluminum profile isn't just a piece of metal—it's a precision-engineered component. Its smooth, anodized surface does more than look nice: it resists corrosion, reduces friction (important if you're using it with roller tracks or sliding parts), and ensures a tight fit with aluminum profile accessories like connectors, brackets, and end caps. A scratch or dent can compromise that fit—imagine trying to slide an aluminum profile rubber strip into a groove that's been nicked; it might not sit flush, leaving gaps that collect dust or throw off your project's alignment. Even a small blemish can stand out like a sore thumb on a finished workbench or rack, especially if you're building something for a client or displaying it in a professional space. Plus, repairing surface damage takes time—time you could be spending assembling your project. So, protecting the surface isn't just about aesthetics; it's about efficiency and quality.
Step 1: Gather Your Tools and Materials (And Yes, This Includes Tape)
Before you even think about turning on a saw, gather everything you need. Skipping this step is where most people go wrong—running back and forth for tools while your profile is clamped loosely, or realizing mid-cut that your blade is dull. Here's what you'll need:
| Tools/Materials | Purpose | Pro Tip |
|---|---|---|
| 4040A EU standard aluminum profile (measured to length) | The profile you're cutting—duh! | Double-check measurements twice before cutting. Aluminum isn't cheap to replace. |
| Masking tape (low-tack, 1-2 inch width) | Protects the surface from scratches and helps mark straight lines. | Use low-tack tape to avoid leaving residue. Painter's tape works great here. |
| Measuring tape and square (metal or plastic, rigid) | For marking accurate, straight lines. | A metal square is sturdier than plastic—less likely to flex when marking. |
| Aluminum pipe clamp (2-4, depending on profile length) | Secures the profile to your workbench to prevent movement during cutting. | Look for clamps with soft, non-marring jaws—rubber or plastic coated—to avoid indenting the profile. |
| Cutting tool (miter saw, circular saw, or hacksaw) | The tool that does the cutting—more on this later. | A miter saw with a fine-tooth blade is ideal for straight, clean cuts on 4040A profiles. |
| Carbide-tipped saw blade (60-80 teeth, 10-12 inch diameter) | Blades designed for aluminum cut cleaner and reduce chipping. | Avoid using wood-cutting blades—they're too coarse and will tear the aluminum. |
| Deburring tool (handheld or electric) | Removes sharp edges and burrs after cutting. | A manual deburring tool with a replaceable blade is affordable and easy to control. |
| Safety gear: gloves, safety glasses, dust mask | Protects hands from sharp edges, eyes from aluminum chips, and lungs from dust. | Aluminum dust is fine and can irritate lungs—don't skip the mask. |
| Soft cloth and isopropyl alcohol | Cleans off tape residue and fingerprints after cutting. | Microfiber cloths work best—they won't scratch the surface. |
Notice I included aluminum pipe clamp in that list? That's not an accident. Even if you think you can "hold it steady," aluminum is slippery, and a sudden movement during cutting can lead to both a messy cut and a scratched surface. Invest in good clamps—they're worth every penny.

Step 2: Prepare the Profile and Workspace
Now that you have your tools, let's set up for success. Start by clearing your workspace—no coffee mugs, loose screws, or random tools cluttering the area. You need a flat, stable surface (a workbench is ideal) and enough room to maneuver the profile without hitting anything. Next, inspect your 4040A profile. Check for any existing dents or scratches—you don't want to confuse pre-existing damage with new marks from cutting. If there's a protective film on the profile (many suppliers add this), leave it on! It's an extra layer of defense against scratches during handling.
Marking the Cut Line (The Most Overlooked Step)
Here's a secret: the key to a clean cut starts with a clean mark. Grab your masking tape and apply a strip along the length of the profile where you plan to cut. Make sure the tape is straight and covers the area where the saw blade will pass. Why tape? Two reasons: first, it protects the surface from the saw blade rubbing against it (even a minor scrape can leave a mark). Second, pencil or marker lines show up better on tape than on shiny aluminum, so you can see your cut line clearly. Use a metal square to align the tape edge with your measurement—hold the square firmly against the profile's edge, then run the tape along the square to ensure it's perfectly straight. Once the tape is on, mark your cut line directly on the tape using a sharp pencil or a fine-tip marker. I like to draw a dotted line first, then go over it with a solid line to make sure it's visible. Add a few "X" marks on the side of the line that will be the "scrap" piece—this prevents mix-ups if you're cutting multiple profiles. Trust me, there's nothing worse than cutting the wrong end because you forgot which side was which.
Securing the Profile: Clamp Like Your Project Depends On It
Now, clamp the profile to the workbench. This is critical—if the profile moves while you're cutting, the blade will bind, leaving a jagged edge or, worse, jumping and scratching the surface. Position the profile so the cut line hangs over the edge of the workbench (this prevents the saw from cutting into your bench). Place one clamp a few inches behind the cut line (on the "keep" side) and another clamp near the end of the profile to prevent it from wobbling. Tighten the clamps slowly—you want the profile secure, but not so tight that the jaws indent the aluminum. If your clamps don't have soft jaws, wrap a layer of masking tape around the clamp jaws to protect the profile. I once used a metal clamp without tape and left permanent indentations on a 4040A profile—it's a mistake you only make once.
Step 3: Choosing the Right Cutting Tool (Saws, Blades, and Why Speed Matters)
Not all cutting tools are created equal when it comes to aluminum profiles. Let's break down the options, from power tools to hand tools, and which one is best for your project.
Miter Saw: The Go-To for Straight, Clean Cuts
If you have access to a miter saw, use it. Miter saws are designed for precision cuts, and with the right blade, they'll slice through 4040A aluminum like butter. Here's how to set it up: Swap out the blade for a carbide-tipped aluminum blade with 60-80 teeth (more teeth mean a smoother cut). Avoid blades with fewer than 60 teeth—they'll tear the aluminum instead of cutting it cleanly. Set the saw to 0 degrees (for a straight cut) and adjust the speed. Most miter saws have variable speed settings; aim for 2,000-3,000 RPM. Cutting too fast generates heat, which can melt the aluminum and clog the blade; too slow and the blade will drag, causing vibrations that scratch the surface. Before cutting, lower the blade slowly to the tape (without turning it on) to check alignment—make sure the blade lines up exactly with your marked line. When you're ready, turn on the saw, let the blade reach full speed, then lower it steadily through the profile. Let the blade do the work—don't force it. If you feel resistance, ease up; forcing the saw can bend the profile or cause the blade to jump.
Circular Saw: Portable but Requires Extra Care
No miter saw? A circular saw works too, but it's trickier to keep straight. Use the same carbide-tipped blade as you would for a miter saw, and set the depth so the blade extends 1/4 inch below the profile. Clamp a straightedge (like a long piece of wood or another aluminum profile) to the workbench, parallel to your cut line, to guide the saw. Hold the saw firmly with both hands, align the blade with the mark, and start cutting. Keep the saw base flat against the straightedge—any tilting will lead to a crooked cut. Circular saws can vibrate more than miter saws, so go slow and steady to avoid scratching the profile with the saw's base plate.
Hacksaw: Old-School but Effective for Small Jobs
For small cuts or if you don't have power tools, a hacksaw will work, but it requires patience. Use a fine-tooth blade (32 teeth per inch) labeled for aluminum. Start by making a small notch at the mark with the hacksaw to guide the blade, then saw with smooth, even strokes. Let the weight of the saw do the cutting—pressing too hard will bend the blade and scratch the profile. To keep the cut straight, attach a guide block to the profile with tape (use the same masking tape trick) so the hacksaw stays aligned. Hacksawing takes longer, but it's gentle on the surface if you're careful.
Step 4: Post-Cutting Care—Deburring and Cleaning
You've made the cut—congrats! But the job isn't done yet. Even the cleanest cut leaves burrs (sharp, jagged edges) and sometimes tiny scratches from the blade. Let's fix that.
Deburring: Smooth Those Edges
Grab your deburring tool and run it along the cut edge. Most deburring tools have a rotating blade that shaves off burrs—hold it at a 45-degree angle and apply light pressure. Work slowly to avoid scratching the surface; focus only on the cut edge, not the surrounding area. If you don't have a deburring tool, a fine-grit sandpaper (400 grit or higher) wrapped around a block works too—sand in one direction, not back and forth, to prevent swirl marks. After deburring, feel the edge with your finger (wear gloves!)—it should be smooth, no sharp spots.
Removing Tape and Cleaning the Surface
Peel off the masking tape slowly at a 45-degree angle—pulling too fast can leave residue. If there's sticky residue, dampen a soft cloth with isopropyl alcohol and wipe gently. Don't use abrasive cleaners or steel wool—they'll scratch the anodized surface. Once the tape is off, inspect the profile again. If you see any minor scratches (they happen to the best of us), try buffing them with a metal polish (like Mothers Mag & Aluminum Polish) and a microfiber cloth. Apply a small amount of polish, rub in a circular motion, then wipe clean. For deeper scratches, you may need to sand with progressively finer grits (start with 600 grit, then 800, then 1000) and polish afterward. It's tedious, but worth it for a flawless finish.
Common Mistakes to Avoid (Lessons from My Early Blunders)
Even with the best instructions, it's easy to slip up. Here are the mistakes I've made (so you don't have to):
- Skipping the tape: I once thought, "I'll be careful, I don't need tape." Big mistake—the saw blade grazed the surface, leaving a thin scratch. Tape is cheap insurance.
- Using a dull blade: A dull blade tears aluminum instead of cutting it, leading to rough edges and more vibration (which causes scratches). replace blades when they start to leave jagged cuts.
- Clamping too tight: Over-tightening clamps with metal jaws left dents in a batch of profiles I was cutting for a material rack. Now I always use tape on clamp jaws or invest in soft-jaw clamps.
- Rushing the cut: I once tried to cut three profiles in five minutes to meet a deadline. The third cut was crooked, and the saw jumped, scratching the surface. Slow down—quality takes time.
Final Thoughts: Cutting with Confidence
Cutting 4040A EU standard aluminum profile without damaging the surface isn't rocket science, but it does require attention to detail. By prepping with tape, using the right tools, and taking your time, you can keep those profiles looking sharp and professional. Remember, the goal isn't just to make a cut—it's to make a cut that lets your project shine, whether it's a sleek workbench, a sturdy material rack, or a custom conveyor system. And when you're done, you'll step back, look at that clean edge, and think, "I did that—and it looks great." That's the satisfaction that makes all the prep work worth it. Now go grab your tape measure, your aluminum pipe clamp, and that 4040A profile—your next project is waiting, and it's going to look amazing.