- Company Articles
- Products and Technology
- Product knowledge
- How to Cut 4040B EU Standard Aluminum Profile: Tools & Techniques for Precision Cuts

How to Cut 4040B EU Standard Aluminum Profile: Tools & Techniques for Precision Cuts
Related Product
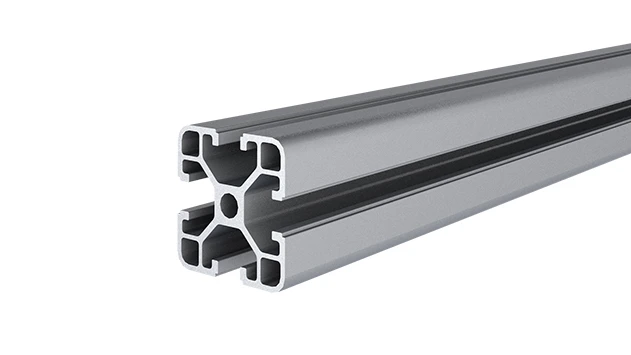
4040B EU Standard Aluminum Profile
4040B is a 4.00x4.00 CM fractional 40 series square extrusion T-slot profile with four open T-slots, each side with 4.00cm face. The profile has align-a-grooves to assist in aligning connecting profiles.
If you've ever stood in front of a pile of aluminum extrusion profile, holding a tape measure and wondering how to turn those raw lengths into something useful—like a sturdy workbench, a sleek material rack, or even part of a conveyor system—you know the first big hurdle: cutting it right. Not just "good enough" cuts, but precise, clean, and consistent ones. And when it comes to profiles like the 4040B EU standard aluminum profile, that precision matters even more. This isn't just about aesthetics; a wonky cut can throw off an entire assembly, waste material, and turn a straightforward project into a frustrating mess. So let's dive into the tools, techniques, and little tricks that will help you cut 4040B aluminum profile like a pro—no fancy workshop required (though a few key tools definitely help).
Understanding the 4040B EU Standard Aluminum Profile: Why It's Worth Getting Right
First, let's talk about what makes the 4040B EU standard aluminum profile so popular. If you're in manufacturing, warehousing, or even DIY projects, you've probably seen this profile before. It's part of the aluminum extrusion profile family, which means it's made by forcing molten aluminum through a die to create its signature T-slot design. The "4040" refers to its dimensions: roughly 40mm by 40mm, a versatile size that balances strength and flexibility. The "B" denotes a specific flange design—slightly different from the "A" or "C" variants—with grooves that make it easy to attach aluminum profile accessories like connectors, end caps, or brackets. And "EU standard" means it adheres to strict quality and dimensional specs, so you can trust that one length will match the next, as long as you cut them correctly.
Why does this matter for cutting? Well, the T-slots and precise dimensions mean every cut needs to be square, clean, and the exact length you need. A 1mm error in length might not sound like much, but when you're stacking shelves on a material rack B (3 row and 3 floor), or building a workbench where every joint needs to line up, that 1mm can turn into a noticeable gap or a wobbly structure. Plus, aluminum is soft enough that rough cuts can leave burrs or deform the T-slots, making it hard to slide in accessories later. So think of cutting as the foundation—get it right, and the rest of the project flows smoothly.
Essential Tools: What You'll Need to Cut 4040B Aluminum Profile
You don't need a million-dollar workshop, but you do need the right tools for the job. Let's break down the most common options, from budget-friendly manual tools to power tools that speed things up. I'll also share when to use each one, so you can pick based on your project size, skill level, and how much you're willing to invest.
1. The Basics: Measuring and Marking Tools
Before you even pick up a saw, you need to measure and mark your cuts. Skipping this step (or rushing it) is the number one cause of bad cuts. Here's what you'll need:
- Tape measure : A 25-foot (7.5m) tape with clear markings. Look for one with a locking mechanism to hold the tape in place—no more fumbling with one hand while marking with the other.
- Speed square : This triangular tool is a lifesaver for marking straight, 90-degree lines across the profile. The 4040B's flat sides make it easy to align the square, ensuring your mark is perpendicular to the length of the profile.
- Marker or scribe : A fine-tip permanent marker works for most cases, but if you need extra precision (or want to avoid smudges), a scribe (a sharp metal tool) can etch a thin line directly onto the aluminum. Just be careful not to scratch too deep—you don't want to weaken the profile.
- Clamps : Not technically a marking tool, but critical for holding the profile steady while you measure and cut. I prefer bar clamps or C-clamps with soft jaws to avoid denting the aluminum.
2. Cutting Tools: From Manual to Power
Now, the star of the show: the cutting tool. The right one depends on how many cuts you need to make, how precise they need to be, and how much physical effort you're willing to put in. Let's compare the options:
| Tool Type | Best For | Precision Level | Speed | Skill Required | Cost Range |
|---|---|---|---|---|---|
| Hacksaw | Small projects, 1-2 cuts | Medium (depends on steady hand) | Slow (5-10 minutes per cut) | High (needs consistent pressure) | Low ($15-$30) |
| Circular Saw (with aluminum blade) | Medium projects, straight cuts | High (with guide) | Fast (30-60 seconds per cut) | Medium (needs clamp and guide) | Medium ($100-$300) |
| Miter Saw (sliding compound) | Large projects, angled cuts | Very High | Very Fast (15-30 seconds per cut) | Low (automatic fence and clamp) | High ($300-$800) |
| Bandsaw | Bulk cutting, thick profiles | High | Medium-Fast (1-2 minutes per cut) | Medium (needs blade tension control) | High ($500+) |
Hacksaw : Let's start with the most accessible option. A hacksaw is cheap, portable, and requires no electricity. If you're only cutting one or two pieces, this might be all you need. But here's the catch: aluminum is soft, so the blade can easily wander if you don't apply steady pressure. Use a blade with 32 teeth per inch (TPI) for aluminum—finer teeth reduce chipping. Pro tip: Lubricate the blade with cutting oil to reduce friction and heat; this keeps the blade from gumming up and makes the cut smoother.
Circular Saw : If you've got more than a few cuts to make, a circular saw is a game-changer. But don't grab just any blade—you need one designed for aluminum (look for "non-ferrous metal" blades, with 60-80 TPI). Attach the saw to a straightedge guide (a long, flat piece of wood clamped to the profile) to keep the cut straight. I like to mark the cut line, clamp the guide so its edge lines up with the mark, then run the saw along the guide. Just make sure the saw is set to the right depth—about 1/4 inch deeper than the profile thickness—to avoid blade binding.
Miter Saw : For the ultimate in precision, especially if you need angled cuts (like 45-degree miters for corners), a sliding compound miter saw is hard to beat. Most miter saws come with a fence that holds the profile square, and a clamp to keep it from moving. Set the blade to 90 degrees for straight cuts, or adjust the miter angle for bevels. Again, use an aluminum-specific blade, and go slow—let the blade do the work. Rushing can cause the aluminum to melt slightly, leaving a ragged edge.
Bandsaw : If you're cutting a lot of profiles (think 10+ pieces) or working with thicker aluminum, a bandsaw is worth considering. It makes smooth, consistent cuts with minimal effort. The key here is blade tension—too loose, and the blade will wander; too tight, and it might snap. Most bandsaws have a speed control; set it to a slower speed for aluminum (around 1500-2500 feet per minute) to prevent overheating.

Step-by-Step Guide: Cutting 4040B Aluminum Profile Like a Pro
Okay, tools in hand, let's walk through the process. We'll use a circular saw as an example—it's a middle-ground tool that most people can access, and it works well for straight cuts, which are the most common. Adjust as needed if you're using a miter saw or hacksaw.
Step 1: Prep Your Workspace
First, clear a flat surface—a workbench or even a sturdy table. Cover it with a piece of plywood or cardboard to protect against scratches. If you're using a power tool, make sure there's a power outlet nearby (or a charged battery) and that the area is well-ventilated—aluminum dust isn't toxic, but you don't want to breathe in a cloud of it. Grab your safety gear: safety glasses (non-negotiable—aluminum chips fly!), gloves (to protect hands from burrs), and ear protection if using a loud saw.
Step 2: Measure Twice, Mark Once (No, Seriously—Twice)
Lay the 4040B aluminum profile on the workspace. Use your tape measure to find the length you need, then mark it with a marker. Now, double-check that measurement. I can't tell you how many times I've cut a piece "to length" only to realize I misread the tape. Once you're sure, use the speed square to draw a straight line across the profile, connecting the marks on each side. If the profile is hollow (which most 4040B variants are), make sure the line goes all the way around the perimeter—you don't want to miss a side mid-cut.
Step 3: Clamp It Down (Tight!)
Slide the profile so the cut line hangs over the edge of the workspace by a few inches—this way, the saw blade won't hit the table. Then clamp the profile to the table on both sides of the cut line: one clamp a foot or so before the line (to hold the main piece steady) and another clamp on the scrap side (to prevent it from vibrating). The tighter the clamps, the less the profile will move—trust me, even a tiny wiggle can ruin a cut.
Step 4: Set Up the Saw
If using a circular saw, install the aluminum blade (check that it's tight—no wobbling!). Adjust the depth of the blade so it extends about 1/4 inch below the bottom of the profile. If you're using a guide (which I highly recommend), clamp it to the profile so its edge aligns perfectly with your cut line. The guide can be a straight piece of 2x4 or a commercial edge guide—whatever's flat and straight.
Step 5: Make the Cut
Stand to the side of the saw (not directly behind it—safety first!), grip the handle firmly, and start the saw. Let it reach full speed before lowering the blade onto the profile. Start at the edge of the cut line, and push the saw slowly and steadily along the guide. Don't force it—if the blade starts to bind or slow down, ease up. Keep your eyes on the blade and the guide; it's easy to drift if you look away. When you're about an inch from the end of the cut, slow down even more—the scrap piece might start to fall, and you don't want it to pull the saw off line.
Step 6: Deburr and Clean Up
Congratulations—you've made the cut! Now, take a look at the edge. Chances are, there are some burrs (those sharp, raised bits of aluminum) along the cut. These aren't just annoying; they can cut your hands or prevent aluminum profile accessories from fitting properly. To remove them, use a deburring tool (a small hand tool with a rotating blade) or a file. Run the tool along the edge at a 45-degree angle, applying light pressure. For inner burrs (inside the T-slots), a small, round file works best. Once the burrs are gone, wipe the profile with a clean cloth to remove aluminum dust—you're ready to assemble!
Troubleshooting: Common Mistakes and How to Fix Them
Even with the best tools, things can go wrong. Here are the most common issues I've run into, and how to fix (or avoid) them:
Problem: Chipped or Jagged Edges
Why it happens: Dull blade, too fast of a feed rate, or not clamping tight enough. Aluminum is soft, so a dull blade will tear at it instead of cutting cleanly.
Fix: replace the blade with a fresh aluminum-specific one. Slow down your cutting speed—let the blade do the work. If using a hacksaw, use shorter, more controlled strokes.
Problem: Cut Isn't Straight
Why it happens: No guide, loose clamps, or rushing the cut. Even a steady hand can drift without a guide.
Fix: Always use a guide for power saws. Double-check clamps before cutting—give the profile a tug to make sure it doesn't move. If the cut is slightly off, you can sand it straight with a belt sander (for small errors) or use a file (for tiny adjustments).
Problem: Blade Gets Stuck or Overheats
Why it happens: Blade depth too shallow, or cutting too slowly with a power saw. Overheating can melt the aluminum, gumming up the blade teeth.
Fix: Adjust the blade depth so it extends past the profile. For power saws, maintain a consistent feed rate—too slow, and the blade rubs instead of cutting. If the blade starts to smoke, stop and let it cool down.
Final Thoughts: Precision Cuts = Better Projects
Cutting 4040B EU standard aluminum profile might seem intimidating at first, but with the right tools, a little patience, and these techniques, you'll be making clean, precise cuts in no time. Remember: it's all about preparation—measuring carefully, clamping tightly, and using the right blade. And don't skip the deburring step—those little burrs are the difference between a project that looks "homemade" and one that looks professional.
Whether you're building a workbench E (single deck-without caster), a material rack B (3 row and 3 floor), or just need to trim a few pieces for a custom setup, the time you spend getting the cuts right will pay off in the end. And who knows? Once you master this, you might find yourself eyeing other aluminum extrusion profile projects—maybe a conveyor system, or a set of rolling shelves. The possibilities are endless, as long as you can cut straight.
So grab your saw, clamp down that profile, and let's make something great. Happy cutting!