- Company Articles
- Products and Technology
- Product knowledge
- How to Cut & Fabricate 4040C EU Standard Aluminum Profile: Tools & Best Practices

How to Cut & Fabricate 4040C EU Standard Aluminum Profile: Tools & Best Practices
Related Product
4040C EU Standard Aluminum Profile
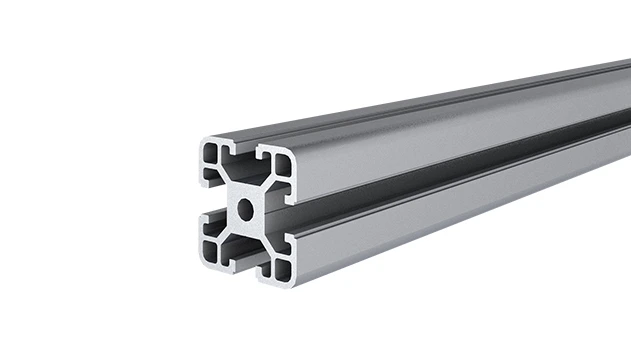
4040C is a 4.00x4.00 CM fractional 40 series square extrusion T-slot profile with four open T-slots, each side with 4.00cm face. The profile has align-a-grooves to assist in aligning connecting profiles.
Introduction: Why 4040C Aluminum Profile Matters
If you've ever walked through a manufacturing plant, a workshop, or even a tech startup's prototyping lab, you've probably seen it without realizing: sleek, silver frames holding up workbenches, material racks, or assembly lines. Chances are, those frames were made from aluminum profile—and one of the most versatile options out there is the 4040C EU Standard Aluminum Profile. Its name might sound technical, but its appeal is simple: it's strong, lightweight, and infinitely customizable, thanks to its T-slot design that lets you attach accessories, panels, and components with ease.
Whether you're building a sturdy workbench for your garage, a modular material rack for a warehouse, or a custom assembly station for a factory, 4040C is a go-to choice. But to unlock its full potential, you need to know how to cut it cleanly and fabricate it properly. In this guide, we'll walk through everything from choosing the right tools to assembling with aluminum profile accessories, so you can turn raw lengths of 4040C into functional, professional-grade structures.
Understanding 4040C EU Standard Aluminum Profile
First, let's demystify the "4040C" label. The "4040" refers to its cross-section: 40mm by 40mm, making it a square profile that strikes a perfect balance between strength and manageability. The "C" denotes its specific groove design—EU standard T-slots, which are uniform and compatible with a wide range of aluminum profile accessories like connectors, brackets, and panels. Unlike custom or non-standard profiles, 4040C is widely available, so replacement parts or expansions are easy to source.
What makes it stand out? For starters, aluminum's natural resistance to corrosion means it holds up in damp or industrial environments without rusting. It's also lightweight enough to handle by hand (no need for heavy machinery to move pieces around) but strong enough to support hundreds of pounds—ideal for workbenches stacked with tools or material racks loaded with inventory. And that T-slot? It's like a built-in track system: slide in a T-nut, bolt on a bracket, and you've got a secure connection in seconds. No welding, no drilling random holes—just clean, adaptable assembly.

Essential Tools for Cutting 4040C Aluminum Profile
Cutting aluminum profile might seem intimidating, but with the right tools, it's surprisingly straightforward. The key is to choose a tool that matches your project size, budget, and precision needs. Below's a breakdown of the most common options, from DIY-friendly hand tools to professional-grade machines:
| Tool Type | Best For | Pros | Cons |
|---|---|---|---|
| Hacksaw with Aluminum Blade | Small projects, occasional cuts, tight spaces | Affordable, portable, no power needed | Slow for large jobs, requires steady hand to avoid crooked cuts |
| Miter Saw (with Aluminum-Cutting Blade) | Medium projects, angled cuts (90°, 45°) | Fast, precise, handles repeat cuts easily | Bulky, needs power source, blade must be aluminum-specific (not wood/metal combo) |
| Bandsaw | High-volume cutting, thick-walled profiles | Smooth cuts, minimal vibration, can cut curves (with practice) | Expensive, requires setup space, not portable |
| CNC Cutter | Industrial production, complex shapes, tight tolerances | Ultra-precise, automated, ideal for batch production | Cost-prohibitive for small projects, requires programming knowledge |
Pro tip: No matter which tool you use, always wear safety gear. Aluminum dust isn't toxic, but it can irritate eyes and lungs—so goggles, a dust mask, and gloves (to handle sharp edges) are non-negotiable. And if you're using power tools, ear protection is a must!
Step-by-Step Guide to Cutting 4040C Aluminum Profile
1. Measure Twice, Cut Once
Even the best tools can't fix a bad measurement. Start by marking your cut line with a pencil or marker. Use a straightedge (a metal ruler or another piece of 4040C profile works great) to ensure the line is perfectly straight—aluminum is unforgiving if you veer off course. For angled cuts (like 45° for corners), use a protractor or a miter gauge to mark the angle clearly. And don't forget to account for the "kerf"—the width of the material removed by the saw blade. For most blades, this is 1-2mm, so add that to your measurement if precision is critical.
2. Secure the Profile
Aluminum might be lightweight, but it'll wiggle while cutting if not clamped down. Use a bench vise or C-clamps to secure the profile to a workbench, making sure the cut line hangs over the edge (so you don't saw into your bench!). If you're cutting a long piece, support the free end with a sawhorse to prevent bending—it'll keep the cut straight and reduce vibration.
3. Cut with Care
The technique varies by tool, but the goal is the same: steady, consistent motion. For a hacksaw, use long, smooth strokes and let the blade do the work—no need to press hard (you'll just dull the teeth). For a miter saw, set the blade speed to medium (aluminum cuts best at slower speeds than wood) and lower the blade gently into the profile. Let the saw reach full speed before cutting, and keep your hands clear of the blade path.
4. Deburr the Edges
After cutting, you'll notice sharp burrs along the edge—tiny metal shards that can slice skin or catch on gloves. Smooth them out with a deburring tool (a simple hand tool with a rotating blade) or a file. Run the tool along the cut edge at a 45° angle, then flip the profile and do the inside of the T-slots too—burrs there can block T-nuts or accessories later.
Fabrication: Assembling 4040C with Aluminum Profile Accessories
Cutting is just the first step—now it's time to turn those pieces into something functional. The magic here is in aluminum profile accessories: connectors, corner codes, brackets, and more that let you join 4040C pieces without welding. Let's break down the basics of assembly.
Choosing the Right Accessories
4040C's T-slots work with a huge range of accessories, but here are the must-haves for most projects:
- Corner Codes: For 90° joints (like the corners of a workbench or shelf). Look for 2020 switch to aluminum corner codes if you need extra strength—these are reinforced for heavier loads.
- T-Nuts and Bolts: The backbone of T-slot assembly. Slide a T-nut into the slot, align your bracket or panel, and tighten the bolt—no pre-drilling required.
- End Caps: Cover exposed ends of the profile to protect against sharp edges and keep out dust or debris.
- Aluminum Profile Rubber Strip: A small but mighty accessory. Slide it into the T-slot to reduce rattling, protect panels from scratches, or add a non-slip grip for items placed on the profile.
Step-by-Step Assembly: Building a Simple Workbench
Let's put this into practice with a common project: a basic workbench. You'll need four 4040C legs (cut to your desired height, say 800mm), four horizontal rails (cut to 1200mm for the top frame), and a plywood or aluminum honeycomb panel for the top.
- Build the Frame: Use corner codes to join the legs to the horizontal rails, forming a rectangle for the top and another for the bottom (to add stability). insert T-nuts into the rails, align the corner codes, and tighten bolts with a hex key—snug but not over-tight (aluminum can strip if you crank too hard).
- Add Cross-Braces: For extra stability, cut two diagonal braces (45° angles) and attach them between the top and bottom frames using angle brackets.
- Mount the Top Panel: Lay the plywood panel on the top frame, mark where the T-slots are, and drill small holes through the panel. Slide T-nuts into the top rails, align the holes, and bolt the panel down.
- Finishing Touches: Snap on end caps to the legs, and slide aluminum profile rubber strip into the top rails to prevent tools from sliding off.
That's it! In an hour or two, you've got a sturdy, customizable workbench that can be modified later—add a shelf, tool hooks, or a vice by bolting accessories to the T-slots.
Best Practices for Professional-Grade Results
Even seasoned fabricators make mistakes—here's how to avoid them and ensure your 4040C projects look and perform like they were made in a factory.
Measure for Squareness
A wobbly frame is usually the result of misaligned joints. After assembling a rectangular frame (like a workbench or shelf), measure the diagonals—they should be equal. If not, gently push or pull the corners until they are. Clamp the frame while tightening bolts to lock in the square shape.
Don't Over-Tighten Bolts
Aluminum is strong, but its threads can strip if you crank bolts too hard. Tighten until the joint is secure, then stop—you'll feel resistance, but there's no need to use a wrench for extra torque. If you're unsure, use a torque wrench set to 4-5 Nm (check your accessory manufacturer's specs for exact values).
Plan for Load Capacity
4040C can handle heavy loads, but it's not indestructible. If you're building a material rack (like Material Rack B with 3 rows and 3 floors), distribute weight evenly across shelves. Use thicker profile walls (look for "2.0mm" specs) for heavy-duty applications, and add extra supports (like vertical braces) for tall structures.
Clean as You Go
Aluminum dust and debris can gunk up T-slots, making it hard to insert T-nuts later. Wipe down cut pieces with a dry cloth before assembly, and blow out T-slots with compressed air if you're working in a dusty environment. A clean build is a smooth build!
Troubleshooting Common Issues
Even with careful work, you might run into snags. Here's how to fix them:
- Crooked Cuts: If a cut is slightly off, use a file to trim the edge—aluminum files easily. For major mistakes, recut the piece (better to waste a few inches than build with a warped frame).
- Loose Joints: If a corner wiggles, check if the T-nut is seated properly in the slot—sometimes it shifts while tightening. Loosen the bolt, realign the T-nut, and retighten.
- Accessories Not Fitting: EU standard T-slots are uniform, but cheap knockoff accessories might have slightly off dimensions. Stick to reputable brands, or test-fit accessories before buying in bulk.
Maintenance: Keeping Your 4040C Structures in Top Shape
Aluminum profile is low-maintenance, but a little care goes a long way:
- Clean Regularly: Wipe down frames with a damp cloth to remove dirt or grease—avoid harsh chemicals that can damage the anodized finish.
- Check Connections: Every few months, tighten any loose bolts—vibration from daily use can wiggle them over time.
- replace Worn Rubber Strips: If aluminum profile rubber strip starts to crack or peel, slide in a new one to keep T-slots protected and functional.
Final Thoughts: Unlocking 4040C's Potential
4040C EU Standard Aluminum Profile isn't just a building material—it's a blank canvas for anyone who needs strong, adaptable structures. Whether you're a hobbyist building a workbench or a manufacturer designing an assembly line, mastering cutting and fabrication with aluminum profile accessories lets you create exactly what you need, when you need it. And the best part? It's scalable. Start small with a single shelf, then add to it as your needs grow—no need to start over from scratch.
So grab your saw, stock up on T-nuts and corner codes, and get cutting. With the right tools and a little patience, you'll be turning 4040C into functional, professional-grade projects in no time.