- Company Articles
- Products and Technology
- Product knowledge
- How to Cut & Fabricate 4080B EU Standard Aluminum Profile: Tools & Techniques

How to Cut & Fabricate 4080B EU Standard Aluminum Profile: Tools & Techniques
Related Product
4080B EU Standard Aluminum Profile
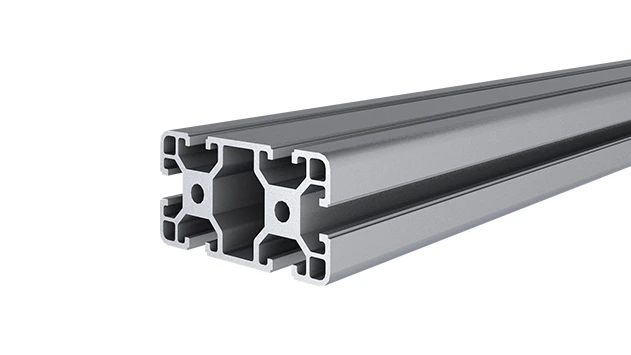
4080B is a 4.00x8.00 CM fractional 40 series square extrusion T-slot profile with two side open T-slots, each side with 4.00cm face, two side with 8.00cm face. The profile has align-a-grooves to assist in aligning connecting profiles.
If you've spent any time in a workshop, factory, or even a DIY garage, you've probably come across those sleek, silver metal bars with grooves running along their length. Chances are, that's an aluminum extrusion profile—and if it's labeled "4080B EU Standard," you're looking at one of the most versatile workhorses in industrial and DIY fabrication. Whether you're building a sturdy workbench, a material rack for your garage, or a custom conveyor frame, the 4080B aluminum profile is a go-to choice for makers, engineers, and small business owners alike. But to unlock its full potential, you need to know how to cut and fabricate it properly. In this guide, we'll walk through everything from choosing the right tools to assembling your first project, with plenty of tips to avoid common mistakes. Let's dive in.
What Is 4080B EU Standard Aluminum Profile, Anyway?
First things first: Let's get familiar with the star of the show. The 4080B is part of the EU standard aluminum extrusion profile family, named for its dimensions: 40mm in width and 80mm in height (hence "4080"). The "B" denotes a specific cross-sectional design, typically featuring T-slots—those handy grooves that run the length of the profile. These slots are what make aluminum extrusion profiles so popular: they let you slide in nuts, brackets, and accessories without drilling holes, making assembly and adjustments a breeze.
Why choose 4080B? For starters, it's strong. Made from 6063-T5 aluminum alloy, it balances lightweight properties with rigidity, so it won't flex under heavy loads but won't weigh down your project either. Its size makes it ideal for medium-to-heavy-duty applications: think workbenches that need to support power tools, material racks that hold boxes of inventory, or even small conveyor systems. And because it's an EU standard, you'll find a huge range of aluminum profile accessories designed to fit it perfectly—from end caps to corner connectors, which we'll talk about later.
Tools You'll Need: Your Fabrication Toolkit
Before you start cutting, you'll need to gather the right tools. Don't worry—you don't need a fully equipped machine shop, but having the right gear will save you time, frustration, and botched cuts. Here's what I recommend:
Cutting Tools
The 4080B profile is tough, but aluminum is softer than steel, so you don't need industrial-grade cutting tools—just sharp ones. Here are your main options:
- Miter Saw: The gold standard for clean, straight cuts. Look for a 10-inch or 12-inch model with a carbide-tipped blade designed for non-ferrous metals (aluminum, brass). A sliding miter saw works even better for longer profiles.
- Bandsaw: Great if you're cutting multiple pieces or need to make curved cuts (though 4080B is usually cut straight). Use a bi-metal blade with 14–18 teeth per inch (TPI) for smooth results.
- Hacksaw: The budget-friendly, manual option. It's slower, but if you're only cutting a few pieces, it'll get the job done. Opt for a fine-tooth blade (24 TPI) to avoid tearing the aluminum.
Measuring & Marking Tools
Aluminum extrusion profiles are precise, so your measurements need to be too. Grab:
- A 25-foot tape measure (with a lock to keep it steady).
- A combination square (for checking 90° and 45° angles).
- Vernier calipers (for measuring slot widths or small dimensions, if you're getting fancy).
- A fine-tipped marker or scribe (permanent marker works, but a scribe leaves a sharper line that won't rub off).
Securing & Finishing Tools
You'll need to hold the profile steady while cutting, and clean up the edges afterward:
- A bench vise (clamp it to your workbench for rock-solid support).
- C-clamps or bar clamps (to secure longer profiles that extend beyond the vise).
- A deburring tool (to smooth rough edges after cutting—aluminum burrs are sharp!)
- A file (for stubborn burrs) and sandpaper (120–220 grit for finishing).
Joining Tools
Once your pieces are cut, you'll need to put them together. Most 4080B projects use aluminum profile accessories like connectors and bolts, so you'll need:
- Hex keys (Allen wrenches) in metric sizes (common sizes for 4080B are M5, M6, and M8).
- Adjustable wrenches or socket sets (for tightening nuts on bolts).
- A rubber mallet (for gently tapping pieces into place without damaging the aluminum).
Safety Gear (Non-Negotiable!)
Aluminum chips fly when you cut, and burrs can slice skin. Protect yourself with:
- Safety glasses (or a face shield, if you're using a saw).
- Work gloves (leather or cut-resistant—avoid latex, which can slip).
- A dust mask or respirator (aluminum dust isn't great to breathe in, especially if you're cutting a lot).
- Ear protection (if using power tools—miter saws are loud!).
| Tool Type | Best For | Pros | Cons | Blade Recommendation |
|---|---|---|---|---|
| Miter Saw | Precision straight cuts, single pieces | Fast, clean, minimal burrs | Expensive upfront; needs power | Carbide-tipped, 60T (non-ferrous) |
| Bandsaw | Multiple cuts, curved cuts | Versatile, can cut long profiles | Slower than miter saw; needs setup | Bi-metal, 14–18 TPI |
| Hacksaw | Budget projects, small quantities | Portable, no power needed | Manual labor; harder to keep straight | High-carbon steel, 24 TPI |

Step 1: Preparing to Cut—Measure Twice, Cut Once
You've heard the saying, and it's never truer than with aluminum extrusion profiles. A mistake here means wasted material (and money), so take your time. Here's how to prep:
Measure Accurately
Start by figuring out the length you need. Let's say you're building a workbench—you'll need four legs (let's say 36 inches tall), two front/back rails (60 inches long), and two side rails (24 inches long). Write these measurements down! Use your tape measure to mark the length on the profile, but don't just eyeball it. Hold the tape measure tight against the profile's edge, and make sure it's parallel to the length—if it's angled, your measurement will be off.
Pro Tip:
If you're cutting multiple pieces to the same length, use a stop block. Clamp a piece of wood or metal to your saw's fence at the desired length, and just butt the profile against it before cutting. This ensures every piece is identical.
Mark the Cut Line
Once you've measured, mark the cut line. A fine-tipped marker works, but for the sharpest line, use a scribe and a combination square. Here's how: Place the square's blade against the profile's edge, aligning the 90° corner with your measurement mark. Hold the square steady, then run the scribe along the blade to scratch a thin line into the aluminum. This line won't rub off, and it's easier to follow with a saw blade.
If you're cutting at an angle (like 45° for a corner joint), use the square's angle guide to mark the line. Double-check the angle with a protractor if you're unsure—aluminum profile connectors like the 90° aluminum profile connector rely on precise angles to fit snugly.
Secure the Profile
Ever tried cutting a wobbly piece of metal? It's a recipe for jagged cuts and slipped blades. Secure the 4080B profile firmly before cutting. If you're using a miter saw, clamp it to the saw's table with the cut line hanging over the edge (so the blade doesn't hit the table). For a hacksaw or bandsaw, use a bench vise: open the vise, place the profile in it with the cut line just above the jaws, and tighten until it's immobile. If the profile is longer than the vise, support the overhanging end with a sawhorse or stack of books to prevent bending.
Step 2: Cutting the 4080B Profile—Techniques for Clean Cuts
Now for the fun part: making the cut. The technique varies slightly by tool, but the goal is the same: a straight, burr-free edge. Let's break it down by tool:
Using a Miter Saw
Miter saws are the easiest way to get professional results. Here's the process:
- Set the blade speed: Aluminum is soft, so high speed can melt the metal or clog the blade. Most miter saws have a speed control—aim for 2,000–3,000 RPM. If yours doesn't adjust, go slow and let the blade do the work.
- Align the cut line: Position the profile so the scribe line lines up with the saw blade's path. Clamp it down tight—even a tiny shift will ruin the cut.
- Cut slowly: Lower the blade gently into the aluminum, applying light pressure. Let the blade teeth bite into the metal; forcing it will cause burrs or kickback.
- Let the blade stop: Don't lift the blade until it's completely stopped spinning. Aluminum chips can fly, and you don't want to drag the blade across the cut edge.
Using a Bandsaw
Bandsaws are great for batch cutting. Here's how to use one:
- Adjust the guides: Lower the upper guide so it's just above the profile—this keeps the blade stable.
- Set the speed: Slow to medium speed (around 1,000–1,500 FPM). Faster speeds generate heat, which can warp the blade or the profile.
- Feed steadily: Push the profile into the blade with even pressure. If the blade starts to wander, stop and readjust—don't force it.
Using a Hacksaw (Manual Option)
Hacksaws take patience, but they work. Here's the trick:
- Mount the blade correctly: The teeth should point forward (so they cut on the push stroke, not the pull).
- Start with a notch: Use the corner of the saw to make a small notch along your scribe line—this helps the blade stay on track.
- Keep the saw straight: Use slow, steady strokes, keeping the saw perpendicular to the profile. Let the weight of the saw do most of the work—no need to muscle it.
Step 3: Post-Cutting Cleanup—Deburring and Finishing
Congratulations—you've cut your first piece! But before you start assembling, you need to clean up the cut edge. Aluminum is soft, so cutting leaves behind burrs—those sharp, ragged bits of metal that can slice your hands or prevent accessories from fitting. Here's how to fix them:
Deburring the Edges
Start with a deburring tool—a small, handheld tool with a rotating blade or carbide tip. Run it along the outer edge of the cut, applying light pressure. This will shave off the big burrs. For the inner edges (like the T-slots), use a small file or a deburring brush. Be thorough: even a tiny burr can make it hard to slide a nut into the T-slot later.
Cleaning the Profile
Aluminum chips love to hide in the T-slots and corners. Use a shop vac with a narrow nozzle to suck out loose chips, then wipe the profile with a clean rag. If there's stubborn grime, dampen the rag with isopropyl alcohol—it won't damage the aluminum's anodized finish.
Checking Straightness
Lay the cut piece on a flat surface (like a workbench) and check if it rocks. If it does, the cut might be slightly angled. You can fix minor warps by gently tapping the high side with a rubber mallet, but if it's crooked, you might need to recut it. Better to take time now than struggle with assembly later!
Step 4: Fabrication—Putting It All Together
Now that you have clean, cut pieces, it's time to build something. Let's walk through assembling a simple workbench—a common project that uses 4080B and aluminum profile accessories. We'll use a workbench E (single deck-without caster) design, which is a basic, sturdy tabletop setup.
Gather Your Accessories
For this project, you'll need:
- 4x 4080B legs (cut to your desired height, e.g., 36 inches).
- 4x 4080B rails (2x front/back, 2x sides; e.g., 60 inches and 24 inches).
- 4x 90° aluminum profile connectors (to join legs and rails at the corners).
- 1x workbench top (we'll use a plywood or aluminum honeycomb panel, cut to 60x24 inches).
- 4x 4080 aluminum profile end caps (to cover the top of the legs and prevent dust from collecting in the T-slots).
- M5 or M6 bolts and T-nuts (to secure the top to the rails via the T-slots).
Assembling the Frame
- Attach the rails to the legs: Slide a T-nut into the T-slot of each rail, then align the rail with the top of a leg. insert a 90° aluminum profile connector into the corner where the rail and leg meet, and tighten the bolts with a hex key. Do this for all four corners until you have a rectangular frame.
- Square the frame: Measure the diagonals of the frame—they should be equal if it's square. If not, push/pull the corners until the measurements match, then retighten the connectors.
- Add cross-braces (optional): For extra stability, add diagonal cross-braces between the legs using shorter 4080B pieces and 45° aluminum profile connectors.
Mounting the Top
Lay the workbench top face down on a flat surface. Place the frame on top of it, centering it. Mark where the T-slots are, then drill small pilot holes through the top into the slots (if using wood) or use T-nuts and bolts to secure it (if using aluminum). Tighten the bolts evenly to avoid warping the top.
Finishing Touches
Snap the 4080 aluminum profile end caps onto the top of the legs—they'll cover the exposed T-slots and give the bench a polished look. Wipe down the entire frame with a damp rag to remove fingerprints and dust, and you're done! You now have a custom workbench that's sturdy enough for tools, projects, or even as a material rack.
Troubleshooting Common Issues
Even with careful work, things can go wrong. Here's how to fix the most common problems:
- Loose connectors: If a 90° aluminum profile connector feels wobbly, check if the bolt is tight. If it still moves, the T-nut might be misaligned—slide it along the T-slot until it lines up with the connector hole.
- Burrs causing fit issues: If an accessory won't slide into the T-slot, check for burrs inside the slot. Use a small file or deburring tool to smooth them out.
- Crooked cuts: If a rail doesn't sit flush with a leg, recut the piece or use shims (small pieces of aluminum) to fill the gap—just don't force it, as this can bend the profile.
Final Thoughts: Why 4080B Is Worth the Effort
Cutting and fabricating 4080B EU standard aluminum profile might seem intimidating at first, but with the right tools and a little patience, it's surprisingly approachable. What I love most about aluminum extrusion profiles is their flexibility—you can take apart and rebuild your project if you need to, or add new accessories later (like aluminum guide rail A for sliding shelves, or hooks for tools). Whether you're a seasoned fabricator or a DIY newbie, the 4080B profile opens up a world of possibilities.
So grab your saw, measure twice, and start building. Your next project—a custom workbench, a material rack, or even a mini conveyor—will be stronger, cleaner, and more professional than anything you could buy pre-made. And who knows? You might just catch the aluminum extrusion bug.