- Company Articles
- Products and Technology
- Installation And Maintenance
- How to replace Damaged 3060 Aluminum Profile End Caps: Step-by-Step

How to replace Damaged 3060 Aluminum Profile End Caps: Step-by-Step
Related Product
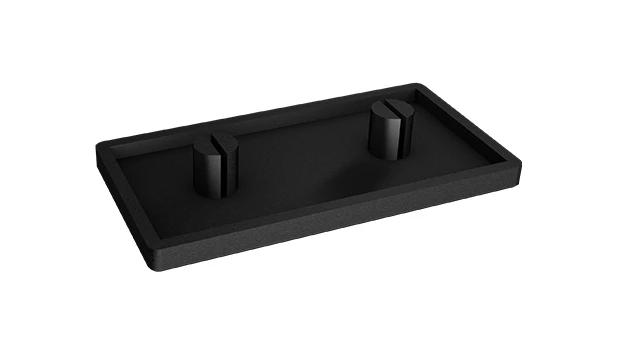
3060 Aluminum Profile End Cap
The aluminum profile end cap adds a finishing touch to your project and closes off profile ends to limit dust and debris buildup, also it can avaid some scratch for material and labor during the assemble work.
Why Bother with End Caps, Anyway?
Let's start with the obvious: aluminum extrusion profiles are workhorses. Whether you're using them to build a sturdy workbench, a material rack for your warehouse, or a custom workstation in your garage, these profiles form the backbone of countless projects. But even the toughest tools need a little TLC—and that's where end caps come in. The 3060 aluminum profile end cap might seem like a small detail, but it's a critical one. Think about it: without a proper end cap, the raw edge of the aluminum extrusion is exposed. That means sharp corners that can catch on gloves, scratch surfaces, or even cut skin. Plus, over time, dust, debris, and moisture can seep into the hollow core of the profile, leading to corrosion or weakening the structure from the inside out. And let's not forget aesthetics—damaged or missing end caps make even the most well-built setup look unfinished, like a puzzle with a missing piece. So if you've noticed a cracked, loose, or missing end cap on your 3060 aluminum extrusion profile, don't put off replacing it. This guide will walk you through the process, step by step, with tips to make it easy—even if you're new to DIY projects.
Getting to Know Your 3060 Aluminum Profile
Before we dive into the replacement process, let's make sure we're all on the same page about what a 3060 aluminum profile is. The "3060" refers to its dimensions: 30mm in width and 60mm in height. It's a popular choice for medium-duty applications because it strikes a balance between strength and flexibility—strong enough to support shelves or workbenches, but lightweight enough to assemble without heavy machinery. Like most aluminum extrusion profiles, it has a T-slot design, which lets you attach accessories like brackets, panels, or handles using T-nuts and bolts. But today, our focus is on the end cap: that small, often-overlooked piece that snaps or screws onto the open end of the profile. End caps for 3060 profiles are usually made of plastic (like PVC or nylon) or sometimes aluminum, and they're designed to fit snugly into the profile's end, covering the raw edges and sealing off the interior. They might seem simple, but there are a few variations—some are press-fit (they just pop into place), others have small tabs or screws to keep them secure. Knowing which type you have will make removal and installation much smoother.
Pro Tip: If you're not sure what type of end cap you need, check the manufacturer's label on your aluminum profile or take the damaged end cap to a local aluminum profile supplier. They'll help you find an exact match—no guesswork required!

Gathering Your Tools and Materials
You don't need a fully stocked workshop to replace an end cap, but having the right tools on hand will save you time and frustration. Here's what I recommend gathering before you start:
| Tool/Material | Why You Need It | Pro Tips for Use |
|---|---|---|
| New 3060 aluminum profile end cap | The star of the show! Make sure it's the correct size (30x60mm) and style (press-fit, screw-on, etc.). | Buy an extra—you never know when another end cap might crack, and it's cheaper than making a second trip to the supplier. |
| Flathead screwdriver (small to medium size) | For prying off stubborn press-fit end caps or removing screws from screw-on types. | Wrap the tip in electrical tape to avoid scratching the aluminum profile's finish. |
| Needle-nose pliers | Helpful for gripping small tabs or bending back any deformed plastic on the old end cap. | Choose pliers with rubberized handles for a better grip—your hands will thank you! |
| Soft-bristled brush (old toothbrush works too) | To clean out dust, dirt, or debris from the profile's end before installing the new cap. | Avoid metal brushes—they can scratch the aluminum. |
| Mild soap and water | For wiping down the profile's end if it's greasy or grimy. | Dry thoroughly with a lint-free cloth to prevent water spots. |
| Rubber mallet (optional) | For gently tapping the new end cap into place if it's a tight press-fit. | Never use a metal hammer—even a light tap can dent the aluminum profile. |
Once you've rounded up these items, find a clean, flat workspace. If your aluminum profile is part of a larger structure (like a workbench or material rack), you might need to disassemble it partially to access the end cap. For example, if the profile is a vertical leg on a workbench, you might need to remove the shelf above it to get a clear shot at the end cap. Take your time here—rushing disassembly can lead to bent brackets or misplaced screws (we've all been there!).

Step-by-Step: Removing the Damaged End Cap
Now that you're prepped, let's get to work removing the old end cap. This step can be tricky if the cap is stuck or cracked, but with a little patience, you'll have it off in no time.
Step 1: Inspect the old end cap. First, take a close look at how the end cap is attached. Is it a press-fit (no screws, just snapped into place)? Or does it have small screws holding it in? If there are screws, they're usually hidden in tiny recesses on the end cap—check the center or edges for small Phillips or flathead slots. If you see screws, use your screwdriver to remove them first (turn counterclockwise) and set them aside in a small bowl so you don't lose them.
Step 2: Loosen the end cap (for press-fit types). If there are no screws, it's a press-fit end cap. These can be stubborn, especially if they've been in place for years. Here's how to loosen them: Gently insert the flathead screwdriver between the end cap and the aluminum profile, at the edge. Apply light pressure to pry the cap outward. You might hear a small "pop"—that's the cap releasing from the profile's inner lips. Work your way around the cap, prying gently at each edge, until it starts to come loose. If the cap is cracked, be careful—pieces might break off. Use needle-nose pliers to grip any loose fragments and pull them out.
Warning: If the end cap is made of brittle plastic (common in older profiles), it might shatter when you pry it. Wear gloves to protect your hands from sharp plastic shards!
Step 3: Remove the end cap completely. Once the cap is loose, pull it straight off the end of the profile. If it's still stuck, wiggle it gently from side to side while pulling—this helps break any remaining friction between the cap and the profile. If pieces of the cap are stuck inside the profile (common with cracked caps), use the needle-nose pliers to fish them out. You want the end of the profile to be completely clear of debris before installing the new cap.
Prepping the Profile for the New End Cap
With the old end cap removed, it's time to get the aluminum profile ready for its new accessory. This step is easy to skip, but trust me—taking a few minutes to clean and inspect the profile will make the new end cap fit better and last longer.
Step 1: Clean the profile end. Grab your soft-bristled brush and sweep out any dust, dirt, or small debris from the inside of the profile's end. If there's grease or grime (common in workshop settings), dip a cloth in mild soap and water, wring it out well, and wipe the inside and outside edges of the profile. Avoid using harsh chemicals like acetone or bleach—they can damage the aluminum's anodized finish. Let the profile dry completely before moving on—moisture trapped between the cap and profile can cause mold or corrosion over time.
Step 2: Inspect for damage. Take a close look at the end of the aluminum extrusion. Are there any dents, bends, or sharp edges? If the profile was hit or dropped, the end might be slightly deformed, which could prevent the new end cap from fitting. Use your fingers to feel for rough spots—if you find any, gently file them down with fine-grit sandpaper (400 grit or higher) until the edge is smooth. Be careful not to over-sand—you don't want to change the profile's dimensions, just remove sharpness.
Quick Check: Hold the new end cap up to the profile's end (without pushing it on) to see if it lines up. If there's a gap on one side, the profile might be bent. Use a rubber mallet to gently tap the end until it's straight—go slow, and check alignment often.
Installing the New 3060 Aluminum Profile End Cap
Now comes the satisfying part: putting the new end cap in place. This step is straightforward, but a little care will ensure a tight, long-lasting fit.
Step 1: Align the end cap correctly. Most end caps have a "top" and "bottom" or "front" and "back," especially if they have tabs or a specific shape to match the profile's T-slots. Check the new cap—you might see small notches or a slightly curved edge that corresponds to the profile's design. If you're unsure, hold it up to the profile and make sure the edges line up evenly. Press-fit caps will have flexible plastic tabs that should face inward, toward the profile's interior.
Step 2: Press or screw the cap into place. For press-fit caps: Hold the cap with both hands, align it with the profile's end, and push firmly but evenly. You should feel it "seat" into place with a small click. If it's tight, place a soft cloth over the cap and gently tap it with the rubber mallet—this distributes pressure evenly and prevents cracking. For screw-on caps: Place the cap on the profile, then reinsert the screws you removed earlier (or new ones if they came with the cap). Tighten them clockwise until they're snug, but don't over-tighten—you could strip the plastic threads.
Step 3: Test the fit. Give the end cap a gentle tug to make sure it's secure. It shouldn't wiggle or come loose. If it does, check for debris inside the profile (you might have missed a small piece) or misalignment. For press-fit caps, you might need to push harder or tap it again. For screw-on caps, ensure the screws are tight but not stripped.
Troubleshooting Common Issues
Even with careful prep, things can go wrong. Here are a few common problems and how to fix them:
Problem:
The new end cap is too loose and falls off.
Solution:
Check if the cap is the correct size—maybe you accidentally bought a 3030 cap instead of 3060. If it's the right size, try adding a small strip of double-sided foam tape to the inside of the cap (avoid thick tape, which can bulge). This adds friction and helps it stay in place.
Problem:
The cap won't press all the way in.
Solution:
The profile end might still have debris or a small bend. Re-clean the end with the brush, then check for bends again. If it's still stuck, warm the end cap slightly with a hair dryer (on low heat)—plastic becomes more flexible when warm, making it easier to press into place.
Problem:
The end cap cracks when you try to install it.
Solution:
You're pushing too hard! Press-fit caps should snap into place with moderate pressure. If you're using a mallet, wrap the cap in a thick cloth and tap lighter. If the cap is brittle (common with cheap plastic), consider upgrading to a nylon or aluminum end cap—they're more durable.
Maintaining Your Aluminum Profile End Caps (and Accessories!)
Now that your new end cap is installed, a little maintenance will keep it (and the rest of your aluminum profile accessories) in top shape. Here's what I recommend:
Regular Inspections: Every few months, take a quick look at all your end caps, especially those on frequently moved equipment like turnover trolleys or material racks. Check for cracks, looseness, or discoloration (a sign of UV damage if they're exposed to sunlight). Catching issues early means easier fixes.
Cleaning: Wipe end caps with a damp cloth when you clean your workbench or rack. For stubborn grime, use mild soap and water—avoid abrasive cleaners like steel wool, which can scratch plastic caps.
Protect from Impact: End caps are tough, but they're not indestructible. Try to avoid hitting the ends of your aluminum profiles against walls, floors, or other equipment. If you're moving a rack or trolley, pad the corners with foam or tape to prevent damage.
Wrapping Up: Small Fix, Big Difference
Replacing a 3060 aluminum profile end cap might seem like a minor task, but it's one that makes a big difference in safety, functionality, and appearance. A secure, intact end cap protects you and your equipment, keeps debris out of the profile, and makes your setup look polished and professional. And the best part? You don't need to be a DIY expert to do it—with the right tools, a little patience, and this guide, you've got this. So the next time you spot a damaged end cap, don't ignore it—grab your screwdriver, head to your aluminum profile supplier for a replacement, and get to work. Your future self (and your aluminum extrusion profile) will thank you.