- Company Articles
- Products and Technology
- Installation And Maintenance
- How to Disassemble and Reuse Aluminum Workbench D: Supporting Circular Economy Goals

How to Disassemble and Reuse Aluminum Workbench D: Supporting Circular Economy Goals
Related Product
Aluminum Workbench D
Aluminum tube workbench is more flexible and durable, compared with traditional PE/ABS coated steel tube. It is easy to assemble, anti corrosion, rust protection, and recycle use after disassemble.
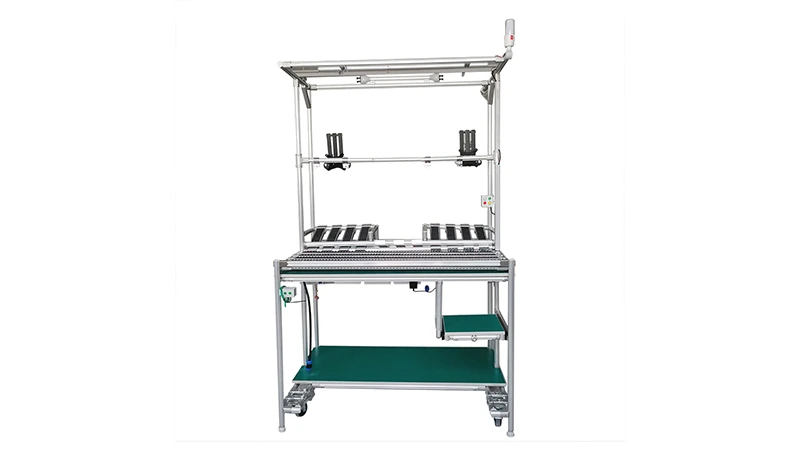
Every piece of equipment in a workshop tells a story—of projects built, problems solved, and hours of hands-on work. But what happens when that equipment, like your trusty Aluminum Workbench D, reaches the end of its original purpose? Too often, it ends up collecting dust in a corner or, worse, in a landfill. But here's the thing: that workbench isn't just a table. It's a collection of sturdy, adaptable parts—aluminum profiles, joints, casters, and more—just waiting for a second life. Disassembling and reusing it isn't just a way to save money (though that's a nice bonus). It's a small but powerful step toward a circular economy, where we reduce waste, extend resources, and build systems that respect both our wallets and the planet.
In this guide, we'll walk through how to take apart your Aluminum Workbench D safely, sort its components, and give them new purpose. Whether you're a small business owner looking to cut costs, a hobbyist who loves repurposing, or someone who cares about sustainability, this process is for you. Let's dive in.
Why Disassemble and Reuse? The "Why" Behind the Work
Before we grab our tools, let's talk about why this matters. Aluminum Workbench D is built to last, thanks in large part to its aluminum extrusion profile—a material known for its durability and recyclability. But recycling (melting down and reprocessing) still takes energy. Reusing? That's even better. It skips the energy-intensive recycling step and keeps perfectly good parts in action. For small workshops or startups, reusing components can cut down on equipment costs by 30-50%—money that can go toward new tools or growing your business.
Then there's the lean system angle. Lean principles are all about eliminating waste, and what's more wasteful than tossing a workbench that's just a little worn or no longer fits your workflow? By reusing, you're embodying lean thinking: making the most of what you have, reducing excess, and creating value without unnecessary consumption. Plus, there's a certain satisfaction in looking at a repurposed shelf or trolley and thinking, "I built that—from parts that were once something else." It's resourcefulness in action.
Pre-Disassembly: Gather Your Tools and Prep the Space
Disassembling a workbench isn't complicated, but it does require a little prep work. Rushing in without the right tools or a clear plan is a recipe for frustration (or a bent aluminum profile—yikes). Let's get set up.
Tools You'll Need
- Hex keys (Allen wrenches): Aluminum Workbench D's joints and fasteners are typically secured with hex screws—grab a set with both metric and standard sizes to cover all bases.
- Rubber mallet: For gently tapping apart stubborn joints without damaging the aluminum (a metal hammer might scratch or dent the profiles).
- Work gloves: Aluminum edges can be sharp, and casters have small parts—protect your hands.
- Screwdriver (flathead and Phillips): For any accessory brackets or caster wheel locks that might be secured with regular screws.
- Labeling materials: Masking tape and a marker to tag parts (e.g., "left side frame," "caster wheel assembly")—trust us, you'll forget which part goes where otherwise.
- Cleaning supplies: A bucket of soapy water, a rag, and maybe some rubbing alcohol for sticky residue—clean parts are easier to inspect and reuse.
- Work surface: A clear, flat area (like a second workbench or a large table) to lay out parts as you disassemble. Avoid hard concrete floors—dropping a metal caster wheel could chip the floor (or the wheel).
Safety first: Make sure the workbench is empty before you start. Remove any tools, materials, or equipment from the surface—you don't want a heavy drill press sliding off mid-disassembly. If your workbench has caster wheels, lock them (if they have brakes) or wedge a piece of wood under the legs to keep it from rolling. And if you're working alone, consider propping up one side with a sturdy block when removing heavy parts—no one wants to strain their back lifting a 20-pound workbench top.

Step-by-Step Disassembly: Taking It Apart (Without Breaking It)
Now for the main event: taking apart Aluminum Workbench D. The key here is patience—this isn't a race. Rushing can bend parts or strip screws, turning reusable components into trash. Take it slow, and follow these steps:
Step 1: Remove Accessories and Attachments
Start small. Your workbench might have added features like tool hooks, shelves, or a power strip bracket. These are usually attached with screws or clips and can be removed first. For example, if there's a caster wheel assembly on the bottom (common for mobile workbenches), start by unlocking the brakes and unscrewing the caster mounts. Most caster wheels on Aluminum Workbench D are secured with 4 small screws—use your Phillips screwdriver to remove them, then set the casters aside (label them "casters" so you don't mix them up later).
Next, check the workbench top. If there are any clamps, vices, or bins bolted to the surface, remove those too. Even small things like cable management clips or magnetic strips should come off—you want the top as bare as possible before moving to the frame.
Step 2: Detach the Workbench Top from the Frame
The top of Aluminum Workbench D is usually attached to the frame with screws or brackets. Flip the workbench onto its side (gently!) so you can access the underside. Look for screws connecting the top to the aluminum profile frame—these might be hidden under plastic caps (pop those off with a flathead screwdriver if needed). Use your hex key or screwdriver to remove them one by one, keeping the screws with the top (tape them to the underside with your labeling tape). Once all screws are out, lift the top off the frame. It might be heavier than it looks—get a helper if needed to avoid straining your back.
Pro tip: If the top is stuck (maybe from years of glue or rust), tap the edges gently with your rubber mallet. Don't force it—aluminum is strong, but bending the frame here could ruin its reuse potential.
Step 3: Disassemble the Frame (Aluminum Profiles and Joints)
Now we're getting to the heart of the workbench: the frame, made of aluminum extrusion profiles connected by aluminum profile accessories like joints and brackets. This is where the real "reuse gold" is. The frame is typically held together with hex screws that go through the joints into the profiles. Start by identifying the joints—they might be 90-degree corners, T-joints, or straight connectors.
Using your hex key, loosen the screws on each joint. Go slow here: some screws might be tight from years of use, so apply steady pressure (no brute force). Once a joint is loose, gently pull the aluminum profiles apart. If they're still stuck, wiggle them slightly or tap the joint with the rubber mallet. As you disassemble, label each profile (e.g., "front vertical," "rear horizontal") and keep their matching joints together—this will make reassembly easier later.
Fun fact: Aluminum extrusion profiles are designed with T-slots (those long grooves along the sides) that make them easy to connect and disconnect. That's why they're such a favorite in lean systems—they're built for adaptability. Your workbench's frame is basically a giant set of building blocks, and now you're taking the blocks apart to build something new.
Step 4: Sort and Inspect Every Component
You've got a pile of parts—now what? It's time to play "detective" and figure out which parts are reusable, which need a little love, and which might be beyond saving. Lay everything out on your clean work surface and sort by category:
- Aluminum profiles: Check for dents, cracks, or excessive bending. Minor scratches are fine—they won't affect strength. If a profile is bent, try gently straightening it with your hands (aluminum is malleable) or a rubber mallet. If it's cracked, set it aside for recycling instead of reuse.
- Joints and connectors: Look for stripped threads (if screws won't tighten) or broken plastic components (some joints have plastic covers). Metal joints are usually reusable unless they're bent or cracked.
- Caster wheels: Spin them—do they roll smoothly? Check for flat spots on the wheels or rust on the axles. A little lubricant (like WD-40) can fix a squeaky or stiff caster wheel.
- Accessories: Brackets, clips, and screws—sort by size and condition. Toss any bent screws (they won't hold well) but keep the rest.
Once sorted, give reusable parts a quick clean. Wipe aluminum profiles with a soapy rag to remove grease or dust. For sticky residue (like old tape marks), use rubbing alcohol on a rag. Dry everything thoroughly to prevent water spots—you want these parts looking their best for their next job.

Reuse Ideas: From Workbench to Wonder
Now comes the fun part: deciding what to build with your repurposed parts. The possibilities are almost endless, but here are a few ideas to spark your creativity—all aligned with lean system principles of efficiency and functionality.
Idea 1: A Compact Material Rack
Need a place to store sheets of plywood, metal, or boxes of parts? Use your aluminum profiles to build a simple material rack. Cut the profiles to your desired height (or leave them full length if you need vertical storage) and connect them with T-joints to create shelves. Add a few cross-braces for stability, and you've got a sturdy rack that can hold hundreds of pounds. Pro tip: If you saved the caster wheels, attach them to the bottom to make the rack mobile—perfect for moving materials around the workshop.
Idea 2: A Mobile Tool Trolley
Ever wished your tools could follow you around the workshop? Turn your old workbench parts into a rolling tool trolley. Use shorter aluminum profiles for the frame, add a shelf (the old workbench top, cut down to size), and attach the caster wheels. Add hooks or small bins (using the T-slots in the profiles) to hold screwdrivers, pliers, and drills. Now you've got a custom tool station that glides wherever you need it—no more running back and forth to the toolbox.
Idea 3: A Kids' Workbench (Yes, Really!)
Want to pass on your love of building to the next generation? Cut the aluminum profiles down to kid-sized proportions and build a mini workbench for your little one. Use the old workbench top (sanded smooth to avoid splinters) as the surface, and add a few simple accessories like a small vice (thrift store find!) or a pegboard for toy tools. It's a sustainable way to create a meaningful gift—and when they outgrow it, you can disassemble it again and reuse the parts.
Idea 4: A Wall-Mounted Shelving Unit
Short on floor space? Go vertical! Mount aluminum profiles to the wall (using brackets into studs) and add shelves made from the old workbench top or plywood. Use T-joints to create adjustable shelves—you can move them up or down as your storage needs change. This works great for storing small parts, paint cans, or even office supplies in a home workshop.
The Impact: Numbers and Stories
It's easy to think, "One workbench won't make a difference." But small actions add up. Let's put this into perspective with a quick table:
| Metric | Landfilling the Workbench | Reusing Its Components |
|---|---|---|
| CO2 Emissions | ~15kg (from manufacturing a new workbench) | ~0kg (no new materials needed) |
| Cost Savings | $200-$500 (cost of a new workbench/rack) | $0-$50 (cost of minor hardware/accessories) |
| Waste Sent to Landfill | ~50kg (full workbench weight) | ~5kg (non-reusable parts only) |
Take it from Maria, a small business owner who runs a jewelry-making studio in Portland. "We had an old Aluminum Workbench D that was too short for our new 3D printer," she says. "Instead of buying a new material rack, we disassembled it and built a custom shelf unit for our printer filaments. It cost us $12 in new screws and took an afternoon—and it works better than any store-bought rack. Plus, we avoided sending 40 pounds of aluminum to the landfill. Win-win."
Stories like Maria's are why this work matters. It's not just about reusing parts—it's about rethinking how we see "old" equipment. That workbench isn't trash. It's potential.
Final Thoughts: Your Turn to Build Something New
Disassembling and reusing your Aluminum Workbench D is more than a DIY project. It's a mindset shift—from "replace" to "repurpose," from "waste" to "resource." It's about seeing the value in what you already have and using your skills to create something useful, sustainable, and uniquely yours.
So grab your hex key, put on your gloves, and start taking that workbench apart. As you sort through the aluminum profiles and caster wheels, remember: you're not just breaking something down. You're building a better way to work—one that's lean, circular, and full of possibility. And who knows? The next project you build with those repurposed parts might be your best one yet.
Happy disassembling, and here's to the second (and third, and fourth!) lives of your workshop tools.