- Company Articles
- Products and Technology
- Installation And Maintenance
- How to Disassemble and Reuse Two Way Lean Pipe Joint for Reconfigurable Lines

How to Disassemble and Reuse Two Way Lean Pipe Joint for Reconfigurable Lines
Related Product
Two Way Lean Pipe Joint
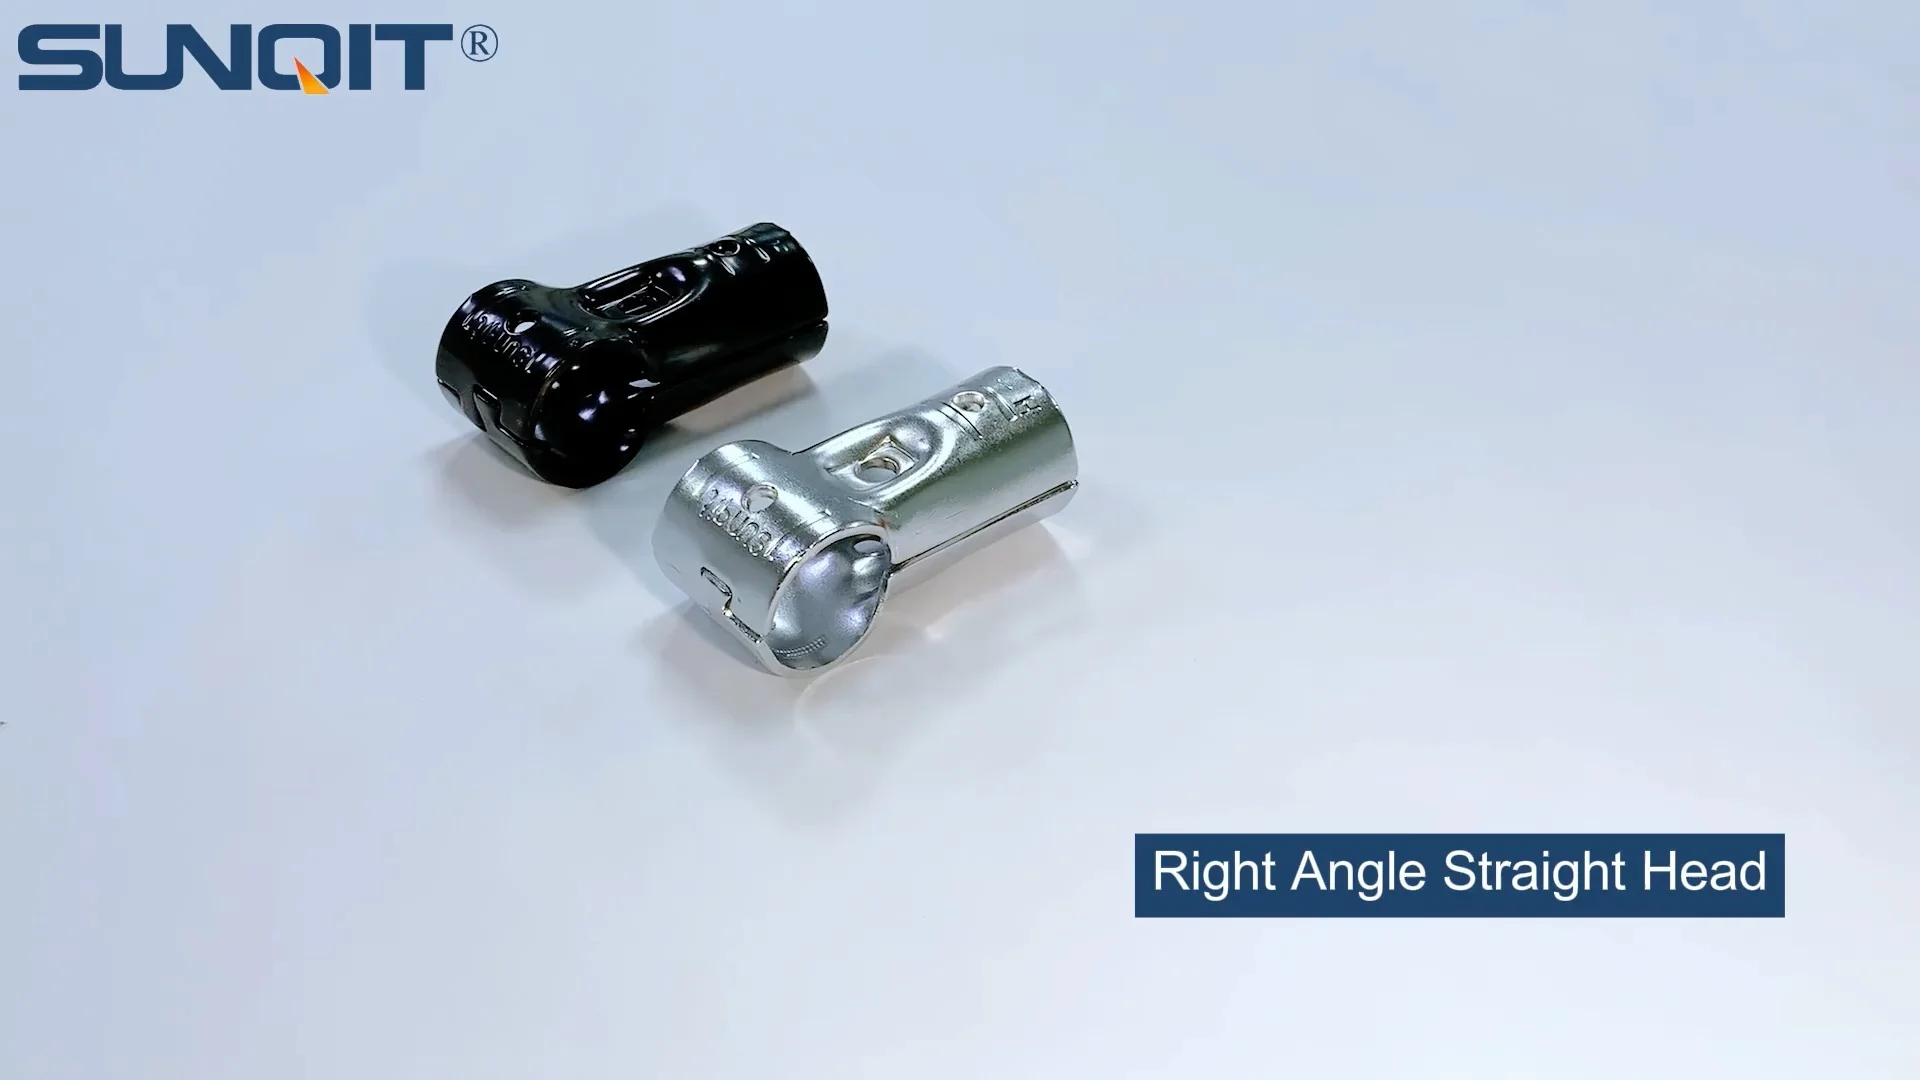
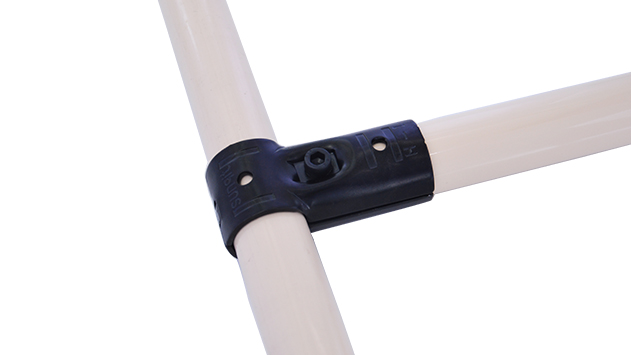
Two way lean pipe joint for 2 pcs 28MM lean pipe connection in straight angle, which used widely in workbench, flow rack, hand trolley frame connection.
If you've ever stepped foot in a modern manufacturing facility, warehouse, or assembly plant, you've likely encountered the unsung backbone of flexible production: lean pipe systems. These modular setups—made from simple pipes, joints, and accessories—power everything from workbenches and flow racks to turnover trolleys and material handling stations. What makes them so indispensable? Their ability to adapt. In an era where production lines shift overnight to meet new demands, reconfigurable systems aren't just a luxury—they're a necessity. And at the heart of that adaptability lies a small but mighty component: the two way lean pipe joint.
But here's the thing: when production needs change, many teams default to buying new components, letting old joints and pipes gather dust in storage or, worse, end up in landfills. That's not just wasteful—it's a missed opportunity. The two way lean pipe joint, in particular, is designed to be disassembled, inspected, and reused, aligning perfectly with lean manufacturing's core principle of "reduce, reuse, recycle." In this guide, we'll walk through how to properly take apart, evaluate, and repurpose these joints to breathe new life into your reconfigurable lines—saving time, cutting costs, and staying true to lean ideals.
Understanding the Two Way Lean Pipe Joint: More Than Just a Connector
Before we dive into the "how," let's make sure we're on the same page about the "what." A two way lean pipe joint is exactly what it sounds like: a connector that joins two lean pipes at a fixed angle (usually 90 degrees, though some designs allow for adjustments). Think of it as the hinge that holds your lean system together. These joints are typically made from durable materials like galvanized steel, chrome-plated steel, or even aluminum, depending on the application—whether you need corrosion resistance for a food processing line or ESD (electrostatic discharge) protection for electronics assembly.
You'll find two way lean pipe joints in almost every lean setup. They're the reason your workbench stays sturdy while you assemble circuit boards, why your flow rack's roller tracks don't sag under the weight of boxes, and how your turnover trolley holds its shape during daily use. But their real superpower? Unlike welded or glued connections, they're designed to be taken apart. That means when your production line needs to shrink, expand, or pivot entirely, you don't have to start from scratch—you just reconfigure.
Let's break down why reusing these joints matters. First, cost. A single new two way lean pipe joint might only cost a few dollars, but multiply that by hundreds (or thousands) across a large facility, and the numbers add up fast. Reusing joints can slash your material costs by 30-40% over time. Second, sustainability. Lean manufacturing isn't just about efficiency—it's about minimizing waste. By reusing components, you're reducing your carbon footprint and keeping metal and plastic out of landfills. Third, speed. Ordering new parts means waiting for shipping, inventory checks, and approvals. Reusing what you already have lets you reconfigure lines in hours, not days.
Tools You'll Need: Gearing Up for Safe, Effective Disassembly
Disassembling a two way lean pipe joint isn't rocket science, but it does require the right tools to avoid damaging the joint (or yourself). Let's start with the basics. You'll need a few common hand tools, plus some supplies to clean and inspect the joint afterward. Here's a quick breakdown:
| Tool/Item | Purpose | Pro Tips |
|---|---|---|
| Hex Key Set (Allen Wrenches) | Loosening/tightening set screws on the joint | Use a ball-end hex key for hard-to-reach angles; match the size exactly to avoid stripping screws. |
| Rubber Mallet | Gently tapping pipes loose from stuck joints | Always tap the pipe, not the joint itself, to prevent cracking the joint's housing. |
| Adjustable Pliers | Gripping and twisting seized joints | Wrap the jaws in electrical tape to avoid scratching chrome-plated or aluminum joints. |
| Wire Brush (Nylon or Brass) | Cleaning debris, rust, or old lubricant from the joint | Brass brushes are better for metal joints; nylon works for plastic or coated surfaces. |
| Degreaser (Mild, Non-Corrosive) | Removing oil, grease, or adhesive residue | Avoid harsh chemicals like acetone—they can damage plastic components or coatings. |
| Safety Gloves | Protecting hands from sharp edges or pinch points | Choose nitrile gloves for grip and chemical resistance; avoid latex if handling oils. |
| Work Gloves (Leather or Canvas) | Extra protection when handling heavy pipes | Essential if you're disassembling larger structures like material racks or conveyor supports. |
| Marker and Labeling Tape | Tagging joints with their original location (optional but helpful!) | Note angles or orientations (e.g., "Workbench E, left leg") to simplify reassembly later. |
Pro tip: Lay out a clean workspace before you start—preferably a flat table or workbench (fitting, right?) with a towel or rubber mat to prevent parts from rolling away. You don't want to lose a tiny set screw or scratch a chrome joint because it slipped off a metal surface.
Step-by-Step: Disassembling the Two Way Lean Pipe Joint
Now that you've got your tools ready, let's walk through the disassembly process. We'll use a common scenario: taking apart a section of a workbench to repurpose the joints for a new flow rack. The steps here apply to most two way lean pipe joints, but always check the manufacturer's guidelines if you're working with specialized designs (like aluminum or ESD-safe versions).
Step 1: Safety First—Assess the Structure
Before you touch a single joint, take a minute to look at the entire structure. Is it holding any weight? If it's a workbench with tools on it, clear everything off first. If it's a flow rack with boxes, empty it. Leaning on or applying pressure to a partially disassembled structure is a recipe for accidents. Also, check for sharp edges or rust—if a pipe is corroded, it might snap when you apply force, so wear those work gloves!
Step 2: Identify the Locking Mechanism
Most two way lean pipe joints use one of two locking methods: set screws or friction fit. Set screws are the most common—small screws (usually hex-headed) that tighten against the pipe to hold it in place. You'll find them on the side of the joint, often labeled with a small indentation or "tighten here" mark. Friction-fit joints, on the other hand, rely on a spring-loaded collar or compression ring; these are less common but easier to disassemble (no tools needed—just pull!).
For this guide, we'll focus on set-screw joints, since they're the standard in most industrial setups. Grab your hex key and locate the set screw(s) on the joint. Some joints have one screw per pipe connection; others have two for extra stability. If there are two, loosen both—never just one, or you'll risk bending the joint.
Step 3: Loosen the Set Screws (But Don't Remove Them!)
Here's a common mistake: over-loosening the set screws. You don't need to unscrew them all the way—just enough so they're no longer pressing into the pipe. If you remove them completely, they're easy to lose, and reinserting them later can be a hassle (especially if the threads are dirty). Aim for 2-3 full turns counterclockwise—you should feel the tension release as the screw backs away from the pipe.
If the set screw is stuck (a common issue if the joint hasn't been moved in years), try this trick: tap the hex key gently with a rubber mallet while applying pressure. The vibration can loosen rust or debris that's jamming the screw. Avoid using a steel hammer—you could strip the hex socket.
Step 4: Separate the Pipes from the Joint
With the set screws loosened, it's time to separate the pipes. Grasp one pipe firmly with one hand and the joint with the other. Gently twist the pipe back and forth while pulling it away from the joint. If it's stuck, don't yank—instead, tap the end of the pipe with your rubber mallet (hold the pipe horizontally to avoid bending it). The goal is to break the seal between the pipe and the joint's inner surface, which may have formed due to friction or minor corrosion.
Pro tip: If the joint is connecting two pipes at a right angle (like the corner of a workbench), twist one pipe at a time. Start with the vertical pipe if it's supporting weight—this reduces stress on the horizontal connection. Once one pipe is free, the other should come loose much easier.
Step 5: Remove the Joint and Inspect for Damage
Once both pipes are separated, the joint should slide off easily. If it doesn't, check for hidden set screws—some manufacturers hide a second screw under a plastic cap for extra security. Pop off the cap (use a flathead screwdriver if needed) and loosen that screw too.
Now, take a close look at the joint. Are there cracks in the housing? Bent or stripped threads on the set screws? Dents in the pipe insertion points? These are red flags. A cracked joint won't hold tension, and stripped threads mean the set screws can't tighten properly. If you spot any of these issues, set the joint aside for recycling—don't risk reusing it.
Pro Tip: The "Wiggle Test"
To check if a joint is still usable, try this: insert a scrap piece of lean pipe into one end, tighten the set screw, and wiggle the pipe. If it moves more than 1-2 millimeters, the joint is worn and should be replaced. A tight fit is crucial for stability in reconfigurable lines!

Cleaning and Prepping the Joint for Reuse
Okay, so you've got a pile of disassembled two way lean pipe joints—now what? Before you toss them into a bin labeled "reuse," they need a little TLC. Even if a joint looks clean, dirt, oil, and rust can compromise its performance when you reassemble it. Let's walk through the cleaning process step by step.
Step 1: Remove Surface Debris with a Wire Brush
Start by scrubbing the joint with a wire brush. Focus on three areas: the inner pipe insertion holes (where dirt and metal shavings often build up), the set screw threads (to remove rust or debris that could jam the screw), and the outer surface (to wipe away grease or paint splatters). For chrome-plated joints, use a brass brush to avoid scratching the finish—nylon works better for aluminum or plastic joints.
If the inner holes are really gunked up, try this hack: cut a small piece of sandpaper (120-grit) into a strip, wrap it around a pencil, and twist it inside the hole. This will loosen stubborn debris without damaging the joint's inner diameter.
Step 2: Degrease to Remove Oil and Grease
Lean systems often get coated in machine oil, lubricant, or even food residue (in packaging lines). This grime can prevent the set screws from gripping the pipe properly, leading to wobbly structures. Grab your mild degreaser and a clean rag, and wipe down the entire joint—pay extra attention to the set screw recesses and pipe holes. Let it sit for 5-10 minutes if the grease is thick, then wipe again with a dry rag.
Avoid using harsh solvents like brake cleaner or paint thinner—they can eat away at plastic components (like the caps on some ESD joints) or strip protective coatings. A simple mixture of dish soap and warm water works surprisingly well for most jobs if you don't have degreaser on hand.
Step 3: Check for Rust and Treat It
If your joints are steel or chrome-plated, rust is the enemy. Even small spots can spread, weakening the joint over time. For light surface rust, a quick scrub with a brass brush and degreaser should do the trick. For heavier rust, try a rust converter (like Naval Jelly) or a paste of baking soda and water. Apply it, let it sit for 10 minutes, then scrub with the brush. Rinse with water and dry immediately to prevent new rust from forming.
Aluminum joints rarely rust, but they can develop a white, powdery oxidation. This is mostly cosmetic—scrub it off with a nylon brush and vinegar, then dry thoroughly. Oxidation doesn't weaken aluminum, but it can make the joint look unprofessional if you're reusing it in a visible area (like a customer-facing workbench).
Step 4: Lubricate the Set Screws (Sparingly!)
Once the joint is clean and dry, a tiny bit of lubricant on the set screws will make future disassembly easier. Use a dry lubricant (like graphite powder) or a light machine oil (3-in-1 oil works well). Apply just one drop to the threads of each set screw, then tighten and loosen the screw a few times to spread the lubricant evenly. Wipe off any excess—you don't want oil dripping onto your pipes or workbench later.
Why dry lubricant? It won't attract dust like oil does. If you're working in a dusty environment (like a woodworking shop), dust + oil = sludge, which can gunk up the threads. For clean rooms or electronics assembly, stick to food-grade or ESD-safe lubricants to avoid contamination.

Reusing the Joint: Building a New Reconfigurable Line
Now comes the fun part: putting those cleaned, inspected joints back to work. Let's say your team needs a new material rack for incoming components—instead of buying a prefab unit, you'll build one using reused two way lean pipe joints, leftover lean pipes, and a few new accessories (like roller tracks for easy loading). Here's how to make it happen.
Step 1: Plan Your Design (Measure Twice, Cut Once)
Reconfigurable lines thrive on planning. Sketch out your new structure first—whether it's a workbench, flow rack, or trolley. Note the length of each pipe, the angles between joints, and any accessories you'll need (like caster wheels for mobility or roller tracks for material flow). For our material rack example, let's say we need a 3-foot wide, 5-foot tall unit with 3 shelves. We'll use two way lean pipe joints to connect the vertical supports to the horizontal shelves, and add roller tracks on the top shelf for sliding boxes.
Pro tip: Use a digital caliper to measure the inner diameter of your reused joints. Most lean pipes are standard (1.5 inches in diameter), but over time, joints can wear slightly, making them loose on new pipes. If the fit is too loose, wrap a layer of Teflon tape around the pipe end before inserting it into the joint—this adds friction and tightens the connection.
Step 2: Assemble the Frame (Start with the Base)
When building with lean pipes and joints, always start from the bottom up. For our material rack, we'll begin with the base: four vertical pipes (5 feet each) connected by horizontal pipes (3 feet each) at the bottom, using two way joints at each corner. insert the pipes into the joints, making sure they're fully seated (you should feel a slight "click" when they're all the way in). Then, hand-tighten the set screws—just enough to hold the pipes in place while you adjust the frame.
Once the base is square (use a carpenter's square to check the corners), tighten the set screws fully. Here's the key: tighten them in a "star" pattern, like you would with a car tire. For a four-corner base, tighten the top-left joint, then bottom-right, then top-right, then bottom-left. This ensures even tension and prevents the frame from warping.
Step 3: Add Shelves and Accessories
With the base and vertical supports in place, it's time to add the shelves. Cut horizontal pipes to length (3 feet for our example) and attach them to the vertical supports using two way joints at the desired height (we'll space ours 18 inches apart for 3 shelves). Again, insert the pipes fully, hand-tighten the screws, check for level, then final-tighten.
For the top shelf, we'll add roller tracks to make loading boxes easier. Roller tracks slide into grooves on the lean pipes or attach via special brackets—since we're reusing parts, we'll use leftover roller track placon mounts (flat brackets that bolt to the aluminum profile of the shelf). Screw the mounts to the shelf pipes, then snap the roller track into place. Done! Your reused two way joints are now holding up a fully functional material rack.
Step 4: Test for Stability and Adjust as Needed
Before you load the rack with materials, give it a good shake. Does it wobble? Check the set screws—they might need a final tighten. Are the shelves level? Use a bubble level to adjust the joint angles if needed. Remember, lean systems are only as good as their stability—even a small wobble can lead to materials sliding off or pipes bending over time.
If you're using the rack for heavy items (50+ pounds), add diagonal braces using three way joints (you can reuse those too!) for extra support. Braces reduce sway and distribute weight evenly across the frame—critical for long-term durability.
Case Study: How One Manufacturer Saved $12,000 by Reusing Joints
Let's put this into real-world context. A mid-sized electronics manufacturer in Ohio recently shifted production from smartphones to tablets—a change that required reconfiguring 12 workbenches and 8 flow racks. Instead of buying new lean pipe systems ($3,500 per workbench, $2,800 per flow rack), they decided to disassemble and reuse their old joints and pipes.
The team spent two days disassembling the old setups, cleaning 450+ two way lean pipe joints, and sorting usable parts. They replaced only 30 joints (those with cracks or stripped threads) and bought new roller tracks and ESD-safe workbench tops for the tablet assembly line. Total cost? $8,200—compared to $20,000+ for new systems. That's a savings of over $12,000, plus they kept 200+ pounds of metal out of landfills.
The best part? The new lines were up and running in three days instead of the two weeks it would have taken to order and deliver new components. As the plant manager put it: "We used to see old joints as trash. Now we see them as cash in the bank."
Common Mistakes to Avoid (and How to Fix Them)
Even with the best intentions, reusing two way lean pipe joints can go wrong. Here are the most common pitfalls and how to steer clear of them:
Mistake 1: Reusing Damaged Joints "Just This Once"
It's tempting to reuse a joint with a small crack or stripped screw—"it's just for a temporary setup," you tell yourself. Big mistake. A cracked joint will fail under stress, potentially causing the entire structure to collapse. If a joint is damaged, recycle it. The $5 you save isn't worth a workplace injury or damaged materials.
Mistake 2: Over-Tightening Set Screws
More is not better when it comes to set screws. Overtightening can strip the threads, bend the joint housing, or even dent the lean pipe—making future disassembly impossible. Tighten until you feel resistance, then give it a quarter-turn more. That's enough to hold the pipe securely without damaging the joint.
Mistake 3: Mixing and Matching Joint Sizes
Lean pipes come in different diameters (1 inch, 1.5 inches, etc.), and joints are sized to match. Using a 1-inch joint on a 1.5-inch pipe will result in a loose fit, no matter how tight you crank the screws. Always check the joint's size marking (usually stamped on the housing) before reusing it.
Mistake 4: Skipping the Cleaning Step
Dirt in the pipe holes or on the set screws might seem harmless, but it can prevent the pipe from seating fully. This leads to "soft spots" in the structure that wobble or sag. Even a quick 30-second brush and wipe can make a world of difference in stability.
Final Thoughts: Reuse as a Lean Mindset
Disassembling and reusing two way lean pipe joints isn't just a cost-cutting tactic—it's a mindset. Lean manufacturing isn't about doing more with less; it's about doing more with what you already have. By taking the time to properly take apart, inspect, clean, and repurpose these small but critical components, you're not just saving money—you're building a more resilient, adaptable, and sustainable production system.
So the next time your production line needs a makeover, don't reach for the catalog. Look in your storage closet. That box of old joints and pipes? It's not junk. It's the foundation of your next reconfigurable line. And who knows? You might just find that the process of reusing parts sparks new ideas for how to make your lean system even more efficient.
After all, in lean manufacturing, the best innovations often come from seeing value in places others overlook. And that, more than any tool or technique, is what makes a truly lean operation.