- Company Articles
- Products and Technology
- Installation And Maintenance
- How to Extend the Lifespan of One Way Rotatory Straight Lean Pipe Joints

How to Extend the Lifespan of One Way Rotatory Straight Lean Pipe Joints
Related Product
One Way Rotatory Straight Lean Pipe Joint
Two way lean pipe joint for 2 pcs 28MM lean pipe connection in straight angle with rotatory fucntion, which used widely in workbench, flow rack, hand trolley frame connection.
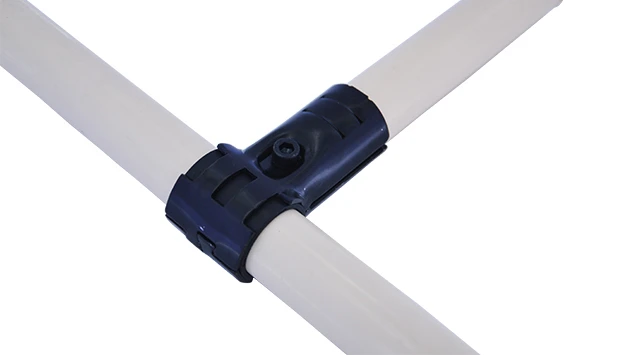
In the world of manufacturing and production, every component plays a quiet but critical role in keeping operations running smoothly. Among these unsung heroes are the one way rotatory straight lean pipe joints—small, unassuming parts that connect lean pipes, enable controlled movement, and form the backbone of everything from workbenches and flow racks to roller tracks and turnover trolleys. These joints might not grab headlines, but their performance directly impacts your team's efficiency, your facility's throughput, and ultimately, your bottom line.
Think about it: a stuck or worn-out joint can slow down material flow, force workers to waste time adjusting misaligned pipes, or even lead to costly downtime. But with the right care, these joints can last years longer than their expected lifespan, saving you from frequent replacements and keeping your lean system operating at peak performance. In this guide, we'll walk through practical, actionable steps to extend the life of your one way rotatory straight lean pipe joints—from understanding their role in your lean system to implementing maintenance habits that prevent premature wear.
Understanding the One Way Rotatory Straight Lean Pipe Joint
Before diving into maintenance, let's clarify what these joints do. A one way rotatory straight lean pipe joint is designed to connect two or more lean pipes (often steel, aluminum, or stainless steel) while allowing rotation in a single direction. This controlled movement is essential for applications like roller tracks, where materials need to glide smoothly in one path, or adjustable workbenches, where angles might need (fine-tuning) without compromising stability.
These joints are typically made from durable materials like galvanized steel or aluminum, with internal components (like bearings or washers) that facilitate rotation. They're engineered to handle specific weight loads and environmental conditions, but they're not indestructible. Their lifespan depends on three factors: how well they're installed, how regularly they're maintained, and how thoughtfully they're used.
For example, in a busy assembly line, a joint on a flow rack might rotate hundreds of times daily as boxes or parts slide through. Without proper care, the constant friction and stress can wear down its internal mechanisms, leading to stiffness, wobbling, or even breakage. But with proactive steps, you can minimize this wear and keep the joint rotating smoothly for years.
Common Culprits: What Shortens a Joint's Lifespan?
To protect your joints, you first need to know what's working against them. Here are the most common factors that cut a joint's lifespan short:
1. Overloading: Pushing Beyond Limits
Every lean pipe joint has a maximum weight capacity specified by the manufacturer. Exceeding this limit is like asking a car to tow a truck—it might work temporarily, but over time, the stress bends the joint, warps internal components, or loosens bolts. For instance, if a joint rated for 50kg is regularly used to support 70kg of materials on a flow rack, its rotational mechanism will degrade far faster than intended.
2. Poor Lubrication: Friction Eats Away at Parts
Rotation relies on smooth movement between metal surfaces, and without proper lubrication, friction builds up. Dust, debris, and even moisture can mix with unlubricated parts, creating a gritty paste that wears down bearings and washers. A joint that's stiff or makes a grinding noise when rotated is often crying out for lubrication.
3. Environmental Stress: Moisture, Dust, and Corrosion
Your facility's environment plays a big role. In humid or dusty areas, unprotected steel joints can rust, while aluminum joints might corrode if exposed to chemicals or salt. Even small amounts of moisture can seep into the joint's crevices, causing internal components to degrade over time. Similarly, dust and debris can jam the rotational mechanism, forcing the joint to work harder than necessary.
4. Improper Installation: Cutting Corners Early On
A joint is only as strong as its installation. Rushing to connect pipes without aligning them properly, using the wrong tools (like over-tightening with a power drill), or skipping steps (like using thread lockers) can create uneven stress. For example, if a lean pipe is slightly bent when the joint is tightened, the joint will bear extra pressure every time it rotates, leading to premature fatigue.

Proactive Maintenance: The Key to Longevity
The good news? Most joint failures are preventable with regular, simple maintenance. Think of it like caring for a car: a little oil change and tire rotation go a long way. Below is a breakdown of habits to adopt, along with a handy maintenance schedule to keep you on track.
1. Inspect Regularly: Catch Issues Early
Set a routine to check joints for signs of wear. Daily, have operators do a quick visual scan: Are there cracks or dents in the joint body? Is rotation smooth, or does it feel stiff? Are bolts loose or missing? Weekly, take a closer look: Use a flashlight to check for rust or corrosion in crevices, and wiggle the joint gently to test for wobbling (a sign of loose connections).
Early detection is critical. A small crack today might become a broken joint next month, but if you spot it early, you can replace the joint during a scheduled downtime instead of scrambling during a production rush.
2. Clean to Prevent Debris Buildup
Dust, grease, and small particles love to collect in joint crevices, especially around the rotational mechanism. Use a soft brush or compressed air to blow away debris weekly—pay extra attention to the area where the joint meets the lean pipe, as this is a common trap for dirt. For joints in particularly dusty areas (like near sanding stations), wipe them down with a dry cloth daily to prevent buildup.
Avoid using harsh chemicals or water, which can damage internal components or cause rust. If a joint is greasy (e.g., from oil leaks in the facility), use a mild, non-corrosive degreaser and dry thoroughly afterward.
3. Lubricate Strategically
Lubrication reduces friction and protects against corrosion. The type of lubricant matters: For most one way rotatory joints, a light machine oil or silicone-based lubricant works best (check your manufacturer's recommendations—some joints use sealed bearings that don't require lubrication). Apply a small amount (a drop or two) to the rotational points every 2–4 weeks, depending on usage.
Pro tip: After lubricating, rotate the joint a few times to distribute the lubricant evenly. Wipe away excess to avoid attracting dust. In high-humidity environments, add a corrosion-inhibiting lubricant to the routine to protect metal surfaces.
4. Tighten and Torque Bolts
Vibration from daily use can loosen bolts over time, leading to wobbling joints and uneven stress. Once a month, use a torque wrench to check bolt tightness—follow the manufacturer's specs (over-tightening can strip threads or crack the joint). For joints on high-vibration equipment (like near conveyor belts), check bolts weekly.
Consider using thread locker (a liquid adhesive) on bolts during installation or after re-tightening—this prevents them from loosening due to vibration, especially in critical areas like roller track connections.
| Maintenance Task | Frequency | Tools Needed | Key Notes |
|---|---|---|---|
| Visual inspection (cracks, stiffness) | Daily | Flashlight, hands | Check during pre-shift walkthroughs |
| Debris cleaning (brush/air) | Weekly (daily in dusty areas) | Soft brush, compressed air | Focus on rotational crevices |
| Lubrication | Every 2–4 weeks | Lubricant, cloth | Use manufacturer-recommended lubricant |
| Bolt torque check | Monthly (weekly for high-vibration areas) | Torque wrench, thread locker | Follow torque specs to avoid over-tightening |
| Deep cleaning (degreasing) | Quarterly | Mild degreaser, cloth | For joints in greasy environments |

Installation: Start Strong to Last Longer
Even the best maintenance can't fix a poorly installed joint. Getting installation right from the start sets the foundation for a long lifespan. Here's how:
1. Use Compatible Parts
Not all lean pipes and joints are created equal. A one way rotatory straight lean pipe joint designed for aluminum lean pipe might not fit or function properly with steel or stainless steel pipe, and vice versa. Check that the joint's diameter matches the pipe (e.g., 28mm for standard lean pipe) and that the material is compatible (aluminum joints with aluminum pipe to avoid galvanic corrosion, where dissimilar metals react in moisture).
Also, use accessories from the same supplier when possible—mismatched lean pipe clamps, connectors, or end caps can create uneven pressure on the joint, leading to stress points.
2. Align Pipes Precisely
Misaligned pipes put extra stress on joints. Before tightening, ensure pipes are straight and level—use a spirit level or laser level for accuracy. If pipes are bent or warped, replace them first; forcing a bent pipe into a joint will twist the joint every time it rotates.
For roller track systems, alignment is especially critical: even a small misalignment can cause materials to jam, putting excess pressure on the joints as the system tries to compensate.
3. Avoid Forcing Connections
If a joint doesn't slide onto the pipe easily, don't hammer or twist it into place—this can damage the internal threads or warp the joint body. Instead, check for debris in the pipe or joint, or verify that the pipe is cut cleanly (a burr on the pipe end can block the joint). Use a pipe deburring tool to smooth rough edges before installation.
4. Follow Weight Limits
During installation, calculate the maximum load the joint will bear (including dynamic loads, like materials sliding on a roller track) and ensure it's below the joint's rated capacity. When in doubt, over-engineer slightly—using a higher-capacity joint than needed adds a safety buffer and reduces stress.
When to Repair vs. replace
Even with perfect maintenance, joints will wear out eventually. Knowing when to repair and when to replace can save time and money:
Repair When:
- Loose bolts: Tighten or replace with new bolts (use thread locker).
- Minor stiffness: Clean and lubricate—if rotation improves, the joint is still viable.
- Surface rust: Remove with a wire brush and apply a rust inhibitor (for steel joints).
replace When:
- Cracks or deformation: A cracked joint can fail suddenly under load—replace immediately.
- Seized rotation: If cleaning and lubrication don't restore movement, internal components (like bearings) are likely worn out.
- Excessive wobbling: If tightening bolts doesn't fix wobbling, the joint's internal structure is damaged.
- Corrosion in crevices: Rust that can't be removed (e.g., inside the rotational mechanism) weakens the joint over time.
Final Thoughts: Invest in Longevity, Reap the Rewards
Caring for one way rotatory straight lean pipe joints might seem like a small task, but it's a powerful investment in your lean system's health. By inspecting, cleaning, lubricating, and installing these joints properly, you'll reduce downtime, extend their lifespan, and keep your production line moving smoothly.
Remember: these joints are part of a larger ecosystem. A well-maintained joint supports better material flow, reduces worker frustration, and aligns with the core principles of lean management—eliminating waste (in this case, waste from frequent replacements and downtime). So the next time you walk through your facility, take a moment to appreciate these hardworking components—and give them the care they deserve. Your team, your operations, and your bottom line will thank you.