- Company Articles
- Products and Technology
- Installation And Maintenance
- How to Inspect One Way Rotatory Straight Lean Pipe Joints for Wear & Tear

How to Inspect One Way Rotatory Straight Lean Pipe Joints for Wear & Tear
Related Product
One Way Rotatory Straight Lean Pipe Joint
Two way lean pipe joint for 2 pcs 28MM lean pipe connection in straight angle with rotatory fucntion, which used widely in workbench, flow rack, hand trolley frame connection.
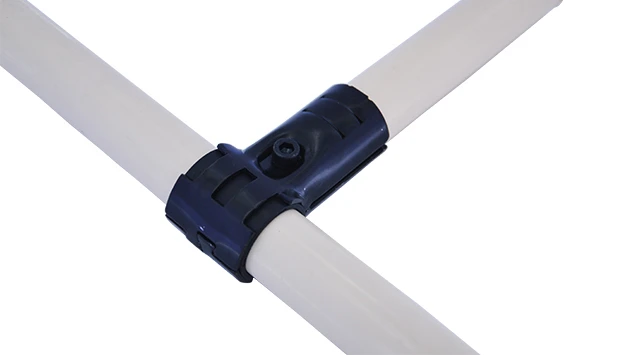
In the world of manufacturing and workshop efficiency, it's often the smallest components that keep the entire operation running smoothly. Take the lean pipe joint, for example—those unassuming connectors that hold together workbenches, roller tracks, and material handling systems. Among these, the one way rotatory straight lean pipe joint plays a quiet but critical role: it allows controlled rotation in a single direction, making tasks like loading materials onto a conveyor or adjusting a workbench height feel seamless. But like any hardworking part, it's prone to wear and tear over time. A worn joint might start with a subtle squeak, a tiny wobble, or a slight resistance when rotating—and if left unchecked, it can snowball into bigger issues: production delays, damaged materials, or even safety hazards.
If you've ever stood in front of a clunky workbench or a jammed roller track, you know how frustrating (and costly) these small failures can be. That's why learning to inspect your one way rotatory straight lean pipe joints isn't just about maintenance—it's about protecting your team's productivity and keeping your workflow lean. In this guide, we'll walk through why these joints matter, how to spot early signs of wear, and the step-by-step process to inspect them like a pro. Whether you're a seasoned facility manager or a new workshop lead, by the end, you'll have the tools to keep those joints—and your operations—in top shape.
What Is a One Way Rotatory Straight Lean Pipe Joint, Anyway?
Before we dive into inspection, let's make sure we're all on the same page about what exactly a one way rotatory straight lean pipe joint is. Picture this: you're assembling a workbench using lean pipe (those lightweight, often metal or aluminum tubes that form the backbone of lean systems). To connect two pipes at a straight angle while allowing rotation in one direction—say, to tilt a tool holder or guide materials along a roller track—you'd reach for this specific joint. It's designed with a internal mechanism (usually a spring-loaded pin or a ratchet-like system) that lets the joint rotate freely in one direction but locks it in place when turned the other way. Think of it like a door hinge that only swings open, not closed—controlled movement that prevents accidental backsliding.
These joints are everywhere once you start looking: under workbenches with adjustable shelves, along roller tracks that feed parts to assembly lines, or on mobile trolleys that need to pivot smoothly. They're built to handle repetitive motion, but that repetition takes a toll. The metal components rub against each other, the internal springs weaken, and the plastic or rubber washers that reduce friction start to degrade. Over time, even a well-made joint will show signs of fatigue. The key is to catch those signs early—before they turn into bigger problems.
Why Regular Inspection Matters (Spoiler: It's Not Just About the Joint)
Let's start with the obvious: a failed lean pipe joint can bring a workstation to a halt. Imagine a roller track where a one way rotatory joint has seized up. Suddenly, the smooth flow of materials from one station to the next turns into a bottleneck—workers have to manually lift heavy parts, slowing down the line, and frustration builds. But the costs go beyond time. If a joint on a workbench gives way, tools or might crash to the floor, leading to replacement costs or scrapped products. And in the worst cases, a loose or broken joint could cause a structure to collapse, putting your team at risk of injury.
But here's the thing: most joint failures don't happen overnight. They start with small, noticeable clues that are easy to ignore in the chaos of a busy day. A joint that "sticks" a little when you rotate it. A tiny gap between the joint and the lean pipe. A faint grinding sound when it moves. These are your joint's way of saying, "Hey, I need a check-up." By making inspection part of your routine, you're not just extending the life of the joint—you're preventing these small issues from becoming big, expensive headaches.

Tools You'll Need: Keep It Simple
Inspecting a one way rotatory straight lean pipe joint doesn't require a fancy toolbox. In fact, you probably already have most of what you need lying around the workshop. Here's a quick list to gather before you start:
- Flashlight : To check hard-to-see areas, like the gap between the joint and the pipe or the internal components.
- Gloves : Nitrile or work gloves to protect your hands from sharp edges or grease.
- Feeler gauge or thin ruler : To measure small gaps between the joint and the lean pipe (more on that later).
- Wrench or hex key : The same one you use to tighten the joint originally—you might need to loosen it slightly to inspect internal parts.
- Clean cloth : To wipe away dust, grease, or debris that could hide wear.
- Notebook or phone : To jot down notes or take photos of any issues you find (this helps when ordering replacements!)
That's it—no special sensors or diagnostic tools required. The most important "tool" is your attention to detail. Take your time, and don't rush through the process. Remember: you're looking for small changes, not obvious breaks.

Step-by-Step Inspection: How to Check for Wear & Tear
Now, let's get hands-on. Follow these steps to inspect a one way rotatory straight lean pipe joint from top to bottom. We'll use a common scenario: a joint on a roller track that's used daily to move plastic bins from one workstation to another. But these steps work for any joint, whether it's on a workbench, a trolley, or a material rack.
Step 1: Start with a Visual Check
First, stand back and look at the joint in its "resting" position. Is it aligned straight with the lean pipe, or does it look slightly bent or twisted? A joint that's off-kilter might mean the internal components are warped or the mounting is loose. Next, get up close. Use your flashlight to check for:
- Rust or corrosion : Especially if your workshop is humid or uses water-based coolants. Rust starts as tiny orange spots but can eat through metal over time.
- Cracks or chips : Check the outer housing of the joint and the area where it connects to the pipe. Even a hairline crack can weaken the joint.
- Debris buildup : Dust, grease, or small bits of material (like plastic shavings) can get trapped in the joint, causing friction and wear.
- Worn labels or markings : If the joint has directional arrows (indicating which way it should rotate), are they faded? This might not affect function, but it's a sign of heavy use.
Pro tip: Compare the joint to a newer one if you have a spare. Fresh joints have smooth, uniform surfaces, while worn ones might look dull or pitted.
Step 2: Test Rotation & Resistance
The one way rotatory joint's superpower is its controlled movement—so any change in how it rotates is a red flag. Gently grasp the joint and try to rotate it in the "allowed" direction (the one it's supposed to move). It should turn smoothly, with consistent resistance—no jerks, sticking, or sudden "catching" points. Now, try rotating it in the opposite direction (the "locked" direction). It should stay firm, with no give or slipping. If it rotates backward even a little, the internal locking mechanism (like a spring or ratchet) might be worn.
As you rotate, listen closely. A healthy joint might make a soft, even sound, but grinding, squeaking, or clicking usually means parts are rubbing where they shouldn't. For example, if the internal bearings are worn, you might hear a gritty noise. If the joint is loose, it might rattle against the lean pipe.
Step 3: Check for Play or Wobble
"Play" is the technical term for looseness in the joint—how much it moves side-to-side or up-and-down when you wiggle it. To test this, hold the lean pipe firmly with one hand and gently push and pull the joint with the other. There should be almost no movement. If you can wiggle the joint more than 1-2 millimeters, that's a problem. Excess play means the joint isn't gripping the pipe tightly, which can lead to misalignment over time.
To measure the gap more precisely, slide a feeler gauge or thin ruler between the joint and the lean pipe. A gap larger than 0.5mm is a sign that the joint's clamping mechanism (like a set screw or collar) is worn or that the pipe itself is damaged (though lean pipe is tough, it can get dented with heavy use).
Step 4: Inspect Internal Components (If Possible)
Some one way rotatory joints are designed to be partially disassembled for inspection—check if yours has a removable cover or a hex screw that holds the rotation mechanism in place. If it does, carefully loosen the screw (don't fully remove it!) and peer inside with your flashlight. Look for:
- Worn washers or gaskets : These are the soft, rubbery parts that reduce friction. If they're cracked, flattened, or missing, the joint will grind.
- Bent or broken springs : The spring is what gives the joint its "one way" action. A bent spring might cause weak locking or uneven rotation.
- Damaged teeth or ratchets : If your joint uses a ratchet system for one-way rotation, look for chipped or worn teeth—these will cause slipping.
If your joint isn't meant to be disassembled, don't force it open—you could damage it further. In that case, rely on the earlier steps (visual check, rotation test, play) to gauge its condition.
Step 5: Test Under Load (Optional but Helpful)
A joint might feel fine when you're just wiggling it by hand, but how does it hold up when it's doing its job? If possible, simulate its daily workload. For example, if it's on a roller track, place a bin of typical weight on the track and slide it past the joint. Does the joint rotate smoothly, or does it catch? If it's on a workbench, place a heavy tool on the shelf attached to the joint—does the joint sag or creak?
This step is crucial because some wear only shows up under stress. A joint with a slightly bent internal component might rotate freely when empty but bind up when loaded. Better to catch that in a test than during a busy production run!
Common Wear Signs: What to Watch For
By now, you might be wondering: "How do I know if a joint is 'bad enough' to replace?" Not every scratch or squeak means it's time for a new one. To help you decide, here's a breakdown of the most common wear signs and what they mean:
| Sign of Wear | What It Means | Action Needed |
|---|---|---|
| Squeaking or grinding during rotation | Worn washers, dry internal parts, or debris buildup | Clean and lubricate first. If noise persists, replace washers or the joint. |
| Joint rotates backward (loses one-way lock) | Damaged spring, ratchet teeth, or locking mechanism | replace the joint—this is a safety risk (materials could slide backward unexpectedly). |
| Wobble or play (more than 1mm) | Loose clamping mechanism or worn pipe connection | Tighten set screws. If play continues, replace the joint (or check the lean pipe for damage). |
| Cracks in the joint housing | Structural weakness—could fail under load | replace immediately—do not use the joint! |
| Resistance when rotating (gets "stuck") | Debris in the mechanism or bent internal parts | Clean and lubricate. If stuck, disassemble (if possible) to remove debris. replace if bent parts are found. |
Remember: When in doubt, err on the side of caution. A $10 joint replacement is far cheaper than a $1,000 production delay or a workplace injury.
Maintenance Tips: How to Extend Joint Life
Inspection is just one part of caring for your lean pipe joints. With a little regular maintenance, you can significantly extend their lifespan. Here are a few easy habits to adopt:
Keep It Clean
Dust, grease, and metal shavings are the enemy of moving parts. Wipe down your joints with a clean cloth once a week (more often if your workshop is particularly dusty). For hard-to-reach spots, use a small brush (like an old toothbrush) to dislodge debris. If you notice oil or coolant buildup, use a mild degreaser (avoid harsh chemicals that can damage plastic components).
Lubricate Sparingly
Most one way rotatory joints have internal parts that need a little lubrication to stay smooth—but don't overdo it. Use a lightweight machine oil or silicone spray (avoid heavy greases, which attract dust). Apply 1-2 drops to the joint's rotation points (you'll see small gaps where the moving parts meet) and rotate the joint a few times to spread the oil evenly. Do this every 1-2 months, depending on use.
Tighten When Needed
Vibration from daily use can loosen the set screws or bolts that hold the joint to the lean pipe. Check these monthly and tighten them gently with your wrench—over-tightening can strip the threads or crack the joint housing.
Avoid Overloading
Every joint has a weight limit (check the manufacturer's specs if you're unsure). Using it to support more than it's designed for accelerates wear. If you need to move heavier loads, upgrade to a heavy-duty joint or reinforce the structure with extra supports.
Real-World Example: When a Worn Joint Caused a Crisis (and How It Could Have Been Prevented)
Let's paint a picture: Maria runs a small electronics assembly workshop with 10 employees. Their most critical line is a roller track that moves circuit boards from the soldering station to the testing station. The track uses six one way rotatory straight lean pipe joints to guide the boards smoothly—each joint allows the board to slide forward but locks to prevent it from sliding back if someone bumps the track.
One Monday morning, the team noticed the track was "sticking." Boards would get halfway down and stop, forcing workers to nudge them forward by hand. At first, Maria thought it was a minor issue—maybe a dirty roller. But by midday, a board got stuck so badly that it bent, ruining $200 worth of components. Frustrated, Maria shut down the line to investigate.
When she inspected the roller track, she found the culprit: one of the one way rotatory joints had lost its locking ability. The spring inside had worn out, so the joint would rotate backward slightly when a board hit it, creating a "bump" that stopped the board. The team had noticed the joint was squeaking the week before but hadn't had time to check it—they were too busy meeting a deadline. By the time it failed, the line was down for 2 hours, costing them not just the bent board but also lost production time.
The fix? A $15 replacement joint and 10 minutes of installation. But the lesson stuck: Maria now has her team do a 5-minute "joint check" every Friday afternoon. They walk the workshop, wiggle each one way rotatory joint, listen for squeaks, and jot down any issues. Since then, they haven't had a single line stop due to a worn joint.
Maria's story isn't unique. Most workshop disruptions from lean pipe joint failures are preventable with a little proactive care. The takeaway? Don't wait for a crisis—make inspection part of your routine.
Creating an Inspection Schedule That Works for You
The key to successful joint maintenance is consistency. But "consistency" doesn't mean spending hours every day inspecting joints. Here's a simple schedule you can adapt to your workshop's needs:
Daily: Quick Visual & Sound Check
Have operators do a 30-second check when they start their shift. As they set up their workbench or start using a roller track, they should:
- Listen for unusual noises (squeaks, grinding).
- Check if the joint moves smoothly (no sticking).
- Note any obvious wobble or gaps.
If they spot something, they jot it down on a "maintenance log" hanging near the workstation.
Weekly: Deep Dive (15-20 Minutes)
Assign a team member (or rotate the task) to do a more thorough inspection once a week. They'll use the steps we outlined earlier: visual checks for cracks/rust, rotation tests, play measurements, and a quick clean/lube if needed. Focus on high-use joints first—like those on frequently adjusted workbenches or busy roller tracks.
Monthly: Full Inventory & Replacement Plan
At the end of each month, review the maintenance log and the weekly inspection notes. Identify joints that are showing signs of wear (even minor ones) and order replacements ahead of time. This way, you'll never be caught without a spare when a joint fails.
Final Thoughts: Small Components, Big Impact
The one way rotatory straight lean pipe joint might not be the star of your workshop, but it's the unsung hero that keeps your lean system lean. By taking 10 minutes to inspect it regularly, you're not just maintaining a part—you're protecting your team's ability to work efficiently, safely, and without frustration. Remember: every squeak, wobble, or gap is a message. Listen to it, and you'll keep your workflow moving forward—just like that well-functioning joint.
So the next time you walk past a workbench or a roller track, take a second to give the joints a little attention. Wiggle them, rotate them, and listen. Your future self (and your production schedule) will thank you.