- Company Articles
- Products and Technology
- Installation And Maintenance
- How to Install 2040 Aluminum Profile End Caps: Step-by-Step Guide

How to Install 2040 Aluminum Profile End Caps: Step-by-Step Guide
Related Product
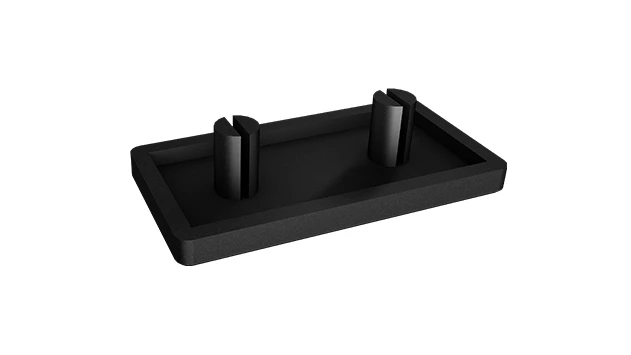
2040 Aluminum Profile End Cap
The aluminum profile end cap adds a finishing touch to your project and closes off profile ends to limit dust and debris buildup, also it can avaid some scratch for material and labor during the assemble work.
Why 2040 Aluminum Profile End Caps Matter More Than You Think
If you've ever worked with aluminum extrusion profiles—whether building a garage workbench, a material rack for your workshop, or a custom storage system—you know the satisfaction of seeing those sleek, industrial-looking frames come together. But here's a small detail that can make or break the final result: the end caps. Specifically, 2040 aluminum profile end caps. These tiny accessories might seem like an afterthought, but they're the unsung heroes that turn a "functional but unfinished" project into something polished, safe, and built to last.
Let's start with safety. Aluminum extrusion profiles, by design, have open ends. Those ends? They're sharp. Run your hand along an exposed 2040 profile end, and you could walk away with a nasty cut—especially if the profile was recently cut to size. End caps seal those edges, turning potential hazards into smooth, touchable surfaces. That's a big deal if you have kids around, or if you're constantly moving around your workspace (we've all bumped into a project mid-build, right?).
Then there's aesthetics. Imagine spending hours assembling a workbench with 2040 aluminum profiles—aligning joints, tightening brackets, making sure every angle is square—only to leave the ends looking ragged. Exposed profile ends collect dust, show off tool marks, and just… look unfinished. End caps cover those imperfections, giving your project a clean, professional finish that says, "I care about the details." Whether you're building something for your home garage or a client's workshop, that polished look matters.
And let's not forget protection. The inside of an aluminum profile is a magnet for dust, debris, and even moisture. Over time, that gunk can corrode the interior or make it harder to add accessories later (like brackets or connectors that slide into the T-slot). End caps act as a barrier, keeping the inside of your 2040 profile clean and ready for whatever you throw at it down the line. Think of them as tiny shields for your hard work.
In short, 2040 aluminum profile end caps are more than just aluminum profile accessories—they're essential. They keep you safe, make your project look great, and extend the life of your aluminum extrusion profile. So let's dive into how to install them properly, step by step.
Understanding the 2040 Aluminum Profile and Its End Caps
Before we grab our tools, let's make sure we're all on the same page about what we're working with. First up: the 2040 aluminum profile. If you're new to aluminum extrusion, "2040" refers to the profile's dimensions: 20mm wide and 40mm tall (or vice versa, depending on orientation). It's one of the most popular profiles out there because it strikes a perfect balance between strength and versatility. You'll find it in everything from workbenches and material racks to 3D printer frames and conveyor systems. Its T-slot design (those grooves running along the length) lets you attach accessories like shelves, lights, or hooks—making it a favorite for DIYers and professionals alike.
Now, the star of the show: the 2040 aluminum profile end cap. These are small, usually plastic or rubber covers designed to snap or press into the open ends of your 2040 profile. They come in different colors (black, silver, white are common) to match your profile, and they're typically shaped to fit the exact inner dimensions of the 2040 profile. Some are plain, others have a slight dome or texture, but their core job is the same: cover the end, seal the profile, and look good doing it.
It's also worth noting that end caps are part of a larger ecosystem of aluminum profile accessories. When you're building with 2040 profiles, you're probably using joints, brackets, casters, and maybe even roller tracks to bring your project to life. End caps fit right into that system, complementing those other parts to create a cohesive whole. They might be small, but they're a key piece of the puzzle.
Pro Tip: Not all end caps are created equal! Make sure you're buying end caps specifically labeled for 2040 profiles. Profiles come in different sizes (like 2020, 3030, or 4040), and their end caps won't fit interchangeably. A 2020 end cap will be too small for a 2040 profile, and a 4040 cap will be way too big. Check the product description—look for "2040 aluminum profile end cap" to be sure.

Tools and Materials You'll Need (Yes, It's a Short List!)
Installing 2040 aluminum profile end caps isn't rocket science, and you won't need a workshop full of tools. In fact, you probably already have most of what you need lying around. Here's a quick breakdown:
| Tool/Material | Why You Need It |
|---|---|
| 2040 Aluminum Profile End Caps | The star of the show! Make sure you have one end cap per profile end (e.g., 4 caps for a 4-sided workbench frame). |
| Rubber Mallet | To gently tap the end cap into place without damaging the profile or the cap. |
| Cleaning Cloth | To wipe down the inside of the profile end—dust or debris can block the cap from seating properly. |
| Utility Knife or Sandpaper (Optional) | For smoothing out any burrs or rough edges on the profile end (more on this later). |
| Gloves (Optional but Recommended) | To protect your hands from sharp edges while cleaning or adjusting the profile. |
| Measuring Tape (Optional) | To double-check that your profile ends are cut square (if you're unsure). |
That's it! No drills, no screws, no complicated tools. This is a project you can do with just a few items, even if you're new to working with aluminum extrusion profiles.

Step-by-Step: Installing Your 2040 Aluminum Profile End Caps
Now, let's get to the good stuff: installing those end caps. We'll break this down into simple steps, so even if you've never touched an aluminum profile before, you'll be a pro by the end.
Step 1: Prep the Profile End
First things first: clean the end of your 2040 aluminum profile. Grab your cleaning cloth and wipe the inside and outside of the end. Dust, metal shavings, or even a stray piece of tape can prevent the end cap from fitting snugly. If you notice any burrs (those tiny, sharp metal bits left over from cutting the profile), gently sand them down with sandpaper or trim them with a utility knife. You want the end to be smooth and clean—no rough spots to block the cap.
Pro tip: If your profile was cut recently, it might have oil or residue from the cutting tool. A quick wipe with a cloth dampened with rubbing alcohol will remove that and help the end cap adhere better (some end caps have a slight friction fit, and a clean surface means a tighter seal).
Step 2: Align the End Cap
Take your 2040 aluminum profile end cap and hold it up to the profile end. Look at the shape—most end caps have a lip or flange that will sit flush against the outside of the profile. You'll notice that the cap is slightly larger than the opening of the profile (that's by design, to create a tight fit). Make sure the cap is oriented correctly: the flange should face outward, and the "insert" part should face into the profile.
If your end cap has a design (like a logo or texture), make sure it's facing the right way! It sounds silly, but there's nothing more frustrating than tapping a cap into place only to realize it's upside down. Take a second to double-check—you'll thank yourself later.
Step 3: Press (or Tap) the Cap into Place
Now, it's time to seat the cap. Start by pressing it gently with your hand. Most end caps will "catch" with a little pressure—you'll feel them start to slide into the profile. If it's a tight fit (which is good!), don't force it with just your hand—you might bend the cap or scratch the profile. Instead, grab your rubber mallet.
Hold the cap in place with one hand (wear gloves if the profile is sharp!), and tap the center of the cap lightly with the rubber mallet. Start with small taps—you don't need to hit it hard. The goal is to gradually seat the cap until the flange is flush with the end of the profile. If you tap too hard, you might crack the cap (especially if it's plastic) or damage the profile's finish.
Here's a trick: if the cap is misaligned, gently twist it with your fingers while tapping. Sometimes the cap can catch on the T-slot edges inside the profile, and a little twist helps it slide into place evenly. You'll know it's seated correctly when the entire flange is touching the profile end—no gaps, no wobbling.
Step 4: Check for a Snug Fit
Once the cap is in place, give it a little wiggle. It should feel tight—no movement. If it slides out easily, it might not be seated all the way. Try tapping it again, focusing on the side that feels loose. If it's still loose, check the inside of the profile for debris (you might have missed a metal shaving) or burrs (which can keep the cap from seating). Clean it again, then try reinstalling.
On the flip side, if the cap is so tight that you can't get it in all the way, don't panic. Sometimes end caps are molded slightly larger (manufacturing tolerances, right?). Try sanding the "insert" part of the cap very lightly with fine-grit sandpaper (like 220 grit). Sand a little, then test the fit—repeat until it slides in smoothly. Just be careful not to sand too much, or the cap will be loose!
Step 5: Repeat for All Ends
That's it! You've installed one end cap. Now just repeat the process for every exposed end of your 2040 aluminum profile. Whether you're working on a workbench, a material rack, or a shelving unit, each end gets the same treatment: clean, align, tap, check. Before you know it, all those sharp, messy ends will be covered, and your project will look like it was built by a pro.
Troubleshooting Common Issues (Because Even Pros Run Into These)
Installing end caps is usually straightforward, but every once in a while, things don't go as planned. Here are the most common issues and how to fix them:
Issue 1: The End Cap Won't Stay In
If your end cap pops out after installation, there are two likely culprits: either the cap is too small (wrong size—remember, 2040 caps only fit 2040 profiles!), or the profile end is damaged. If it's the wrong size, return it and get the correct 2040 aluminum profile end cap. If the profile end is bent or dented (maybe from dropping it?), use a rubber mallet to gently tap the profile back into shape. A bent end can create gaps that let the cap slide out. Once the profile is straight, try reinstalling the cap.
Issue 2: The Cap Is Cracked or Damaged During Installation
Oops—tapped too hard with the mallet? It happens. If the cap cracks, it's best to replace it. A cracked cap won't seal the profile properly, and it looks unprofessional. To avoid this, always tap lightly and focus on the center of the cap (tapping the edges can cause cracking). If you're worried about damaging the cap, place a small piece of wood (like a popsicle stick) over the cap before tapping—it spreads the force evenly.
Issue 3: The Profile End Is Too Rough to Seat the Cap
If you cut the profile yourself (or had it cut at a hardware store), the end might be rough or uneven. Use sandpaper to smooth it out—start with 120-grit sandpaper to remove big burrs, then switch to 220-grit for a smooth finish. Wipe away the dust, then try the cap again. A smooth end makes for a much easier installation.
Issue 4: The Cap Is Stuck (And You Need to Remove It)
Maybe you installed the wrong cap, or you need to access the inside of the profile. To remove a stuck end cap, gently pry it out with a flathead screwdriver. Place the screwdriver between the cap's flange and the profile, then twist lightly. Be careful not to scratch the profile! If it's really stuck, heat the cap slightly with a hair dryer (plastic caps expand when warm, making them easier to remove). Just don't overheat—you don't want to melt the cap.
Pro Tips for a Flawless Finish (Because Details Matter)
Now that you know the basics, here are a few extra tips to make your end cap installation even better:
- Match the color to your profile. End caps come in colors like silver, black, and white—pick one that complements your 2040 aluminum profile. A black cap on a silver profile can look sharp, but if you want a seamless look, go for the same color as the profile.
- Install end caps before adding accessories. It's easier to install end caps when the profile is still loose (not bolted into a frame). Once the profile is part of a larger structure, you might have less room to tap the cap into place. Do it early, and save yourself the hassle.
- Use a rubber mallet with a soft face. Hard rubber mallets can leave marks on plastic end caps. Look for a mallet with a "dead blow" face (it has a soft, bouncy surface) to avoid scuffing.
- Keep extra end caps on hand. Accidents happen—you might crack a cap, lose one, or decide to add more profiles later. Having spares means you won't have to pause your project to order more.
- Clean the caps before installation. New end caps can have mold release residue (that shiny, slippery stuff) from manufacturing. Wipe them with a cloth dampened with rubbing alcohol to remove it—that way, they'll seat better and stay clean longer.
Maintaining Your End Caps (Because They Need Love Too)
Once your end caps are installed, they don't need much maintenance—but a little care will keep them looking good for years. Here's what to do:
Wipe them down occasionally with a damp cloth to remove dust and grime. If they get really dirty (like in a garage with oil or grease), use mild soap and water—avoid harsh chemicals (like bleach or ammonia), which can fade the color or damage plastic caps.
Check them every few months for looseness. Over time, vibrations (from tools, moving the project, or even just daily use) can cause end caps to wiggle loose. A quick tap with a rubber mallet will snug them back up.
replace damaged caps ASAP. If a cap cracks or falls off, don't leave the profile end exposed. Cracks let in dust and moisture, and exposed ends are a safety hazard. Swap out the damaged cap for a new one—it's a 5-minute fix that prevents bigger problems later.
Final Thoughts: Small Accessory, Big Impact
Installing 2040 aluminum profile end caps might seem like a small step, but it's one that transforms your project from "good" to "great." These little aluminum profile accessories keep you safe, make your workbench or rack look professional, and protect your aluminum extrusion profile for years to come. And the best part? It's easy. With just a few tools and a little patience, you can install end caps like a pro—no experience needed.
So the next time you're building with 2040 aluminum profiles, don't skip the end caps. Take the extra 10 minutes to install them properly. Your hands (and your project's appearance) will thank you.
Now go forth and cap those profiles! And when someone asks, "Wow, who built this? It looks amazing," you can smile and say, "Me—and I paid attention to the details."