- Company Articles
- Products and Technology
- Installation And Maintenance
- How to Install 3030 Aluminum Profile End Caps: Step-by-Step Tutorial

How to Install 3030 Aluminum Profile End Caps: Step-by-Step Tutorial
Related Product
3030 Aluminum Profile End Cap
The aluminum profile end cap adds a finishing touch to your project and closes off profile ends to limit dust and debris buildup, also it can avaid some scratch for material and labor during the assemble work.
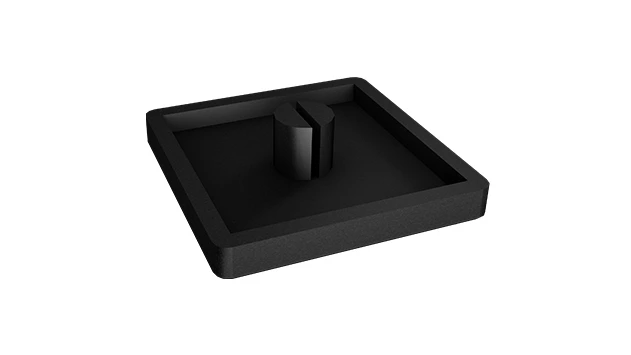
Why Bother with End Caps? The Small Part That Makes a Big Difference
If you've spent any time around workshops, factories, or even DIY projects, you've probably seen aluminum extrusion profiles in action. These versatile pieces of metal—with their signature T-slots and sturdy build—are the backbone of everything from workbenches and material racks to conveyor systems and machine guards. And among the most common sizes out there? The 3030 aluminum profile. It's like the "medium" in a coffee shop—just right for so many jobs, balancing strength and flexibility without being too bulky.
But here's the thing: even the best aluminum extrusion profile is only as good as its finishing touches. That's where 3030 aluminum profile end caps come in. These tiny, often-overlooked aluminum profile accessories are the unsung heroes of any setup. Think about it: without them, the raw, cut ends of the profile are sharp enough to scratch hands or catch on clothing. Dust, dirt, and even small tools can fall into the open T-slots, gumming up the works over time. And let's be honest—those exposed ends just make the whole project look unfinished, like forgetting to put a cap on a marker after using it.
I've been working with aluminum profiles for years, and I've lost count of how many times I've heard, "Oh, end caps? We'll get to those later." Spoiler: "Later" usually turns into "never," and then someone ends up with a scraped forearm or a T-slot jammed with sawdust. Trust me—taking 5 minutes to install end caps now saves hours of hassle (and band-aids) later. Plus, they make your setup look professional. Clients notice that kind of attention to detail, and coworkers will thank you for not leaving sharp edges lying around.
Gather Your Tools: What You'll Need (Spoiler: It's Not Much!)
One of the best things about installing 3030 aluminum profile end caps is that you don't need a fancy toolbox. In fact, you probably already have everything you need lying around the shop. Let's break it down:
| Tool | Why You Need It |
|---|---|
| 3030 Aluminum Profile End Caps | Obviously, the star of the show! Make sure they're the right size—3030 profiles have a 30mm x 30mm cross-section, so the end caps should match that. |
| Rubber Mallet | To gently tap the end cap into place without damaging the plastic or the aluminum profile. |
| Soft Cloth or Paper Towel | To clean the end of the profile before installation—grease or dust can prevent the end cap from seating properly. |
| Fine Sandpaper (Optional) | If the cut end of the profile has burrs (tiny metal splinters), a quick sand will smooth them out. |
| Gloves (Optional but Smart) | Even if you sand, those edges can still be sharp. A pair of work gloves adds extra protection. |
| Small Flathead Screwdriver (Optional) | For prying off old or stuck end caps, or adjusting if the new one is misaligned. |
Pro tip: Avoid using a metal hammer! It's too easy to crack the plastic end cap or dent the aluminum profile. A rubber mallet (or even a block of wood tapped with a regular hammer) gives you the force you need without the risk of damage. And if you're installing a lot of end caps, keep a few extras on hand—they're cheap, and it's frustrating to run out mid-project.

Prep Work: The Secret to a Smooth Installation
Before you start slapping end caps on, take 2 minutes to prep. Trust me, this step is non-negotiable if you want a tight, long-lasting fit. Here's how to do it right:
Step 1: Inspect the Profile End for Burrs
Grab the 3030 aluminum profile and run your finger very gently along the cut end. (If you're worried about sharpness, wear gloves for this!) If you feel any rough spots or tiny metal splinters (called burrs), that's a problem. Burrs can prevent the end cap from sitting flush and might even tear the plastic as you press it on.
Fixing burrs is easy: fold a piece of fine sandpaper (around 220 grit) into a small square and lightly sand the edge. Move in one direction—back-and-forth motions can create new burrs. You don't need to polish it to a mirror finish; just smooth out the rough spots. Wipe away any metal dust with your soft cloth when you're done.
Step 2: Clean the End of the Profile
Even if there are no burrs, the end of the profile is probably covered in oil, dust, or fingerprints. This gunk acts like a barrier, making it harder for the end cap to grip. Take your soft cloth and wipe the end thoroughly. If it's extra greasy (looking at you, freshly cut profiles from the mill!), a quick wipe with rubbing alcohol on the cloth will do the trick. Let it dry for 30 seconds before moving on—you don't want alcohol residue messing with the fit.
Step 3: Check the End Cap for Defects
Not all end caps are created equal. Before you install, take a quick look at the 3030 aluminum profile end cap. Are there cracks in the plastic? Is the lip (the part that presses into the profile) bent or misshapen? If yes, toss it and grab a new one. A defective end cap won't stay on, and it's not worth risking a loose fit just to "use up" a faulty part. Most aluminum profile accessories suppliers include a few extra end caps in bulk orders, so check your package—you might have spares!

Installation Time: Let's Get Those Caps On!
Okay, prep's done—now for the fun part. Installing 3030 aluminum profile end caps is straightforward, but there's a trick to getting them on straight and tight. Follow these steps, and you'll be done in minutes:
Step 1: Align the End Cap with the Profile
Hold the end cap in one hand and the aluminum profile in the other. Look at the end cap—you'll notice it has a slightly raised lip around the edge. This lip is what presses into the inside of the profile's end. Now, line up the end cap so that the lip matches the inner edges of the profile. If your profile has T-slots (which most 3030s do), make sure the end cap's notches (if any) align with the slots. Some end caps have small tabs that fit into the T-slots to prevent rotation—if yours does, those tabs need to slide into the slots.
Pro move: If you're having trouble aligning, set the profile upright on a flat surface (like a workbench) so the end is facing up. Then place the end cap on top—gravity will help hold it in place while you adjust. Just make sure the profile is stable so it doesn't tip over!
Step 2: Press Gently to Start
Once aligned, use your thumb to press the center of the end cap. You should feel it start to "catch" on the profile. Don't force it—if it's misaligned, pressing hard will bend the lip. If it feels stuck, lift it off and realign. Most end caps are designed to be a snug press-fit, so a little resistance is normal, but it shouldn't require Herculean strength to start.
Step 3: Tap It Into Place with the Rubber Mallet
Here's where the rubber mallet comes in. Hold the mallet loosely—you want to tap, not swing. Start at one corner of the end cap and give a light tap. Then move to the opposite corner and tap again. Work your way around the edges: top, bottom, left, right. This "cross-pattern" tapping ensures the end cap goes in evenly, not lopsided. You'll hear a change in sound as it seats—from a hollow "thud" to a solid "clunk" when it's fully pressed in.
Warning: Don't tap directly in the center! This can warp the end cap, especially if it's made of thin plastic. Stick to the edges, and keep the taps light. If it's taking more than 3-4 taps per side, stop and check alignment—you might have a burr you missed or a misaligned end cap.
Step 4: Check for a Flush Fit
Once you think it's in, run your finger around the edge of the end cap. It should sit perfectly flush with the profile—no gaps, no overhang. If one side is sticking out, gently tap that side with the mallet until it's even. If it's still wonky, pop it off (use a flathead screwdriver under the edge, gently prying) and start over. It's better to redo it now than have it fall off later.
Troubleshooting: When Things Don't Go Smoothly (And How to Fix Them)
Even with the best prep, sometimes end caps can be finicky. Here are the most common issues I've run into, and how to solve them:
Problem: The End Cap Won't Fit—It's Too Tight!
First, double-check that you have the right size. 3030 profiles are 30mm x 30mm, but some manufacturers make "close enough" end caps that are actually for 28mm or 32mm profiles. If the packaging says "3030," though, the issue might be with the profile itself. Sometimes, during cutting, the end can get slightly crushed or bent, narrowing the opening. Try gently expanding the end with a round object (like the handle of your screwdriver) inserted into the T-slot—twist lightly to widen it. Alternatively, warm the end cap with a hair dryer for 10-15 seconds (not too hot!) to soften the plastic, making it easier to press in.
Problem: The End Cap Falls Off Easily
If the end cap slides off with a light tug, it's probably too loose. This can happen if the profile end is worn, or the end cap is slightly undersized. A quick fix: apply a tiny drop of cyanoacrylate glue (super glue) to the inner lip of the end cap, then press it into place. Wipe away any excess glue immediately—you don't want it seeping into the T-slot! For a more permanent solution, look for "grippy" end caps with rubberized edges—they're designed to stay put better than smooth plastic ones.
Problem: The End Cap Cracks During Installation
Ouch—nobody likes cracking plastic. This usually happens from tapping too hard or hitting the center instead of the edges. If it's a small crack, you can try gluing it with plastic cement, but honestly, it's better to replace it. To prevent this, use lighter taps, and if the end cap is stiff, warm it first to make it more flexible. Also, avoid using metal hammers at all costs—rubber mallets are worth the $10 investment to save on replacement end caps.
Maintenance: Keeping Your End Caps (and Profile) in Top Shape
Installing end caps is just the first step—you'll want to keep an eye on them over time to make sure they're doing their job. Here's how:
Every few months, do a quick "end cap check" during your regular shop maintenance. Give each end cap a gentle tug to ensure it's still snug. Vibration from machinery or frequent handling can loosen them over time. If one is loose, pop it off, clean the profile end again, and re-install. If it's cracked or damaged, replace it immediately—even a small crack can let dust in or leave a sharp edge exposed.
For end caps on outdoor or high-moisture setups (like garage workbenches), consider upgrading to UV-resistant or stainless steel end caps. Plastic end caps can fade or become brittle in sunlight or humidity, but metal ones last longer. They're a bit pricier, but worth it for durability.
FAQs: Your End Cap Questions Answered
Q: Do I really need end caps on every aluminum profile?
A: Yes! Even if the profile is in a "hidden" spot, like the back of a rack, dust and debris will still get into the T-slots. And if someone ever moves the rack, that hidden end could become exposed. Save yourself the hassle and cap 'em all.
Q: Can I paint my end caps to match my project?
A: Absolutely! Use a plastic-compatible spray paint (like Krylon Fusion) for best results. Clean the end cap first with rubbing alcohol, let it dry, then apply 2-3 light coats. Avoid painting the inner lip—paint can add thickness, making it harder to press the cap into place.
Q: What's the difference between "press-fit" and "screw-on" end caps?
A: Press-fit end caps (the ones we've been talking about) are the most common—they just snap into place. Screw-on end caps have small screws that thread into the profile's T-slots, which is great for heavy-duty setups where vibration might loosen press-fit caps. For most workshops, though, press-fit is more than enough.
Q: I lost the end cap—where can I buy replacements?
A: Any aluminum profile accessories supplier should carry 3030 end caps. Check online retailers like Amazon or industrial supply stores, or contact the manufacturer of your profile—they often sell replacement parts. Buy in bulk if you can—they're cheaper that way, and you'll always have spares.
Wrapping Up: Small Investment, Big Returns
Installing 3030 aluminum profile end caps might seem like a tiny task, but it's one of those details that elevates a project from "homemade" to "professional." These little aluminum profile accessories protect your team, keep your equipment running smoothly, and make your workspace look polished. And let's be real—there's something deeply satisfying about that final "clunk" when the end cap seats perfectly, knowing you've dotted every i and crossed every t.
So next time you're building with aluminum extrusion profiles, don't skip the end caps. Grab your rubber mallet, take 5 minutes, and do it right. Your future self (and your hands) will thank you.