- Company Articles
- Products and Technology
- Installation And Maintenance
- How to Install 3030 National Standard Profile A: Step-by-Step Assembly Guide with Connectors

How to Install 3030 National Standard Profile A: Step-by-Step Assembly Guide with Connectors
Related Product
3030 National Standard Profile A
Workbench, production line, logistic rack, warehouse rack Industry: Manufacturer workshop, Automobile, Electronic, Assembling, logistic
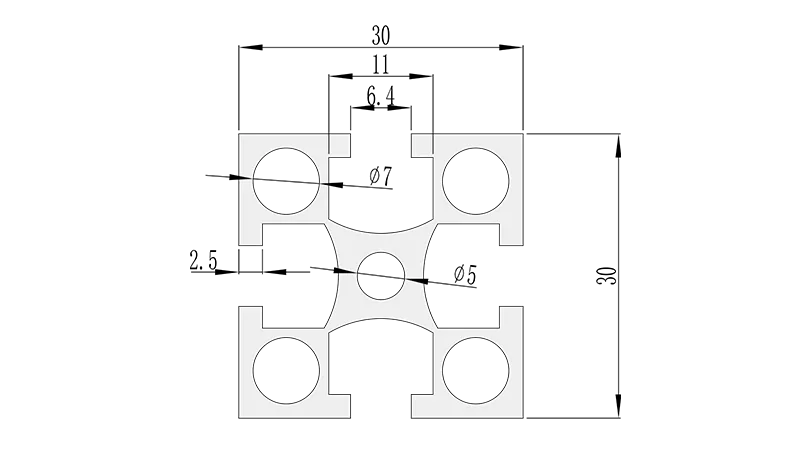
If you've ever walked into a workshop, factory floor, or even a home garage that feels effortlessly organized, chances are you've seen the handiwork of aluminum profiles at play. Lightweight yet sturdy, infinitely customizable, and surprisingly easy to assemble, these profiles are the backbone of everything from workbenches to material racks. And today, we're zeroing in on one of the most versatile options out there: the 3030 National Standard Profile A. Whether you're building a simple workbench, a shelving unit, or a custom machine frame, this guide will walk you through the assembly process—no prior experience required. Let's dive in.
Why 3030 National Standard Profile A?
First, let's talk about why this profile is a favorite among DIYers and professionals alike. The "3030" refers to its dimensions: 30mm in width and 30mm in height, making it compact enough for small projects but robust enough to handle moderate loads. The "National Standard" label ensures consistency in sizing and hole spacing, so you can mix and match parts from different suppliers without worrying about compatibility. And unlike some bulkier profiles, the 3030 National Standard Profile A strikes the perfect balance between strength and weight, making it easy to transport, cut (if needed), and assemble by hand.
But what really sets it apart is its T-slot design—the long, narrow groove running along each side. This slot lets you slide in connectors, brackets, and accessories, turning a simple length of aluminum into a fully functional structure. No welding, no drilling random holes, no complicated tools. Just connectors, fasteners, and a little patience. Ready to build something awesome? Let's start with the basics.
Tools & Materials You'll Need
Before you start, gather your tools and materials. You don't need a fully stocked workshop, but having the right items on hand will make the process smooth and frustration-free. Here's what you'll need:
Tools
- Hex Key (Allen Wrench): Most aluminum profile fasteners use hex sockets. Check your connectors—they'll typically require a 4mm or 5mm hex key (included with many kits, but it never hurts to have a set on hand).
- Rubber Mallet: For gently tapping connectors into place or adjusting misaligned profiles. Avoid metal hammers—they can scratch or dent the aluminum.
- Measuring Tape & Pencil: To double-check lengths and mark where connectors will go (critical for keeping your structure square).
- Level: A small 2-foot level will help ensure your vertical posts are straight and your horizontal beams are level—no wobbly workbenches here!
- Work Gloves: Optional but recommended. The edges of aluminum profiles can be sharp, especially if they're freshly cut.
Materials
- 3030 National Standard Profile A: Cut to your desired lengths (many suppliers will cut them for you if you provide measurements).
- Connectors: The star of the show! For most projects, you'll need 90° aluminum profile connectors (to join vertical and horizontal profiles), but we'll cover other types later. Pro tip: Buy a few extra—you never know when you might want to add an extra shelf or brace.
- Fasteners: These are usually included with connectors, but double-check. Look for T-slot bolts, nuts, and washers—they're designed to fit snugly in the profile's T-slot.
- Aluminum Profile End Caps: Small, plastic or rubber caps that snap onto the ends of profiles to cover sharp edges and prevent dust from getting inside the T-slot.
- Aluminum Profile Accessories (Optional): Depending on your project, you might want gussets (for extra stability), brackets, or even wheels (casters) if you want your structure to be mobile. For example, if you're building a workbench, you might add a plywood or aluminum top later.
Pro Tip:
Lay out all your materials on a flat surface (like a table or clean floor) before starting. Sort the profiles by length and the connectors by type—this will save you from rummaging through a pile halfway through assembly!
Pre-Assembly Prep: Plan, Check, & Sort
You wouldn't bake a cake without reading the recipe first, right? The same goes for assembling aluminum profiles. A little prep work will save you time and headaches later. Here's how to get ready:
1. Review Your Design
Even if your project is simple (like a 2x3ft workbench), sketch a quick diagram. Note the lengths of the vertical posts, horizontal beams, and any cross-braces. For example, a basic workbench might have four vertical posts (3ft tall), four horizontal beams for the top frame (2ft each), and four horizontal beams for the bottom shelf (2ft each). Write down how many connectors you'll need—for a square frame, that's 8 corner connectors (one for each vertical-horizontal joint).
2. Inspect Your Parts
Take a minute to check each profile and connector for damage. Look for bent ends, dents in the T-slot (which could block connectors), or stripped threads on fasteners. If something looks off, contact your supplier—most will replace defective parts quickly. Also, check that the hole spacing on the connectors lines up with the T-slot on the 3030 profiles. National Standard profiles have holes every 30mm, so connectors should match that spacing.
3. Clear Your Workspace
Assembling profiles requires space to lay out parts and move around. Clear a spot at least twice the size of your finished project—you'll need room to maneuver the frame as you build it. If you're working on the floor, lay down a blanket or cardboard to protect both the profiles (from scratches) and your floor (from dents).
Step-by-Step Assembly: Building Your Frame
Now for the fun part: putting it all together! We'll walk through assembling a basic square frame (the foundation of most projects, from workbenches to shelving). Once you master this, you can add shelves, cross-braces, or other features. Let's get started.
Step 1: Start with the Base Frame
Let's begin with the bottom frame—this will be the "base" of your structure. For a workbench, this might be the frame that sits on the floor; for a shelf, it could be the bottom shelf. Take two horizontal profiles (let's say 2ft long) and two vertical profiles (6in long for the bottom frame—we'll add taller vertical posts later). You'll connect these into a rectangle using 90° aluminum profile connectors.
Take one 90° connector and slide it into the end of a horizontal profile. The connector should have two "arms"—one to fit into the horizontal profile and one for the vertical. Gently push it until the end of the connector is flush with the end of the profile. Now, take a vertical profile and slide its end into the other arm of the connector. You should feel it click into place, but don't force it—if it's stuck, check that the T-slot is clear of debris.
Repeat this for the other three corners until you have a rectangle. Now, grab your hex key and tighten the fasteners on each connector. insert the hex key into the small hole on the connector and turn clockwise until the fastener is snug. Don't overtighten—aluminum is soft, and stripping the threads is easy. A firm "click" or resistance is enough.
Step 2: Add Vertical Posts
Now, let's add height. Take your four vertical posts (the 3ft ones we mentioned earlier) and attach them to the corners of the base frame. For this, you'll use another set of 90° aluminum profile connectors—this time, the vertical arm of the connector will attach to the top of the base frame's vertical posts, and the horizontal arm will hold the new vertical posts.
Flip the base frame upside down so the open ends of the vertical posts are facing up. Slide a 90° connector into each open end, then insert the bottom of a tall vertical post into the connector's other arm. Tighten the fasteners with your hex key. Once all four vertical posts are attached, flip the frame right-side up. Now you have a "table leg" setup—four tall posts connected by a bottom frame.
3. Attach the Top Frame
Next, we'll add the top frame to complete the "cage" of your structure. Using the same method as the base frame, cut four horizontal profiles (2ft each) and connect them to the tops of the vertical posts with 90° connectors. Make sure the top frame is parallel to the bottom frame—use your measuring tape to check that the distance between opposite posts is the same on all sides. If it's not, loosen the connectors slightly and adjust until the frame is square.
Once the top frame is attached, stand back and check for wobbles. If the structure leans, it might be because the vertical posts aren't plumb (straight up and down). Use your level to adjust each post—loosen the connectors, tweak the angle, and retighten until the bubble in the level is centered.
4. Add Cross-Braces (For Extra Stability)
For most projects (especially workbenches or shelving that will hold weight), cross-braces are a must. These diagonal or horizontal beams add rigidity, preventing the frame from swaying. To add a cross-brace, cut a profile to fit diagonally between two vertical posts (measure the distance first!) and attach it using 45° aluminum profile connectors or swivel connectors. Alternatively, you can add horizontal cross-braces halfway up the vertical posts for a shelf.
For example, if you want a middle shelf, cut four horizontal profiles (2ft each) and attach them between the vertical posts using 90° connectors. Space them evenly (say, 1.5ft from the bottom) and tighten the fasteners. Now you have a bottom shelf, middle shelf, and top frame—perfect for storage!
5. Install Aluminum Profile End Caps
Once the frame is stable, it's time to add the finishing touches: aluminum profile end caps. These small caps snap onto the open ends of the profiles, covering sharp edges and giving your structure a clean, professional look. To install them, simply align the cap with the end of the profile and press firmly—you'll hear a small "pop" when it's seated. If the cap is tight, run your finger along the edge of the profile first to remove any burrs.
6. Add Accessories (Optional)
Now that the basic frame is done, it's time to customize! If you're building a workbench, add a top (plywood, MDF, or even an aluminum sheet) by drilling holes through the top and securing it to the frame with T-slot bolts. If you want mobility, attach casters to the bottom posts using caster mounting brackets (an aluminum profile accessory). You can even add tool hooks, light mounts, or bins by sliding brackets into the T-slot.
Heads Up:
If you're adding heavy accessories (like a power tool mount), reinforce the frame with gussets first. Gussets are triangular brackets that attach to the inside of corners, distributing weight and preventing bending.
Common Connectors & When to Use Them
Not all connectors are created equal. Depending on your project, you might need more than just 90° corner connectors. Here's a quick guide to the most useful types for 3030 National Standard Profile A assemblies:
| Connector Type | Best For | How It Works |
|---|---|---|
| 90° Aluminum Profile Connector | Square or rectangular frames (corners of workbenches, shelves, or racks) | Has two perpendicular arms that slide into the T-slot of two profiles, joining them at a right angle. |
| 45° Aluminum Profile Connector | Diagonal braces, angled frames (e.g., a sloped roof on a cart) | Similar to the 90° connector but with arms at a 45° angle, perfect for cross-braces. |
| Three-Way Connector | Adding a third profile to a joint (e.g., a vertical post with a horizontal beam on two sides) | Three arms (often 90° apart) allow you to connect three profiles at once—great for T-joints or corners with extra support. |
| Swivel Connector | Adjustable angles (e.g., a fold-down shelf or tiltable work surface) | One arm rotates, letting you set custom angles (30°, 60°, etc.) before tightening the fastener. |
| Gusset (Angle Bracket) | Reinforcing corners (heavy-load applications like tool chests) | A flat, triangular bracket that bolts to two profiles at a corner, adding rigidity and preventing twisting. |
Troubleshooting Common Issues
Even with careful planning, you might run into a few snags. Here's how to fix the most common problems:
Loose Connections
If a joint feels wobbly after tightening, check two things: Did you use the right connector? And are the fasteners tight enough? Sometimes, using a connector with a smaller fastener (or one that's not rated for 3030 profiles) can lead to looseness. Try swapping in a heavier-duty connector or adding a second fastener to the T-slot (most profiles have space for two fasteners per connector).
Misaligned Holes
If the holes on the connector don't line up with the T-slot, don't force it! This usually happens if the connector is inserted at an angle. Pull it out, realign it with the T-slot, and push gently. If the T-slot is bent, use a small flathead screwdriver to gently pry it open (be careful not to scratch the aluminum).
Fasteners Stripping
Aluminum threads are softer than steel, so overtightening is the #1 cause of stripped fasteners. If you strip a fastener, try using a slightly larger hex key (gently!) to grip the stripped head and back it out. If that fails, you can drill out the fastener (slowly, with a small drill bit) and replace it with a new one.
Maintenance: Keep Your Structure Strong for Years
Your 3030 National Standard Profile A assembly is built to last, but a little maintenance will keep it looking and performing like new. Here's how:
- Clean Regularly: Wipe down the profiles with a damp cloth to remove dust and grime. For stubborn stains, use mild soap and water—avoid abrasive cleaners, which can scratch the aluminum.
- Tighten Fasteners: Every few months (or after heavy use), go around with your hex key and gently snug up any loose fasteners. Vibration from tools or movement can loosen them over time.
- replace Worn Parts: If an end cap falls off or a connector cracks, replace it ASAP. Exposed T-slots can collect dirt, and cracked connectors weaken the structure.
- Protect from Moisture: If your structure is outdoors or in a damp area, consider adding a clear coat of sealant to the profiles to prevent corrosion. Most aluminum profiles are anodized (coated to resist rust), but extra protection never hurts.
Final Thoughts: You've Got This!
Assembling 3030 National Standard Profile A might seem intimidating at first, but once you get the hang of sliding in connectors and tightening fasteners, you'll wonder why you ever thought it was hard. The beauty of these profiles is their flexibility—you can start small (a simple shelf) and build up to more complex projects (a custom machine enclosure) as you gain confidence.
Remember: Take your time, check your alignment, and don't be afraid to experiment. And if you make a mistake? No problem—just loosen the connectors, adjust, and try again. That's the magic of T-slot profiles: they're forgiving. So grab your tools, gather your parts, and start building. The workshop (or garage, or home office) of your dreams is just a few connectors away.