- Company Articles
- Products and Technology
- Installation And Maintenance
- How to Install 3060 Aluminum Profile End Caps: Step-by-Step Tutorial

How to Install 3060 Aluminum Profile End Caps: Step-by-Step Tutorial
Related Product
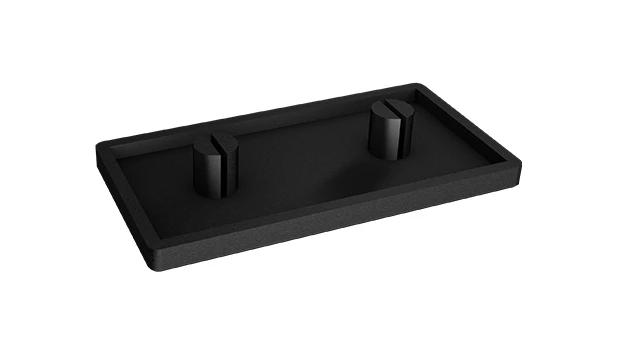
3060 Aluminum Profile End Cap
The aluminum profile end cap adds a finishing touch to your project and closes off profile ends to limit dust and debris buildup, also it can avaid some scratch for material and labor during the assemble work.
Aluminum profiles are the unsung heroes of modern workshops, factories, and even DIY projects. You've probably seen them without realizing it—supporting the shelves in your garage, forming the frame of a conveyor belt at your local warehouse, or holding up the workbench in a home workshop. Among the most versatile of these is the 3060 aluminum profile, a popular choice for its perfect balance of strength, lightweight design, and adaptability. But what truly elevates a 3060 profile from a functional component to a polished, professional finished product? The answer lies in the small but mighty details: aluminum profile end caps. These unassuming accessories are the final touch that ties everything together, and today, we're going to walk through exactly how to install them correctly.
First, let's get familiar with what we're working with. The 3060 aluminum profile is part of the broader family of aluminum extrusion profiles—products made by pushing heated aluminum through a precision die to create consistent, uniform shapes. This process ensures every 3060 profile has the same 30mm x 60mm cross-section, making it easy to pair with compatible parts. And while the profile itself is robust, its raw, cut ends can be sharp, unfinished, and prone to collecting dust or debris. That's where 3060 aluminum profile end caps come in. As essential aluminum profile accessories, they transform rough edges into safe, clean, and visually appealing finishes. Whether you're building a material rack, a workbench, or a custom storage system, installing end caps isn't just about looks—it's about safety, durability, and pride in your work.
Why 3060 Aluminum Profile End Caps Matter More Than You Think
Before diving into the "how," let's talk about the "why." You might be thinking, "They're just caps—do I really need to bother?" Trust us, you do. Here's why:
- Safety First: Raw aluminum ends are sharp. Even a small nick from an exposed profile can ruin your day (or your project timeline). End caps act as a buffer, covering those jagged edges and turning a potential hazard into a smooth, touchable surface. If you've ever brushed against an unfinished aluminum extrusion profile, you know how quickly a minor scrape can happen—end caps eliminate that risk entirely.
- Debris Defense: Open profile ends are like tiny trash cans for dust, dirt, and even small tools. Over time, this buildup can corrode the inside of the profile, weaken its structural integrity, or jam moving parts if the profile is part of a dynamic system (like a sliding shelf or conveyor). End caps seal off these openings, keeping the interior clean and functional for years.
- Aesthetic Appeal: There's a reason even the most utilitarian projects benefit from a polished look. Unfinished ends on a 3060 profile scream "unfinished project," while end caps give it a cohesive, professional finish. Whether you're building something for your business or your home, details like this make a big difference in how the final product is perceived.
- Profile Protection: The exposed ends of an aluminum extrusion profile are surprisingly vulnerable. A dropped tool, a bump from a cart, or even regular wear and tear can dent or bend these edges, compromising the profile's fit with other parts (like connectors or brackets). End caps add a layer of armor, absorbing impacts and preserving the profile's shape.
Gathering Your Tools: What You'll Need for the Job
Installing 3060 aluminum profile end caps is a straightforward task, but having the right tools on hand will make it faster, easier, and more effective. You don't need a fully stocked workshop—just a few basic items you might already have. Here's your checklist:
| Tool | Purpose | Pro Tip |
|---|---|---|
| Soft Microfiber Cloth | Cleaning the profile ends to remove dust, oil, or debris before installation. | Dampen the cloth slightly with water (not soaking!) for stubborn grime—avoid harsh chemicals that might damage the aluminum. |
| Tape Measure (6-inch or Flexible Ruler) | Confirming the profile size (30mm x 60mm) and ensuring the end cap matches. | Double-check the end cap packaging for "3060 compatibility" to avoid buying the wrong size. |
| Rubber Mallet | Gently tapping the end cap into place without damaging the profile or the cap. | Opt for a small, lightweight mallet (8-12 ounces) to avoid overzealous tapping—you want precision, not force. |
| Fine-Grit Sandpaper (220-grit or Higher) | Smoothing burrs or rough edges on the profile's inner or outer ends. | Fold the sandpaper into a small square to reach tight corners; sand in gentle, circular motions to avoid scratching the profile's surface. |
| Utility Knife (Optional) | Trimming excess material from flexible end caps (rare, but useful for custom fits). | Use a fresh blade for clean cuts, and always cut away from your body to prevent accidents. |
Pro Tip: If you're new to working with aluminum extrusion profiles, consider picking up an aluminum profile accessories kit. These often include end caps, connectors, and basic tools, making it easy to get started without hunting for individual parts.

Pre-Installation Prep: Setting Yourself Up for Success
Like any project, installing end caps is easier when you take a few minutes to prepare. Rushing this step can lead to misaligned caps, damaged profiles, or frustrating do-overs. Let's walk through the prep work:
Step 1: Clean the Profile Ends Thoroughly
Even if your 3060 profile looks clean, there's likely dust, oil from manufacturing, or tiny metal shavings clinging to the ends. Grab your microfiber cloth and wipe the cut end of the profile firmly but gently. Pay special attention to the inner edges, where debris loves to hide. If there's stubborn grime (like old tape residue), dampen the cloth slightly and rub in small circles until it lifts. A clean surface ensures the end cap sits flush and adheres properly—no gaps, no slipping, and no trapped dirt ruining the finish.
Step 2: Inspect for Burrs or Damage
Next, run your finger lightly around the edge of the profile end (be careful—raw aluminum can be sharp!). If you feel any rough spots, tiny metal protrusions (burrs), or dents, now's the time to fix them. Grab your fine-grit sandpaper and gently smooth the affected area. For burrs on the inner edge (where the end cap will sit), fold the sandpaper into a narrow strip to reach inside. The goal is to create a smooth, even surface so the end cap can seat properly. Don't over-sand—you just need to remove the rough spots, not reshape the profile.
Step 3: Verify the End Cap Size
Not all end caps are created equal! Even if you bought them labeled "3060," it's worth double-checking. Hold the end cap up to the profile end—its inner lip should align with the profile's outer edges. If it's too small, it won't cover the entire end; if it's too large, it'll hang over awkwardly. Most aluminum profile end caps are designed with a slight "snap" fit, meaning they should hug the profile snugly without being loose. If yours feels off, check the packaging again—mix-ups happen, and using the wrong size is a common rookie mistake.
Step 4: Check the End Cap for Defects
End caps are durable, but they can get damaged during shipping or storage. Take a close look at your end cap: Are there cracks in the plastic or rubber? Is the lip bent or misshapen? Are there any sharp edges on the cap itself? If you spot any issues, swap it out for a new one. A damaged end cap won't protect the profile effectively and might even fall off over time. Most suppliers include extra end caps in aluminum profile accessories kits, so keep a few spares handy—you'll thank yourself later.

Step-by-Step Installation: Putting It All Together
Now that you're prepped and ready, let's get to the main event: installing the 3060 aluminum profile end cap. Take your time—this isn't a race, and precision here will pay off in a clean, long-lasting result. Follow these steps, and you'll have it done in minutes.
Step 1: Position the End Cap Correctly
Hold the end cap in one hand and the 3060 profile in the other. Look at the end cap—most have a slightly raised lip around the inner edge. This lip is designed to fit inside the profile, creating a tight seal. Align the end cap so that this lip faces the open end of the profile. If the end cap has a flat side and a curved side (some designs do), the flat side should face outward for a flush finish. Take a moment to make sure the cap is centered—you don't want it lopsided, with one edge hanging over more than the other.
Pro Tip: If you're struggling to visualize the alignment, place the end cap on a flat surface, lip-side up. Then hold the profile vertically, end down, and lower it gently onto the cap. This gives you a clear view of how they'll fit together before you commit to pushing.
Step 2: Apply Gentle, Even Pressure
With the end cap aligned, use your thumbs to press firmly but slowly on opposite corners of the cap. Start with the top-left and bottom-right corners (or top-right and bottom-left—whichever feels more natural). You should feel a slight "give" as the lip of the end cap starts to slide into the profile. Keep pressing evenly, moving your thumbs around the edges to ensure the cap doesn't tilt. Avoid using your palms or fingers—thumbs give you more control and prevent uneven pressure that could bend the cap.
What if it doesn't slide in easily? Don't panic! It might be that the lip is slightly stiff (common with new end caps). Try wiggling the cap gently from side to side as you press—this can help the lip find its way into the profile's groove. If it still resists, double-check for burrs (we covered that in prep!)—a tiny burr could be blocking the way.
Step 3: Tap into Place (If Needed)
For most 3060 profiles, hand pressure alone will seat the end cap. But if it's a tight fit (which is a good thing—snug means secure!), grab your rubber mallet. Here's how to do it without damaging anything: Wrap a small piece of cloth around the end cap (this prevents the mallet from leaving marks) and hold the profile steady with one hand. Use the mallet to tap lightly around the edges of the end cap, starting with the side that feels least seated. Tap once, then check the alignment—you want to move the cap into place gradually, not force it.
Avoid these mistakes: Don't hit the center of the end cap—this can crack it. Don't tap too hard—aluminum profiles are strong, but the end cap (especially if plastic) can chip. And never use a metal hammer—even a light tap can dent the profile or shatter the cap. The rubber mallet is your friend here—its soft head absorbs shock and distributes force evenly.
Step 4: Verify the Fit
Once the end cap feels seated, take a step back and inspect your work. Run your finger around the edge where the cap meets the profile—there should be no gaps. The cap should sit flush with the end of the profile, with no part of it sticking out or sinking in. If you notice a gap on one side, that means the cap is misaligned. Gently tap that side with the mallet (again, through a cloth) until it evens out. If the cap feels loose—like it might fall off if you shake the profile—it wasn't seated fully. Repeat step 3, focusing on the areas that feel wobbly.
Pro Tip: Give the end cap a gentle twist with your fingers. If it moves, it's not seated right. A properly installed cap should feel solid, like it's part of the profile itself.
Step 5: Repeat for Multiple Ends (If Needed)
If your project uses multiple 3060 profiles—say, a workbench with four legs or a material rack with vertical supports—repeat the process for each end. It's tempting to rush through the second or third cap, but consistency matters. Take the same care with each one: clean, align, press, tap, verify. You'll be glad you did when the entire project looks polished and professional, not just one or two ends.
Fun Fact: Many pros keep a small "installation checklist" on their phone or a sticky note when working with multiple profiles. It sounds silly, but it helps avoid skipping steps when fatigue sets in—no one wants to finish a rack only to realize they forgot an end cap on the back leg!
Troubleshooting: Fixing Common End Cap Issues
Even with careful prep, things can go wrong. Maybe the end cap is too loose, too tight, or just won't stay put. Don't stress—most issues have simple fixes. Let's troubleshoot the most common problems:
Problem: The End Cap Is Too Loose
If the end cap wiggles or falls off with minimal effort, there are two likely culprits: either the profile end is worn (from previous use or rough handling), or the end cap is the wrong size. Start by checking the end cap packaging again—did you accidentally grab 2020 or 4040 caps instead of 3060? If the size is correct, inspect the profile end for signs of wear. Over time, repeated end cap removal (common in adjustable projects) can stretch the inner edges, making them too big for a standard cap.
Solution: If the profile is worn, try a "thicker" end cap (some brands make slightly oversized caps for this exact issue) or add a thin layer of clear silicone adhesive to the end cap's lip (apply sparingly—you don't want it oozing out). Let the adhesive dry for 10 minutes before installing, then press firmly. The silicone adds just enough thickness to create a snug fit without damaging the profile.
Problem: The End Cap Is Too Tight to Install
A cap that won't budge, even with pressure and tapping, is usually due to burrs or debris on the profile's inner edges (we told you to check for burrs in prep—don't skip that step!). It could also be that the end cap is made of rigid plastic, which doesn't flex as easily as rubber or soft PVC caps.
Solution: First, re-sand the profile's inner edges with fine-grit sandpaper—focus on any spots that feel rough. If the cap is rigid plastic, warm it gently with a hair dryer (set to low heat) for 5-10 seconds. The heat will make the plastic slightly pliable, making it easier to press into place. Be careful not to overheat—melted plastic is impossible to fix. Once warm, align and press quickly before it cools.
Problem: The End Cap Cracks When Tapping
Cracking usually happens when you tap too hard, tap off-center, or use a metal hammer instead of a rubber mallet. It can also occur with low-quality end caps (another reason to invest in good aluminum profile accessories).
Solution: If the crack is small (less than 5mm), you might be able to save it with a tiny drop of super glue (apply with a toothpick, not your finger). For larger cracks, replace the cap—safety first, and a cracked cap won't protect the profile. To prevent future cracks, use a lighter touch with the mallet and always wrap the cap in cloth before tapping.
Problem: The End Cap Won't Stay Seated (Keeps Popping Off)
This is often a alignment issue. If the cap isn't pressed evenly, one side might "pop" loose after a few hours or days. It could also be that the profile end is slightly bent (common if the profile was dropped), making it impossible for the cap to sit flush.
Solution: Remove the cap and check the profile end with a straightedge. If it's bent, gently tap it back into shape with a rubber mallet (support the other end of the profile on a flat surface to avoid warping). Then, reinstall the cap, focusing on pressing evenly across all edges. If it still pops, try a small amount of double-sided tape on the cap's lip (not too much—you want to be able to remove it later if needed).
Pro Tips: Making Your End Caps Last (and Look Great)
Now that your end caps are installed, let's make sure they stay in top shape for years. These pro tips will help you maintain your 3060 aluminum profile end caps and get the most out of your project:
- Invest in Quality End Caps: Not all aluminum profile accessories are created equal. Cheap end caps (often made from low-grade plastic) can crack, fade, or become brittle over time, especially in harsh environments (like garages with extreme temperature swings). Spend a little extra on caps from reputable suppliers—look for ones labeled "UV-resistant" or "impact-resistant" if your project will be outdoors or in a high-traffic area.
- Clean End Caps Regularly: Dust, grease, and even fingerprints can make end caps look dull. Every few months, wipe them down with a damp microfiber cloth. For stubborn stains (like oil from tools), mix a drop of mild dish soap with water and gently scrub—avoid abrasive sponges that might scratch the surface.
- Check for Loose Caps During Routine Maintenance: If your 3060 profile is part of a frequently used item (like a workbench or rolling cart), take 30 seconds during your weekly cleanup to wiggle each end cap. Tighten any that feel loose—catching them early prevents damage to the profile and avoids safety risks.
- Customize for Aesthetics (If You Want): Bored of plain black or silver end caps? Some suppliers offer colored caps (red, blue, yellow) or even wood-grain finishes. These are purely cosmetic, but they're a fun way to personalize a project—great for home workshops or kids' spaces!
- Store Spare End Caps Smartly: Keep a few extra 3060 end caps in a labeled container (a small plastic bin or zip-top bag works) near your tools. That way, if one cracks or gets lost, you can replace it immediately instead of putting it off (and risking injury from an exposed profile).
Conclusion: Small Details, Big Impact
Installing 3060 aluminum profile end caps might seem like a minor step, but it's a critical one. These small accessories turn a functional aluminum extrusion profile into a safe, clean, and professional finished product. By following the steps in this tutorial—prepping carefully, aligning precisely, and troubleshooting patiently—you've not only improved the look of your project but also extended its lifespan and ensured it's safe to use.
Remember, the best DIY projects aren't just about the big components—they're about the care you put into the details. Whether you're building a workbench for your garage, a conveyor system for a small business, or a custom shelf for your home, taking the time to install end caps correctly shows pride in your work. And who knows? Maybe next time you walk into a workshop or factory, you'll find yourself smiling at the sight of perfectly installed end caps—knowing you could do that too.
So go ahead—step back, admire your handiwork, and enjoy your newly finished 3060 aluminum profile project. You've earned it.