- Company Articles
- Products and Technology
- Installation And Maintenance
- How to Install 60 Steel Roller Track Grey: Step-by-Step Industrial Installation Guide

How to Install 60 Steel Roller Track Grey: Step-by-Step Industrial Installation Guide
Related Product
60 Steel Roller Track Grey
The roller track can be installed with multiple accessories to create different slopes and configurations of flow racks.All steel conveyor 60 roller track accessories are engineered to perfectly fit the sliding rail.
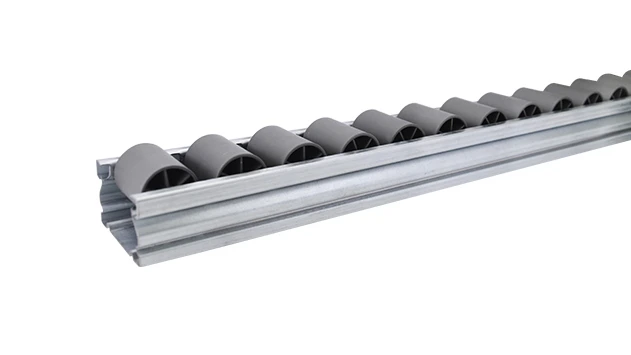
If you've ever stood in a busy warehouse or production line, you know the frustration of clunky, unreliable material handling systems. Parts get stuck, boxes tumble, and workers waste time fixing flow issues instead of focusing on their tasks. That's where the 60 Steel Roller Track Grey comes in—this heavy-duty component is designed to deliver smooth, consistent flow for everything from small electronics parts to heavy boxes. This guide will walk you through every step of installing this track, from prepping your tools to integrating it with your existing lean systems. By the end, you'll have a setup that boosts efficiency and cuts down on unnecessary delays.
What Makes 60 Steel Roller Track Grey Special?
Before we dive into installation, let's talk about why this track is a go-to for industrial teams. Made from high-quality steel with a durable grey finish, it's resistant to corrosion and wear—perfect for high-traffic environments. Its rollers are spaced evenly to ensure items glide without jamming, and it's compatible with a wide range of roller track connectors and end supports. Whether you're building a flow rack for order picking or adding a material feed to your lean pipe workbench, this track fits seamlessly into your lean system. It's also easy to customize—you can cut sections to length or join multiple pieces to create longer lines.
Pre-Installation: Tools & Components You'll Need
Skipping pre-installation prep is a common mistake that leads to messy, inefficient setups. Take 10 minutes to gather these tools and check your components before you start:
Essential Tools
- Adjustable wrench (10-15mm)
- Phillips-head screwdriver (size #2)
- Digital spirit level (for precise alignment)
- Measuring tape (metric, at least 3m)
- Rubber mallet (for gentle adjustments)
- Safety gloves (cut-resistant) and goggles
- Marker pen (for marking installation points)
- Phillips-head screwdriver (size #2)
- Digital spirit level (for precise alignment)
- Measuring tape (metric, at least 3m)
- Rubber mallet (for gentle adjustments)
- Safety gloves (cut-resistant) and goggles
- Marker pen (for marking installation points)
Components Checklist
| Component Name | Quantity (per 2m Track) | Key Notes |
|---|---|---|
| 60 Steel Roller Track Grey Sections | 1 | Choose length (1m/2m/3m) based on your needs |
| Roller Track Connectors | 4 | Use T-slot connectors for aluminum profiles or clamp-style for lean pipes |
| End Support with Stop | 2 | Prevents items from sliding off the track ends |
| M6 Hex Screws & Nuts | 12 | Stainless steel for rust resistance |
| Flat Washers | 12 | Distribute pressure to avoid frame damage |
| Roller Track Placon Mount for Rail Connection | 1 (if joining sections) | Ensures smooth flow between track pieces |
Pro Tip: Always inspect components for defects before installation. Bent rollers, cracked connectors, or warped track sections will ruin your flow—replace any damaged parts immediately.

Step-by-Step Installation Guide
Step 1: Mark Your Installation Positions
Start by deciding where your track will go. If you're attaching it to a flow rack frame, measure the distance between the frame's vertical supports and mark the spots where your connectors will sit. For a lean pipe workbench, mark the edge of the workbench top where the track will feed materials to workers. Use your spirit level to confirm the frame is level—even a 1-degree tilt can cause items to slide too fast or get stuck.
Step 2: Secure Connectors to the Frame
Take your roller track connectors and align them with the marks you made. If you're using an aluminum profile frame, slide the connector into the T-slot and tighten the set screw with your wrench. For lean pipe frames, wrap the clamp-style connector around the pipe and tighten the bolt until it's snug (don't over-tighten—you might need to adjust later). Make sure the connectors are parallel to each other—this ensures the track sits straight.
Step 3: Place the Track on the Connectors
Carefully lift the 60 Steel Roller Track Grey section and place it onto the connectors. Ensure each end of the track rests fully on the connectors—no part of the track should hang over. If you're joining multiple sections, use the roller track placon mount to connect them. Align the rollers so they're flush between sections—this prevents items from getting caught at the joint.
Step 4: Fasten the Track to the Connectors
Use your screws and washers to secure the track to the connectors. insert a washer between the screw and the track to avoid scratching the surface. Tighten each screw in a crisscross pattern (like tightening a car tire) to distribute pressure evenly. Check the track with your spirit level again—if it's not level, loosen the screws slightly and adjust the connectors until it's straight.
Step 5: Install End Supports & Stops
Attach the end support with stop to both ends of the track. These stops are non-negotiable—they prevent items from falling off the track and causing accidents or damage. Align the stop so it's flush with the end of the track and tighten the screws. Test the stop by pushing a heavy box against it—if it moves, tighten the screws further.
Step 6: Test the Flow & Adjust
Now it's time to put your track to the test. Grab a few items that match the size and weight of what you'll be moving (e.g., a 5kg box for warehouse use or a small electronics part for assembly). Place them on the track and watch how they flow. If items stick, check for debris in the rollers or loose connectors. If they slide too fast, adjust the frame's angle (for gravity flow racks) to make it less steep. Keep testing until the flow is smooth and consistent.

Integrating with Other Lean Components
The 60 Steel Roller Track Grey isn't just a standalone component—it's part of a larger lean ecosystem. Here are three ways to integrate it with your existing setup:
1. Flow Rack Setup
Flow racks are a staple in warehouses, and this track is the heart of any good flow rack. To build one, attach multiple track sections to a lean pipe or aluminum profile frame, angled at 2-3 degrees downward. This allows items to flow from the back of the rack to the front as workers pick them. Add dividers between track sections to separate different products, and use end stops to keep items in place. This setup cuts down on picking time by up to 30%—workers don't have to reach into the back of the rack to grab items.
2. Lean Pipe Workbench Material Feed
For assembly lines, attach the track to the edge of your lean pipe workbench. This creates a continuous feed of parts to workers, so they don't have to leave their station to grab supplies. For example, in a 3C assembly line, the track can feed phone screens or battery packs to workers assembling smartphones. Use aluminum pipe clamps to secure the track to the workbench—adjust the height so it's at elbow level for the worker, reducing strain on their arms.
3. Conveyor Line Extension
If you have an existing conveyor system, use this track to extend it to new stations. Join the track sections with conveyor connectors to create a seamless flow. For example, in a medical device factory, the track can carry surgical tools from the sterilization area to the assembly line. It's also easy to add motorized components if you need powered flow—just attach a small motor to the end of the track to move items along.
Integration Tip: Use compatible accessories from the same supplier to avoid fit issues. For example, if your frame is made of lean pipe, use lean pipe connectors instead of aluminum profile connectors—this ensures a tight, secure fit.
Maintenance & Troubleshooting
To keep your track running smoothly for years, follow these maintenance tips:
Regular Maintenance Tasks
- Clean rollers weekly: Use a brush or compressed air to remove dust and debris. For sticky rollers, wipe them down with a damp cloth and mild detergent.
- Lubricate rollers monthly: Apply a small amount of light machine oil to each roller to keep them gliding smoothly.
- Check connectors quarterly: Tighten any loose screws or bolts—vibration from constant use can cause them to come undone.
- Inspect for damage: replace bent rollers or cracked connectors immediately—they can cause jams or damage to your products.
- Lubricate rollers monthly: Apply a small amount of light machine oil to each roller to keep them gliding smoothly.
- Check connectors quarterly: Tighten any loose screws or bolts—vibration from constant use can cause them to come undone.
- Inspect for damage: replace bent rollers or cracked connectors immediately—they can cause jams or damage to your products.
Common Issues & Fixes
| Issue | Cause | Solution |
|---|---|---|
| Items stick in the middle of the track | Debris in rollers or uneven track alignment | Clean rollers, adjust track to level |
| Track sags in the middle | Insufficient connectors or overloaded track | Add more connectors, reduce load weight |
| Rollers make loud noise | Dry rollers or misaligned track | Lubricate rollers, adjust track alignment |
| Items slide too fast (gravity flow) | Track angle is too steep | Reduce the angle of the frame to 1-2 degrees |
Real-World Use Cases
This track is used in industries across the board. Here are a few examples of how it's making a difference:
1. 3C Assembly Line
A leading smartphone manufacturer uses the 60 Steel Roller Track Grey to feed parts to their assembly stations. The track carries battery packs, screens, and circuit boards to workers, reducing the time spent reaching for supplies by 25%. It's also compatible with their ESD workbenches, protecting sensitive electronics from electrostatic discharge.
2. Warehouse Order Picking
A large e-commerce warehouse uses this track in their flow racks for order picking. The track carries boxes of clothing and electronics from the back of the rack to the front, so workers can pick items quickly. This has cut down on order processing time by 20% and reduced the number of picking errors by 15%.
3. Medical Device Manufacturing
A medical device company uses the track to carry surgical tools from the sterilization area to the assembly line. The track is easy to clean, which is critical for compliance with FDA standards. It also ensures tools are handled gently, reducing the risk of damage to delicate instruments.
Final Thoughts
Installing the 60 Steel Roller Track Grey is a simple process that delivers big results. By following the steps in this guide, you'll have a setup that improves efficiency, reduces waste, and integrates seamlessly with your existing lean systems. Remember to maintain your track regularly to keep it running smoothly, and don't hesitate to customize it to meet your specific needs—whether you're in 3C assembly, warehousing, or medical device manufacturing. This track is more than just a piece of metal—it's a tool that helps your team work smarter, not harder.