- Company Articles
- Products and Technology
- Installation And Maintenance
- How to Install a Castor Install Base on Aluminum Lean Tubes: A Comprehensive Guide

How to Install a Castor Install Base on Aluminum Lean Tubes: A Comprehensive Guide
Related Product
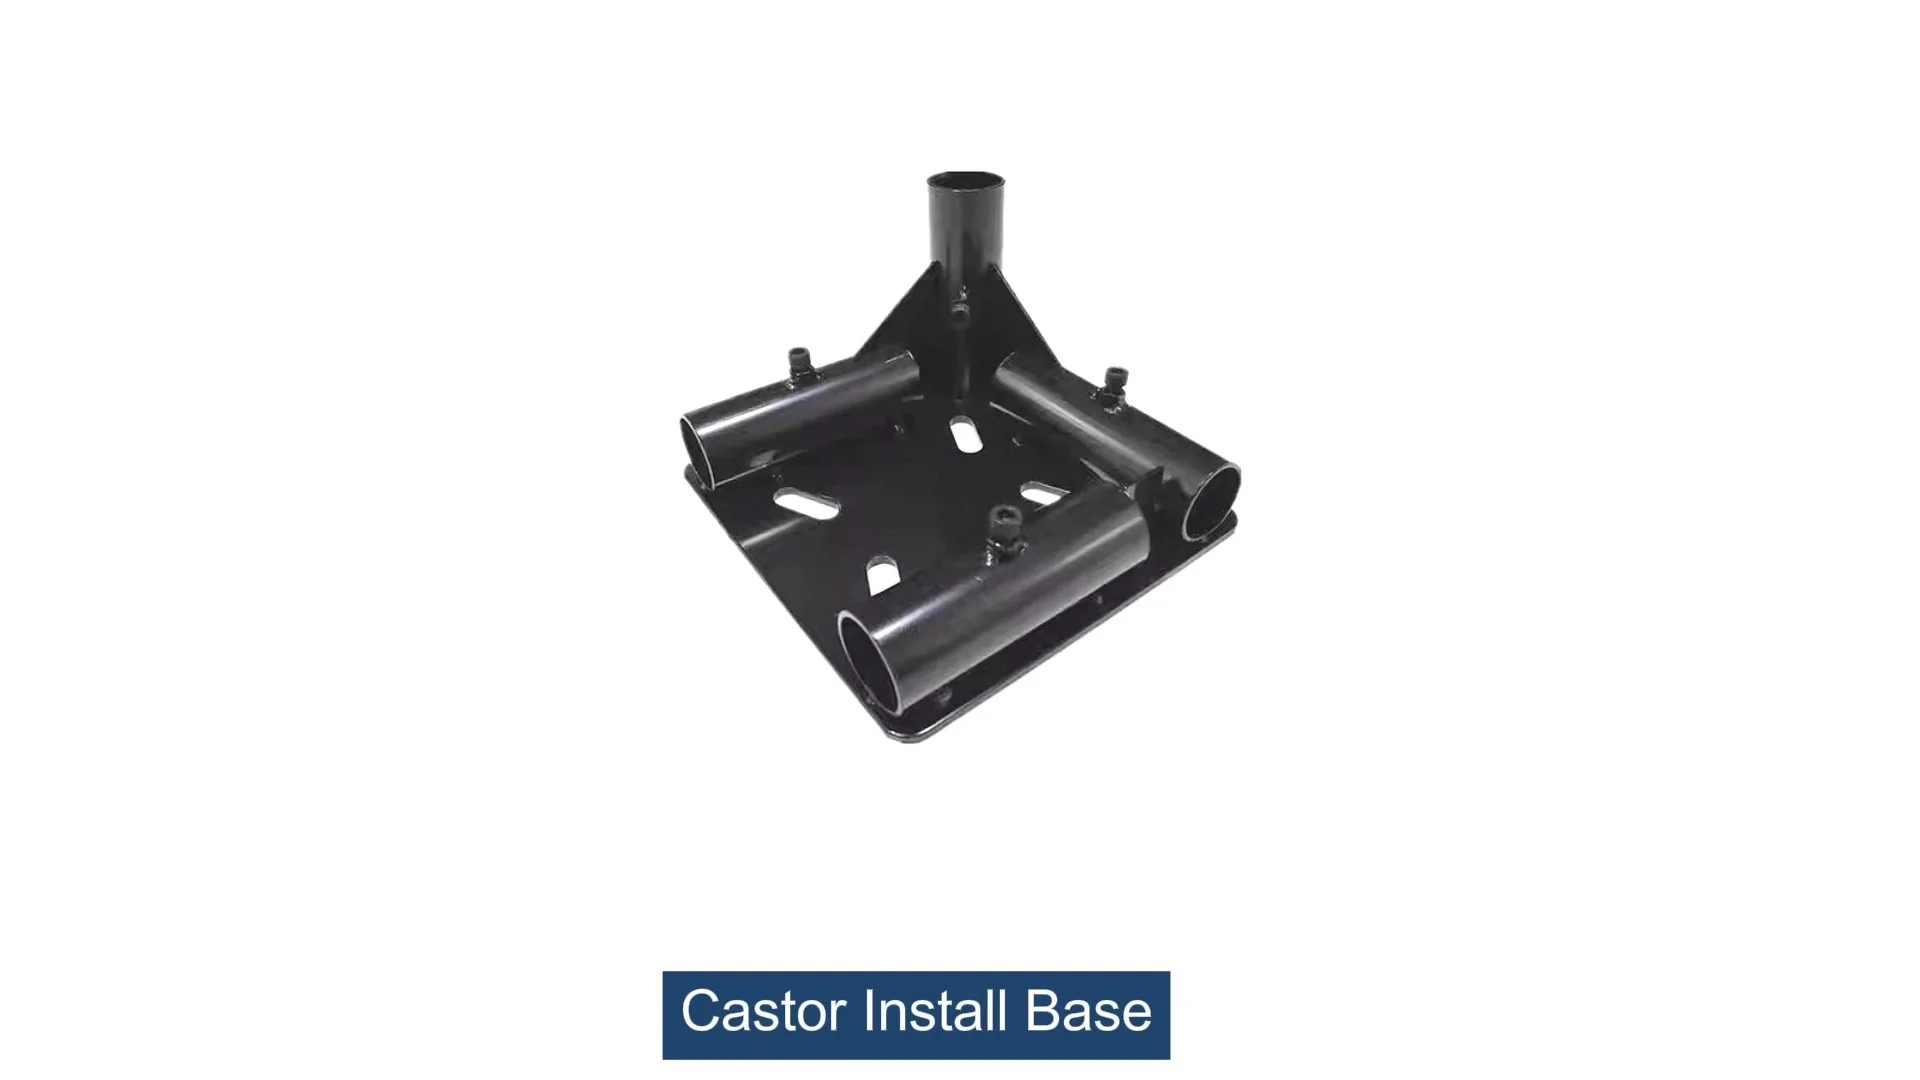
Castor Install Base
Castor install base, used for connection between pipe and castor, it can connect 4 pcs pipe by 1 pcs castor base, to make the structure strong and stable.
Introduction: The Power of Mobility in Modern Workspaces
In the fast-paced world of manufacturing, warehousing, and workshop operations, efficiency isn't just a goal—it's a necessity. Every second wasted moving materials, adjusting workstations, or reconfiguring layouts eats into productivity. That's where aluminum lean tubes have become a game-changer. Lightweight yet surprisingly strong, these modular tubes let teams build everything from workbenches to material racks with unmatched flexibility. But even the most well-designed static setup hits a wall when mobility is needed. Enter the castor install base: a small but critical component that transforms fixed structures into movable assets, turning rigid workspaces into dynamic hubs that adapt to your team's needs.
Whether you're assembling a production line workbench, a parts trolley, or a mobile material rack, installing a castor install base on aluminum lean tubes is a skill that bridges the gap between static stability and on-demand movement. Done right, it ensures your equipment glides smoothly, supports heavy loads safely, and stands up to the daily grind of industrial use. Done wrong, it can lead to wobbly structures, damaged floors, or even workplace accidents. In this guide, we'll walk you through every step of the process, from understanding the basics of aluminum lean pipes and their accessories to troubleshooting common issues—so you can build mobility into your workspace with confidence.
Understanding the Basics: Aluminum Lean Tubes and Castor Install Bases
What Are Aluminum Lean Tubes?
Aluminum lean tubes (sometimes called "aluminum lean pipes") are the backbone of modular workspace systems. Unlike traditional steel pipes, they're lightweight (about 30% lighter than steel equivalents), resistant to corrosion, and incredibly easy to assemble. Their smooth, anodized finish not only looks professional but also resists scratches and wear, making them ideal for clean environments like electronics assembly lines or food processing facilities. What really sets them apart, though, is their modularity: with the right aluminum pipe accessories—joints, clamps, and yes, castor install bases—you can build, disassemble, and reconfigure structures in minutes, no welding or heavy tools required.
The Role of the Castor Install Base
Think of the castor install base as the bridge between your aluminum lean tube structure and the casters (wheels) that let it move. It's a metal bracket designed to securely attach to the end of an aluminum lean tube, providing a stable platform to mount casters. Without it, attaching casters directly to the tube would be risky—aluminum tubes are hollow, and screws or bolts alone might strip the material or loosen over time. The castor install base distributes the weight of the structure and its load evenly across the tube, ensuring a tight, wobble-free connection that can handle repeated movement and heavy use.
Why Quality Aluminum Pipe Accessories Matter
You could have the strongest aluminum lean tubes and the most durable casters, but if your castor install base is flimsy or poorly designed, the whole setup will fail. That's why choosing high-quality aluminum pipe accessories is non-negotiable. A well-made castor install base should be precision-machined to fit your specific aluminum lean tube diameter (most commonly 28mm or 30mm), with pre-drilled holes that align perfectly with standard caster mounting plates. Look for bases made from thick-gauge aluminum or steel with a corrosion-resistant coating—these will stand up to oil, grease, and moisture in industrial settings. And if you're sourcing from a lean system supplier, ask about load ratings: a base rated for 150kg per caster might seem overkill, but when you're moving a fully loaded workbench, that extra strength prevents bending or cracking under pressure.

Tools and Materials: Gathering What You Need
Before you start, having the right tools and materials on hand will save you time and frustration. This isn't a job that requires a fully stocked toolbox, but skipping a key item could lead to misalignment, loose connections, or even damage to your aluminum lean tubes. Here's a breakdown of what you'll need:
| Item | Purpose | Pro Tips |
|---|---|---|
| Aluminum lean tubes | The main structural component (ensure they're cut to your desired length). | Use a pipe cutter or hacksaw with a fine-tooth blade for clean, burr-free ends. |
| Castor install bases | Brackets to attach casters to the lean tubes (1 per caster, typically 4 per structure). | Match the base size to your tube diameter (e.g., 28mm bases for 28mm tubes). |
| Aluminum pipe accessories (bolts, washers, nuts) | Hardware to secure the base to the tube and the caster to the base. | Use stainless steel or zinc-plated hardware to resist rust; M6 or M8 bolts are standard. |
| Casters | Wheels for mobility (choose swivel, rigid, or locking types based on needs). | Opt for heavy-duty casters (50-100kg load rating each) for industrial use. |
| Allen wrench set | To tighten hex bolts (most aluminum pipe accessories use hex heads). | Magnetic-tip wrenches help keep bolts from dropping into tight spaces. |
| Screwdriver (Phillips or flathead) | For bolts with slotted or Phillips heads (if not using hex bolts). | Use a driver with a comfortable grip to avoid hand fatigue during multiple installations. |
| Measuring tape and pencil | To mark where the base will attach to the tube. | Measure twice, mark once—misaligned bases cause wobbling! |
| Bubble level | To ensure the base (and later, the entire structure) is level. | A small 4-inch level fits easily in tight spaces between tubes. |
| Rubber mallet | To gently tap the base into alignment if it's stuck. | Avoid steel hammers—they can dent or scratch aluminum tubes. |
Pro Tip:
Lay out all parts on a clean, flat surface (like a workbench) before starting. This helps you spot missing hardware or damaged components early—no one wants to stop mid-installation to hunt for a lost washer!

Step-by-Step Installation: From Preparation to Testing
Installing a castor install base isn't complicated, but attention to detail is key. Follow these steps, and you'll have a stable, mobile structure in no time.
Step 1: Prepare the Workspace and Aluminum Lean Tubes
Start by clearing a flat, level area to work. If you're installing bases on a pre-assembled structure (like a workbench frame), lay it on its side to access the bottom tubes easily—this prevents strain and makes alignment simpler. If you're working with loose tubes, clamp them to a workbench to keep them steady.
Next, inspect the ends of your aluminum lean tubes. Even minor burrs or dents can prevent the castor install base from seating properly. Use fine-grit sandpaper to smooth any rough edges, and wipe the tube clean with a dry cloth to remove dust or oil—grease on the tube can cause the base to slip during installation.
Step 2: Mark the Installation Position
Most castor install bases attach to the bottom end of a vertical aluminum lean tube (the "leg" of a workbench or trolley). To ensure stability, the base should sit flush against the end of the tube, with no gaps. Use your measuring tape to confirm the tube is cut to the correct length (add 2-3cm to the desired height to account for the base and caster).
Hold the base against the end of the tube and mark the positions of the mounting holes with a pencil. If the base has pre-drilled holes, align them so they're evenly spaced around the tube (most bases have 2-4 holes for balanced support). For extra precision, use a center punch to make small indentations at each mark—this prevents the drill (if needed) or screwdriver from slipping.
Note:
Some aluminum lean tubes come pre-drilled for accessories like castor install bases. If yours does, skip marking and go straight to attaching the base—just ensure the holes align!
Step 3: Attach the Castor Install Base to the Aluminum Lean Tube
Now it's time to secure the base to the tube. Take your bolts (from your aluminum pipe accessories kit) and insert them through the base's holes and into the tube. If the tube isn't pre-drilled, you may need to drill pilot holes first—use a drill bit slightly smaller than the bolt diameter to avoid stripping the aluminum. Once the bolts are in place, add washers and nuts, then tighten them by hand until they're snug.
Next, use your Allen wrench or screwdriver to fully tighten the bolts. Go slowly and alternate between bolts (like tightening lug nuts on a car wheel) to ensure even pressure—this prevents the base from warping or tilting. Stop when the bolts are tight but not over-tightened; aluminum is softer than steel, and overtightening can strip threads or crack the tube.
Once tight, give the base a gentle shake. It should feel solid, with no movement or creaking. If it wobbles, check if the bolts are loose or if the base is misaligned—loosen, realign, and retighten if needed.
Step 4: Mount the Caster to the Base
With the base secured to the tube, it's time to add the caster. Flip the base so the mounting plate (the flat part where the caster attaches) is facing up. Place the caster on the plate, aligning its holes with the holes in the base. insert bolts through the caster's mounting holes and into the base, then add washers and nuts. Again, tighten by hand first, then use your wrench or screwdriver to secure them firmly.
If your casters have brakes, position them so they're easy to reach when the structure is upright (typically on the side facing outward). Test the brake by flipping it on and off— it should engage smoothly and hold the caster in place without slipping.
Step 5: Repeat for All Bases and Test Mobility
Repeat steps 2-4 for each castor install base (most structures need 4 bases, one on each leg). Once all bases and casters are installed, carefully stand the structure upright. Use your bubble level to check if it's stable—if it rocks, one of the bases may be higher than the others. To fix this, loosen the bolts on the "tall" base, add a washer under it to raise the tube slightly, and retighten. Repeat until the structure sits flat.
Now, test the mobility. Push the structure gently across a smooth floor. It should roll straight without pulling to one side. If it veers, check if the casters are aligned—misaligned bases can cause casters to point in different directions. Loosen the base bolts, adjust the angle, and retighten. Finally, load the structure with a typical workload (e.g., tools, parts) and test again—this ensures the bases can handle real-world weight without flexing or loosening.

Troubleshooting Common Issues
Even with careful installation, problems can pop up. Here's how to fix the most common issues:
Issue 1: The Base Feels Loose or Wobbles
Loose bases are usually caused by under-tightened bolts or misaligned holes. First, check if the bolts securing the base to the tube are tight—use your wrench to give them a ¼-turn. If that doesn't work, remove the base and inspect the tube for dents or warping (a bent tube won't seat properly). Sand down minor dents or replace the tube if it's badly damaged. For persistent wobbling, add a second washer under the base to fill gaps between the tube and base.
Issue 2: Casters Scratch Floors or Get Stuck
Scratches often come from rough caster wheels or debris caught in the base. If your floors are sensitive (e.g., polished concrete), switch to soft rubber caster wheels (most lean system suppliers offer these as options). If wheels get stuck, check for hair, string, or dirt wrapped around the axle—use a small brush or tweezers to clean it out, then apply a drop of lubricating oil to the axle.
Issue 3: The Structure Leans to One Side
Leaning is almost always an alignment problem. Use your bubble level to identify which leg is shorter. Loosen the castor install base on that leg, slide a thin metal shim (or an extra washer) between the base and tube, and retighten. Test again—you may need to adjust multiple legs to get it perfectly level.
Maintenance: Keeping Your Mobile Structure in Top Shape
A little maintenance goes a long way in extending the life of your castor install base and aluminum lean tube setup. Here's what to do regularly:
- Inspect bolts monthly: Tighten any loose bolts with your Allen wrench—vibration from movement can loosen them over time.
- Clean casters and bases: Wipe away dust, oil, and debris with a damp cloth. For sticky casters, use a toothbrush to scrub the wheels and axles.
- Lubricate moving parts: Every 3-6 months, apply a light machine oil to caster axles and brake mechanisms to keep them moving smoothly.
- Check for wear: replace cracked bases, bent bolts, or worn caster wheels immediately—damaged parts compromise safety and mobility.
Remember: quality matters. Investing in durable aluminum pipe accessories and casters from a reputable lean system supplier means fewer replacements and less downtime in the long run.
Conclusion: Mobility That Drives Efficiency
Installing a castor install base on aluminum lean tubes is more than just a DIY project—it's an investment in your workspace's flexibility. By following these steps, you're not just attaching wheels to a structure; you're building a system that adapts to your team's needs, reduces unnecessary movement, and turns static workspaces into dynamic, productive environments.
From choosing the right aluminum pipe accessories to testing mobility under load, every step ensures your setup is safe, stable, and ready to handle the demands of daily use. And when you source your materials from a trusted lean system supplier, you can rest easy knowing you're building on a foundation of quality—one that will keep your workspace moving forward, one smooth roll at a time.