- Company Articles
- Products and Technology
- Installation And Maintenance
- How to Install a Parallel Lean Pipe Joint with One Side Rotatory: Step-by-Step Guide

How to Install a Parallel Lean Pipe Joint with One Side Rotatory: Step-by-Step Guide
Related Product
Parallel Lean Pipe Joint
Parallel lean pipe joint used for 2 pcs 28MM lean pipe connection in parallel direction to enhance frame structure, usually for heavy payload requirement for workbench. flow rack, hand trolley.
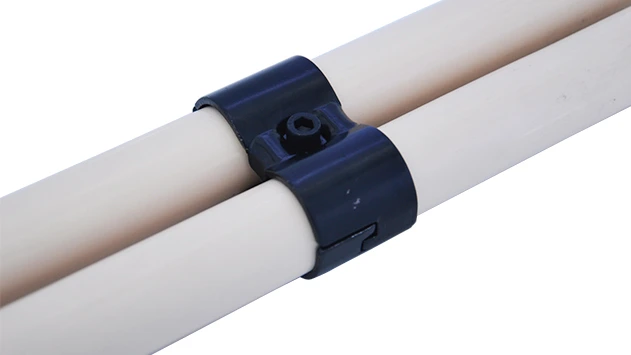
If you've ever walked through a busy production floor or a well-organized workshop, you've probably noticed the backbone of their efficiency: lean systems. These systems rely on simple, flexible components that adapt to changing needs, and at the heart of many of these setups are lean pipe joints. Today, we're diving into one of the most versatile pieces in the lean toolbox: the parallel lean pipe joint with one side rotatory . Whether you're building a custom workbench, a material rack, or an assembly line flow rack, getting this joint right can make all the difference between a wobbly, frustrating setup and a smooth, efficient workspace. Let's break down how to install it like a pro—no prior engineering degree required.
Why This Joint Matters: A Quick Overview
First, let's make sure we're on the same page. A parallel lean pipe joint with one side rotatory is exactly what it sounds like: a connector that joins two parallel lean pipes, with one side fixed in place and the other able to rotate. This rotation isn't just for show—it's a game-changer for flexibility. Imagine setting up a workbench where one section needs to stay stationary (like your main workspace) while another (maybe a tool holder or a parts bin) needs to swing out of the way when not in use. That's where this joint shines. It's also a staple in material handling setups, like flow racks or turnover trolleys, where adjustability helps keep production lines moving without wasted motion.
But here's the thing: even the best components fail if installed poorly. A misaligned joint can lead to wobbly structures, stuck rotations, or even safety hazards. So whether you're a small business owner setting up your first assembly station or a seasoned facility manager upgrading your lean system, this guide will walk you through the process step by step. We'll cover tools, prep work, common pitfalls, and pro tips to ensure your joint works smoothly for years.
Tools & Materials You'll Need (Plus a Handy Checklist)
Before you dive in, let's gather what you'll need. Nothing kills momentum like realizing halfway through that you're missing a wrench or that the joint you ordered is the wrong size. Here's a breakdown of tools and materials—we've even included a table to keep you organized:
| Category | Items | Why You Need It |
|---|---|---|
| Tools | Adjustable wrench, hex key set, rubber mallet, measuring tape, spirit level, pencil/marker | Wrenches and hex keys tighten the joint; a rubber mallet helps seat pipes without damaging them; level ensures alignment |
| Materials | Parallel lean pipe joint with one side rotatory, lean pipes (aluminum or steel, cut to length), lean pipe accessories (e.g., end caps, clamps) | The joint itself, pipes to connect, and accessories for finishing touches |
| Safety Gear | Work gloves, safety glasses | Gloves protect hands from sharp edges; glasses shield eyes from debris |
Pro tip: Double-check the size of your lean pipes before starting. Most joints are designed for standard diameters (like 28mm for steel lean pipes or 30mm for aluminum), but mixing sizes is a common mistake. If you're unsure, check the product specs from your lean pipe supplier —they'll usually list compatible pipe diameters.

Step 1: Prep Like a Pro—Avoid These Common Mistakes
You wouldn't bake a cake without preheating the oven, right? The same logic applies here: proper prep saves time and headaches. Let's walk through the prep steps:
Clear Your Workspace
Start by clearing a flat, stable surface—your garage floor, a workbench, or even a large table. Clutter leads to mistakes: a misplaced tool could scratch your pipes, or a wobbly surface might throw off your alignment. If you're working on the floor, lay down a piece of cardboard or a towel to protect the pipes from scratches.
Inspect Your Parts
Take a minute to look over the joint and pipes. Are there any cracks in the joint's plastic or metal components? Are the threads on the rotatory side smooth, or do they have burrs that might jam? Check the pipes, too—dents or bends will make alignment impossible. If something looks off, contact your supplier immediately. It's better to wait for a replacement than to install a faulty part that could fail later.
Measure Twice, Cut Once (Or, in This Case, Mark Twice)
If your pipes aren't pre-cut, now's the time to measure and mark where you'll join them. Use your measuring tape to mark the pipe ends where they'll insert into the joint. A general rule: pipes should insert into the joint by at least 3-4cm to ensure a secure fit. Mark the spots with a pencil or marker—bright colors work best on darker pipes. Pro tip: If you're installing multiple joints (like for a long flow rack), measure all pipes first and mark them in a sequence to ensure consistency.

Step 2: Align the Pipes—The Foundation of a Sturdy Setup
Now that you're prepped, it's time to start assembling. The first rule of lean pipe installation? Alignment is everything. A misaligned joint will feel "off" from the start—stiff rotation, uneven weight distribution, or even pipes that pop out under pressure. Here's how to get it right:
Lay Out the Pipes
Place your two lean pipes on the flat surface, parallel to each other, with the marked ends facing inward. The distance between the pipes should match the length of the joint's parallel arms—check the joint's specs if you're unsure. For example, if the joint spans 20cm between pipes, measure and adjust until the pipes are exactly 20cm apart at the marked points.
Use the Level to Check Parallelism
Grab your spirit level and place it across both pipes. The bubble should sit dead center—if it's leaning to one side, gently nudge the pipes until they're level. This step might seem fussy, but it's critical: even a tiny tilt can cause the joint to wear unevenly over time, leading to loose connections or stuck rotation.
Secure the Pipes Temporarily (If Needed)
If you're working alone, it can help to prop the pipes up with blocks or clamps to keep them steady. Just make sure the blocks are the same height—you don't want one pipe sitting higher than the other. Think of it like building a shelf: the base has to be level before you add the top.
Step 3: Assemble the Joint—Fixed Side First, Then Rotatory
Now comes the hands-on part: putting the joint together. Remember, this joint has two sides: one fixed (doesn't rotate) and one rotatory (swivels). We'll start with the fixed side to anchor the structure, then move to the rotatory side for flexibility.
insert the Fixed Side Pipe
Take the joint and identify the fixed side—it's usually marked with a "fixed" label or has a non-moving collar. Slide the end of one pipe into the fixed side socket. Push firmly, but don't force it—if it's tight, a gentle tap with the rubber mallet (on the pipe end, not the joint!) will help seat it. Stop when the pipe hits the inner stop of the joint (you'll feel a slight resistance).
Tighten the Fixed Side Collar
Most joints have a collar or set screw on the fixed side to lock the pipe in place. Use your hex key or wrench to tighten this collar—snug, but not over-tight. Over-tightening can strip the threads or crack the joint, especially if it's made of plastic. A good rule: tighten until you feel resistance, then give it a quarter-turn more. Check that the pipe doesn't wiggle—if it does, tighten a bit more.
Attach the Rotatory Side Pipe
Now, move to the rotatory side. This side has a moving component (usually a bearing or swivel collar) that allows the pipe to rotate. Slide the second pipe into the rotatory socket, again pushing until it hits the inner stop. The rotatory side might feel looser than the fixed side—that's normal! The rotation relies on a slight gap between the joint and the pipe, so don't panic if it moves a little before tightening.
Adjust the Rotatory Tension (If Needed)
Some joints let you adjust how easy or hard the rotation is—look for a small set screw on the rotatory collar. If you want the pipe to swivel freely (like for a tool holder that needs to swing out), loosen the screw slightly. If you want it to stay in place once positioned (like a material rack shelf), tighten it a bit more. Test the rotation as you go—you want it to move smoothly without slipping unexpectedly.
Step 4: Test, Adjust, and Lock It In
You're almost there! But before you call it a day, you need to test the joint to make sure everything works as it should. Rushing this step is how loose connections or stiff rotations sneak in—take 5 minutes to test, and you'll save hours of frustration later.
Check for Wobble
Gently shake the structure—there should be no wobble in the fixed side. If the fixed pipe moves, the collar is too loose—tighten it a bit more. The rotatory side should swivel smoothly, but the base (where it connects to the joint) shouldn't wiggle. Wobble here means the pipe isn't seated all the way—push it in further and retighten.
Test the Rotation Range
Swing the rotatory pipe back and forth. It should move freely without catching or sticking. If it's stiff, check for debris in the joint (a quick wipe with a cloth usually fixes this) or loosen the rotatory collar slightly. If it swings too freely, tighten the collar a touch. Aim for a " Goldilocks zone": smooth rotation that stays put when you let go.
Recheck Level and Alignment
Grab your level again and check the pipes—did they shift during assembly? If so, gently adjust the fixed side (loosen the collar, realign, retighten) until both pipes are level and parallel. This is especially important if you're building a larger structure (like a workbench with multiple joints)—one misaligned joint can throw off the whole setup.
Step 5: Add Finishing Touches—Make It Last
You've installed the joint—now let's make sure it stays in top shape. These small finishing steps might seem minor, but they'll extend the life of your lean system and keep it looking professional.
Cap the Pipe Ends
If your pipes have exposed ends (not connected to another joint), add lean pipe accessories like plastic or rubber end caps. These prevent dust, debris, and fingers from getting stuck in the pipes. They're cheap, easy to install (just press them on), and make your setup look polished.
Label for Future Adjustments (Optional)
If you think you might need to adjust the joint later (e.g., to change the rotation tension), use a marker to note the current collar position. That way, you can always return to the "sweet spot" if you mess with it later.
Clean Up and Inspect
Wipe down the joint and pipes with a dry cloth to remove fingerprints or debris. Take a step back and admire your handiwork—you've just installed a parallel lean pipe joint with one side rotatory! Pat yourself on the back—this is the kind of detail that makes lean systems so effective.
Troubleshooting: When Things Go Wrong (And How to Fix Them)
Even with careful prep, issues can pop up. Here are the most common problems and how to solve them:
Problem: The Rotatory Side Won't Move
Possible causes: Debris in the joint, over-tightened rotatory collar, or a bent pipe. Solution: Disassemble the rotatory side, clean the socket with a cloth, and check for burrs on the pipe. If the pipe is bent, replace it. Loosen the collar slightly and test rotation again.
Problem: The Fixed Side Wobbles
Possible causes: Pipe not seated all the way, loose collar, or mismatched pipe size. Solution: Push the pipe further into the joint (tap with a mallet if needed), then retighten the collar. If it still wobbles, check if the pipe diameter matches the joint—using a 25mm pipe in a 28mm joint will never stay tight.
Problem: The Joint Leans to One Side
Possible causes: Pipes weren't level during installation. Solution: Loosen the fixed side collar, adjust the pipes with the level, and retighten. This might take a few tries—patience pays off!
Maintenance: Keep Your Joint Working Smoothly for Years
Installing the joint is just the start—regular maintenance ensures it stays functional. Here's how to care for it:
- Monthly Check: Tighten any loose collars or screws—vibration from daily use can loosen them over time.
- Quarterly Clean: Wipe down the rotatory side with a dry cloth to remove dust and grime. If rotation gets stiff, a drop of lubricating oil (like 3-in-1) on the bearing will help (avoid heavy oils—they attract dust).
- Annual Inspection: Check for cracks, rust (on steel joints), or worn bearings. replace the joint if parts are damaged—safety first!
Wrapping Up: Your Lean System Just Got More Flexible
Installing a parallel lean pipe joint with one side rotatory might seem intimidating at first, but break it down into steps, and it's totally doable. Whether you're building a workbench , a flow rack, or a turnover trolley, this joint adds the flexibility lean systems are known for—helping you adapt to changing production needs without rebuilding from scratch.
Remember, the key is prep, alignment, and gentle tightening. And if you ever need more parts—whether it's joints, pipes, or accessories—reach out to a reliable lean pipe supplier who can guide you to the right products. With the right tools and a little patience, you'll be building custom lean setups like a pro in no time.
Now go out there and make that production floor more efficient—one joint at a time!