- Company Articles
- Products and Technology
- Installation And Maintenance
- How to Install a Parallel Rotatory Lean Pipe Joint: Step-by-Step Guide

How to Install a Parallel Rotatory Lean Pipe Joint: Step-by-Step Guide
Related Product
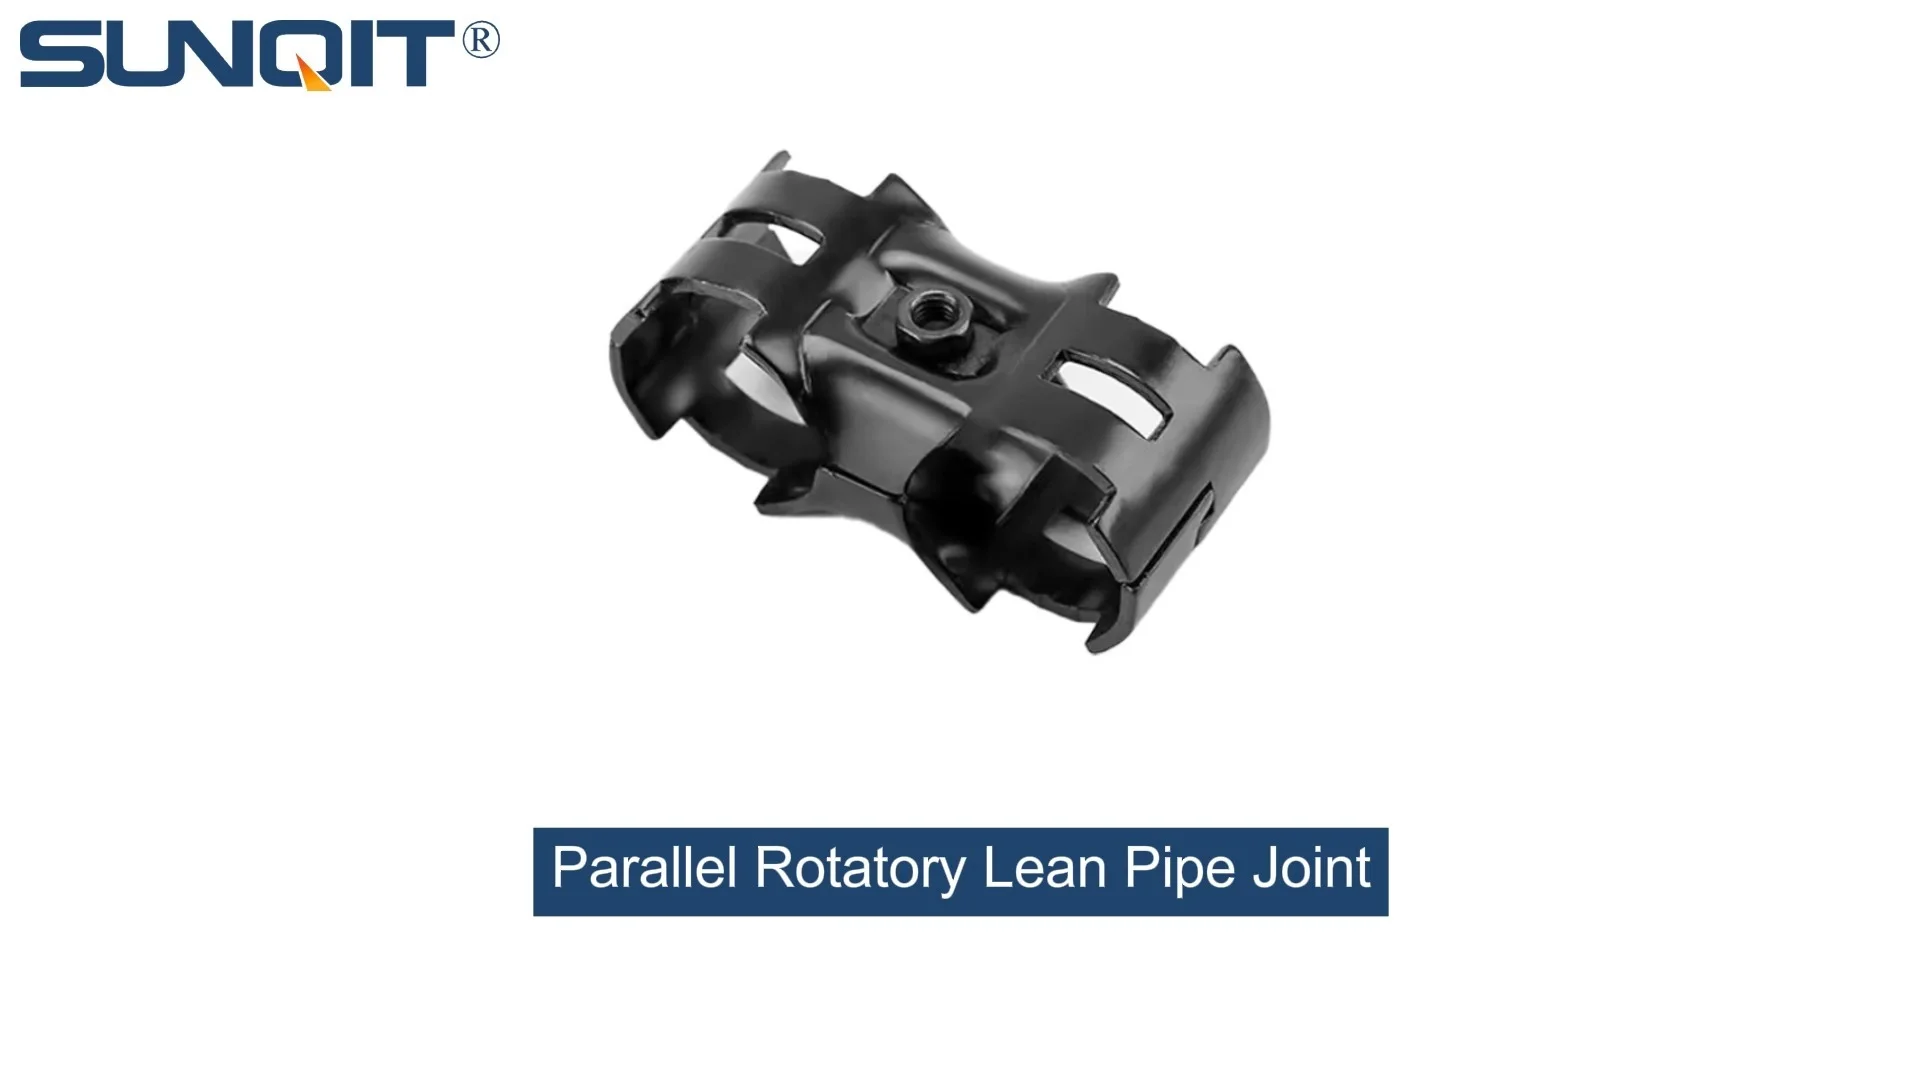
Parallel Rotatory Lean Pipe Joint
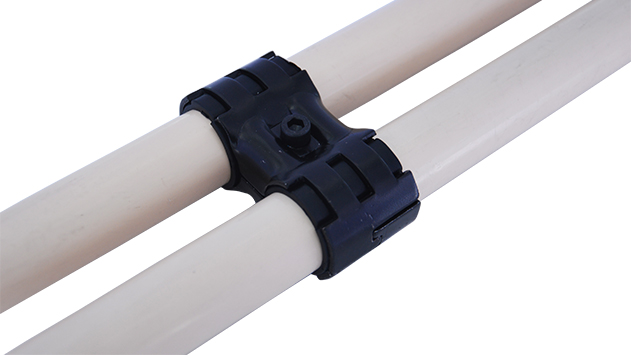
Parallel rotatory lean pipe joint, for 2 pcs pipe conenction in parallel direction with rotatory function.
Introduction: The Backbone of Flexible Lean Systems
In the world of manufacturing and production, efficiency isn't just a buzzword—it's the lifeblood of successful operations. Lean manufacturing, a philosophy centered on minimizing waste while maximizing value, has revolutionized how factories, warehouses, and assembly lines operate. At the heart of this revolution lies the humble
lean pipe
system—a modular, adaptable framework that allows teams to build everything from workbenches and material racks to conveyor systems and turnover trolleys. And within these systems, few components are as critical (or as underappreciated) as the
parallel rotatory lean pipe joint
.
If you've ever walked through a well-organized production floor, you've likely seen lean pipe structures in action: sleek, metallic frames that seem to effortlessly support tools, materials, and even entire workstations. What makes these systems so powerful is their flexibility—they can be reconfigured in hours (or even minutes) to adapt to new products, shifting workflows, or seasonal demands. And that flexibility? It starts with the joints that hold the pipes together.
The parallel rotatory lean pipe joint is a standout in this category. Unlike fixed-angle joints, which lock pipes into rigid 90° or 45° angles, this joint allows for smooth rotation along its axis, enabling parallel pipes to pivot, adjust, and align with precision. Whether you're building a dynamic material flow rack that needs to tilt for easy access or a workstation that can be repositioned for different operators, this joint is the key to unlocking that adaptability.
But here's the thing: even the best components fall short if they're not installed correctly. A poorly installed joint can lead to wobbly structures, misaligned workflows, and even safety hazards. That's why we've put together this comprehensive guide. By the end, you'll not only know how to install a parallel rotatory lean pipe joint like a pro but also understand why each step matters, how to troubleshoot common issues, and how to keep your lean system running smoothly for years to come.
Whether you're a seasoned facility manager, a production line supervisor, or a small business owner just starting to build your lean setup, this guide is for you. We'll keep things conversational, skip the overly technical jargon, and focus on practical, actionable steps. Let's dive in.
If you've ever walked through a well-organized production floor, you've likely seen lean pipe structures in action: sleek, metallic frames that seem to effortlessly support tools, materials, and even entire workstations. What makes these systems so powerful is their flexibility—they can be reconfigured in hours (or even minutes) to adapt to new products, shifting workflows, or seasonal demands. And that flexibility? It starts with the joints that hold the pipes together.
The parallel rotatory lean pipe joint is a standout in this category. Unlike fixed-angle joints, which lock pipes into rigid 90° or 45° angles, this joint allows for smooth rotation along its axis, enabling parallel pipes to pivot, adjust, and align with precision. Whether you're building a dynamic material flow rack that needs to tilt for easy access or a workstation that can be repositioned for different operators, this joint is the key to unlocking that adaptability.
But here's the thing: even the best components fall short if they're not installed correctly. A poorly installed joint can lead to wobbly structures, misaligned workflows, and even safety hazards. That's why we've put together this comprehensive guide. By the end, you'll not only know how to install a parallel rotatory lean pipe joint like a pro but also understand why each step matters, how to troubleshoot common issues, and how to keep your lean system running smoothly for years to come.
Whether you're a seasoned facility manager, a production line supervisor, or a small business owner just starting to build your lean setup, this guide is for you. We'll keep things conversational, skip the overly technical jargon, and focus on practical, actionable steps. Let's dive in.
Tools and Materials: What You'll Need to Get Started
Before you grab your
lean pipe
and joint, let's make sure you have everything you need. Installing a parallel rotatory lean pipe joint doesn't require a fully equipped machine shop, but having the right tools on hand will save you time, frustration, and potential mistakes. Below is a breakdown of the essential tools and materials, along with why they matter and pro tips to use them effectively.
| Tool/Material | Purpose | Pro Tips |
|---|---|---|
| Hex Key Set (Allen Wrenches) | Tightening the set screws on the parallel rotatory joint | Most lean pipe joints use metric sizes (common sizes: 4mm, 5mm, 6mm). Invest in a magnetic set to avoid dropping keys in tight spaces. |
| Rubber Mallet | Gently seating pipes into joint sockets (avoids damaging threads or pipes) | Opt for a mallet with a soft rubber head—hard plastic or metal can scratch aluminum lean pipes. |
| Measuring Tape (10ft or longer) | Ensuring pipe lengths are consistent and aligned | Use a tape with clear markings and a locking mechanism to keep measurements steady while marking pipes. |
| Spirit Level (2ft or longer) | Checking that pipes are straight (horizontal or vertical) | A magnetic level is helpful for hands-free use on metal pipes. |
| Clean Cloth (Microfiber Preferred) | Removing dust, oil, or debris from pipes and joint sockets | For stubborn grime, dampen the cloth with isopropyl alcohol—avoid harsh chemicals that can damage plastic components. |
| Lean Pipe (Cut to Desired Length) | The main structural component (aluminum, steel, or plastic-coated) | Ensure pipes are cut square (90° angles) to prevent misalignment. If cutting yourself, use a pipe cutter or hacksaw with a guide. |
| Parallel Rotatory Lean Pipe Joint | The star of the show—connects two parallel pipes with rotational capability | Inspect the joint before use: check for cracks, stripped threads, or rough rotation. A smooth spin means it's in good shape. |
| Lean Pipe and Accessories (Optional) | End caps, pipe clamps, or anti-slip feet for finishing touches | End caps prevent sharp edges and keep debris out of pipes—always a good safety add-on. |
Pro Tip:
Lay out all tools and materials on a flat work surface (like a sturdy table or workbench) before starting. This "mise en place" approach—borrowed from professional kitchens—saves time and ensures you won't have to pause mid-installation to hunt for a missing hex key.
Pre-Installation Preparation: Setting Yourself Up for Success
Installation day is here—and you're ready to dive in. But before you start twisting pipes into joints, take a few minutes to prepare. Rushing this step is one of the most common causes of mistakes, and trust us: it's far easier to fix a measurement error on the workbench than to disassemble a half-built structure later. Let's walk through the pre-installation checklist.
Now, inspect your lean pipe . If you cut the pipe yourself, check the ends: are they square, or do they have jagged burrs? A quick pass with a metal file or deburring tool will smooth out rough edges, preventing them from damaging the joint's socket or causing misalignment. If the pipe is pre-cut, measure its length to ensure it matches your design—even a 1cm difference can throw off parallel alignment later.
Finally, check your lean pipe and accessories (if using). End caps should fit snugly, and clamps should open/close without sticking. It's better to discover a faulty end cap now than after you've already assembled the structure.
If you do need to cut pipes, mark the length with a pencil or marker, then use a pipe cutter for clean, square edges. Avoid using a hacksaw unless you have a guide—freehand cutting often results in angled ends, which will make it nearly impossible to get the joint to rotate smoothly. After cutting, deburr the edges as mentioned earlier.
Why does this matter? Oil or dust can act as a lubricant (bad, because it makes pipes slip in the joint) or a barrier (bad, because it prevents a tight fit). Either way, clean components mean a more secure, reliable connection.
Lay out your pipes, joint, and tools in a way that's easy to reach. You'll want the hex key set within arm's reach, and the rubber mallet nearby but not in the way. The goal is to minimize movement during installation—you don't want to knock a pipe off the table mid-step!
Step 1: Inspect Your Components (Yes, All of Them)
Start by giving your parallel rotatory lean pipe joint a thorough once-over. Hold it in your hand and rotate the central mechanism—does it spin smoothly, or is there resistance? A little friction is normal, but grinding or sticking could mean debris is trapped inside, or the internal bearings (if equipped) are worn. Next, check the socket openings where the pipes will insert. Are the threads for the set screws intact? Stripped or cross-threaded screws are a headache, so if you notice damage, swap in a new joint now.Now, inspect your lean pipe . If you cut the pipe yourself, check the ends: are they square, or do they have jagged burrs? A quick pass with a metal file or deburring tool will smooth out rough edges, preventing them from damaging the joint's socket or causing misalignment. If the pipe is pre-cut, measure its length to ensure it matches your design—even a 1cm difference can throw off parallel alignment later.
Finally, check your lean pipe and accessories (if using). End caps should fit snugly, and clamps should open/close without sticking. It's better to discover a faulty end cap now than after you've already assembled the structure.
Step 2: Measure Twice, Cut (If Needed) Once
Even if your pipes are pre-cut, take a second measurement. Use your measuring tape to confirm the length of each pipe that will connect to the parallel rotatory joint. For parallel pipes, consistency is key—if one pipe is 5cm longer than the other, the joint will strain to align them, leading to wobbling or premature wear.If you do need to cut pipes, mark the length with a pencil or marker, then use a pipe cutter for clean, square edges. Avoid using a hacksaw unless you have a guide—freehand cutting often results in angled ends, which will make it nearly impossible to get the joint to rotate smoothly. After cutting, deburr the edges as mentioned earlier.
Step 3: Clean Everything (Even if It Looks Clean)
You'd be surprised how much dust, oil, or metal shavings can accumulate on lean pipe and joints—even brand-new ones. Grab your microfiber cloth and wipe down the outside of each pipe, focusing on the ends that will insert into the joint. For the joint itself, use a dry cloth to wipe out the socket openings and the rotational mechanism. If there's stubborn debris in the socket, a cotton swab works wonders for reaching tight spots.Why does this matter? Oil or dust can act as a lubricant (bad, because it makes pipes slip in the joint) or a barrier (bad, because it prevents a tight fit). Either way, clean components mean a more secure, reliable connection.
Step 4: Set Up a Stable Workspace
Installing the joint requires steady hands and precise alignment, so clear a flat, stable work surface. A workbench is ideal, but a sturdy table or even the floor (covered with a blanket to protect pipes from scratches) works too. Avoid uneven surfaces—if your workspace tilts, your measurements and alignment will too.Lay out your pipes, joint, and tools in a way that's easy to reach. You'll want the hex key set within arm's reach, and the rubber mallet nearby but not in the way. The goal is to minimize movement during installation—you don't want to knock a pipe off the table mid-step!
Pro Tip:
Use masking tape to mark the position of the joint on each pipe. For example, if the joint should sit 10cm from the end of the pipe, wrap a small piece of tape around the pipe at that mark. This gives you a visual guide during installation, ensuring the joint is centered and aligned.

Step-by-Step Installation Guide: Putting It All Together
Now that you're prepped and ready, let's install the parallel rotatory lean pipe joint. We'll break this down into 8 clear steps, with plenty of tips to ensure a smooth process. Take your time—this isn't a race, and rushing increases the risk of mistakes.
Push the pipe in until it reaches the bottom of the socket (most sockets have a small lip inside to prevent over-insertion). If you marked the pipe with masking tape earlier, align the tape with the edge of the socket—this ensures the pipe is inserted to the correct depth.
If your joint has a rotational lock, now's the time to engage it (if needed). Some locks are simple thumb screws; others are levers. Engage the lock lightly—you'll want to double-check alignment before fully locking it.
Once aligned, insert the second pipe into the socket, pushing it to the bottom (again, using your masking tape mark as a guide). Hand-tighten its set screws in the same star pattern as the first pipe.
This is also a good time to test the joint's rotation (if you haven't already). Unlock the rotational lock (if engaged) and spin the joint back and forth—does it move smoothly? Are the pipes staying aligned as it rotates? If not, check for misaligned pipes or debris in the joint.
A good rule of thumb: if the hex key bends or the screw starts to "give," you've tightened too much. Back off slightly and try again.
If everything checks out, congratulations—you've successfully installed a parallel rotatory lean pipe joint! If not, don't panic—we'll troubleshoot common issues next.
Step 1: Position the Joint on Your Workspace
Start by placing the parallel rotatory lean pipe joint on your flat work surface. Orient it so that the two socket openings (where the pipes will insert) are facing up or sideways—whatever feels most comfortable for you. If the joint has a rotational lock (some models do), make sure it's in the "unlocked" position to allow free movement during installation.
Step 2: insert the First Pipe into the Joint Socket
Take one of your cleaned, measured lean pipes and align its end with one of the joint's socket openings. Gently push the pipe into the socket—you should feel some resistance, but it shouldn't require force. If it does, stop and check for debris in the socket or a burr on the pipe (you did deburr, right?).
Push the pipe in until it reaches the bottom of the socket (most sockets have a small lip inside to prevent over-insertion). If you marked the pipe with masking tape earlier, align the tape with the edge of the socket—this ensures the pipe is inserted to the correct depth.
Step 3: Hand-Tighten the Set Screws (But Don't Fully Tighten Yet)
Locate the set screws on the side of the joint's socket (there are usually 2-3 per socket, spaced evenly). Using the appropriate hex key from your set, hand-tighten each screw until it just touches the pipe. The goal here is to hold the pipe in place temporarily, not to lock it down—you'll need to adjust the pipe's position later, so over-tightening now will only slow you down.
Pro Tip:
Tighten set screws in a "star" pattern (like tightening lug nuts on a car). For example, if there are 3 screws, tighten the top one, then the bottom-left, then the bottom-right. This ensures even pressure, preventing the pipe from bending or misaligning in the socket.
Step 4: Rotate the Joint to the Desired Angle
Now comes the fun part: using the joint's rotational feature. Gently grasp the part of the joint that holds the first pipe and rotate it along the axis—you should feel smooth movement as the joint pivots. Rotate it to the angle you need for your application. For example, if you're building a material rack where the top shelf needs to tilt 15° for easy access, set the joint to that angle.
If your joint has a rotational lock, now's the time to engage it (if needed). Some locks are simple thumb screws; others are levers. Engage the lock lightly—you'll want to double-check alignment before fully locking it.
Step 5: Align and insert the Second Pipe
Take your second lean pipe and align it with the joint's remaining socket. The key here is to ensure the two pipes are parallel (or at the desired angle, if not parallel). Use your level to check: place the level across both pipes (perpendicular to their length) and adjust the joint's rotation until the bubble is centered. If the pipes need to be perfectly parallel, the level should read "flat" across both.
Once aligned, insert the second pipe into the socket, pushing it to the bottom (again, using your masking tape mark as a guide). Hand-tighten its set screws in the same star pattern as the first pipe.
Step 6: Double-Check Alignment and Rotation
Now, step back and inspect the assembly. Are the pipes parallel? Do they extend the same length from the joint? Is the joint rotated to the angle you need? If something looks off, loosen the set screws slightly, adjust the pipes or joint rotation, then retighten by hand.
This is also a good time to test the joint's rotation (if you haven't already). Unlock the rotational lock (if engaged) and spin the joint back and forth—does it move smoothly? Are the pipes staying aligned as it rotates? If not, check for misaligned pipes or debris in the joint.
Step 7: Fully Tighten the Set Screws
With alignment confirmed, it's time to lock everything in place. Using your hex key, tighten each set screw in the star pattern, applying firm (but not excessive) pressure. You'll feel resistance as the screw digs into the pipe—stop when you can't turn the key without straining. Overtightening can strip the screw threads or even dent the pipe, weakening the connection.
A good rule of thumb: if the hex key bends or the screw starts to "give," you've tightened too much. Back off slightly and try again.
Step 8: Test the Assembly for Stability and Rotation
The final step: put your assembly to the test. Gently shake the pipes—there should be no wobbling or movement at the joint. Now, if the joint is meant to rotate, unlock it and spin it through its full range of motion. It should move smoothly, with no sticking or grinding. If it does stick, check for misaligned pipes (one pipe might be longer than the other, causing strain) or debris in the rotational mechanism.
If everything checks out, congratulations—you've successfully installed a parallel rotatory lean pipe joint! If not, don't panic—we'll troubleshoot common issues next.

Troubleshooting Common Issues: When Things Don't Go as Planned
Even with careful preparation, hiccups happen. Maybe the joint won't rotate, or the pipes feel loose, or there's a mysterious wobble. Don't stress—most issues are easy to fix with a little patience. Below are the most common problems and how to solve them.
- Debris (dust, metal shavings) in the rotational mechanism.
- Pipes are misaligned, putting strain on the joint.
- The rotational lock is accidentally engaged (or stuck).
Solution:
First, check the rotational lock—ensure it's fully disengaged. If it's stuck, spray a small amount of silicone lubricant (WD-40 works too, but silicone is better for long-term use) on the lock mechanism and gently wiggle it back and forth.
If the lock is fine, loosen the set screws on both pipes and pull them out of the joint. Use a cotton swab to clean out the rotational mechanism—focus on the area where the joint pivots. If there's visible debris, wipe it away with a dry cloth. Reinsert the pipes, realign them, and retighten the screws. Test rotation again—this usually fixes the issue.
If rotation is still rough, the joint may be damaged. Inspect the internal bearings (if equipped)—if they're cracked or worn, it's time to replace the joint.
- Set screws aren't tight enough.
- Pipes are the wrong diameter for the joint (e.g., using 28mm pipe with a 30mm joint).
- Pipe ends are deformed (dented or crushed).
Solution:
Start by tightening the set screws—use the star pattern and apply firm pressure (but don't strip them). If the pipes still slip, check the pipe diameter against the joint's specifications (most joints are labeled with compatible pipe sizes, e.g., "for 28mm lean pipe"). Using the wrong diameter is a common mistake—if that's the case, swap in the correct pipe or joint.
If the pipe diameter is correct, inspect the pipe ends for dents. A crushed end won't grip the set screws properly. Cut off the damaged section (if there's enough pipe length left) and deburr the new end before reinserting.
- Pipes are not parallel (one is longer or shorter than the other).
- Pipes are bent or not straight.
- Joint is installed at an angle (not perpendicular to the pipes).
Solution:
Use your level to check if the pipes are straight—if one pipe curves upward or downward, it will cause wobbling. replace bent pipes with straight ones. Next, measure the length of each pipe from the joint to their ends—they should be identical. If not, trim the longer pipe to match the shorter one (or replace it if it's too short).
Finally, check if the joint is perpendicular to the pipes. If the joint is tilted relative to the pipes (e.g., one socket is higher than the other), loosen the set screws, realign the joint so it sits flat, then retighten.
- Using the wrong size hex key.
- Overtightening the screws.
- Screws are already damaged (cross-threaded or worn).
Solution:
Always use the hex key size specified by the joint manufacturer—using a smaller key will rounded the screw head, making it impossible to tighten. If the screw is already stripped, use a screw extractor tool to remove it, then replace it with a new set screw (most hardware stores carry generic replacements). When installing new screws, hand-tighten first, then give a ¼-turn with the hex key—this is usually enough to secure the pipe without stripping.
Issue 1: The Joint Won't Rotate (Or Rotates Roughly)
Causes:- Debris (dust, metal shavings) in the rotational mechanism.
- Pipes are misaligned, putting strain on the joint.
- The rotational lock is accidentally engaged (or stuck).
Solution:
First, check the rotational lock—ensure it's fully disengaged. If it's stuck, spray a small amount of silicone lubricant (WD-40 works too, but silicone is better for long-term use) on the lock mechanism and gently wiggle it back and forth.
If the lock is fine, loosen the set screws on both pipes and pull them out of the joint. Use a cotton swab to clean out the rotational mechanism—focus on the area where the joint pivots. If there's visible debris, wipe it away with a dry cloth. Reinsert the pipes, realign them, and retighten the screws. Test rotation again—this usually fixes the issue.
If rotation is still rough, the joint may be damaged. Inspect the internal bearings (if equipped)—if they're cracked or worn, it's time to replace the joint.
Issue 2: Pipes Feel Loose in the Joint
Causes:- Set screws aren't tight enough.
- Pipes are the wrong diameter for the joint (e.g., using 28mm pipe with a 30mm joint).
- Pipe ends are deformed (dented or crushed).
Solution:
Start by tightening the set screws—use the star pattern and apply firm pressure (but don't strip them). If the pipes still slip, check the pipe diameter against the joint's specifications (most joints are labeled with compatible pipe sizes, e.g., "for 28mm lean pipe"). Using the wrong diameter is a common mistake—if that's the case, swap in the correct pipe or joint.
If the pipe diameter is correct, inspect the pipe ends for dents. A crushed end won't grip the set screws properly. Cut off the damaged section (if there's enough pipe length left) and deburr the new end before reinserting.
Issue 3: The Assembly Wobbles When Touched
Causes:- Pipes are not parallel (one is longer or shorter than the other).
- Pipes are bent or not straight.
- Joint is installed at an angle (not perpendicular to the pipes).
Solution:
Use your level to check if the pipes are straight—if one pipe curves upward or downward, it will cause wobbling. replace bent pipes with straight ones. Next, measure the length of each pipe from the joint to their ends—they should be identical. If not, trim the longer pipe to match the shorter one (or replace it if it's too short).
Finally, check if the joint is perpendicular to the pipes. If the joint is tilted relative to the pipes (e.g., one socket is higher than the other), loosen the set screws, realign the joint so it sits flat, then retighten.
Issue 4: Set Screws Keep Stripping
Causes:- Using the wrong size hex key.
- Overtightening the screws.
- Screws are already damaged (cross-threaded or worn).
Solution:
Always use the hex key size specified by the joint manufacturer—using a smaller key will rounded the screw head, making it impossible to tighten. If the screw is already stripped, use a screw extractor tool to remove it, then replace it with a new set screw (most hardware stores carry generic replacements). When installing new screws, hand-tighten first, then give a ¼-turn with the hex key—this is usually enough to secure the pipe without stripping.
Maintenance Tips: Keeping Your Joint (and Lean System) in Top Shape
Installing your parallel rotatory lean pipe joint is just the first step—proper maintenance will ensure it lasts for years, even in busy production environments. Lean systems are designed to be durable, but they're not indestructible. A little care goes a long way.
If the joint is exposed to heavy oil or grease (common in automotive or machining shops), wipe it down with a cloth dampened in isopropyl alcohol, then dry thoroughly.
To apply: unlock the joint, spray a tiny amount of lubricant on the pivot point, then rotate the joint back and forth a few times to distribute the lubricant evenly. Wipe away any excess with a cloth.
- Check for cracks in the joint body or sockets.
- Test rotation—does it still move smoothly, or is there new resistance?
- Look for signs of rust (on steel joints) or corrosion (on aluminum).
- Check pipe ends for deformation (dents, crushing).
If you notice any of these issues, replace the joint or pipe immediately. A damaged joint is a safety hazard—don't wait for it to fail completely.
1. Clean Regularly (But Gently)
Dust, oil, and metal shavings are the enemies of moving parts. Every 2-4 weeks (depending on how dusty your environment is), wipe down the joint and pipes with a dry microfiber cloth. For the rotational mechanism, use a cotton swab to clean out debris from tight spots. Avoid using water or harsh chemicals—they can corrode metal parts or damage plastic components.If the joint is exposed to heavy oil or grease (common in automotive or machining shops), wipe it down with a cloth dampened in isopropyl alcohol, then dry thoroughly.
2. Lubricate the Rotational Mechanism Quarterly
Even the smoothest joints need lubrication to keep rotating freely. Every 3-6 months (more often if used heavily), apply a small amount of silicone spray or dry lubricant to the joint's rotational axis. Avoid oil-based lubricants—they attract dust and can gum up the mechanism over time.To apply: unlock the joint, spray a tiny amount of lubricant on the pivot point, then rotate the joint back and forth a few times to distribute the lubricant evenly. Wipe away any excess with a cloth.
3. Check Set Screws Monthly
Vibration from production equipment can loosen set screws over time. Once a month, grab your hex key and gently tighten each set screw (again, using the star pattern). You don't need to overtighten—just a ¼-turn should be enough to secure any that have worked loose.4. Inspect for Wear and Tear
Every 6 months, do a thorough inspection of the joint:- Check for cracks in the joint body or sockets.
- Test rotation—does it still move smoothly, or is there new resistance?
- Look for signs of rust (on steel joints) or corrosion (on aluminum).
- Check pipe ends for deformation (dents, crushing).
If you notice any of these issues, replace the joint or pipe immediately. A damaged joint is a safety hazard—don't wait for it to fail completely.
5. Reconfigure Carefully
One of the best things about lean systems is their reconfigurability—but that doesn't mean you should yank pipes out of joints without care. When reconfiguring, loosen set screws fully before removing pipes, and avoid bending or twisting pipes excessively. For the parallel rotatory joint, unlock it before rotating to prevent straining the mechanism.
Pro Tip:
Keep a small "maintenance kit" near your lean system: hex keys, silicone spray, microfiber cloths, and spare set screws. This way, you can address issues as soon as they arise, minimizing downtime.
Conclusion: Your Lean System, Built to Adapt
Installing a parallel rotatory lean pipe joint might seem like a small task, but it's a big step toward building a lean system that truly works for your team. By following these steps—preparing carefully, aligning precisely, and maintaining regularly—you're not just assembling a structure; you're creating a workspace that can adapt, evolve, and grow with your business.
Remember, lean manufacturing isn't about perfection—it's about continuous improvement. The same goes for your lean pipe system. If something isn't working, don't be afraid to reconfigure, adjust, or even start over. The parallel rotatory joint is designed to give you that flexibility, so use it.
Whether you're building a simple material rack or a complex assembly line, the principles here apply: take your time, use the right tools, and prioritize alignment and stability. With a little practice, installing these joints will become second nature—and you'll wonder how you ever worked with rigid, fixed systems.
So go ahead: grab your lean pipe , your parallel rotatory lean pipe joint , and start building. The future of your production floor is flexible, adaptable, and (thanks to you) perfectly installed.
Remember, lean manufacturing isn't about perfection—it's about continuous improvement. The same goes for your lean pipe system. If something isn't working, don't be afraid to reconfigure, adjust, or even start over. The parallel rotatory joint is designed to give you that flexibility, so use it.
Whether you're building a simple material rack or a complex assembly line, the principles here apply: take your time, use the right tools, and prioritize alignment and stability. With a little practice, installing these joints will become second nature—and you'll wonder how you ever worked with rigid, fixed systems.
So go ahead: grab your lean pipe , your parallel rotatory lean pipe joint , and start building. The future of your production floor is flexible, adaptable, and (thanks to you) perfectly installed.