- Company Articles
- Products and Technology
- Installation And Maintenance
- How to Install Aluminum Workbench C: A Step-by-Step Guide

How to Install Aluminum Workbench C: A Step-by-Step Guide
Related Product
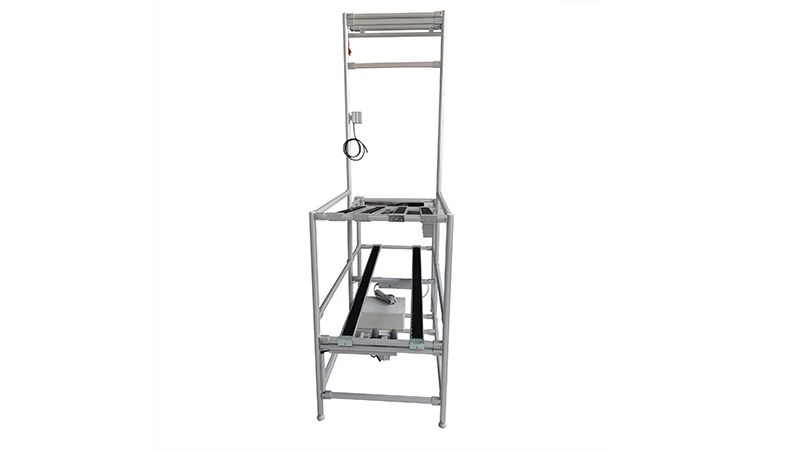
Aluminum Workbench C
aluminum-tube-workbench-is-more-flexible-and-durable,-compared-with-traditional-pe/abs-coated-steel-tube.-it-is-easy-to-assemble,-anti-corrosion,-rust-protection,-and-recycle-use-after-disassemble.
How to Install Aluminum Workbench C: A Step-by-Step Guide
Let's be real—there's something equal parts exciting and intimidating about unboxing a new piece of equipment. You've got big plans for that workspace: maybe it's a garage upgrade, a lab setup, or a workshop revamp. But then you stare at the pile of parts, the instruction manual that might as well be written in code, and suddenly that excitement starts to feel a little shaky. If you've recently ordered an Aluminum Workbench C, take a deep breath. This guide is here to turn that pile of aluminum profile, screws, and joints into a sturdy, functional workspace you'll be proud to use. No confusing jargon, no skipped steps—just a friendly walkthrough to get you from "what am I doing?" to "I built this!"
Aluminum Workbench C is more than just a table. Its magic lies in the aluminum profile itself—lightweight but surprisingly strong, resistant to rust, and designed to hold up under daily use. Pair that with aluminum profile accessories like joints, screws, and adjustable leveling feet, and you've got a workbench that's not just durable, but customizable. Whether you're assembling electronics, crafting, or tackling DIY projects, this workbench is built to adapt. And the best part? With a little patience and this guide, you won't need a pro to put it together.
Before we dive in, let's talk about why this matters. A well-assembled workbench isn't just about looks—it's about safety and efficiency. A wobbly table or loose joints can lead to accidents, damaged tools, or frustration mid-project. By following these steps, you'll ensure your workbench is stable, level, and ready to handle whatever you throw at it. Plus, there's a unique satisfaction in using something you built yourself. So grab a coffee, clear some space, and let's get started.
Tools and Materials You'll Need
First things first: let's gather everything you need. You don't need a fully stocked toolbox, but having the right tools on hand will make this process way smoother. Check your Aluminum Workbench C package to make sure all parts are included—manufacturers usually provide a parts list, so grab that and do a quick inventory. If something's missing, reach out to your supplier now (better to wait a day than stall halfway through!).
| Tool/Material | Purpose | Pro Tips |
|---|---|---|
| Allen Wrench Set (included in package) | Tightening hex screws on aluminum profile accessories | Keep the smallest wrench handy—most joints use M5 or M6 screws. |
| Phillips Head Screwdriver | Securing tabletop to the frame | Magnetic tip helps prevent dropping screws into hard-to-reach spots. |
| Rubber Mallet | Gently tapping joints into place without damaging aluminum profile | Don't use a metal hammer—aluminum dents easily! |
| 4-Foot Level | Ensuring the workbench is flat and stable | Check both side-to-side and front-to-back for levelness. |
| Tape Measure | Verifying distances between frame legs for symmetry | Measure twice, assemble once—avoids lopsided frames! |
| Work Gloves | Protecting hands from sharp edges on aluminum profile | Opt for nitrile or leather—they grip better than cotton. |
| Soft Cloth or Towel | Wiping down parts and cleaning fingerprints from aluminum | Microfiber works best to avoid scratching the surface. |
| Aluminum Workbench C Components | Main parts: aluminum profile (frame rails, legs), tabletop, aluminum profile accessories (joints, screws), adjustable leveling feet | Lay parts out on a clean, flat surface—we'll organize them next! |
Pro Tip:
If your workbench came with caster wheels (some models include them as optional extras), you'll also need a wrench to attach them. Check the parts list for "caster wheel" or "caster accessories" to confirm.

Step 1: Prep Your Workspace
You wouldn't bake a cake without preheating the oven, right? The same goes for assembling your workbench. A little prep now saves a lot of hassle later.
Clear and Clean the Area
Find a space big enough to lay out all the parts—you'll need at least 6 feet by 4 feet of open floor. Move any clutter, tools, or tripping hazards out of the way. If you're working on a hard floor (like concrete or tile), lay down a soft mat, old blanket, or cardboard. Aluminum profile can scratch easily, and you don't want to mar that sleek finish before you even start.
Organize the Parts
Unbox all the components and spread them out. Take a minute to sort them into piles: frame rails (long aluminum profile pieces), legs (shorter aluminum profile), tabletop, joints (these are the aluminum profile accessories that connect the rails), screws, and adjustable leveling feet. If there's a manual, use the part numbers to label each pile—this will save you from hunting for "that one small joint" later.
Check each part for damage, too. Look for bent aluminum profile, cracked joints, or stripped screws. If something looks off, contact the supplier immediately—don't try to "make do" with a damaged part. It's better to wait a few days for a replacement than end up with a weak spot in your workbench.
Read the Manual (Yes, Really)
I know, I know—manuals are boring. But before you start (nǐng luósī—twisting screws), flip through the manual that came with your Aluminum Workbench C. It might have diagrams specific to your model, or note small differences in parts (like a unique joint design). You don't need to memorize it, but a quick scan will help you recognize which parts go where. Think of it as a cheat sheet for the steps ahead.

Step 2: Assemble the Frame
The frame is the backbone of your workbench—get this right, and the rest is easy. The frame is made up of four vertical legs (short aluminum profile pieces) and four horizontal rails (longer aluminum profile pieces) that form a rectangle. We'll use aluminum profile accessories called "90° aluminum profile connectors" to join them—these are the L-shaped joints that hold the rails and legs together.
Start with the Bottom Rectangle
Take two of the longer aluminum profile pieces (these will be the front and back rails of the bottom frame) and two shorter pieces (the side rails). Lay them on your workspace in a rectangle, with the ends overlapping at the corners. The holes in the aluminum profile should line up with the holes in the 90° connectors—this is where the screws will go.
Attach a 90° connector to each corner. Slide the connector into the end of one rail, then align the other rail with the connector's other arm. insert the screws provided (they should be in your aluminum profile accessories bag) into the pre-drilled holes. Don't tighten them all the way yet—just hand-tighten to hold the pieces together. This "loose fit" lets you adjust the rectangle to make sure it's square later.
Heads Up:
Aluminum profile can be slippery—hold the rails firmly when attaching connectors to avoid them sliding apart. If a rail feels like it's not seating properly, check that the connector is fully inserted into both ends.
Square Up the Frame
Now, let's make sure your rectangle is actually a rectangle (not a wonky parallelogram). Grab your tape measure and measure the diagonals of the frame. If the frame is square, both diagonals should be the same length. For example, if one diagonal is 48 inches, the other should also be 48 inches. If they're off, gently push or pull the corners until the measurements match.
Once the diagonals are equal, go back and tighten the screws on the 90° connectors. Use the Allen wrench from your tool kit—turn clockwise until the screw is snug, but don't overdo it. Aluminum is soft, and stripping a screw hole is a pain to fix. A good rule: tighten until you feel resistance, then give it a tiny extra turn. That's it.
Add the Vertical Legs
Now it's time to stand the frame up. Take the four vertical leg pieces (these are the shortest aluminum profile pieces in your parts). On each corner of the bottom frame, you'll attach a vertical leg using another 90° connector. This time, the connector will point upward, turning the flat rectangle into a 3D frame.
Flip the bottom frame so the connectors are facing up. Slide a vertical leg into the open end of each corner connector. Make sure the leg is straight—hold a level against it to check, or just eye it up if you're confident. insert screws into the connector holes and hand-tighten them. Again, keep them loose for now—we'll adjust the legs for level later.
Once all four legs are attached, gently lift the frame to make sure it stands on its own. If it wobbles, check that the legs are all the same length (measure them with your tape measure if needed) and that the connectors are seated properly. A little wobble is normal at this stage—we'll fix that with the adjustable leveling feet later.
Attach the Top Rails
To make the frame extra sturdy, we'll add top rails that connect the tops of the vertical legs. These rails will also support the tabletop later. Take the remaining two long aluminum profile pieces and two short ones (same lengths as the bottom frame) and repeat the rectangle process, but this time, attach them to the tops of the vertical legs using 90° connectors.
Again, start with loose screws, square up the top rectangle by measuring diagonals, then tighten the screws. Once the top frame is secure, give the entire structure a gentle shake. It should feel solid—no creaking or shifting. If it moves, check the connectors and screws—you might have missed a loose one.
Pro Tip:
If your workbench has cross-braces (extra diagonal rails for stability), now's the time to add them. They'll be labeled in your parts list—attach them between the top and bottom rails using 45° aluminum profile connectors for extra rigidity.

Step 3: Install the Tabletop
With the frame standing, it's time to add the surface you'll actually work on: the tabletop. Aluminum Workbench C typically comes with an aluminum honeycomb panel (lightweight but strong) or a solid aluminum sheet. Either way, attaching it is straightforward—we'll use screws to secure it to the top frame rails.
Prepare the Tabletop
Flip the tabletop upside down on your soft mat (to avoid scratching the top surface). If there are pre-drilled holes in the tabletop, those are for attaching it to the frame—make sure they're clean and free of any plastic film or debris. If there are no pre-drilled holes, don't panic! The top frame rails are sturdy enough to support the tabletop with screws placed every 12–18 inches along the rails.
Wipe the bottom of the tabletop with a soft cloth to remove dust—this helps the screws grip better. If your tabletop has a protective film, leave it on for now; you can peel it off once everything is assembled.
Center the Tabletop on the Frame
Carefully lift the frame and set it upside down on top of the tabletop (yes, upside down—this makes attaching the screws easier). Center the frame so there's an equal overhang on all sides, or align it flush with the edges if that's your preference. Use your tape measure to check: measure from the edge of the tabletop to the frame rail on the left and right—they should be the same. Do the same front and back.
Once centered, mark the screw holes with a pencil (if there are no pre-drilled holes). Use the top frame rails as a guide—mark through the rail's holes onto the tabletop. This ensures the screws will go into the rails, not just the air.
Secure the Tabletop
Now, attach the tabletop to the frame. Use the Phillips head screwdriver to drive the screws through the tabletop and into the top frame rails. If you pre-drilled or marked holes, align the screws with those marks. Tighten each screw until it's snug, but again, don't over-tighten—you don't want to crack the tabletop or strip the holes in the aluminum profile.
Work in a crisscross pattern (like tightening lug nuts on a car) to distribute pressure evenly. For example, tighten the front-left screw, then the back-right, then front-right, then back-left. This prevents the tabletop from warping or bending as you tighten.
Once all screws are in, flip the workbench right-side up. Take a step back—how does it look? The tabletop should sit flat on the frame, with no gaps or wobbles. If it feels uneven, check that all screws are tight and the frame is square.
Step 4: Level the Workbench with Adjustable Leveling Feet
Even the sturdiest frame won't work well if it's wobbly on the floor. That's where adjustable leveling feet come in—these handy aluminum profile accessories screw into the bottom of the legs, letting you raise or lower each corner to level the workbench. Trust me, taking 5 minutes to do this now will save you endless frustration later.
Attach the Leveling Feet
Locate the adjustable leveling feet in your parts bag—they'll look like small threaded disks with rubber bottoms (the rubber helps grip the floor and prevents slipping). Screw one into the bottom of each vertical leg. Turn them clockwise to tighten—they should screw in easily by hand, but if they're tight, use a wrench (gently!) to get them started.
Start with all feet screwed in most of the way (so the workbench is as low as possible). We'll adjust their height next.
Check for Level
Place your level on top of the workbench, running front to back. Does the bubble sit in the middle? If not, adjust the front or back leveling feet. If the bubble is to the left (meaning the left side is higher), screw the left foot counterclockwise to lower it. If it's to the right, lower the right foot. Repeat until the bubble is centered.
Now do the same side to side. Place the level across the width of the tabletop and adjust the left or right feet as needed. For extra precision, check the diagonal—place the level from the front-left corner to the back-right corner. If it's off, tweak the feet until the bubble is centered there too.
Pro Tip:
If your floor is really uneven, try placing a thin shim (like a piece of cardboard) under a leveling foot instead of lowering it all the way. This prevents the foot from unscrewing too far and becoming loose.
Test Stability
Once the workbench is level, give it a gentle shake. It should feel solid—no rocking or creaking. If it still wobbles, double-check the frame screws (maybe they loosened when flipping the bench) and the leveling feet. Tighten any loose screws, and adjust the feet one last time if needed.
Stand back and press down on each corner of the tabletop. It should barely move. If a corner sinks, that foot might need to be raised slightly. Take your time here—leveling is all about small adjustments.
Step 5: Add Optional Extras (Caster Wheels, Side Guards, etc.)
Your Aluminum Workbench C is already functional, but maybe you ordered extra aluminum profile accessories to customize it. Common add-ons include caster wheels (for mobility), side guards (to keep tools from rolling off), or tool hooks. Let's cover the most popular one: caster wheels.
Installing Caster Wheels (If Included)
If your workbench came with caster wheels (check for "caster wheel" or "caster accessories" in your parts), you can replace the adjustable leveling feet with these for a mobile workbench. Caster wheels typically come with brakes, so you can lock the bench in place when you need it stationary.
Remove the leveling feet by unscrewing them counterclockwise. Screw the caster wheels into the leg bottoms—they'll have the same threading as the leveling feet. Tighten them by hand, then give them a gentle tug to make sure they're secure. Test the brakes by pressing down on the lever—they should lock the wheel in place.
Now, roll the workbench around! It should move smoothly, and the brakes should hold it steady when engaged. If a wheel squeaks, add a drop of lubricating oil (but avoid getting oil on the tabletop).
Attaching Side Guards or Accessories
Aluminum profile is designed to be modular, so adding extras is easy. If you have side guards (aluminum strips that attach to the edges of the tabletop), use small aluminum profile connectors and screws to secure them to the tabletop frame. Line them up with the edge, pre-drill small holes if needed, and screw them in place.
For tool hooks or holders, look for "T-slot aluminum pipe" accessories—these slide into the grooves on the aluminum profile and let you attach hooks, shelves, or bins. Simply slide the accessory into the T-slot and tighten the set screw to hold it in place. Customize away!
Troubleshooting Common Issues
Even with careful assembly, things can go wrong. Here's how to fix the most common problems:
- Frame is wobbly: Check that all 90° connectors are tight. If the frame still wobbles, add cross-braces (diagonal rails) using 45° aluminum profile connectors for extra support.
- Tabletop is uneven: Make sure the top frame is square and the tabletop screws are evenly tightened. If the tabletop itself is warped (rare, but possible), place a thin plywood sheet on top for a flat surface.
- Leveling feet keep unscrewing: Apply a tiny drop of thread locker (like Loctite) to the threads—this keeps them from loosening but still lets you adjust them later if needed.
- Screw stripped: If a screw hole in the aluminum profile is stripped, try a slightly larger screw (but not too large—you don't want to crack the profile). Alternatively, use a nut and bolt through the hole instead of a screw.
Maintenance Tips to Keep Your Workbench Looking Great
Now that your Aluminum Workbench C is assembled, a little maintenance will keep it in top shape for years:
- Clean regularly: Wipe the tabletop with a damp cloth and mild soap to remove oil, grease, or dust. Avoid harsh chemicals (like bleach) that can damage the aluminum finish.
- Tighten screws annually: Aluminum expands and contracts with temperature changes, which can loosen screws over time. Give all connectors a quick check with the Allen wrench once a year.
- Protect the surface: Use a cutting mat for sharp tools, or a rubber mat for heavy equipment, to prevent scratches on the aluminum tabletop.
- replace worn parts: If caster wheels start to squeak or leveling feet wear out, contact your aluminum profile supplier for replacements. Most accessories are standard and easy to swap.
Final Thoughts
You did it! Take a step back and admire your handiwork. That pile of aluminum profile and accessories is now a sturdy, functional Aluminum Workbench C—built by you. Whether you're using it for woodworking, electronics, or just as a extra counter space, remember: this workbench is more than just a piece of furniture. It's a testament to your patience, attention to detail, and ability to tackle something new.
And if you ever need to reconfigure it (maybe add a shelf, raise the height, or swap out accessories), you've got the skills to do it. Aluminum profile's modular design means this workbench can grow with your needs. So go ahead—start that project you've been planning. Your workspace is ready, and so are you.
Happy building!