- Company Articles
- Products and Technology
- Installation And Maintenance
- How to Install Gusset ALP 4040: Step-by-Step Assembly Guide

How to Install Gusset ALP 4040: Step-by-Step Assembly Guide
Related Product
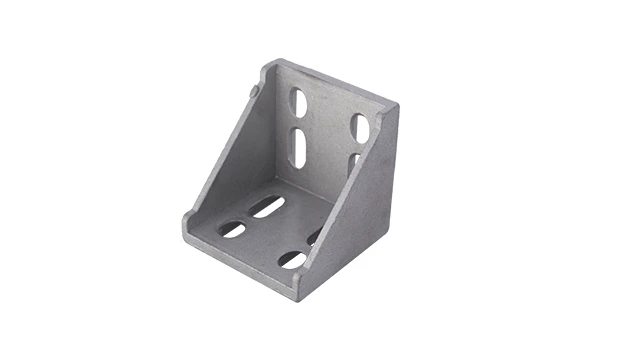
Gusset ALP 4040
The 4040 bracket/Gusset is an external fastening method that creates a 90 degree connection. 4040 means this size is used for 40 series aluminum profile with a quick connection by bolt and nut. It is a lightweight bracket that requires no machining servic
A practical walkthrough to secure and strengthen your aluminum profile structures
Introduction: Why Gusset ALP 4040 Matters in Aluminum Profile Projects
If you've ever worked with aluminum profiles—whether building a workbench, a material rack, or a custom production line—you know that stability is everything. Even the sturdiest aluminum profile can wobble or flex under load if the joints aren't properly reinforced. That's where the gusset ALP 4040 comes in. This small but mighty aluminum profile accessory is designed to add rigidity to 4040 aluminum profile connections, turning wobbly frames into rock-solid structures.
Aluminum profiles are beloved in manufacturing, workshops, and DIY projects for their lightweight strength, modularity, and sleek look. But their versatility relies on the right accessories. Gussets, or gusset plates, are metal brackets that fit snugly at the corners of profile joints, distributing weight evenly and preventing lateral movement. Think of them as the "backbone" of your aluminum frame—quietly doing the hard work to keep everything aligned and stable.
In this guide, we'll walk you through installing a gusset ALP 4040 from start to finish. Whether you're a seasoned workshop pro or a first-time builder, you'll learn how to prep your workspace, identify the right parts, and assemble with confidence. By the end, you'll not only have a reinforced joint but also the know-how to apply this skill to future projects involving aluminum profiles and their accessories.
Tools and Materials You'll Need
Before diving in, let's gather everything you'll need. Having the right tools on hand will save you time and frustration—nothing kills momentum like pausing mid-assembly to hunt for a missing wrench. Here's a breakdown of the essentials:
| Item | Purpose | Quantity |
|---|---|---|
| Gusset ALP 4040 | Reinforcing 4040 aluminum profile joints | 1 per joint (adjust based on your project) |
| 4040 Aluminum Profile | The main structural component (pre-cut to your project's length) | 2 (for a basic corner joint) |
| Aluminum Profile Fixings (M5 or M6 screws and T-nuts) | Securing the gusset to the profile | 4-6 screws + matching T-nuts (check gusset hole count) |
| Hex Key (Allen Wrench) | Tightening screws (size depends on screw head—typically 3mm or 4mm) | 1 set (magnetic tip recommended) |
| Rubber Mallet | Gently tapping T-nuts into profile slots (avoids damaging aluminum) | 1 |
| Level (Bubble or Digital) | Ensuring profiles are straight and square during assembly | 1 |
| Measuring Tape or Ruler | Verifying hole positions and joint alignment | 1 |
| Work Gloves | Protecting hands from sharp aluminum edges | 1 pair |
| 4040 Aluminum Profile End Cap | Finishing the profile ends (optional but recommended for safety) | 2 (one per profile end) |
Pro Tip: If you're new to aluminum profiles, double-check that your gusset ALP 4040 is compatible with your 4040 profile. Most 4040 profiles have standard T-slot sizes, but some manufacturers use slightly different dimensions. A quick test fit—holding the gusset against the profile—can save you from ordering the wrong part!

Step 1: Prepare Your Workspace
First things first: set up a clean, flat workspace. Aluminum profiles are smooth and can scratch easily, so avoid rough surfaces like concrete or unvarnished wood. A workbench with a rubber mat or a sheet of cardboard works great to protect both the profiles and your table.
Clear the area of clutter—you'll need room to lay out the profiles, gusset, and tools. If you're working on a large project (like a rack or conveyor frame), consider using sawhorses to elevate the profiles. This keeps them at a comfortable height and prevents bending while you work.
Put on your work gloves now, too. Aluminum profile edges can be surprisingly sharp, especially if they're newly cut. A quick brush with a file or sandpaper can smooth any burrs, but gloves add an extra layer of protection while handling parts.

Step 2: Identify and Inspect Your Parts
Before assembling, take a minute to inspect each component. This might seem trivial, but catching defects early can save you from rework later. Let's break down what to look for:
Gusset ALP 4040
The gusset ALP 4040 is a flat, typically L-shaped bracket with pre-drilled holes. Check that the holes are clean and free of debris—metal shavings or paint can block screws from seating properly. The edges should be smooth, with no dents or warping. A warped gusset won't lie flat against the profile, leading to uneven pressure and weak joints.
4040 Aluminum Profile
Your 4040 aluminum profile should be straight (no bends or twists) and the T-slots should be clean. Run your finger along the length of the slot—if you feel grit or dirt, wipe it out with a dry cloth or compressed air. T-nuts need to slide freely in these slots, so any obstruction will make installation a hassle.
Aluminum Profile Fixings (Screws and T-Nuts)
Match the screws to the gusset holes. Most gusset ALP 4040 brackets use M5 or M6 screws—check the hole diameter if you're unsure. T-nuts should have a smooth threading and a spring-loaded ball (or "keeper") to hold them in place once inserted into the T-slot. If a T-nut is missing its keeper, it might slip while tightening, so replace it with a new one.
Warning: Avoid using damaged parts! A bent gusset or stripped screw might seem "good enough," but it will compromise the joint's strength. If you spot a defect, pause and grab a replacement—your project's stability depends on it.
Step 3: Position the 4040 Aluminum Profiles for Joint Assembly
Now it's time to set up the joint you'll reinforce. For this guide, we'll focus on a basic 90-degree corner joint (the most common use for a gusset), but the same principles apply to T-joints or cross-joints.
Lay the two 4040 aluminum profiles on your workspace, forming a right angle. The ends should meet cleanly at the corner—no gaps or overlaps. If your project requires a specific length, double-check the measurements now. For example, if you're building a workbench, the vertical legs should align perfectly with the horizontal top frame.
Use your level to ensure the profiles are straight. Place the level along the length of each profile—if the bubble is off-center, adjust until it's centered. A small shim (like a piece of cardboard) under one end can help level uneven surfaces. This step is critical: a crooked base will lead to a crooked joint, even with a gusset.
Once the profiles are level and aligned, gently clamp them together (optional but helpful). A bar clamp or C-clamp with soft jaws (to avoid marring the aluminum) will hold the joint steady while you attach the gusset. If you don't have clamps, ask a helper to hold the profiles—having an extra set of hands makes this step much easier.
Step 4: insert T-Nuts into the Aluminum Profile T-Slots
T-nuts are the unsung heroes of aluminum profile assembly. These small, threaded fasteners slide into the T-slots of the profile, providing a secure anchor for screws. Here's how to insert them correctly:
First, identify where the gusset holes will align with the profile T-slots. Lay the gusset over the corner joint—its holes should line up with the slots in both profiles. Mark these positions lightly with a pencil or masking tape. This ensures you don't waste time sliding T-nuts to the wrong spot.
Take a T-nut and orient it so the threaded hole faces outward (toward where the gusset will sit). The spring-loaded keeper should face into the T-slot. Gently push the T-nut into the slot at your marked position. If it's tight, tap it lightly with a rubber mallet—don't use a steel hammer, as it can dent the profile or damage the T-nut.
Slide the T-nut along the slot until it's directly under the gusset hole. The keeper should click into place, holding the T-nut steady. Test it by gently pulling—if it slides, the keeper might be worn, or the slot is dirty. Clean the slot or replace the T-nut if needed.
Repeat this for all gusset holes. Most gusset ALP 4040 brackets have 2-3 holes per side of the L-shape, so you'll need 4-6 T-nuts total (2-3 per profile). Take your time here—misaligned T-nuts will make it impossible to screw the gusset on straight.
Step 5: Attach the Gusset ALP 4040 to the Joint
Now comes the moment you've been prepping for: attaching the gusset. This is where all your prep work pays off. Follow these steps for a snug, secure fit:
Place the gusset over the corner joint, aligning its holes with the T-nuts you just inserted. The gusset should lie flat against both profiles—no gaps. If it's lifting at the edges, check that the T-nuts are in the right position or that the profiles are square. A warped gusset (which you should have caught in Step 2!) might also cause this—swap it out if needed.
Take a screw and insert it through a gusset hole, then into the T-nut. Start by hand-turning the screw—this prevents cross-threading. Once it's snug, use the hex key to tighten it. Go slowly, applying even pressure. You'll feel resistance as the screw pulls the gusset tight against the profile. Stop when the screw head is flush with the gusset—over-tightening can strip the T-nut or crack the gusset.
Repeat this for all screws, working in a "star" pattern (like tightening lug nuts on a car). For example, if there are four screws (two on each profile), tighten the top-left, then bottom-right, then top-right, then bottom-left. This distributes pressure evenly, preventing the gusset from bowing.
After tightening all screws, give the gusset a gentle wiggle. It shouldn't move—if it does, check that the T-nuts are seated properly or that the screws are tight enough. A loose gusset won't reinforce the joint, so take the time to fix this now.
Step 6: Check Alignment and Adjust as Needed
You're almost there, but don't skip this critical check: verify that the joint is still square and stable. Remove any clamps and use your level again—place it along the profiles and across the joint. If the bubble is off, gently loosen the screws, adjust the profiles, and retighten.
Test the joint's strength by applying light pressure. Push or pull on the profiles—they should resist movement. If the joint flexes, the gusset might not be tight enough, or you might need additional gussets (for heavy-load projects, two gussets per corner—one on each side—add extra stability).
Now's also the time to inspect the screw heads. They should be flush with the gusset—no sticking up or sinking too deep. If a screw is stripped (spins without tightening), remove it and replace both the screw and T-nut. Stripped threads are a common issue if you cross-threaded the screw, so always start by hand-turning!
Step 7: Finish with 4040 Aluminum Profile End Caps (Optional but Recommended)
While not strictly part of gusset installation, adding 4040 aluminum profile end caps is a small step that makes a big difference. These plastic or rubber caps snap onto the ends of the profile, covering sharp edges and giving your project a polished look. They also keep dust, debris, and moisture out of the T-slots—extending the life of your aluminum structure.
To install end caps: simply align the cap with the profile end and press firmly. It should snap into place with a satisfying "click." If it's loose, check that you have the right size—end caps are profile-specific (e.g., 4040 caps won't fit 3030 profiles). If the cap is tight, warm it slightly with your hands (or a hair dryer on low) to soften the plastic—this makes insertion easier without damaging the cap.
Pro tip: If your project will be used in a workshop or production area, colored end caps can add functionality. For example, yellow caps might mark "safe" zones, while red caps could indicate high-traffic areas. This is a simple way to boost safety and organization!
Step 8: Test the Joint Under Load (Optional but Smart)
For peace of mind, test the joint with a realistic load. If you're building a workbench, place a heavy toolbox on top. For a material rack, stack a few boxes of parts. Let the load sit for 10-15 minutes, then check the joint again. Has the gusset shifted? Are the profiles still square? If everything holds, you're good to go!
If the joint flexes under load, don't panic. It might just need additional reinforcement. Adding a second gusset on the opposite side of the joint is a quick fix. Alternatively, upgrading to longer screws or thicker gusset material (if your project requires extreme strength) can help. Remember: aluminum profiles are modular, so you can always tweak and improve as needed.
Maintenance Tips: Keeping Your Gusset ALP 4040 in Top Shape
Your gusset ALP 4040 is built to last, but a little maintenance goes a long way. Here's how to keep it (and your aluminum profile structure) strong for years:
- Inspect regularly: Check screws for tightness every few months, especially if the structure is used daily. Vibration from tools or machinery can loosen fasteners over time.
- Clean gently: Wipe the gusset and profiles with a damp cloth to remove dust and grease. Avoid harsh chemicals—mild soap and water work best.
- Lubricate T-slots: If T-nuts start to stick, apply a small amount of dry lubricant (like graphite powder) to the T-slots. This keeps them sliding smoothly for future adjustments.
- replace worn parts: If a gusset bends, a T-nut strips, or a screw rusts, replace it immediately. Damaged parts weaken the entire structure.
Conclusion: You're Now a Gusset Installation Pro!
Installing a gusset ALP 4040 might seem like a small task, but it's a skill that elevates your aluminum profile projects from "functional" to "professional-grade." By following these steps—prepping your workspace, inspecting parts, aligning profiles, and securing the gusset—you've built a joint that's strong, stable, and ready to handle whatever you throw at it.
Remember, aluminum profiles and their accessories are all about flexibility. Now that you know how to install a gusset, you can apply this knowledge to workbenches, material racks, conveyors, and more. Whether you're a hobbyist or a production manager, the ability to reinforce joints with confidence will save you time, money, and headaches down the line.
So go ahead—tackle that next aluminum profile project. With your new gusset installation skills, there's no limit to what you can build.