- Company Articles
- Products and Technology
- Installation And Maintenance
- How to Install One Way Rotatory Straight Lean Pipe Joints: DIY Guide

How to Install One Way Rotatory Straight Lean Pipe Joints: DIY Guide
Related Product
One Way Rotatory Straight Lean Pipe Joint
Two way lean pipe joint for 2 pcs 28MM lean pipe connection in straight angle with rotatory fucntion, which used widely in workbench, flow rack, hand trolley frame connection.
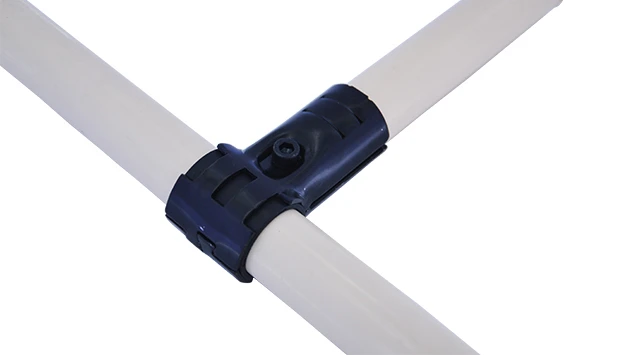
Introduction: The Unsung Hero of Lean Systems
If you've ever walked through a well-organized workshop, a bustling manufacturing floor, or even a home garage that feels surprisingly efficient, chances are you've seen the results of lean pipe systems in action. These modular setups—think workbenches that adjust on the fly, material racks that flow seamlessly, or turnover trolleys that glide exactly where they're needed—owe much of their flexibility to one small but mighty component: the one way rotatory straight lean pipe joint.
Maybe you're here because you've decided to build your own lean system, or perhaps you're upgrading an existing setup. Either way, if the thought of installing these joints feels intimidating—like trying to solve a puzzle with extra moving parts—you're not alone. I've been there. Early in my career, I helped a small factory reconfigure their assembly line, and let's just say our first attempt at using rotatory joints resulted in a wobbly workbench that threatened to collapse under a box of screws. But that's the beauty of these tools: they're designed to be user-friendly, even for beginners. With a little guidance, you'll be securing joints, testing rotations, and building structures that would make any lean manufacturing expert nod in approval.
In this guide, we're going to demystify the one way rotatory straight lean pipe joint. We'll cover everything from gathering the right tools to troubleshooting common hiccups, and by the end, you'll not only know how to install these joints—you'll understand why they're a game-changer for anyone who values adaptability, efficiency, and the satisfaction of building something with their own hands. Whether you're crafting a simple workbench for your garage or a complex flow rack for a production line, these joints will be your most reliable collaborators. Let's dive in.
Tools and Materials: What You'll Need to Get Started
Before we pick up a single tool, let's make sure you have everything required to install your one way rotatory straight lean pipe joint. Think of this as your pre-flight checklist—skipping a step here could lead to frustration later (trust me, I've spent 20 minutes hunting for a missing hex key mid-project). Most of these items are easy to find at hardware stores, and if you're already into DIY, you might have half of them in your toolbox.
| Category | Items | Why You Need Them |
|---|---|---|
| Tools | Hex Key Set (Metric, preferably 3mm–8mm) | Most lean pipe joints use hex-head set screws; this will tighten/loosen them. |
| Rubber Mallet | Gently taps pipes into joints without damaging the finish (metal mallets are too harsh!) | |
| Measuring Tape & Carpenter's Pencil | Ensures pipes are cut to the right length and joints are aligned evenly. | |
| Level (2-foot or longer) | Prevents wobbly structures—critical for workbenches or racks that hold weight. | |
| Wire Brush or Sandpaper (Fine Grit) | Cleans dirt, rust, or factory residue from pipe ends for a snug fit. | |
| Materials | One Way Rotatory Straight Lean Pipe Joints | The star of the show—ensure they're compatible with your pipe diameter (most are 28mm or 30mm). |
| Lean Pipes (Aluminum or Steel) | Aluminum is lighter for workbenches; steel is sturdier for heavy racks. Cut to your project's length. | |
| Aluminum Profile (Optional) | Adds rigidity if building a frame (e.g., workbench legs or rack sides). | |
| Lean Pipe End Caps | Covers sharp pipe ends—safer for hands and prevents dust buildup inside pipes. |
Pro tip: If you're buying new joints, check if they come with set screws pre-installed. Some manufacturers include them, but it never hurts to grab a few extras—they have a sneaky way of rolling under shelves when you drop them. Also, if you're working with aluminum lean pipe, consider picking up a tube of anti-seize lubricant. It'll make adjusting joints later much easier, especially if you live in a humid area where metal can corrode slightly over time.

Step-by-Step Installation: From Unboxing to Rotation
Now that you've got your tools and materials laid out, let's walk through installing a one way rotatory straight lean pipe joint. I'll break this into seven steps, each with tips to avoid the mistakes I (and countless others) have made. We'll start simple: securing a single joint to a pipe. Later, we'll build up to integrating it into a real structure, like a workbench.
Step 1: Prep Your Workspace (Yes, This Matters)
First things first: clear a flat, stable surface. A concrete floor, a sturdy table, or even a large sheet of plywood on sawhorses works. Lay down a towel or a piece of cardboard to protect your pipes and joints from scratches—aluminum, in particular, shows scuffs easily. Gather your tools within arm's reach. Trust me, there's nothing more frustrating than tightening a set screw halfway only to realize your hex key rolled across the room.
Step 2: Measure and Cut Pipes (If Needed)
If your project requires custom pipe lengths (most do), now's the time to measure twice and cut once. Use your measuring tape to mark the pipe where you need to cut—say, 4 feet for a workbench leg. For straight cuts, clamp the pipe to your workspace to prevent it from rolling. If you're using a hacksaw, move slowly and keep the blade perpendicular to the pipe; if you have a pipe cutter, rotate it evenly to avoid pinching the blade. After cutting, use sandpaper to smooth the edges—sharp burrs are not only dangerous but can also prevent the joint from seating properly.
Pro tip: If you're new to cutting pipes, practice on a scrap piece first. I once rushed this step and ended up with a pipe that was ½ inch too short—enough to throw off the entire frame of a material rack.
Step 3: Clean the Pipes and Joints
Factory-fresh pipes and joints often come with a thin layer of oil, dust, or plastic residue. Grab your wire brush or sandpaper and gently scrub the end of each pipe (about 2 inches from the tip) and the inner surfaces of the joint. This might seem trivial, but dirt or oil can create a barrier between the pipe and joint, leading to loose connections down the line. Wipe everything with a dry cloth when you're done—you want these surfaces as clean as possible.
Step 4: Align the Joint with the Pipe
Now, let's get the joint and pipe ready to meet. Hold the one way rotatory straight lean pipe joint in one hand and the pipe in the other. Look closely at the joint: you'll notice a hollow opening (where the pipe inserts) and a small set screw (usually on the side or top). The "one way" part means the joint will rotate freely in one direction but lock in place when turned the other way—keep that in mind as you align.
Slide the pipe into the joint opening. It should go in smoothly, but don't force it. If it gets stuck, check for debris or a bent pipe end. Once the pipe is inserted about 1–1.5 inches (or until it hits the inner stop, if the joint has one), rotate the joint to face the direction you want it to pivot. For example, if you're building a workbench with a fold-down shelf, you'd align the joint so the shelf can swing up and lock into place.
Step 5: Secure the Joint (Tighten, but Don't Overdo It)
Here's where the hex key comes in. Locate the set screw on the joint—it's usually recessed, so you might need to angle the key to find it. insert the hex key and turn it clockwise to tighten. Start with gentle pressure—you want the screw to grip the pipe, not chew into it. Once you feel resistance, give it a ¼-turn more. That's it. Over-tightening can strip the threads or warp the pipe, making future adjustments impossible.
If the joint feels loose after tightening, try this trick: tap the end of the pipe lightly with your rubber mallet. Sometimes the pipe needs a little nudge to seat fully in the joint. Then re-tighten the set screw. I learned this the hard way when a joint kept slipping during a project—turns out, the pipe wasn't pushed in all the way, and a tiny tap fixed it.
Step 6: Test Rotation and Stability
Now for the fun part: testing the joint. Gently rotate it in the intended direction—does it move smoothly, without jerking? Then try rotating it the opposite way—does it lock firmly? If it's stiff, check if the set screw is too tight (loosen it slightly) or if there's debris in the joint (clean with a dry cloth). If it rotates too freely, the set screw might need a tiny tweak.
Next, give the pipe a gentle shake. The joint should feel solid—no wobbling or shifting. If it moves, double-check that the set screw is tight and the pipe is fully inserted.
Step 7: Integrate into Your Structure
Once your single joint is secure, it's time to build. Let's say you're making a workbench: attach another joint to the top of your vertical pipe, then connect a horizontal pipe to create the frame. Repeat the process for the other legs, using your level to ensure everything is straight. As you go, periodically test the structure's stability—lean on it gently, push it slightly. If it sways, check the joints for looseness or pipes that are misaligned.
Remember: lean systems are all about adaptability. If you decide later that your workbench needs a shelf, or your material rack should angle differently, these joints make reconfiguration easy—just loosen the set screws, adjust, and retighten.

Troubleshooting: When Things Don't Go as Planned
Even with careful prep, DIY projects have a way of throwing curveballs. Here are the most common issues I've encountered with one way rotatory straight lean pipe joints—and how to fix them.
Problem: The Joint Won't Rotate Smoothly
Possible causes: Debris in the joint, set screw over-tightened, or a misaligned pipe. Try this: Loosen the set screw, remove the pipe, and inspect the joint's inner rotation mechanism. Wipe away any dust or grit with a Q-tip. Reinsert the pipe, tighten the set screw halfway, and test rotation. If it's still stiff, apply a drop of light machine oil to the joint's pivot point (avoid heavy oils—they attract dust).
Problem: The Pipe Slips Out of the Joint
This usually happens because the pipe wasn't inserted far enough or the set screw isn't gripping. Remove the pipe, check that the end is clean and smooth, then push it into the joint until it hits the inner stop. Tighten the set screw firmly (but not excessively). If the pipe is still slipping, the set screw might be worn—replace it with a new one (they're cheap and widely available at hardware stores).
Problem: The Joint Feels Wobbly After Installation
Wobbliness often stems from uneven pipes or a joint that's not aligned with the structure. Use your level to check if the pipes are straight vertically and horizontally. If a pipe is bent, replace it—even a small kink can throw off stability. If the joint itself is wobbly, ensure both ends (if it's a double-ended joint) are tightened equally. I once had a joint that wobbled because I'd tightened one set screw much more than the other—balancing them fixed the issue.
Problem: Scratched Pipes or Joints
Oops—we've all done it. If you scratch an aluminum pipe, a quick wipe with a metal polish can reduce the visibility. For deeper scratches, touch-up paint (matching the pipe color) works. To prevent scratches in the future, always work on a padded surface and avoid dropping joints onto pipes.
Building a Simple Workbench: A Real-World Example
To put everything into practice, let's walk through building a basic workbench using one way rotatory straight lean pipe joints. This project is perfect for a garage, workshop, or even a home office—it's sturdy, adjustable, and takes about 2–3 hours to complete (even if you're a beginner).
Project Overview
We'll build a workbench that's 4 feet long, 2 feet deep, and 36 inches tall (standard counter height). It will have a frame made of aluminum lean pipes and one way rotatory joints, with a plywood or aluminum honeycomb panel top. The rotatory joints will let us add optional shelves later, or even fold down the sides if space is tight.
Materials You'll Need
- 4 aluminum lean pipes (36 inches long) – for the legs
- 4 aluminum lean pipes (48 inches long) – for the front/back rails
- 4 aluminum lean pipes (21 inches long) – for the side rails (21 inches accounts for the pipe ends inside the joints)
- 8 one way rotatory straight lean pipe joints
- 1 plywood/aluminum honeycomb panel (48x24 inches) – for the top
- 4 lean pipe end caps (to cover leg bottoms)
- Wood screws (to attach the top to the frame)
Building Steps
1. Assemble the Leg Frames: Take two 36-inch leg pipes and two 21-inch side rails. Attach a rotatory joint to the top of each leg pipe (following Steps 3–5 above). Then connect the side rails to the joints, creating a rectangular frame for the left and right sides of the bench. Use your level to ensure the frames are square (all angles 90 degrees).
2. Connect the Frames with Front/Back Rails: Take the 48-inch front and back rails. Attach rotatory joints to both ends of each rail, then connect them to the left and right leg frames. This will form the full bench frame. Tighten all set screws, then shake the frame gently—does it feel solid? If not, check for loose joints or misaligned pipes.
3. Add the Top: Lay the plywood or aluminum panel on top of the frame. Center it so there's an even overhang (about ½ inch on all sides). Pre-drill small holes through the panel and into the frame rails, then secure with wood screws (be careful not to drill through the pipes!).
4. Install End Caps: Pop the end caps onto the bottom of each leg to protect your floor and prevent the pipes from sliding.
5. Test and Adjust: Stand the bench upright. Lean on it, place a heavy object (like a toolbox) on top—does it wobble? If yes, check the level and tighten any loose joints. Now, test the rotatory joints: if you want to add a shelf later, simply attach additional rails to the joints and rotate them into place.
And just like that, you've built a functional workbench using one way rotatory straight lean pipe joints. I built a similar version for my garage last year, and it's held up to everything from car parts to paint cans. The best part? When I needed extra space, I rotated the side rails down and folded the top (I added hinges to the panel) to tuck it against the wall.
Maintenance Tips: Keep Your Joints (and System) Happy
Installing your one way rotatory straight lean pipe joints is just the first step. To keep them working smoothly for years, a little maintenance goes a long way. Here's what I recommend:
Clean Regularly
Dust and debris love to build up in joint crevices, especially if your system is in a busy workshop. Every few months, wipe down the joints with a dry cloth. For stubborn grime, use a toothbrush to gently scrub the pivot points. Avoid water or harsh cleaners—they can corrode metal parts.
Lubricate Pivot Points
If you notice a joint starting to stick, apply a drop of silicone lubricant or light machine oil to the rotation mechanism. Wipe away excess to prevent attracting dust. I do this annually, and it keeps joints moving like new.
Check Set Screws Quarterly
Vibration from daily use can loosen set screws over time. Every 3–4 months, grab your hex key and give each screw a gentle tighten (remember: ¼-turn after resistance). This simple step prevents pipes from slipping and structures from wobbling.
Inspect for Wear
Look for signs of damage: cracks in the joint, stripped set screws, or bent pipes. replace any worn parts immediately—using a damaged joint is a safety hazard. Most suppliers sell replacement joints and screws affordably.
Safety First: Don't Skip These Steps
DIY projects are fun, but safety should always come first. Here are a few key tips to keep in mind:
- Wear gloves: Pipes can have sharp edges, and set screws can pinch fingers. Leather or nitrile gloves work best.
- Secure your workspace: Clamp pipes when cutting, and never work on an unstable surface.
- Test load capacity: Before loading your workbench or rack with heavy items, test it with lighter weights first. Most lean pipe systems can hold 50–100 pounds per linear foot, but it's better to be safe.
- Don't over-tighten: Stripped screws or warped pipes are not just frustrating—they can lead to structural failure.
Conclusion: You're Ready to Build
By now, you should feel confident installing one way rotatory straight lean pipe joints. We've covered the tools, the step-by-step process, troubleshooting, and even built a workbench together. Remember, the goal of lean systems is to make your space work for you—and these joints are the key to that flexibility. Whether you're building a simple shelf or a full production line, the skills you've learned here will serve you well.
I'll leave you with this: the first time I successfully installed a rotatory joint and watched it rotate smoothly into place, I felt a surge of pride. Not because it was perfect, but because I'd figured it out—one small step toward a more efficient, adaptable space. You've got this. Now go grab your tools, and start building something that works as hard as you do.