- Company Articles
- Products and Technology
- Installation And Maintenance
- How to Install Parallel Lean Pipe Joint Chrome: Step-by-Step Guide

How to Install Parallel Lean Pipe Joint Chrome: Step-by-Step Guide
Related Product
Parallel Lean Pipe Joint Chrome
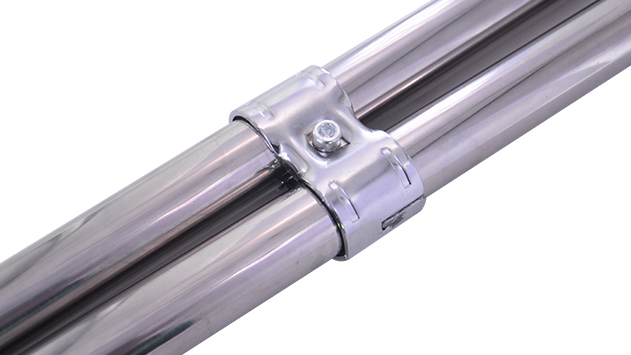
Parallel lean pipe joint used for 2 pcs 28MM lean pipe connection in parallel direction to enhance frame structure, usually for heavy payload requirement for workbench. flow rack, hand trolley.
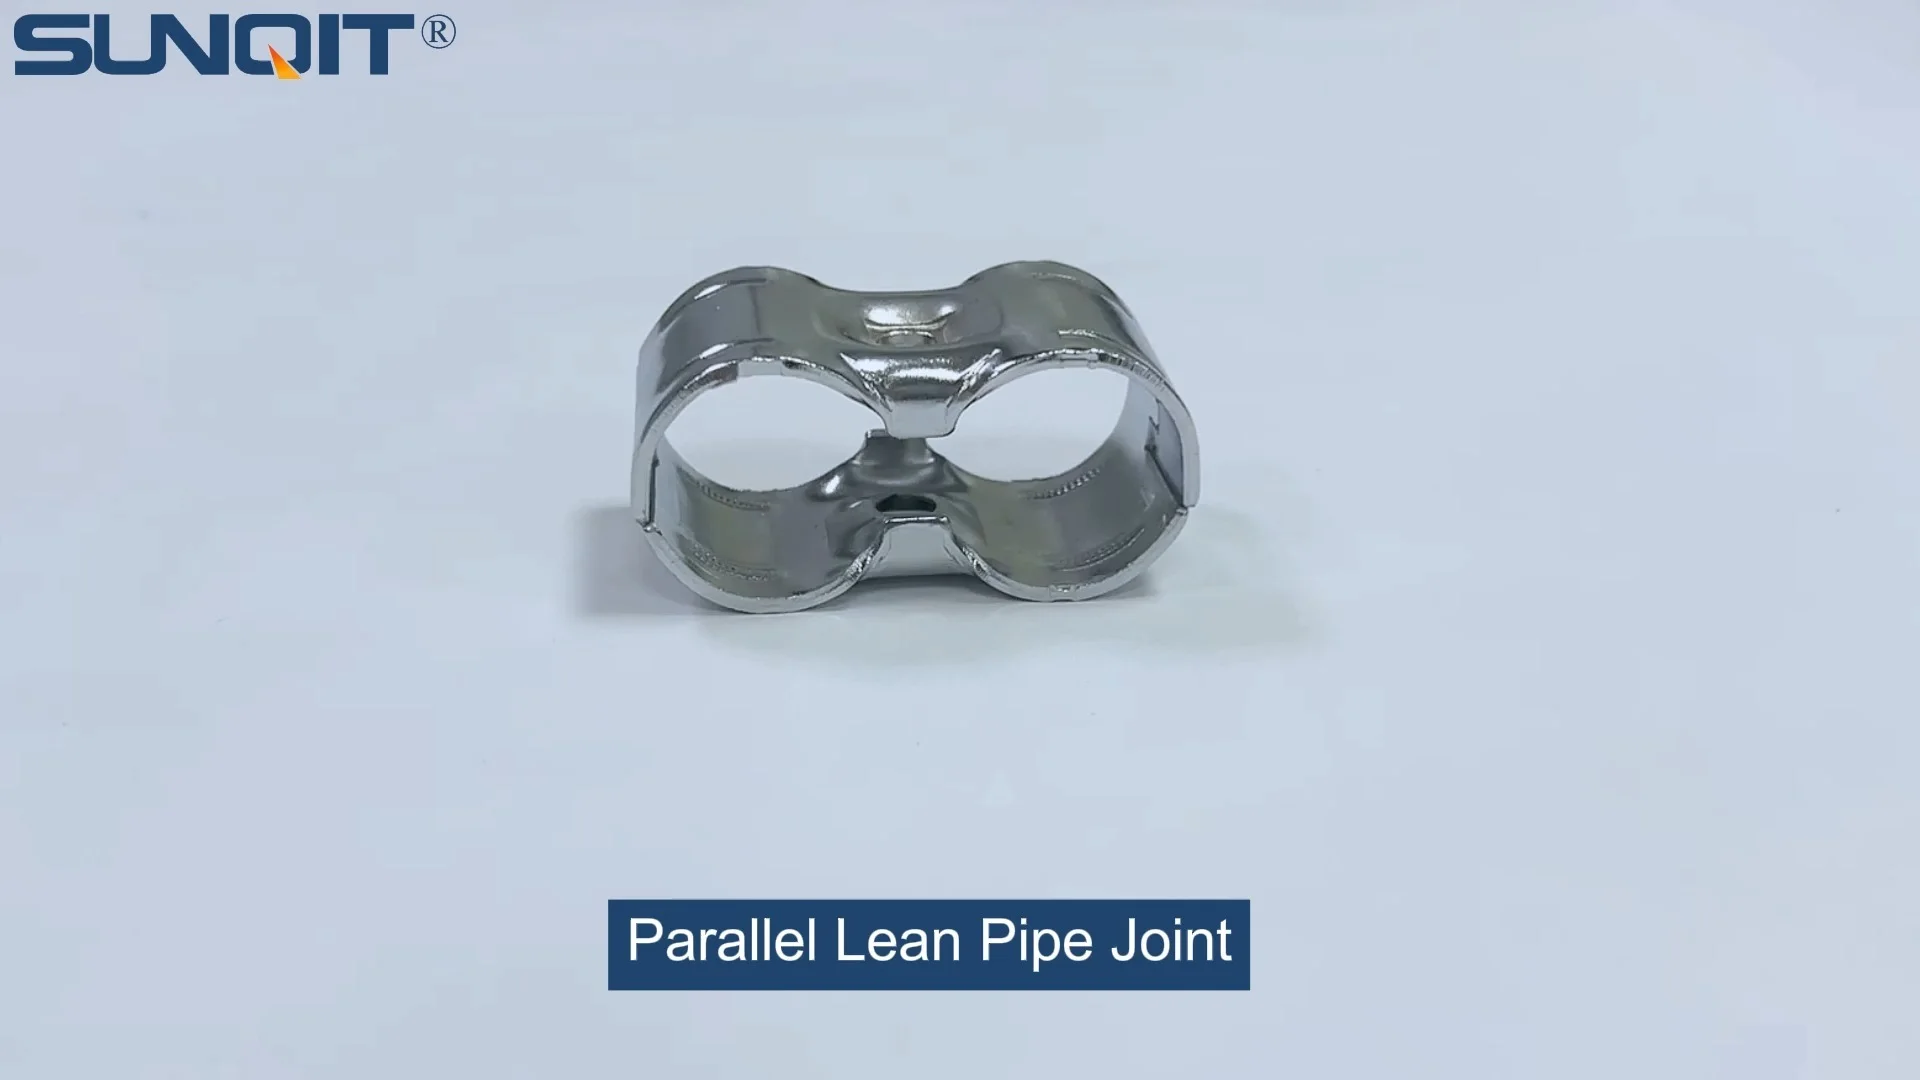
When it comes to building sturdy, flexible structures in lean manufacturing or warehouse settings—think workbenches, flow racks, or turnover trolleys—the unsung hero is often the parallel lean pipe joint chrome . These small but mighty components are the backbone of any reliable lean system, holding together lean pipes with precision and durability. But here's the thing: even the best joints won't perform if they're installed haphazardly. A wobbly workbench or a misaligned flow rack doesn't just slow down your workflow—it can compromise safety and efficiency, too.
In this guide, we're breaking down the installation process for parallel lean pipe joint chrome into simple, actionable steps. Whether you're a seasoned facility manager or a team member tackling a weekend project, you'll learn how to get these joints right the first time. We'll cover everything from prepping your workspace to troubleshooting common snags, with plenty of tips to ensure your structure (like that new workbench you're building) stands strong for years. Let's dive in.
Understanding the Star of the Show: Parallel Lean Pipe Joint Chrome
Before we pick up a tool, let's make sure we know what we're working with. A parallel lean pipe joint chrome is exactly what it sounds like: a connector designed to join two or more lean pipes in a parallel configuration, with a chrome-plated finish for extra strength and corrosion resistance. Unlike fixed-angle joints (which lock pipes at 90° or 45°), parallel joints let pipes run side-by-side, making them perfect for frames, rails, or the horizontal supports of a workbench.
Most of these joints are made from heavy-duty steel with a chrome coating, which not only adds a sleek, professional look but also protects against rust—critical if your workspace deals with moisture or frequent cleaning. They typically feature set screws (often hex-head) that bite into the lean pipe, holding everything tight without welding or drilling. And since they're part of the broader lean pipe and accessories ecosystem, they're designed to work seamlessly with standard lean pipe sizes (usually 28mm outer diameter, the industry standard).
Why does this matter? Because understanding the joint's design helps you avoid common mistakes. For example, over-tightening those set screws can strip the threads or even dent the pipe, while under-tightening leads to a loose connection. It's all about balance—and we'll get to that later.
Gathering Your Tools and Materials
You wouldn't bake a cake without preheating the oven, right? The same goes for installing parallel lean pipe joints. Having the right tools on hand will save you time and frustration. Here's what you'll need:
- Hex Key Set: Most parallel joints use hex (Allen) screws, so grab a set with sizes ranging from 3mm to 6mm—you'll likely need 4mm or 5mm for standard joints.
- Measuring Tape and Straightedge: Precision is key. A 25-foot tape measure and a 2-foot straightedge (or a long level) will help you align pipes evenly.
- Rubber Mallet: For gently tapping pipes into the joint without scratching the chrome finish.
- Level: A 4-foot bubble level ensures your parallel pipes stay straight, not slanted.
- Sandpaper (Fine-Grit): To smooth any burrs or rough edges on cut pipes—these can damage the joint's interior or prevent a tight fit.
- Marker or Pencil: For marking where the joint will sit on the pipes.
- Work Gloves: Optional but smart—chrome can get slippery, and pipes can have sharp edges.
And, of course, your materials: the parallel lean pipe joint chrome itself, lean pipes (cut to your desired length), and any additional accessories like end caps or pipe sleeves (if you're finishing off a workbench or trolley).
Step-by-Step Installation: Let's Build Something Solid
Step 1: Prep Your Workspace and Inspect Parts
Start by clearing a flat, stable surface—like a large table or the floor. Sweep away debris, and if you're working on concrete, lay down a piece of cardboard to protect the chrome finish on the joint (scratching that shiny surface is avoidable with a little care!).
Next, lay out all your parts and give them a once-over. Check the parallel joint for cracks, bent screws, or chipped chrome—even small defects can weaken the connection. Inspect the lean pipes, too: are they straight? Any dents or kinks? If a pipe is bent, it won't seat properly in the joint, so swap it out for a straight one. Finally, run your finger along the cut ends of the pipes—if you feel rough spots or burrs, gently sand them with fine-grit sandpaper until smooth. Trust me, this extra minute prevents snags later.
Step 2: Measure and Mark Your Pipes
Now, let's figure out where the joint will go. Suppose you're building a simple two-pipe frame for a workbench shelf—each pipe is 36 inches long, and you want the joint to sit 6 inches from each end (leaving room for other joints or supports). Take your measuring tape and mark 6 inches from one end of each pipe with a pencil. Then, measure 6 inches from the other end and mark that, too—this gives you a clear target for where the joint should be centered.
Pro tip: Use a straightedge to draw a light line around the pipe at each mark. This ensures the joint sits perpendicular to the pipe, not at an angle. If your pipes are longer than 3 feet, have a helper hold the other end to keep the tape steady—no one wants a wobbly mark!
Step 3: Align the Pipes and Joint
With your marks in place, it's time to fit the joint. Hold the parallel lean pipe joint chrome in one hand and slide one pipe into one of its sockets. Push it in until the mark on the pipe lines up with the edge of the joint. Now, do the same with the second pipe on the opposite side of the joint. You want both pipes to extend equally from the joint—if one is sticking out an inch more than the other, your frame will be lopsided.
Here's where the straightedge comes in: lay it across the top of both pipes. If they're parallel, the straightedge will lie flat; if not, adjust the pipes until they're even. You can also use your level here—place it along the pipes to ensure they're not tilted up or down. Take your time with this step; alignment now prevents headaches later.
Step 4: Tighten the Set Screws (But Don't Overdo It!)
Now, grab your hex key. Most parallel joints have two set screws per pipe socket—one on the top and one on the side, or two opposite sides. Start with the top screw of the first pipe: insert the hex key and turn clockwise until you feel resistance. Then, move to the side screw (or the opposite top screw) and tighten it to the same tension. Repeat this for the second pipe.
Important: Don't crank the screws as tight as possible . Chrome-plated steel is strong, but over-tightening can strip the threads or dent the pipe, weakening the connection. A good rule of thumb: tighten until the screw is snug, then give it a quarter-turn more. You should feel the joint grip the pipe firmly—no wiggling when you shake the structure gently.
If the screws start to spin without tightening, stop! That means the threads are stripped, and you'll need a new joint. Better to catch this now than after you've built the whole frame.
Step 5: Test Stability and Make Adjustments
You're almost there! Now, give your connected pipes a gentle shake. Do they wobble at the joint? If yes, check two things: Are the pipes fully inserted into the joint? Sometimes, they can slip out slightly while tightening. If they're seated correctly, try tightening the screws a little more (but again, no overdoing it). If the wobble persists, the joint might be defective—swap it out for a new one.
Use your level again to confirm the pipes are straight. Place it along the length of the pipes; the bubble should stay centered. If it drifts left or right, loosen the screws, realign the pipes, and retighten. It's okay to repeat this a few times—precision here means your workbench or flow rack won't lean to one side when loaded with tools or materials.
Step 6: Integrate into Your Lean Structure
Once your parallel joint is secure, it's time to build out the rest of your structure. If you're making a workbench, connect additional parallel joints to create the frame, then add vertical supports and a top surface. For a flow rack, attach roller tracks (using roller track connectors, another key lean pipe and accessories item) to the parallel pipes to let materials glide smoothly.
Remember: each new joint adds weight and stress, so check the stability of the entire structure as you go. A quick test: lean against the frame with gentle pressure—if it shifts, reinforce the wobbly joint or add diagonal braces (using 45° joints) for extra support.

Pro Tips for Long-Lasting Results
Even seasoned installers can use a few hacks to make the process smoother. Here are our top tips:
- Protect the Chrome: When transporting or storing joints, wrap them in bubble wrap or cloth to avoid scratches. A chipped chrome finish isn't just unsightly—it can lead to rust over time.
- Lubricate Screws (Sparingly): If you plan to disassemble and reconfigure your structure later (lean systems are all about flexibility!), apply a tiny drop of machine oil to the set screws before tightening. This makes them easier to loosen later without stripping.
- Check Joints Regularly: Over time, vibrations from daily use can loosen screws. Every month or so, give each joint's screws a quick tighten with your hex key—it takes 5 minutes and prevents big problems.
- Match Pipe Sizes: Not all lean pipes are the same! Standard pipes are 28mm in diameter, but some suppliers offer 30mm or 25mm options. Always check that your pipes match the joint's socket size—too small, and they'll slip; too large, and they won't fit.
Troubleshooting: When Things Don't Go as Planned
Even with careful prep, issues can pop up. Here's how to fix the most common problems:
Problem:
The joint feels loose, even after tightening screws.
Solution: Check if the pipes are fully inserted—they should reach the bottom of the joint's socket. If they are, the pipe diameter might be too small. Try wrapping a thin strip of electrical tape around the pipe (where the screw contacts it) to add thickness, then retighten. If that doesn't work, you may need a joint with a smaller socket.
Solution: Check if the pipes are fully inserted—they should reach the bottom of the joint's socket. If they are, the pipe diameter might be too small. Try wrapping a thin strip of electrical tape around the pipe (where the screw contacts it) to add thickness, then retighten. If that doesn't work, you may need a joint with a smaller socket.
Problem:
Pipes are misaligned, even after measuring.
Solution: Loosen the screws, then use your straightedge to realign the pipes. Have a helper hold them steady while you retighten. If the pipes keep shifting, mark their positions on the joint with a pencil before loosening—this gives you a reference point.
Solution: Loosen the screws, then use your straightedge to realign the pipes. Have a helper hold them steady while you retighten. If the pipes keep shifting, mark their positions on the joint with a pencil before loosening—this gives you a reference point.
Problem:
Chrome finish is scratched during installation.
Solution: For minor scratches, apply a chrome polish (like Simichrome) with a soft cloth—this can buff out light marks. For deeper scratches, touch up with a chrome paint pen (available at hardware stores). To prevent this, always use a rubber mallet, not a steel hammer, and avoid dragging joints across rough surfaces.
Solution: For minor scratches, apply a chrome polish (like Simichrome) with a soft cloth—this can buff out light marks. For deeper scratches, touch up with a chrome paint pen (available at hardware stores). To prevent this, always use a rubber mallet, not a steel hammer, and avoid dragging joints across rough surfaces.
Joint Comparison: Is Parallel Chrome Right for You?
| Joint Type | Best For | Installation Difficulty | Corrosion Resistance | Common Use Cases |
|---|---|---|---|---|
| Parallel Lean Pipe Joint Chrome | Side-by-side pipe alignment | Easy (10-15 mins per joint) | High (chrome resists rust) | Workbench frames, flow rack rails, trolley sides |
| Fixed 90° Joint (Non-Chrome) | Right-angle connections | Moderate (requires precise angle alignment) | Low (uncoated steel) | Vertical supports, corner frames |
| Swivel Joint (Chrome-Plated) | Adjustable angles (0°-180°) | Moderate-Hard (multiple screws to align) | High (chrome finish) | Tilted shelves, adjustable work surfaces |
As you can see, parallel lean pipe joint chrome stands out for its ease of installation and corrosion resistance—making it a go-to for most lean system projects, especially those in busy, high-moisture environments.
Wrapping Up: Your Lean System, Built to Last
Installing a parallel lean pipe joint chrome might seem like a small task, but it's the foundation of a sturdy, efficient lean system. By taking the time to align pipes precisely, tighten screws carefully, and test stability, you're not just building a workbench or a flow rack—you're creating a workspace that supports your team's productivity and safety.
Remember, lean manufacturing is all about continuous improvement, and that starts with the tools and structures you use every day. A well-installed joint means less downtime, fewer repairs, and a workspace that adapts as your needs change. So grab your hex key, measure twice, and build something that lasts.
And if you ever need a refresher, come back to this guide—we're here to help you keep those lean pipes parallel, tight, and ready for whatever the day throws at them.