- Company Articles
- Products and Technology
- Installation And Maintenance
- How to Install Stainless Steel Swivel Roller Balls 1 Inch on Lean Pipe Workbenches

How to Install Stainless Steel Swivel Roller Balls 1 Inch on Lean Pipe Workbenches
Related Product
Stainless Steel Swivel Roller Balls 1 Inch
Swivel roller ball casters are convenient and flexible to roll,high-speed and stable operation, used for rotating and changing the direction of the conveyor.Ball transfer unit is made of high quality carbon steel, anti-corrosion and wear resistance.
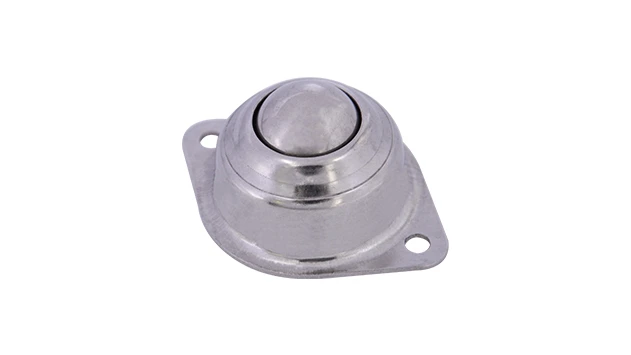
In the fast-paced world of manufacturing, every second counts. When materials stall on the line, it's not just time wasted—it's productivity slipping through your fingers, and potentially, product quality at risk. That's where the 1 inch stainless steel swivel roller balls come in: small components with a huge impact, turning your lean pipe workbench into a smooth, efficient hub for material flow. Whether you're working with a Workbench E (single deck, without caster) or a custom setup, installing these roller balls properly can transform your workflow from frustratingly slow to satisfyingly seamless. Let's walk through the process step by step, with practical tips and insights to ensure you get it right the first time.
Meet Your New Workbench "Teammates"
Before diving into installation, let's get to know the stars of the show. The stainless steel swivel roller balls 1 inch are more than just metal spheres—they're precision-engineered to reduce friction, handle repeated use, and stand up to the demands of daily manufacturing. Made from high-grade stainless steel, they resist rust, corrosion, and wear, making them ideal for environments where cleanliness and durability matter (we're looking at you, 3C assembly and medical device production lines).
Then there's the lean pipe workbench itself. Take the Workbench E, for example—a single-deck, caster-free design built for stability. Its aluminum frame (thanks to those trusty basic aluminum tubes and internal rotary aluminum joints ) provides a sturdy base, but even the best workbench needs the right accessories to unlock its full potential. That's where roller balls fit in: they turn flat surfaces into dynamic pathways, letting materials glide from point A to B with minimal effort.
Pre-Installation Prep: Gather Your Tools & Plan Ahead
Rushing into installation without the right tools is like building a house without a level—you'll end up with a wobbly result. Let's make sure you have everything you need before starting:
| Tool/Component | Quantity | Why You Need It |
|---|---|---|
| Stainless Steel Swivel Roller Balls (1 inch) | As per your workbench size | The star of the show—ensure they're compatible with your workbench's surface thickness |
| Drill & Drill Bits (3mm, 5mm) | 1 set | For creating pilot holes and securing the roller ball mounts |
| Tap & Die Set (M6 or M8, depending on roller ball specs) | 1 set | To thread holes for secure screw fastening |
| Allen Wrench (matching roller ball screws) | 1 | Tightening the roller ball mounts without stripping screws |
| Measuring Tape & Pencil | 1 each | Precise marking ensures even spacing between roller balls |
| Bubble Level | 1 | To check if the workbench surface is flat before installation |
| Anti-Slip Gloves | 1 pair | Protect hands during drilling and handling metal components |
| Clean Cloth & Isopropyl Alcohol | 1 set | Wiping down the workbench surface to remove dust and oil |
Quick Safety Tip:
Always wear safety glasses when drilling metal—tiny shards can fly unexpectedly! And if your workbench is part of an ESD (Electrostatic Discharge) workstation, make sure all tools are ESD-safe to avoid damaging sensitive electronics during installation.

Step-by-Step Installation: From Marking to Rolling
Now that you're prepped, let's turn that workbench into a friction-free zone. Follow these steps, and you'll have roller balls installed in under an hour (yes, even if you're new to this!):
Step 1: Prep the Workbench Surface
Start with a clean slate. Wipe down the workbench top with isopropyl alcohol to remove grease, dust, or residue—anything that might interfere with marking or adhesion. Then, use the bubble level to check if the surface is flat. If it's uneven, adjust the workbench feet (most lean pipe workbenches, like Workbench E, have adjustable leveling feet) until the bubble is centered. A wobbly base will make roller balls perform inconsistently, so don't skip this!
Step 2: Mark Roller Ball Positions
Measure twice, drill once—that's the golden rule here. Decide on the spacing between roller balls: for most material handling (like small 3C components or medical device parts), 10-15cm apart works best. Too close, and you'll waste components; too far, and materials might get stuck.
Using your measuring tape and pencil, mark a grid pattern on the workbench top. For example, if your Workbench E is 120cm long, you might mark 8 positions along the length (15cm apart) and 3 along the width, creating 24 roller ball points. Pro tip: Use a straightedge to draw light guidelines—this keeps rows aligned, so materials glide straight instead of veering off course.
Step 3: Drill Pilot Holes & Tap Threads
Take the 3mm drill bit and carefully drill pilot holes at each marked point. Go slow—applying too much pressure can warp the workbench top (especially if it's a lightweight aluminum panel). Once the pilot holes are done, switch to the tap from your tap & die set. Thread each hole slowly, turning clockwise and pausing occasionally to clear metal shavings. Threaded holes ensure the roller ball screws bite in tightly, preventing loosening over time.
Pro Tip: After tapping, blow out the holes with compressed air or wipe them with a cloth to remove shavings—leftover metal bits can scratch materials later!
Step 4: Install the Stainless Steel Swivel Roller Balls
Now, grab your 1 inch stainless steel swivel roller balls and Allen wrench. Place each roller ball mount over a threaded hole, aligning the screw hole with the tapped thread. insert the screw and tighten with the Allen wrench—snug, but not over-tightened (you don't want to strip the threads or crack the mount). As you install each ball, give it a gentle spin with your finger—if it rotates smoothly without wobbling, you're good. If it sticks, check if the mount is straight or if there's a shaving blocking it.
For extra stability (especially if you're handling heavier items), consider using thread-locking fluid on the screws. A drop on each screw before tightening will prevent them from vibrating loose in high-traffic workbenches (looking at you, automotive assembly lines!).
Step 5: Test & Fine-Tune
You're almost done! Now, test the roller balls with actual materials. Grab a typical workpiece (like a plastic bin of 3C parts or a metal tray) and slide it across the workbench. Does it glide smoothly? Are there any "dead spots" where it slows down? If so, check the roller balls in that area—they might be misaligned or too tight. Loosen the mount slightly, adjust, and retighten.
Also, test with different weights. A lightweight PCB should slide as easily as a heavier tool tray. If heavier items stall, you might need to add extra roller balls in high-load areas. Remember, the goal is consistency—every part of the workbench should feel "effortless" to move materials across.

Why Stainless Steel? The Unsung Hero of Durability
You might be wondering: Why use stainless steel swivel roller balls instead of plastic or aluminum? Great question. In manufacturing environments—whether it's a dusty automotive shop or a sterile medical device line—stainless steel brings three unbeatable benefits:
- Rust Resistance: Spills, humidity, or cleaning agents won't corrode stainless steel, unlike regular steel. This means your roller balls will last for years, even in damp warehouses.
- High Load Capacity: Stainless steel can handle heavier materials without deforming. Try sliding a 10kg component over plastic balls, and you'll likely see them crack—stainless steel laughs that off.
- ESD Compatibility: For ESD workstations (critical in 3C assembly or electronics manufacturing), stainless steel dissipates static electricity, protecting sensitive components from electrostatic damage. Pair this with an ESD workbench top, and you've got a safe zone for delicate parts.
Beyond the Workbench: Where Else Can These Roller Balls Shine?
Installing stainless steel swivel roller balls on your lean pipe workbench is just the start. These versatile components play well with other lean system tools, too. For example:
- Material Rack B (3 Row, 3 Floor): Add roller balls to the shelves of Material Rack B, and suddenly, restocking bins becomes a one-handed task—no more heavy lifting.
- Roller Track Systems: Pair roller balls with roller track accessories (like plastic roller track guide rails) to create custom material chutes between workstations. Imagine parts sliding from a conveyor directly onto your Workbench E, all thanks to coordinated roller components.
- Turnover Trolleys: Install roller balls on trolley shelves to easily shift materials between assembly lines—perfect for batch production in (home appliance) or automotive plants.
Keep Them Rolling: Maintenance Tips for Longevity
Your roller balls are installed and working like a charm—but they need a little love to stay that way. Here's how to keep them smooth for years:
| Task | Frequency | How to Do It |
|---|---|---|
| Clean Roller Balls | Weekly | Wipe with a dry cloth to remove dust; for oil or grease, use a mild degreaser (avoid harsh chemicals that damage stainless steel). |
| Lubricate Bearings | Monthly | Apply a drop of light machine oil to each roller ball bearing (don't overdo it—excess oil attracts dust). |
| Check Tightness | Quarterly | Use the Allen wrench to gently tighten any loose screws—vibration from daily use can loosen them over time. |
| replace Worn Balls | As needed | If a ball stops rotating smoothly or shows cracks, swap it out immediately—one faulty ball can disrupt the entire flow. |
Oops, It's Sticking! Troubleshooting Common Issues
Even with careful installation, you might run into hiccups. Here's how to fix the most common problems:
Problem: Materials get stuck between roller balls.
Solution: Check spacing—if gaps are uneven, add extra roller balls in problem areas. Also, ensure the workbench top is still level (heavy use can sometimes knock adjustable feet out of alignment).
Problem: Roller balls feel "gritty" when spinning.
Solution: Clean bearings with compressed air to remove dust, then relubricate with machine oil. If grit persists, the ball might be damaged—replace it.
Problem: Screws keep loosening.
Solution: Apply thread-locking fluid (like Loctite) to the screw threads and retighten. For extreme cases, switch to slightly longer screws that bite deeper into the workbench top.
Final Thoughts: Small Upgrade, Big Impact
Installing 1 inch stainless steel swivel roller balls on your lean pipe workbench isn't just a "fix"—it's a step toward the lean manufacturing (philosophy) of "continuous improvement." By reducing friction in material handling, you're freeing up your team to focus on what matters: building quality products, faster. And when paired with other lean system components—like aluminum joints, roller tracks, or custom workbenches—you're creating a workflow that adapts as your needs change.
Whether you're running a 3C assembly line, a medical device workshop, or a (warehousing and logistics) center, these roller balls are the quiet workhorses that keep your operation moving. So go ahead—grab your tools, follow these steps, and get ready to watch your productivity roll.
Need help sourcing stainless steel swivel roller balls, lean pipe workbenches, or custom lean solutions? Our team specializes in turning manufacturing challenges into smooth, efficient systems. Reach out today to learn how we can tailor a setup that fits your unique workflow.