- Company Articles
- Products and Technology
- Installation And Maintenance
- How to Integrate 40 Steel Roller Track Black ESD Wheels into Existing Lines

How to Integrate 40 Steel Roller Track Black ESD Wheels into Existing Lines
Related Product
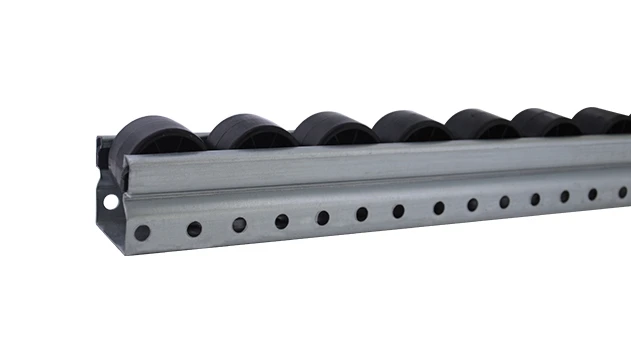
40 Steel Roller Track Black ESD Wheel
The roller track can be installed with multiple accessories to create different slopes and configurations of flow racks.All steel conveyor 40 roller track accessories are engineered to perfectly fit the sliding rail.
A Practical Guide to Boosting Efficiency and Protecting Sensitive Components
Introduction: The Hidden Cost of Overlooking Roller Track Performance
Walk into any manufacturing facility, and you'll quickly realize that the heartbeat of production lies in the flow of materials. From the moment a component arrives on the factory floor to when it's assembled into a final product, every transfer, every glide, every stop matters. But what happens when those critical transitions aren't smooth? When a roller track wheel sticks, or static electricity jumps from the line to a sensitive circuit board? These aren't just minor annoyances—they're silent productivity killers.
For teams working with electronics, medical devices, or precision parts, static damage alone can cost thousands in scrapped components and rework. And when materials stall on the line, bottlenecks form, deadlines slip, and your team's morale takes a hit. This is where the right roller track system becomes more than just equipment—it's a foundation for lean manufacturing, a tool that turns chaos into consistency. Specifically, integrating 40 Steel Roller Track Black ESD Wheels into your existing lines can transform how your team operates, combining durability, electrostatic protection, and seamless flow into one upgrade.
In this guide, we'll walk through the why and how of this integration. We'll break down what makes these wheels unique, how to assess your current setup, step-by-step installation tips, real-world success stories, and even troubleshooting advice to keep your line running smoothly. Whether you're in 3C assembly, medical device production, or any industry where precision and speed matter, this isn't just about replacing parts—it's about building a line that grows with your needs, reduces waste, and empowers your team to do their best work.
Understanding 40 Steel Roller Track Black ESD Wheels: What Makes Them a Game-Changer?
Before diving into integration, let's get clear on what sets these roller tracks apart. The 40 Steel Roller Track Black ESD Wheels aren't just another off-the-shelf component—they're engineered with two critical goals in mind: uninterrupted material flow and reliable electrostatic discharge (ESD) protection . Let's break down their key features:
Key Features at a Glance:
- Steel Construction: Built to handle heavy loads (up to 50kg per linear meter in most cases) without bending or warping, even in high-traffic areas.
- Black ESD Coating: The specialized black finish isn't just for aesthetics—it's a conductive layer that channels static electricity away from components, grounding it safely to prevent damage to PCBs, sensors, or medical devices.
- Precision Bearings: Designed for smooth rotation, reducing friction to keep materials moving at a consistent pace, whether you're transporting small circuit boards or larger assemblies.
- Compatibility: Engineered to fit standard conveyor systems and lean pipe workbench setups, minimizing the need for custom adapters or overhauls.
Why does this matter? Let's take a typical scenario: A 3C manufacturer was using generic plastic roller tracks for their smartphone assembly line. They noticed frequent delays when moving motherboards between stations—wheels would stick, causing backups. Worse, every few weeks, a static discharge would fry a batch of boards, leading to $2,000+ in losses per incident. After switching to 40 Steel Roller Track Black ESD Wheels, they reported a 30% reduction in line stalls and zero static-related failures over six months. That's the difference between reactive fixes and proactive, lean solutions.
But these wheels aren't just for electronics. In medical device production, where sterility and precision are non-negotiable, the steel frame resists corrosion from cleaning agents, while the ESD coating ensures that sensitive monitoring equipment isn't damaged during assembly. For automotive parts, the heavy-load capacity means even metal components glide without straining the track—extending the life of your equipment and reducing maintenance downtime.

Step 1: Assess Your Current Line – Before You Buy, Diagnose the Problem
Integrating new components isn't about swapping old parts for new ones—it's about solving specific pain points. Rushing into installation without first understanding your line's needs is a common mistake that leads to wasted time and money. Here's how to start:
1.1 Map Your Material Flow (Yes, Grab a Pen and Paper)
Take a walk along your production line with a notebook (or a tablet) and document every transfer point where roller tracks are used. Note:
- Where do materials slow down or stop completely?
- Which areas handle sensitive components (e.g., PCBs, microchips, medical sensors) that need ESD protection?
- What's the maximum weight of materials passing through each section? (A quick check with a scale can save you from overloading new tracks.)
- Are there tight turns or inclines where wheel performance is critical?
For example, a team in consumer electronics found that their worst bottleneck was between the lean pipe workbench and the final assembly conveyor—a 10-foot section where small plastic parts often got stuck. By focusing on that specific area, they avoided overspending on unnecessary upgrades elsewhere.
1.2 Test for Static Issues (Don't Guess – Measure)
Static damage isn't always obvious. A component might look undamaged but fail later in testing, costing you time and customer trust. To check if ESD protection is needed:
- Use an electrostatic field meter to measure static levels at different points on your line. Readings above 100V can risk sensitive electronics.
- Review quality reports for the past 3-6 months. Look for trends: Are there sudden failures in components that passed initial inspection? Could static be the culprit?
- Talk to your operators. They're on the front lines—they'll know if parts feel "zappy" or if certain stations have more rejects than others.
1.3 Check Compatibility with Existing Infrastructure
The beauty of 40 Steel Roller Track Black ESD Wheels is their compatibility with most standard systems, but "most" doesn't mean "all." Before ordering, measure:
- Track width: Are your current rails 40mm? (This is standard for many lean systems, but double-checking avoids returns.)
- Mounting holes: Do the new tracks align with your existing brackets, or will you need adapters? (Many suppliers offer universal mounting kits for common conveyor setups.)
- Weight capacity: Ensure the new wheels can handle your heaviest loads. Remember: It's better to overestimate than risk bending tracks under stress.

Step 2: The Integration Process – From Planning to Production
Now that you've assessed your line and confirmed these wheels are the right fit, it's time to integrate. This isn't a weekend DIY project—success depends on careful planning, clear communication with your team, and attention to detail. Here's a step-by-step breakdown:
| Phase | Key Actions | Timeline | Pro Tips |
|---|---|---|---|
| Pre-Installation Prep |
– Schedule downtime during low-production periods
– Gather tools: wrench set, level, tape measure, ESD tester, gloves – Label existing tracks to avoid mix-ups during reinstallation |
1-2 days before installation | Use digital labels (e.g., photos + notes on a tablet) to document the original setup—critical if you need to revert temporarily. |
| Removal of Old Tracks |
– Power down conveyor systems
– Remove materials and secure loose components – Unscrew old tracks (work in sections to avoid disrupting adjacent lines) |
4-6 hours (for a 20-foot section) | Have a designated area for old parts—recycle metal components to align with lean sustainability goals. |
| Installation of New Tracks |
– Align new tracks with existing mounting holes
– Use a level to ensure tracks are flat (even 1° of tilt can cause material sliding issues) – Tighten screws incrementally (cross-pattern to avoid warping) |
6-8 hours (for a 20-foot section) | Test wheel rotation by hand before fully securing—if any wheel sticks, check for debris or misalignment. |
| ESD Grounding Setup |
– Connect the track's ESD coating to your facility's grounding system
– Test resistance with an ESD meter (aim for <10^9 ohms for optimal protection) – Label grounding points for future inspections |
1-2 hours | Train your maintenance team to check grounding monthly—dust and corrosion can weaken connections over time. |
| Testing & Calibration |
– Run test materials through the new track (start with lightweight items, then increase load)
– Monitor speed, noise, and material flow – Adjust track height if materials catch or slide too quickly |
2-4 hours | Have operators test the line—their feedback on "feel" (e.g., smoother glide) is as important as metrics like speed. |
| Full Production Launch |
– Gradually increase production volume
– Assign a team member to monitor the new section for the first shift – Document performance (e.g., time per batch, error rates) |
1-3 days post-installation | Compare metrics to pre-installation data (e.g., "Before: 15 stalls/day; After: 2 stalls/day") to quantify success. |
Common Pitfall to Avoid: Skipping the "test with lightweight materials" step. Rushing to run full loads can mask issues like misaligned wheels or insufficient grounding. Start small, iterate, then scale up.
Real-World Results: How One Medical Device Maker Transformed Their Line
Let's put this into context with a real example. A mid-sized medical device manufacturer in California was struggling with two major issues on their catheter assembly line: frequent static damage to sensor wires and slow material flow between lean pipe workbench stations. Their team was spending 10+ hours weekly reworking static-damaged parts, and line bottlenecks were causing 15% of orders to ship late.
After assessing their line, they identified three critical sections where 40 Steel Roller Track Black ESD Wheels would make the biggest impact: the initial component intake area, the sensor assembly station, and the final packaging conveyor. Here's what happened post-integration:
- Static damage dropped by 92%: By grounding the new tracks and using ESD wheels, they eliminated nearly all sensor wire failures. This alone saved $12,000 in rework costs in the first month.
- Line speed increased by 18%: The smooth-rolling wheels reduced material transfer time between stations, cutting bottlenecks and allowing the team to fulfill 20% more orders without adding shifts.
- Maintenance time decreased: The steel construction proved far more durable than their old plastic tracks—they went from replacing wheels monthly to quarterly, freeing up the maintenance team for other tasks.
The plant manager summed it up best: "We didn't just upgrade a track—we upgraded how we think about production. Every small improvement, like these wheels, adds up to a line that's more reliable, more efficient, and easier for our team to work with."
Troubleshooting: Solving Common Integration Hiccups
Even with careful planning, issues can arise. Here's how to tackle the most common problems:
Problem: Wheels are rolling unevenly, causing materials to shift
Solution: Check track alignment with a level. Even a slight slope can cause uneven rolling. Loosen screws, adjust with shims if needed, then retighten. Also, inspect wheel bearings—debris or manufacturing defects can cause to drag.
Problem: ESD testing shows high resistance (over 10^9 ohms)
Solution: Clean the track's ESD coating with isopropyl alcohol to remove dust or oils. Check the grounding cable connections—loose wires are a common culprit. If issues persist, verify that the track's coating isn't scratched (deep scratches can break the conductive path).
Problem: Tracks are noisy during operation
Solution: Noise often comes from misalignment or dry bearings. Apply a small amount of silicone-based lubricant to wheel axles (avoid oil-based lubricants, which attract dust). If the noise persists, check for loose screws or warped track sections.
Conclusion: Beyond Integration – Building a Leaner, More Resilient Line
Integrating 40 Steel Roller Track Black ESD Wheels isn't just a one-time upgrade—it's a commitment to lean manufacturing principles: eliminating waste, protecting value, and empowering your team to focus on what they do best. By investing in components that reduce downtime, prevent damage, and improve flow, you're not just fixing a problem—you're building a foundation for long-term success.
Remember, lean manufacturing isn't about perfection; it's about continuous improvement. After integration, schedule monthly check-ins with your team to gather feedback. Are there other sections where similar upgrades could help? Could adjusting the track layout further optimize flow? The goal is to create a line that adapts to your needs, not the other way around.
Whether you're in 3C assembly, medical production, or any industry where precision matters, the right roller track system is more than equipment—it's a tool that turns your production line into a competitive advantage. So take the first step: assess your line, plan carefully, and start small. The results—happier teams, fewer defects, and a more efficient process—will speak for themselves.