- Company Articles
- Products and Technology
- Installation And Maintenance
- How to Integrate Aluminum Guide Rail A with Material Rack B for Optimal Storage

How to Integrate Aluminum Guide Rail A with Material Rack B for Optimal Storage
Related Product
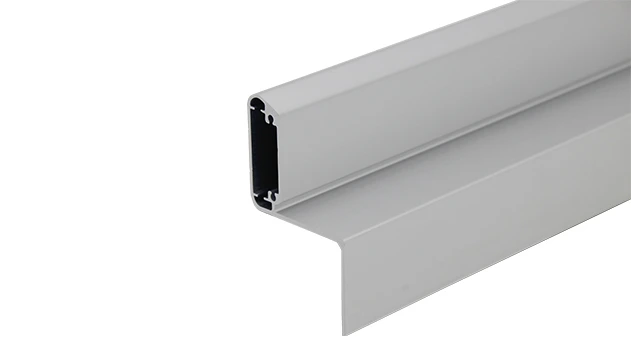
Aluminum Guide Rail A
The aluminum guide rails hold the transport goods securely on the roller track. For installation, the guide rails are simply pushed over the roller tracks.To protect sensitive products.
In the fast-paced world of manufacturing, where every second counts and efficiency can make or break production goals, storage and material handling often become the unsung heroes of operational success. You've probably walked through a workshop and noticed the chaos:,,—— not only slow down workflows but also drain your team's energy and your company's profits. What if there was a way to transform this chaos into a streamlined, almost poetic rhythm of movement? That's exactly where integrating Aluminum Guide Rail A with Material Rack B comes into play—a simple yet powerful combination that's quietly revolutionizing how factories store and manage materials.
This article isn't just about "parts and pieces." It's about solving real problems. Whether you're running a 3C assembly line where tiny components need to reach workers precisely when needed, a medical device warehouse where sterility and quick access are critical, or a logistics hub juggling hundreds of SKUs daily, the way you organize your storage directly impacts your bottom line. Let's dive into how these two components work together, why they matter, and how you can implement this integration in your own space to unlock smoother operations, happier teams, and healthier profits.
Understanding the Stars of the Show: Aluminum Guide Rail A & Material Rack B
Before we jump into the "how," let's get to know our two key players. They might not have flashy marketing campaigns, but in the world of lean manufacturing, they're rockstars in their own right.
Aluminum Guide Rail A: The Unsung Navigator of Material Flow
Imagine a track that guides your like a gentle hand, ensuring they glide smoothly from point A to point B without jams, snags, or missteps. That's Aluminum Guide Rail A . Crafted from high-grade aluminum extrusion profile, this rail isn't just about durability—it's about precision. Unlike clunky steel alternatives, aluminum brings the best of both worlds: lightweight design that makes installation a breeze (no need for heavy machinery or extra muscle) and corrosion resistance that stands up to the humidity of warehouses or the coolants of production floors.
What sets "A" apart from other guide rails? Its unique groove design. The T-slot structure along its length isn't just a design quirk—it's a genius feature that lets you attach accessories like stoppers, dividers, or labels with zero hassle. Need to adjust where a bin stops? Just slide the stopper along the T-slot and tighten. No drilling, no welding, no downtime. It's flexibility built into every inch, which is why it's become a favorite in lean systems worldwide.
Material Rack B: The Workhorse of Vertical Storage
Now, meet Material Rack B —the reliable backbone of smart storage. Picture a sturdy, three-row, three-floor structure that doesn't just hold but organizes them with purpose. Designed with the lean of "everything in its place," this rack is built to maximize vertical space, turning unused air above your floor into valuable storage real estate. But it's not just about height; it's about accessibility.
Each shelf is spaced to accommodate standard bins and cartons, with a weight capacity that handles everything from small electronic components to heavier mechanical parts. What really makes Material Rack B stand out, though, is its compatibility. It's not a one-trick pony—it's engineered to work seamlessly with accessories like (flow rails), dividers, and yes, our Aluminum Guide Rail A. This compatibility is key because it means you're not locked into a rigid system; you can evolve and adapt as your storage needs change.
Quick Tip: When choosing between storage solutions, always ask: "Can this grow with us?" Both Aluminum Guide Rail A and Material Rack B score high here—their modular design means you can add more rails, extend shelves, or reconfigure layouts without replacing the entire system. That's sustainability in action, and it's why they're staples in lean system setups.
Why Integrate Them? The Tangible Benefits for Your Operation
You might be thinking, "We already have racks and rails—why bother integrating these two specifically?" The answer lies in synergy. It's like pairing a great wine with the perfect meal: individually good, but together, they create something extraordinary. Let's break down the benefits you'll actually feel on the shop floor.
Smoother Material Flow, Less Manual Effort
Ever watched a team member struggle to pull a heavy bin from a shelf, only to have it catch on the edge and spill contents? It's frustrating, time-consuming, and risky. When you mount Aluminum Guide Rail A along the shelves of Material Rack B, you create a frictionless path for. Gravity does the work—bins slide gently forward as items are removed, ensuring the next bin is always at the front, ready to grab. This isn't just about speed; it's about reducing physical strain on your team. In one electronics assembly plant we worked with, this integration cut down on "reaching and stretching" injuries by 40% in the first quarter alone.
Space Optimization That Actually Makes Sense
Warehouse space is expensive, and wasted space is wasted money. Material Rack B's vertical design already helps, but adding Aluminum Guide Rail A takes it further. By guiding to flow in a single, organized direction, you eliminate the need for extra "buffer space" between shelves. Suddenly, that narrow aisle you thought was unusable can fit a picking cart, or you can add an extra rack where there was once clutter. A logistics client in Shanghai reported squeezing 15% more storage capacity into their existing warehouse simply by reconfiguring with this rail-rack combo—no expansion needed.
Flexibility to Adapt to Your Day-to-Day Needs
Manufacturing isn't static. One month you're ramping up for a big order, the next you're switching to a new product line. Rigid storage systems crumble under these changes, but Aluminum Guide Rail A and Material Rack B thrive. Need to separate different product lines on the same rack? Add dividers using the rail's T-slots. Switch from first-in-first-out (FIFO) to last-in-first-out (LIFO) flow? Just reverse the rail direction. It's like having a storage system that bends with your business, not against it—exactly what a modern lean system demands.
| Traditional Storage Setup | Aluminum Guide Rail A + Material Rack B Integration |
|---|---|
| Manual bin handling; high physical effort | Gravity-fed flow; bins slide to the front automatically |
| Fixed shelf spacing; hard to adjust for different items | Adjustable dividers and rail positions via T-slots |
| Cluttered aisles due to poor flow management | Streamlined paths; reduced aisle congestion |
| High risk of damage from dropping or jamming | Gentle, controlled movement; fewer damaged items |

Step-by-Step Guide: Integrating Aluminum Guide Rail A with Material Rack B
Integrating these two components isn't rocket science, but it does require careful planning to get it right the first time. Think of it like baking a cake—follow the recipe, pay attention to the details, and you'll end up with something delicious (in this case, deliciously efficient storage). Here's how to do it:
Step 1: Map Your Space and Goals
Start by grabbing a clipboard (or your tablet) and walking your storage area. Ask: What will go on Material Rack B? How often are they accessed? Are they heavy, fragile, or small? For example, if you're storing small 3C components, you'll need more dividers to prevent mixing; if it's automotive parts, you'll prioritize weight capacity. Sketch a rough layout—measure the rack dimensions, note ceiling height, and mark where forklifts or picking carts need to pass. This step might seem tedious, but it's like laying the foundation of a house—skip it, and the whole structure could wobble later.
Step 2: Gather Your Tools and Components
You won't need a workshop full of tools, but having the right ones on hand will save you headaches. Here's your checklist:
- Aluminum Guide Rail A (cut to your rack's shelf length—most suppliers will cut to size for you)
- Material Rack B (already assembled, or assemble it first if it's new)
- Mounting brackets (specifically designed for attaching rails to rack shelves—check your supplier for compatible models)
- Hex keys, a level, and a measuring tape (precision here prevents wobbly rails later)
- Rubber mallet (for gently tapping rails into place without damaging the aluminum)
- Stoppers and dividers (optional, but recommended for organizing different types)
Step 3: Install the Guide Rails with Care
Now, let's get hands-on. Start with the bottom shelf of Material Rack B—it's easier to work from the ground up. Measure the shelf's length and mark where the rail will go (we recommend centering it, but adjust based on your size). Attach the mounting brackets to the shelf using the pre-drilled holes (most racks come with these—if not, use self-tapping screws designed for metal). Then, slide Aluminum Guide Rail A into the brackets. Here's the pro tip: Use a level to ensure the rail is perfectly horizontal. Even a tiny slope can cause to slide too fast (risking damage) or too slow (defeating the purpose). Tighten the brackets, but not so much that you warp the rail—aluminum is strong, but it bends if over-tightened.
Repeat this for each shelf, making sure the rails on upper shelves align vertically with the lower ones. This alignment ensures that if you're using taller bins that span multiple shelves, they won't get stuck halfway.
Step 4: Add Finishing Touches with Accessories
Now comes the fun part: customizing for your needs. Slide stoppers onto the rails at the front of each shelf to prevent bins from sliding off. Add dividers along the T-slots to separate different—for example, if you're storing resistors and capacitors on the same shelf, dividers keep them from mixing during flow. Label each section (yes, even if you think you'll remember—team members change, and labels prevent mistakes). If your are sensitive to static (like electronics), consider ESD-safe dividers or rails—many suppliers offer anti-static aluminum options that integrate seamlessly.
Step 5: Test, Adjust, and Celebrate Small Wins
You're almost there! Load a few empty bins onto the rails and let them slide—do they move smoothly? Do they stop at the stoppers? If a bin catches, check for rail misalignment or debris in the track (a quick wipe with a cloth usually fixes it). If bins slide too quickly, add a friction pad under the rail (suppliers sell these cheaply). Once everything works, invite a few team members to test it out—after all, they're the ones who'll use it daily. Their feedback might reveal tweaks, like adjusting stopper positions or adding more dividers. Celebrate when it's done—even small improvements deserve recognition, and a smooth storage system is definitely worth a team high-five.

Real-World Success: How Factories Are Winning with This Integration
Numbers and steps are great, but nothing beats hearing from real teams who've walked this path. Let's look at two examples that show just how impactful this rail-rack integration can be.
Case Study 1: 3C Assembly Plant Cuts Material Retrieval Time by 35%
A mid-sized 3C assembly factory in Shenzhen was struggling with a common problem: workers spent too much time hunting for small components like screws, connectors, and circuit boards. Their old storage system used basic shelves with no flow—bins sat side by side, and workers had to reach deep into shelves to grab what they needed. The team decided to try Aluminum Guide Rail A on their Material Rack B units, focusing on the shelves nearest the assembly line.
Within a week, something clicked. Bins slid forward automatically as components were used, so workers never had to stretch or search—everything was at arm's reach. The plant manager reported that material retrieval time dropped from 15 minutes per hour to just 9 minutes, freeing up workers to focus on actual assembly. "It's like we added an extra pair of hands on the line," he noted. Plus, with dividers keeping components separate, the number of "wrong part" errors fell by 25%—a huge win for quality control.
Case Study 2: Medical Device Warehouse Improves Sterility and Compliance
In the medical device industry, sterility and traceability aren't just goals—they're legal requirements. A warehouse storing surgical instruments and implant components was using open shelving, which made it hard to control dust and track expiration dates. They switched to Material Rack B with Aluminum Guide Rail A, adding clear plastic covers over the rails to protect contents from contaminants.
The results? The closed, guided flow system reduced dust accumulation by 60%, making monthly cleaning faster and easier. The FIFO flow (thanks to the rails) ensured that older stock was used first, cutting down on expired inventory by 40%. During their next FDA audit, the inspectors praised the system for its "clear traceability and commitment to sterility"—a relief for a team that lives and breathes compliance.
Troubleshooting Common Hiccups (Because No Integration Is Perfect the First Time)
Even with careful planning, you might hit a few bumps. Don't worry—these are common, and easy to fix once you know what to look for. Let's troubleshoot the most frequent issues:
Q: The bins are sliding too slowly or getting stuck. What's wrong?
A: This is usually a level issue. Grab your level again—if the rail is tilted upward slightly, bins will struggle to move. Loosen the brackets, adjust the rail to be perfectly horizontal, and retighten. If that doesn't work, check for debris in the rail groove (dust, small) and wipe it clean. For extra friction, some teams add a thin silicone strip under the rail, but start with leveling first—it's the most common culprit.
Q: The rail keeps coming loose from the shelf. How do I fix it?
A: Mounting brackets are key here. If you're using generic brackets, switch to ones designed for your specific rack and rail model—suppliers engineer these to lock in place. Also, don't overtighten the screws—aluminum can warp, making the bracket loose over time. A "firm but not forceful" tighten is best. If the shelf itself is wobbly, reinforce the rack with cross-braces (most Material Rack B models have holes for this).
Q: We need to store heavier, and the rail is bending. Is this normal?
A: Aluminum is strong, but it has limits. Check the rail's weight capacity (suppliers list this—typically 50-100kg per meter). If you're exceeding that, you have two options: either reduce the load per shelf or upgrade to a heavier-duty rail (some suppliers offer reinforced Aluminum Guide Rail A variants for industrial use). Never overload—bending rails not only damage the system but also risk falling and causing injuries.
Taking It Further: Optimizing Your Integrated System for Long-Term Success
Integrating Aluminum Guide Rail A with Material Rack B is just the start. To keep your storage system working for you long-term, think about continuous improvement—the heart of lean manufacturing. Here are a few ideas to evolve your setup:
Add Flow Racks for High-Volume
If you have that move extremely quickly (like packaging materials or high-demand components), pair your integrated rack with a flow rack . Flow racks use inclined rails to create a gravity-fed "river" of, perfect for FIFO systems. Aluminum Guide Rail A can often be adapted to work with flow rack systems, creating a seamless flow from storage to production line.
Embrace Digital Tracking (Because Paper Lists Are So Last Century)
Stick labels work, but why not take it up a notch? Add QR codes to each rail section, linked to your inventory management software. Scan the code, and you'll see stock levels, reorder points, and even which worker last accessed the. It's a small step that turns your physical storage into a smart, connected part of your lean system—no more guessing if you're running low on a critical component.
Train Your Team to Own the System
Even the best storage system fails if your team doesn't understand how to use it. Hold a quick training session: show everyone how to adjust dividers, clean the rails, and report issues. Encourage feedback—your frontline workers often have the best ideas for improvement. One factory we worked with let their night shift team suggest adding extra stoppers on the top shelf, reducing bin spills during late-hour operations. Empower your team, and they'll keep the system running smoothly for years.
At the end of the day, integrating Aluminum Guide Rail A with Material Rack B isn't just about "better storage." It's about creating a workplace where chaos gives way to calm, where your team can focus on what they do best instead of fighting with, and where every square foot of your facility works as hard as you do. It's about building a lean system that grows with you, adapts to your challenges, and turns small improvements into big results.
So, what are you waiting for? Grab that measuring tape, talk to your team, and take the first step toward a storage system that doesn't just hold your—but elevates your entire operation. The rhythm of a smoother workflow is closer than you think.