- Company Articles
- Products and Technology
- Installation And Maintenance
- How to Lubricate Parallel Lean Pipe Joints with One Side Rotatory Mechanism

How to Lubricate Parallel Lean Pipe Joints with One Side Rotatory Mechanism
Related Product
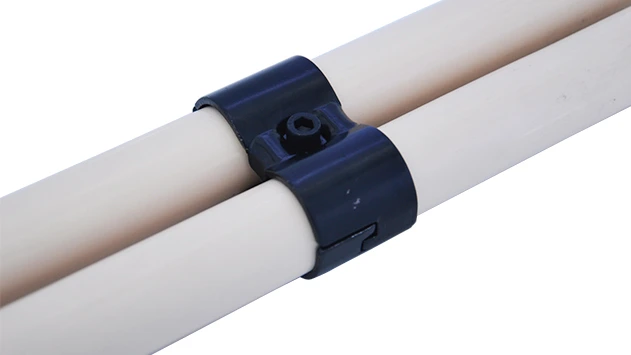
Parallel Lean Pipe Joint
Parallel lean pipe joint used for 2 pcs 28MM lean pipe connection in parallel direction to enhance frame structure, usually for heavy payload requirement for workbench. flow rack, hand trolley.
Introduction: The Unsung Hero of Your Lean System
In the bustling world of manufacturing and production, where every second counts and efficiency is king, there's a quiet workhorse keeping your operations moving: the lean system. From the assembly lines humming with activity to the workbenches where precision meets productivity, lean systems rely on a network of components working in harmony. And among these components, few are as critical yet overlooked as the parallel lean pipe joint with one side rotatory mechanism.
You've probably seen them without even realizing it. These joints are the reason your workbench's adjustable arm swings smoothly into place, why the material rack's shelves tilt just so to feed parts to the line, and how your turnover trolley glides (with a little help from its caster wheel) while maintaining stability. They're the unsung heroes of adaptability in lean environments, allowing teams to reconfigure workspaces, adjust workflows, and respond to changing demands—all without grinding to a halt.
But here's the thing: even the best-designed joints need a little TLC to keep performing at their best. That's where lubrication comes in. It's not just about squirting some oil and calling it a day; proper lubrication is the secret to extending their lifespan, preventing costly breakdowns, and ensuring your lean system stays, well, lean. In this guide, we're going to dive deep into how to lubricate these specific joints—step by step, with practical tips and a whole lot of real-world know-how.
Understanding the Parallel Lean Pipe Joint with One Side Rotatory Mechanism
Before we grab our lubricant and rags, let's make sure we're all on the same page about what exactly we're working with. The parallel lean pipe joint with one side rotatory mechanism is a specialized component in the family of lean pipe accessories. Its design is deceptively simple: one end stays fixed to a lean pipe (often aluminum or steel), while the other end rotates around a central axis, allowing connected pipes or structures to pivot, swing, or tilt. Think of it like a door hinge, but built for the rigors of a production floor.
Key Components of the Joint
To understand how to lubricate it, let's break down its parts:
- Fixed Base: The stationary part that attaches to the main lean pipe, usually via a clamp or bolt.
- Rotary Housing: The moving part that swivels, connected to the fixed base by a bearing or pivot point.
- Contact Surfaces: The areas where the fixed and rotary parts meet—these are the friction hotspots that need lubrication.
- Locking Mechanism (Optional): Some joints have a knob or lever to lock the rotation in place, which also has small moving parts that benefit from lubrication.
These joints are workhorses, built to handle repeated use, varying loads, and the daily chaos of a production environment. But even the toughest components wear down over time, especially when friction is left unchecked.
Where You'll Find Them
Parallel lean pipe joints with one side rotatory mechanisms pop up in all sorts of places across a lean system:
- Workbenches: Adjustable shelves, tool holders, or monitor arms that need to swing into position.
- Material Racks: Tilted flow racks or pivoting shelves that present parts to operators at the optimal angle.
- Assembly Stations: Rotating platforms or component holders that reduce reaching and strain for workers.
- Turnover Trolleys: Foldable or adjustable sides that make loading/unloading easier, paired with caster wheels for mobility.
In short, if a part of your workspace moves, tilts, or swivels to improve efficiency, there's a good chance one of these joints is making it happen.

Why Lubrication Matters: It's Not Just About "Smooth Sailing"
Let's get real: when was the last time you thought about lubricating a joint? If you're like most people, probably not until it started squeaking or sticking. But waiting for problems to arise is the opposite of lean thinking. Preventive maintenance—like regular lubrication—is how you keep small issues from becoming big, expensive headaches.
The Cost of Friction (Yes, Literally)
Friction is the enemy here. Every time that rotary housing moves against the fixed base, metal (or aluminum) surfaces rub together. Over time, this causes:
- Wear and Tear: Tiny metal particles scrape off, creating grooves or rough spots that make movement even harder.
- Rust and Corrosion: Exposed metal attracts moisture and contaminants, leading to rust that can seize the joint entirely.
- Reduced Precision: As the joint wears, its movement becomes less smooth and more unpredictable—bad news for tasks that require exact positioning.
- Worker Fatigue: A stiff joint means more effort to adjust. Multiply that by hundreds of adjustments a day, and suddenly your team is tired, slower, and more prone to mistakes.
And let's talk dollars and cents. A seized joint might mean replacing the entire component—costing anywhere from $20 to $100+ per joint, plus downtime while you wait for a replacement. Multiply that by how many joints are in your facility, and suddenly "saving time" by skipping lubrication becomes a very expensive mistake.
The Benefits of Doing It Right
On the flip side, proper lubrication is like giving your joint a superpower. Here's what you stand to gain:
- Longer Lifespan: A well-lubricated joint can last 2–3 times longer than one that's neglected. That's years of service instead of months.
- Smoother Operation: No more squeaking, sticking, or wrestling with adjustments. Your team can focus on work, not fighting equipment.
- Lower Maintenance Costs: Fewer replacements, fewer repairs, and less time spent troubleshooting.
- Safer Work Environment: Stiff joints can lead to sudden jolts or slips, increasing the risk of injury. Smooth movement means more control.
Think of it as an investment. A few minutes of lubrication today saves hours of frustration (and dollars) tomorrow.
Pro Tip:
Keep a log of when you lubricate each joint. Note the date, type of lubricant used, and any issues you noticed (e.g., "joint X was stiffer than usual"). Over time, this log will help you spot patterns—like joints near dusty areas needing more frequent lubrication—and refine your maintenance schedule.

Step-by-Step Guide: How to Lubricate Your Joint Like a Pro
Okay, enough talk—let's get our hands dirty. Lubricating a parallel lean pipe joint with one side rotatory mechanism isn't rocket science, but it does require a little care and attention to detail. Follow these steps, and you'll have those joints moving like new in no time.
Step 1: Gather Your Tools (You Probably Have Most of These Lying Around)
First, let's make sure you have everything you need. This isn't a job that requires fancy equipment—just a few basics from your toolbox or maintenance closet:
- Clean Rags or Paper Towels: For wiping away dirt and old lubricant. Microfiber cloths work best for getting into small crevices.
- Degreaser or Cleaning Solvent: To cut through grime and old, dried lubricant. Avoid harsh chemicals that might damage plastic parts (check the label if your joint has plastic components).
- Small Brush: A toothbrush (new, please!) or a detail brush works great for scrubbing away debris in tight spots.
- Lubricant: We'll talk about choosing the right one in a minute—for now, just make sure you have the correct type.
- Disposable Gloves: To keep your hands clean and protect against solvents or lubricants (some can irritate skin).
- Safety Glasses: Optional but smart, especially if you're working near other machinery or overhead components.
- Flashlight: To see into dark corners and check if you've missed any dirt.
Pro tip: If the joint is on a mobile unit (like a trolley with caster wheels), lock the wheels first! The last thing you want is the whole setup rolling away while you're working on it.
Step 2: Prep the Area (Safety First, Always)
Before you start, take a minute to set yourself up for success:
- Stabilize the Joint: If the joint is on a workbench or trolley, make sure it's secure. If it's a moving part (like a swinging arm), prop it up or lock it in place so it doesn't fall while you're working.
- Clear the Area: Move tools, parts, or debris out of the way—you don't want to knock something over or get dirt in the joint while you're cleaning.
- Protect Surfaces: Lay down a rag or paper towel under the joint to catch drips of degreaser or lubricant, especially if you're working on a finished workbench surface.
Remember: A little prep saves a lot of hassle later.
Step 3: Clean the Joint (You Can't Lubricate Dirt!)
Here's a golden rule of lubrication: you can't effectively lubricate a dirty joint. Old grease, dust, metal shavings, and grime will just mix with the new lubricant, creating a gritty paste that does more harm than good. So, cleaning is non-negotiable.
How to do it:
- Wipe Away Loose Debris: Use a dry rag to brush off any visible dirt, dust, or loose particles. Pay attention to the area where the rotary housing meets the fixed base—this is where most gunk builds up.
- Apply Degreaser: Spray a small amount of degreaser onto a clean rag (don't spray directly onto the joint—you might get it into places you don't want, like bearings). Gently wipe the entire joint, focusing on the rotating surfaces.
- Scrub Tight Spots: Use the small brush to scrub around the joint's (gaps) and any crevices where dirt is hiding. For really stubborn grime, let the degreaser sit for a minute or two before scrubbing.
- Dry Thoroughly: Use a clean, dry rag to wipe away all traces of degreaser and moisture. Even a little water can mix with lubricant and cause rust, so make sure it's completely dry.
After cleaning, give the joint a gentle wiggle or rotation. You might notice it moves a little better already—just from removing the friction of dirt! But we're not done yet.
Step 4: Choose the Right Lubricant (Not All Grease is Created Equal)
Now comes the important part: picking the right lubricant. The wrong choice can gum up the joint, attract more dirt, or even damage its components. Let's break down your options.
First, understand the two main types of lubricants for these joints:
- Grease: Thick and sticky, ideal for joints that need long-lasting lubrication and protection from contaminants. Good for slow-moving or heavily loaded joints.
- Oil: Thinner and more fluid, better for high-speed rotation or joints with small, precision bearings. Soaks into tight spaces but may need more frequent reapplication.
Next, consider your environment. Ask yourself:
- Is the joint exposed to dust, water, or chemicals? Look for lubricants labeled "water-resistant" or "dust-repellent."
- Does it operate in extreme temperatures? High-heat or cold-resistant formulas are a must for ovens, freezers, or outdoor use.
- Is it near food or pharmaceutical production? You'll need food-grade lubricants (look for NSF H1 certification).
To make it easier, here's a quick reference table of common lubricant types and when to use them:
| Lubricant Type | Best For | Pros | Cons |
|---|---|---|---|
| Lithium Grease (General Purpose) | Most indoor, moderate-use joints (workbenches, material racks) | Affordable, long-lasting, water-resistant | Can attract dust in dirty environments |
| PTFE (Teflon) Grease | Joints with plastic components or high precision needs | Low friction, compatible with plastics, heat-resistant | More expensive than lithium grease |
| Silicone Oil | Small bearings or joints that need smooth, quiet operation | Non-staining, good for rubber/plastic parts | Not ideal for heavy loads; needs frequent reapplication |
| Food-Grade Grease (NSF H1) | Food, beverage, or pharmaceutical production areas | Safe for incidental food contact | More expensive; may have lower load capacity |
When in doubt, check the joint's manual (if you have it) or ask your lean pipe supplier—they'll know exactly what works best with their products.
Step 5: Apply the Lubricant (Less is More!)
Now, the moment we've been waiting for: applying the lubricant. The key here is precision , not quantity. You don't need to drown the joint in grease—just a small amount in the right places.
How to do it:
- Identify the Contact Points: Look for the areas where the rotary housing moves against the fixed base. This could be a bearing, a metal-on-metal surface, or a plastic bushing.
-
Apply a Small Amount:
- For Grease: Use a grease gun (if you have one) or a popsicle stick to apply a pea-sized amount directly to the contact points. Spread it thinly and evenly with your finger (gloved!) or a rag.
- For Oil: Use a dropper or small brush to apply 2–3 drops to the contact points. Let it seep into the for a minute.
- Work the Lubricant In: Rotate the joint back and forth several times to distribute the lubricant evenly. You should feel it start to move more smoothly as the lubricant coats all the contact surfaces.
- Wipe Away Excess: Use a clean rag to wipe off any excess lubricant. Remember, extra grease just attracts dirt—only leave what's necessary in the contact areas.
Pro tip: If your joint has a locking mechanism (like a knob or lever), don't forget to lubricate that too! A drop of oil on the threads or pivot point will keep it turning smoothly.
Step 6: Test It Out (Does It Move Like It Should?)
You're almost done! Now it's time to test your handiwork. Grab the joint and move it through its full range of motion—swing it, tilt it, rotate it as you would during normal use. Ask yourself:
- Is it moving smoothly, without squeaks or sticking?
- Does it feel lighter, like less effort is needed to move it?
- Are there any rough spots or resistance?
If it's still stiff or squeaking, you might need to:
- Check for missed dirt (go back to cleaning!)
- Apply a tiny bit more lubricant to the problematic area
- Verify that you used the right type of lubricant
Once it's moving smoothly, give yourself a pat on the back—you've just extended the life of that joint!
Step 7: Set a Schedule (Consistency is Key)
One-and-done lubrication is better than nothing, but to truly keep your joints in top shape, you need a regular schedule. How often? It depends on how much the joint is used and the environment it's in.
Here's a general guideline to start with:
- High-Use Joints (Used hourly): Lubricate every 2–4 weeks.
- Moderate-Use Joints (Used daily but not constantly): Lubricate every 1–2 months.
- Low-Use Joints (Used weekly or less): Lubricate every 3–6 months.
Adjust based on your environment: dusty, humid, or dirty areas will need more frequent lubrication. And always lubricate after cleaning the joint (e.g., during a deep clean of the workbench).
Stick to the schedule, and you'll never have to deal with a seized joint again.
Troubleshooting: When "Smooth" Just Isn't Happening
Even with the best intentions, things don't always go according to plan. If your joint is still acting up after lubrication, don't panic—here are some common issues and how to fix them.
Problem: The Joint is Still Stiff or Sticking
Possible Causes & Fixes:
- Dirt or Debris Left Behind: Go back and clean the joint again, using more degreaser and a smaller brush to get into tight spots. Sometimes, grime hides deeper than you think.
- Worn Components: If the joint has deep scratches, dents, or rust on the contact surfaces, lubrication might not be enough. You may need to replace the joint or its bearings. Contact your lean pipe supplier for replacement parts.
- Over-Lubrication: Too much grease can create resistance! Wipe away excess lubricant and test again.
Problem: The Joint Squeaks Even After Lubrication
Possible Causes & Fixes:
- Lubricant Not Reaching the Contact Points: The joint might have sealed bearings that need lubrication through a small port (look for a tiny hole labeled "oil" or "grease"). Use a needle-nose oiler or grease gun to inject lubricant into the port.
- Wrong Lubricant Type: If you used oil and it's still squeaking, try a thicker grease (like lithium grease) to cushion the contact points better.
Problem: Lubricant Keeps Leaking Out
Possible Causes & Fixes:
- Over-Lubrication: Again, too much of a good thing! Wipe away excess and apply a smaller amount next time.
- Damaged Seals: If the joint has rubber seals (common in bearings), they might be cracked or worn, allowing lubricant to leak. replace the seals or the entire joint if necessary.
Conclusion: Small Steps, Big Results for Your Lean System
Lubricating a parallel lean pipe joint with one side rotatory mechanism might seem like a small task, but it's the kind of small task that defines a truly lean operation. It's about preventing waste—waste of time, waste of money, and waste of frustration. By taking 10 minutes every few weeks to care for these joints, you're ensuring your workbench, material racks, and trolleys (with their trusty caster wheels) keep supporting your team, not slowing them down.
Remember: a lean system is only as strong as its weakest link. And when that link is a seized joint, it can throw off an entire workflow. But with regular cleaning, the right lubricant, and a little attention to detail, you'll keep those joints—and your entire operation—moving forward.
So, the next time you walk past that workbench or material rack, take a second to give the joint a wiggle. If it feels stiff, grab your rag and lubricant. Your future self (and your bottom line) will thank you.