- Company Articles
- Products and Technology
- Installation And Maintenance
- How to Maintain Parallel Lean Pipe Joints with One Side Rotatory Chrome Finish

How to Maintain Parallel Lean Pipe Joints with One Side Rotatory Chrome Finish
Related Product
Parallel Lean Pipe Joint
Parallel lean pipe joint used for 2 pcs 28MM lean pipe connection in parallel direction to enhance frame structure, usually for heavy payload requirement for workbench. flow rack, hand trolley.
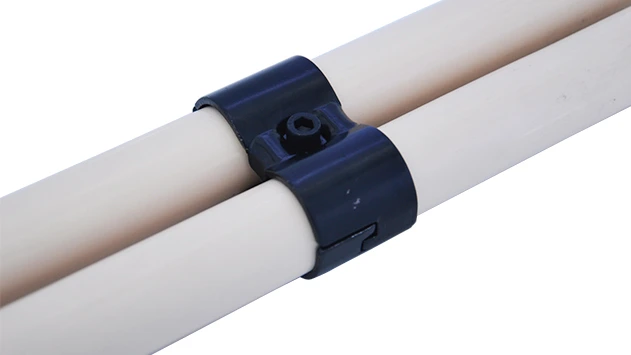
In the fast-paced world of manufacturing and production, efficiency isn't just a buzzword—it's the backbone of success. Lean systems, designed to minimize waste and maximize productivity, rely on a network of precision components working in harmony. Among these unsung heroes are the parallel lean pipe joint s with one side rotatory chrome finish. These small but critical parts keep workbenches stable, material racks aligned, and conveyor systems flowing smoothly. Yet, like any hardworking component, they demand care. Neglecting their maintenance can turn a minor hiccup into a major production delay, costing time, money, and even safety. In this guide, we'll dive deep into what makes these joints essential, how to keep them in top shape, and why a little proactive care goes a long way in keeping your lean system running like a well-oiled machine.
Understanding the Parallel Lean Pipe Joint with One Side Rotatory Chrome Finish
Before we roll up our sleeves and talk maintenance, let's get to know the star of the show: the parallel lean pipe joint with one side rotatory chrome finish. At first glance, it might seem like just another metal piece, but its design is a testament to the ingenuity of lean manufacturing. These joints are the connectors that hold your lean system together—literally. They link lean pipe s (often aluminum or steel) into structures like workbenches, flow racks, and turnover trolleys, all while allowing for controlled rotation on one side to adapt to dynamic workflows.
So, what sets this specific joint apart? Let's break it down. The "parallel" designation means it's engineered to keep connected pipes aligned in parallel, ensuring stability in horizontal or vertical structures. The "one side rotatory" feature adds flexibility: one end stays fixed, while the other can rotate within a specific range, making it ideal for adjustable workstations or components that need to pivot, like a material rack that tilts to feed parts onto a roller track . Then there's the "chrome finish"—a sleek, corrosion-resistant coating that protects the underlying metal (usually steel or aluminum alloy) from rust, scratches, and wear. This finish isn't just for looks; it's a barrier that extends the joint's lifespan, even in dusty or humid factory environments.
To visualize where these joints fit in, think about a typical production line. The workbench where assemblers put together electronics? Its frame likely uses parallel lean pipe joints to keep the surface level and sturdy. The flow rack that slides components from storage to the assembly station? Those horizontal rails are held in place by these joints, with the rotatory side allowing the rack to adjust slightly as parts are loaded or unloaded. Even the turnover trolley with caster wheel s that zips between stations relies on these joints to maintain structural integrity while the casters handle movement. In short, they're the quiet organizers of the lean world, ensuring everything stays in place—until it needs to move.
But here's the thing: their versatility and daily use make them prone to wear. The rotatory mechanism, in particular, is a moving part that can collect debris, dry out, or loosen over time. The chrome finish, while durable, can chip if struck by heavy tools or abrasive materials. And if the joint itself becomes misaligned, it throws off the entire structure—suddenly, that workbench wobbles, the flow rack jams, or the trolley veers off course. That's why understanding their design isn't just about appreciation; it's the first step in knowing how to care for them.
Why Regular Maintenance Matters
Let's start with a scenario we've all seen (or experienced): A production line grinds to a halt. The cause? A seized joint that won't rotate, making it impossible to adjust a workbench. The fix? A quick spray of lubricant, maybe a wrench to tighten a bolt. But what if that "quick fix" could have been avoided? That's the power of regular maintenance. For parallel lean pipe joints with one side rotatory chrome finish, upkeep isn't just about extending their lifespan—it's about protecting your entire operation from costly disruptions.
First, consider downtime. In manufacturing, every minute a line is idle eats into profits. A single stuck joint might take 15 minutes to repair, but multiply that by multiple joints across multiple lines, and suddenly you're looking at hours of lost production. And that's not counting the ripple effect: missed deadlines, overtime pay to catch up, and frustrated teams. Regular maintenance turns those "surprise" breakdowns into predictable, scheduled tasks—no more scrambling to find tools or replacement parts when the pressure is on.
Safety is another non-negotiable. A loose or damaged joint isn't just inefficient; it's a hazard. Imagine a workbench that suddenly collapses because a corroded joint gave way, or a flow rack that dumps parts onto the floor because a rotatory mechanism failed. These scenarios risk injury to employees and damage to products. The chrome finish, when intact, prevents rust from weakening the joint—but if it chips, rust can spread like a hidden disease, compromising structural integrity without warning. Maintenance isn't just about keeping the lights on; it's about keeping people safe.
Then there's the cost of replacement. A single parallel lean pipe joint might not break the bank, but replacing multiple joints across a facility adds up. And that's before you factor in the cost of the pipes, aluminum profile accessories , or other components that might have been damaged due to a faulty joint. For example, if a misaligned joint causes a roller track to bend, you're now replacing both the joint and the track. Regular maintenance—cleaning, lubricating, tightening—extends the life of each joint, delaying replacement and keeping your budget in check.
Finally, precision matters in lean systems. The goal is to eliminate waste, and that includes wasted motion, wasted space, and wasted effort. A well-maintained joint ensures that workbenches stay level, so tools don't slide off. It keeps flow racks at the optimal angle, so parts glide smoothly onto the roller track without jamming. It allows rotatory adjustments to happen with minimal force, so employees don't strain themselves trying to pivot a workstation. In short, maintenance turns "good enough" into "exactly right"—the kind of precision that makes lean systems truly effective.
So, when we talk about maintaining these joints, we're not just talking about cleaning a metal part. We're talking about protecting your productivity, your team's safety, and your bottom line. It's an investment in the reliability of your lean system—and in the success of your operation.

Essential Tools and Materials for Maintenance
You wouldn't fix a car without a wrench, and you wouldn't paint a wall without a brush. Maintaining parallel lean pipe joints with one side rotatory chrome finish is no different—having the right tools and materials on hand makes the job faster, safer, and more effective. Let's walk through what you'll need, from basic hand tools to specialized supplies, and why each one matters.
Tools: The Basics
Hex Keys (Allen Wrenches): These are the backbone of lean pipe maintenance. Most parallel lean pipe joints use hex bolts to secure pipes and adjust tension. You'll need a set with various sizes (common ones are 3mm, 4mm, and 5mm) to fit different joint models. Look for a set with ball-end tips—they allow you to reach bolts at awkward angles, which is crucial when joints are tucked into tight spaces (like under a workbench).
Torque Wrench: Tightening bolts isn't just about "cranking until it won't move." Over-tightening can strip threads or warp the joint, while under-tightening leaves it loose. A torque wrench lets you apply the exact amount of force specified by the manufacturer (usually printed on the joint or in the user manual). For most lean pipe joints, a small torque wrench (1/4-inch drive) with a range of 5–20 Nm will do the trick.
Inspection Light: Many joints are hidden in shadowy corners of workbenches or racks. A bright, portable inspection light—preferably with a flexible neck—helps you spot cracks, rust, or debris you'd miss with the naked eye. LED lights are ideal; they're bright, energy-efficient, and don't get hot, so you can hold them close to the joint without worrying about burns.
Wire Brushes (Soft and Stiff): Soft-bristle brushes (nylon or brass) are for cleaning the chrome finish without scratching it. Stiff-bristle brushes (steel) are for scrubbing rust or caked-on debris from the rotatory mechanism or bolt threads—just be careful not to use steel brushes on the chrome, as they can damage the coating.
Microfiber Cloths: These are gentler than paper towels and won't leave lint behind. Use them to wipe down the chrome finish, dry parts after cleaning, or apply lubricant. Keep a few on hand—you'll go through them quickly, especially if joints are greasy or dusty.
Materials: The Supplies
Lubricant (Silicone-Based): The rotatory mechanism relies on smooth movement, and lubricant is its lifeblood. Silicone-based lubricants are best here—they're water-resistant, won't damage the chrome finish, and don't attract dust like petroleum-based oils. Avoid WD-40 unless it's specifically labeled as a lubricant (the standard WD-40 is a solvent, not a long-term lubricant). Look for a spray or dropper bottle for precise application.
Rust Remover (Phosphoric Acid-Based): Even with a chrome finish, joints can develop rust in nicks or scratches. A phosphoric acid-based rust remover (like Naval Jelly) converts rust into a paintable surface, preventing further corrosion. Apply it sparingly with a cotton swab, let it sit for 10–15 minutes, then wipe it off with a microfiber cloth.
Chrome Polish: To keep the finish shiny and protected, a good chrome polish goes a long way. Choose a non-abrasive formula—abrasives can wear down the chrome over time. Apply a small amount to a microfiber cloth, rub in a circular motion, then buff to a shine. This not only makes the joint look better but also adds a thin protective layer against moisture.
Replacement Parts: Even with great maintenance, parts wear out. Keep a stock of common replacements: hex bolts (in various lengths), washers, and gaskets for the joint. If the rotatory mechanism has bearings, ask your lean pipe supplier for compatible replacement bearings—they'll save you from replacing the entire joint if the bearings fail.
Isopropyl Alcohol (70% or Higher): Before applying lubricant or polish, you need a clean surface. Isopropyl alcohol dissolves grease, oil, and grime without leaving residue. Pour a small amount onto a microfiber cloth and wipe down the joint, focusing on the rotatory area and bolt heads. Let it dry completely before moving on to the next step.
Bonus: A Maintenance Kit
To make maintenance easier, assemble a dedicated kit. A small toolbox with dividers works well—label compartments for tools, lubricants, and replacement parts. Include a copy of the joint's maintenance manual (if available) and a checklist of tasks. Keep the kit near your most-used lean systems (like the main assembly line or warehouse) so it's always within reach. Trust us: When you notice a loose joint, the last thing you want is to hunt for a hex key across the facility.
With these tools and materials, you're ready to tackle just about any maintenance task. Remember, the goal isn't to have a garage full of equipment—it's to have the right tools for the job. A well-prepared kit turns maintenance from a chore into a quick, satisfying task that keeps your lean system running smoothly.

Step-by-Step Maintenance Process
Now that we understand the "why" and have the "what," let's get to the "how." Maintaining parallel lean pipe joints with one side rotatory chrome finish is a systematic process—inspect, clean, lubricate, tighten, test. Follow these steps, and you'll keep your joints in top shape for years. We'll break it down day by day, week by week, and month by month to make it manageable.
Daily Quick Checks (2–3 Minutes per Joint)
You don't need to deep-clean every joint every day, but a quick visual and tactile inspection can catch small issues before they grow. Here's what to do:
- Look for Obvious Damage: Scan the chrome finish for chips, dents, or rust spots. Check the rotatory mechanism for cracks in the housing or loose bolts. If you see something, mark the joint with a piece of tape so you can come back to it later.
- Test Rotation: Gently rotate the movable side of the joint. It should move smoothly, with no grinding or sticking. If it feels stiff or makes noise, note it for lubrication during weekly maintenance.
- Check Alignment: Stand back and look at the structure (workbench, rack, etc.). Are the pipes still parallel? Does the joint sit flush with the pipes, or is there a gap? Misalignment is often a sign of loose bolts.
These checks take almost no time and can be done during routine walkthroughs. For example, if you're passing a workbench, pause for 30 seconds to wiggle the joint—you'll be surprised how many issues you catch.
Weekly Deep Clean and Lubrication (10–15 Minutes per Joint)
Once a week, set aside time to give joints a deeper clean and fresh lubrication. This is when you'll use most of the tools and materials we discussed.
- Clean the Chrome Finish: Start by wiping the joint with a microfiber cloth to remove dust. For greasy or oily spots, dampen the cloth with isopropyl alcohol and rub gently. If there's caked-on debris (like dried paint or glue), use a soft-bristle brush to loosen it before wiping. Avoid steel wool or abrasive pads—they'll scratch the chrome.
- Clean the Rotatory Mechanism: The rotatory part is where debris loves to hide. Use a stiff-bristle brush to scrub around the joint where the fixed and moving parts meet—this dislodges dust, metal shavings, or bits of plastic. Follow up with a blast of compressed air (if available) to blow out any remaining particles. If the mechanism is really dirty, you can use a toothpick to gently pick out debris from tight spaces—just be careful not to scratch the metal.
- Apply Lubricant: With the mechanism clean, it's time to lubricate. Hold the joint so the rotatory part is facing up, then apply a few drops of silicone lubricant to the gap between the fixed and moving sections. Rotate the joint back and forth 10–15 times to work the lubricant into the bearings. Wipe off any excess lubricant with a microfiber cloth—you want a thin, even layer, not a puddle that attracts dust.
- Tighten Bolts (If Needed): Use your hex key to check bolt tightness. If a bolt turns more than 1/4 inch, tighten it until it's snug, then use the torque wrench to apply the manufacturer's recommended torque (usually 8–12 Nm for lean pipe joints). Remember: "snug" doesn't mean "as tight as possible"—over-tightening can strip threads.
Monthly Inspection and Adjustment (20–30 Minutes per Joint)
Monthly maintenance is about precision. This is when you'll check for wear, adjust alignment, and touch up the chrome finish.
- Inspect for Wear: Look closely at the rotatory bearings—are there signs of wear, like pitting or rust? Check the bolt threads for stripping. If the joint has washers or gaskets, inspect them for cracks or brittleness. replace any worn parts immediately—waiting will only make the problem worse.
- Adjust Alignment: Use a level to ensure the joint is keeping pipes parallel. If the structure is leaning, loosen the bolts slightly, adjust the pipes until they're level, then retighten. For rotatory joints, check that the rotation is within the intended range (usually 180 degrees or less). If it's sticking at a certain angle, there might be a bent component—replace the joint if adjustment doesn't fix it.
- Touch Up Chrome: If you noticed small chips or rust spots during daily checks, now's the time to fix them. Apply a tiny amount of rust remover to the spot with a cotton swab, let it sit for 10 minutes, then wipe it off. Once dry, buff the area with a microfiber cloth and apply a dab of chrome polish to protect the exposed metal.
- Test Under Load: Finally, test the joint with the kind of weight it normally handles. For a workbench joint, place a heavy toolbox on the surface and wiggle it gently—no movement means the joint is secure. For a flow rack joint, load it with typical parts and slide them along the roller track —smooth movement indicates the joint is aligned correctly.
Quarterly: Full System Check
Every three months, take a step back and look at how joints interact with other components. For example, a joint on a trolley with caster wheels might loosen faster if the casters are wobbly—fixing the casters reduces stress on the joint. Similarly, a joint connected to aluminum profile accessories might need adjustment if the accessories have shifted. This big-picture check ensures your maintenance efforts aren't just fixing symptoms but addressing root causes.
By following this schedule, you'll keep your parallel lean pipe joints in peak condition. The key is consistency—daily checks take minutes, weekly cleanings fit into a lunch break, and monthly inspections prevent small issues from becoming disasters. Remember: Maintenance isn't a one-time task; it's a habit that keeps your lean system—and your operation—running strong.
Troubleshooting Common Issues
Even with regular maintenance, parallel lean pipe joints with one side rotatory chrome finish can run into problems. The good news? Most issues are fixable with a little know-how. Let's walk through the most common problems, what causes them, and how to solve them—so you can get back to production fast.
Issue 1: The Rotatory Mechanism Is Stiff or Won't Move
What's happening: You try to rotate the joint, and it feels like it's stuck in concrete. Or it moves, but with a grinding, jerky motion. This is one of the most common complaints—and usually the easiest to fix.
Causes: 9 times out of 10, stiffness is due to a lack of lubrication or debris in the mechanism. Over time, dust, oil, and metal shavings can build up between the fixed and moving parts, acting like sandpaper. If you've been diligent with lubrication, the culprit might be rust (especially if the joint is in a humid area) or a bent internal component (from overloading or impact).
Solution: Start with a deep clean. Use a stiff-bristle brush to scrub the rotatory area, then blast with compressed air. Wipe with isopropyl alcohol to dissolve any remaining grease. Apply a generous amount of silicone lubricant and work the joint back and forth—this should loosen most debris. If it's still stiff, check for rust: apply rust remover to the mechanism, let it sit, then wipe and relubricate. If all else fails, the bearings might be worn out—replace them with new ones from your lean pipe supplier.
Issue 2: The Joint Is Loose, Causing the Structure to Wobble
What's happening: The workbench or rack (shakes) when you touch it. You notice gaps between the joint and the pipes, or bolts that spin freely when you try to tighten them.
Causes: Loose joints are usually due to under-tightened bolts or stripped threads. Over time, vibration from daily use can loosen bolts, especially if they weren't torqued properly. Stripped threads happen when bolts are over-tightened or cross-threaded during installation.
Solution: First, try tightening the bolts with a torque wrench (use the manufacturer's specs). If bolts spin without resistance, they're stripped. For minor stripping, apply a thread-locking compound (like Loctite) to the bolt, let it dry, then retighten—this fills small gaps in the threads. For severe stripping, you'll need to replace the bolt or the joint itself. If the pipe is stripped (rare, but possible), use a pipe tap to clean the threads, or replace the pipe section.
Issue 3: Chrome Finish Is Chipped or Rusty
What's happening: The shiny chrome surface has nicks, scratches, or brown rust spots. Left unchecked, rust can spread and weaken the joint.
Causes: Chips and scratches come from impact—dropping tools, bumping the joint with a trolley, or abrasive materials rubbing against it. Rust forms when the chrome is damaged, exposing the underlying metal to moisture and oxygen.
Solution: For small chips, clean the area with isopropyl alcohol, then apply a thin layer of chrome touch-up paint (available at auto parts stores). For rust spots, use rust remover as described earlier, then buff with chrome polish to protect the area. If the damage is extensive (large chips or widespread rust), consider replacing the joint—rust weakens the metal, and a compromised joint is a safety risk.
Issue 4: The Joint Is Misaligned, Throwing Off the Structure
What's happening: Pipes connected to the joint aren't parallel—one is higher than the other, or they're at an angle. This can cause flow racks to jam, workbenches to tilt, or trolleys to pull to one side.
Causes: Misalignment usually happens during installation (if the joint wasn't positioned correctly) or after impact (like a heavy load falling on the structure). It can also occur if adjacent components—like aluminum profile accessories —shift, pulling the joint out of alignment.
Solution: Loosen the bolts holding the joint to the pipes, then adjust the pipes until they're parallel (use a level to check). Retighten the bolts with a torque wrench. If the joint itself is bent (unlikely, but possible with severe impact), replace it—bending weakens the metal and makes proper alignment impossible.
Issue 5: The Rotatory Mechanism Is Noisy (Grinding or Squeaking)
What's happening: Every time you rotate the joint, it makes a loud grinding, squeaking, or clicking noise—annoying for workers and a sign something's wrong.
Causes: Noise is often a sign of dry or dirty bearings. If the joint has been without lubrication for a long time, the bearings can wear unevenly, causing grinding. Debris in the mechanism can also create clicking sounds as it's crushed between moving parts.
Solution: Clean and lubricate the mechanism as described in the maintenance steps. If the noise persists, inspect the bearings for pitting or damage—worn bearings will need to be replaced. A quick test: remove the bearings, spin them by hand—they should rotate smoothly with no noise. If they rattle or grind, they're bad.
The key to troubleshooting is to start simple: check for the easiest fixes (lubrication, tightening bolts) before moving to more complex solutions (replacing parts). Most joint issues are preventable with regular maintenance, but even when problems pop up, a little patience and the right tools will get you back on track.
Best Practices for Long-Term Durability
Maintenance isn't just about fixing problems—it's about preventing them. By adopting these best practices, you'll extend the life of your parallel lean pipe joints with one side rotatory chrome finish, reduce downtime, and keep your lean system performing at its best for years to come. Think of it as investing in your equipment's future.
1. Train Your Team to Spot Issues
Your frontline employees—those who use workbenches, load flow racks, and push trolleys—are the first to notice when something's off. Train them to recognize the signs of a struggling joint: stiffness when rotating, wobbling structures, or unusual noises. Create a simple reporting system (a digital form or even a whiteboard near the production line) where they can note issues. The faster you know about a problem, the faster you can fix it—before it leads to a breakdown.
2. Stick to a Maintenance Schedule (and Document It)
We've talked about daily, weekly, and monthly tasks—but consistency is key. Create a calendar or use maintenance software to schedule checks, and mark tasks as complete when done. Documenting maintenance not only keeps you accountable but also helps identify patterns: if a particular joint always loosens, maybe it's near a high-vibration machine and needs more frequent tightening. Or if multiple joints rust, you might need to improve ventilation in that area.
| Maintenance Task | Frequency | Who Does It | Notes |
|---|---|---|---|
| Visual inspection for damage | Daily | Production team | Report issues immediately |
| Clean and lubricate rotatory mechanism | Weekly | Maintenance team | Use silicone lubricant only |
| Torque bolts and check alignment | Monthly | Maintenance team | Refer to manufacturer torque specs |
| replace worn bearings/bolts | As needed | Maintenance team | Keep spare parts in stock |
3. Avoid Overloading the Joints
Every joint has a weight limit specified by the manufacturer—exceeding it is a recipe for disaster. Overloading bends the joint, strips bolts, and wears out the rotatory mechanism. Post weight limits on workbenches and racks, and train employees to respect them. If you need to handle heavier loads, upgrade to a heavier-duty joint or reinforce the structure with additional supports—don't push your current joints beyond their limits.
4. Protect Joints from Environmental Damage
Chrome finishes and metal parts don't like extreme conditions. If joints are in a humid area (like a washdown zone), coat them with a water-resistant lubricant and check for rust weekly. In dusty environments (like woodworking shops), cover joints with protective caps when not in use, and clean them more frequently. Avoid exposing joints to chemicals or solvents—they can eat through the chrome finish or degrade lubricants. If chemicals are unavoidable, wipe joints down immediately after exposure.
5. Use Genuine Replacement Parts
It's tempting to save money with generic bolts or bearings, but off-brand parts rarely fit as well as genuine ones. Manufacturer-recommended parts are designed to work with your specific joint, ensuring proper fit and performance. A cheap bolt might strip easier, or a generic bearing might wear out faster—costing you more in the long run. Buy from your trusted lean pipe supplier, and keep a small stock of critical parts (bearings, bolts, gaskets) on hand.
6. Consider Upgrades for High-Wear Areas
If certain joints are always failing (like those on a heavily used trolley with caster wheels), it might be time for an upgrade. Look for joints with reinforced rotatory mechanisms or thicker chrome plating. Some suppliers offer stainless steel versions for extra corrosion resistance, or joints with self-lubricating bearings that reduce maintenance needs. Investing in a better joint upfront saves time and money on repairs later.
By following these practices, you'll transform maintenance from a reactive chore into a proactive strategy. Your parallel lean pipe joints will last longer, perform better, and keep your lean system running smoothly—so you can focus on what really matters: making great products efficiently.
Conclusion: The Small Part That Makes a Big Difference
Parallel lean pipe joints with one side rotatory chrome finish might not be the most glamorous components in your facility, but they're undeniably essential. They're the quiet architects of your lean system, holding everything together while allowing the flexibility your operation needs to thrive. And as we've explored, keeping them in top shape isn't just about wrenches and lubricant—it's about protecting your productivity, your team's safety, and your bottom line.
From understanding their design to mastering maintenance steps, troubleshooting issues, and adopting best practices, we've covered how to give these joints the care they deserve. Remember: a daily visual check, a weekly cleaning, and a monthly tune-up are small investments that pay off in fewer breakdowns, less downtime, and a smoother-running operation. And when issues do arise—because even the best-maintained equipment has off days—you now have the tools and knowledge to fix them fast.
So, the next time you walk past a workbench or load a flow rack, take a moment to appreciate the parallel lean pipe joint holding it all together. It's a reminder that in lean manufacturing, success lies in the details—the small parts that work tirelessly behind the scenes. And with a little care, those small parts will keep your big operation moving forward.
Here's to joints that rotate smoothly, structures that stay sturdy, and a lean system that keeps delivering results—one well-maintained component at a time.