- Company Articles
- Products and Technology
- Installation And Maintenance
- How to Maintain Suction Cup Anti-Slip Foot Adjusters for Extended Lifespan

How to Maintain Suction Cup Anti-Slip Foot Adjusters for Extended Lifespan
Related Product
Suction Cup Anti-slip Foot Adjuster
D=35mm suction cup anti-slip foot adjusterï¼screw M10*55ï¼with a blot, used for workbench, flowrack pipe contact with groud.
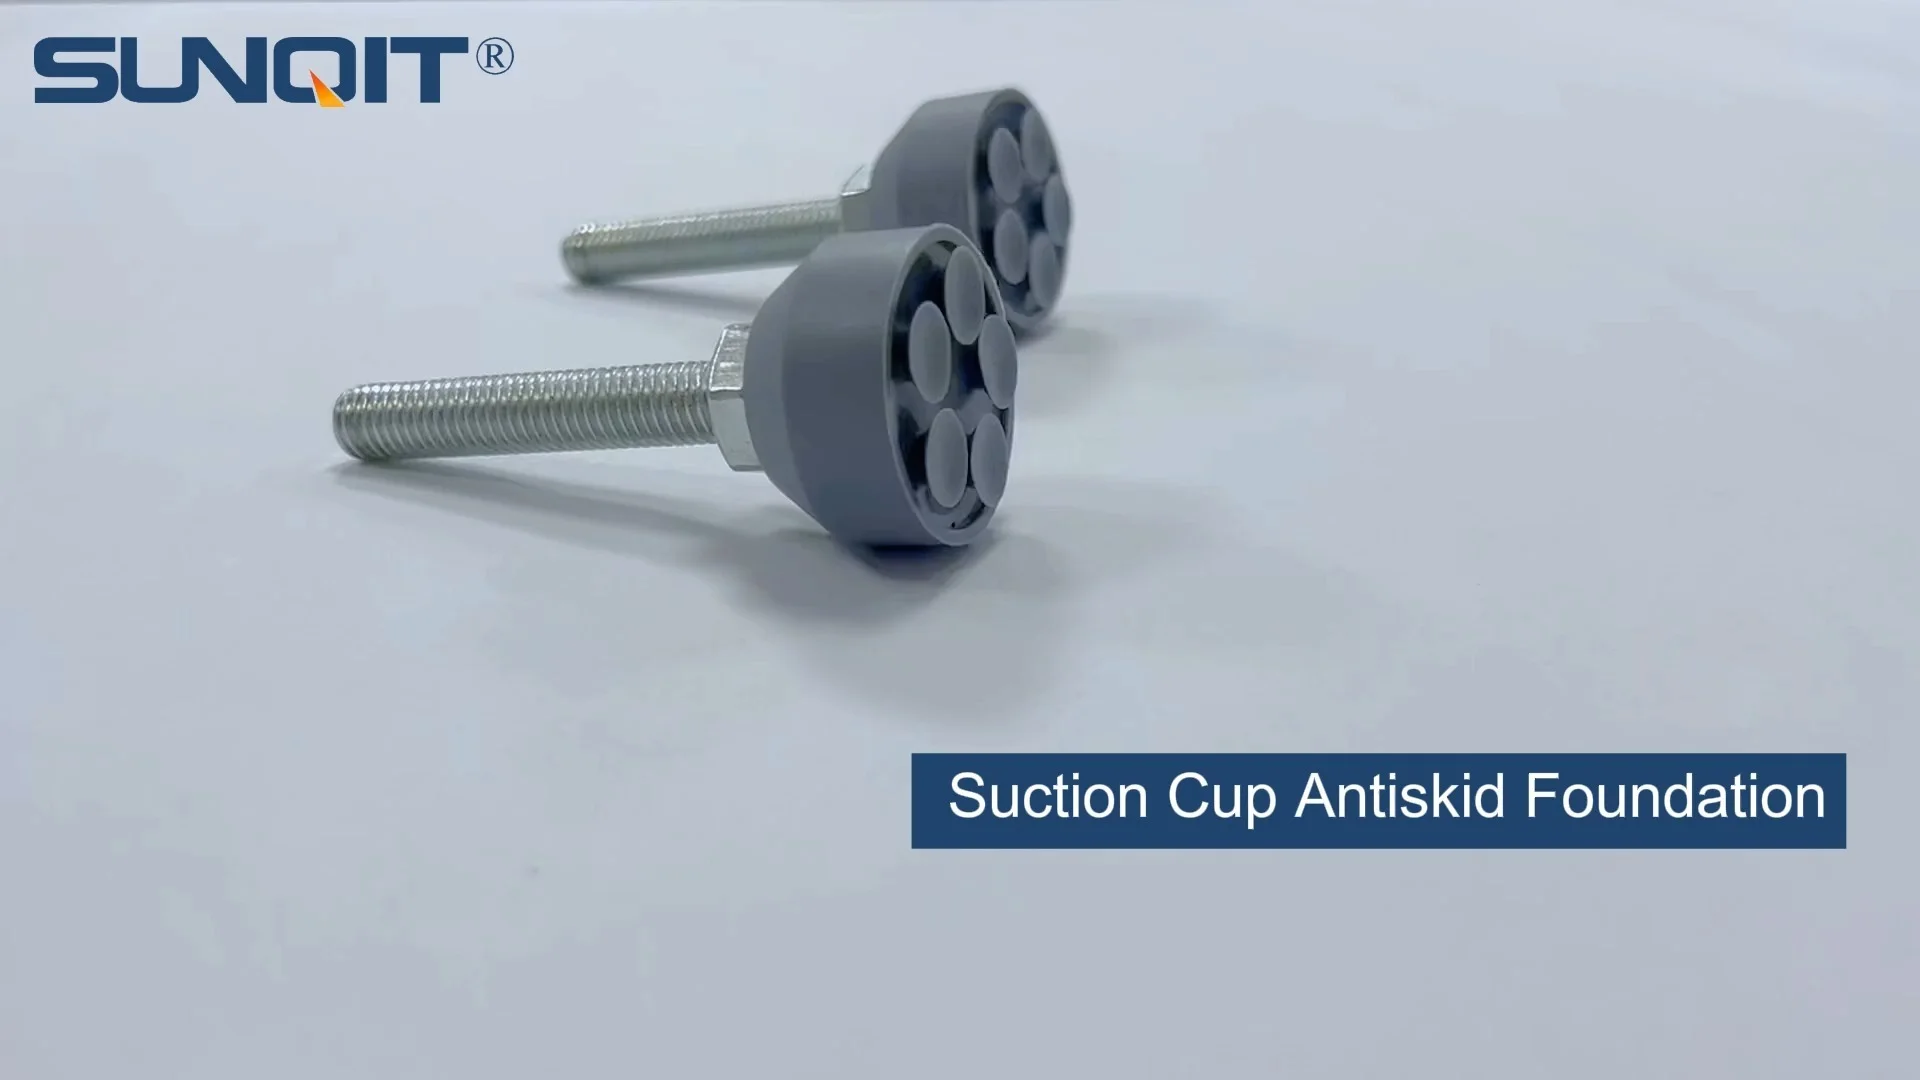
If you've ever stood at a wobbly workbench, watched a material rack shift unexpectedly, or struggled to keep equipment steady on uneven floors, you know how critical stability is in any workspace—whether it's a factory floor, a workshop, or a home garage. Enter the unsung hero of workplace stability: the suction cup anti-slip foot adjuster. These small but mighty components are the quiet guardians of balance, keeping everything from aluminum profile workbenches to heavy-duty material racks firmly rooted, even when floors are less than perfect.
But here's the thing: like any hardworking tool, suction cup anti-slip foot adjusters don't last forever on their own. Dirt, wear, and everyday use can chip away at their effectiveness, turning a steady workbench into a frustrating, unstable mess. The good news? With a little regular care, you can extend their lifespan significantly, saving time, money, and headaches down the line. In this guide, we'll walk through everything you need to know to keep these tiny workhorses in top shape—from daily checks to deep cleaning, troubleshooting, and long-term maintenance. Let's dive in.
Understanding Suction Cup Anti-Slip Foot Adjusters: What They Are and Why They Matter
Before we jump into maintenance, let's make sure we're all on the same page about what these components actually do. A suction cup anti-slip foot adjuster is exactly what it sounds like: a small, adjustable foot that attaches to the bottom of equipment (think workbenches, shelving units, or even machinery) with two key jobs: adjusting height to level the equipment and preventing slipping via a suction cup base. They're often paired with other hardware, like caster wheels (for mobility) or aluminum profile frames (for structural support), making them a versatile solution for stability.
Anatomy of a Foot Adjuster
Most suction cup anti-slip foot adjusters share a few basic parts:
- The Suction Cup: Usually made of durable rubber or silicone, this is the star of the show. It creates a vacuum seal with the floor, gripping tightly to prevent sliding—even on smooth surfaces like concrete or tile.
- The Adjustment Screw: A threaded rod that lets you twist the foot up or down. This is how you fine-tune height to compensate for uneven floors, ensuring your workbench or rack sits perfectly level.
- The Base: The housing that connects the suction cup and screw to the equipment. It's often made of plastic, metal, or a mix, and may include a mounting plate to attach to frames (like those made from aluminum profile).
Why does this matter for maintenance? Each part has its own vulnerabilities. The suction cup can wear down or get clogged with dirt, the screw can seize up if not lubricated, and the base can crack if over-tightened. By understanding how they work, you'll know exactly what to watch for.
Daily Inspection: Catch Issues Before They Escalate
Maintenance starts with awareness. You don't need to spend hours each day checking foot adjusters, but a quick 60-second visual and tactile inspection can save you from bigger problems later. Here's what to look for:
Step 1: Check the Suction Cup Condition
Start by looking at the suction cup itself. Run your finger along the edge—are there cracks, tears, or signs of hardening? Rubber degrades over time, especially if exposed to oils, chemicals, or extreme temperatures. A cracked cup won't seal properly, reducing its anti-slip power. Also, check for debris: dirt, dust, or small bits of material (like metal shavings from a workshop) can get trapped under the cup, breaking the vacuum seal. Even a tiny pebble can make a big difference in stability.
Step 2: Test the Adjustment Mechanism
Next, give the adjustment screw a gentle twist. Does it turn smoothly, or does it feel stuck or gritty? A stiff screw means you might not be able to level the equipment when needed, which can lead to uneven weight distribution and, over time, damage to the aluminum profile frame or workbench surface. Also, check if the foot stays in place after adjustment—if it slowly sinks or rises on its own, the threads might be worn, and the adjuster isn't holding tension.
Step 3: Inspect the Base and Mounting
Finally, look at how the foot adjuster is attached to the equipment. If it's mounted to an aluminum profile frame, are the screws loose? Is the base cracked or warped? A loose mount can cause the foot to pivot or shift, even if the suction cup is in good shape. Pay extra attention if the equipment is moved often (say, if it has caster wheels for mobility)—frequent movement can jostle the mounting hardware over time.
Pro Tip: Keep a small notebook or phone note to track inspections. Jot down dates when you notice minor issues (like a slightly stiff screw) so you can spot patterns—e.g., "Left front foot on Workbench E is getting stiffer each week." This makes it easier to plan maintenance before problems get worse.

Cleaning: Keep the Suction Strong
Dirt is the enemy of suction. Even a thin layer of dust on the suction cup can break the seal, turning a grippy foot into a slippery one. Regular cleaning is the simplest way to keep your foot adjusters working like new—and it's easier than you might think.
What You'll Need
Gather these supplies before you start—most can be found in your kitchen or workshop:
- Warm water (not hot—heat can damage rubber)
- Mild dish soap (avoid harsh detergents or solvents like bleach, which can degrade rubber)
- Soft-bristled brush (an old toothbrush works great for tight spots)
- Microfiber cloth (lint-free to avoid leaving residue)
- Isopropyl alcohol (for tough grime, like oil or grease)
Step-by-Step Cleaning Process
1. Lift the Equipment (Gently!) : To clean the suction cup thoroughly, you'll need to lift the equipment just enough to slide a cloth or brush under the foot. If it's heavy (like a loaded material rack), get help—safety first! If the equipment has caster wheels, lock them in place to prevent rolling.
2. Brush Away Loose Debris : Use the soft brush to sweep away dirt, dust, or small particles from the suction cup and the surrounding area. Pay extra attention to the edges of the cup, where debris loves to hide.
3. Wash with Soapy Water : Mix a few drops of mild soap into warm water. Dip the cloth into the soapy water, wring it out well (you don't want excess water pooling on the floor), and gently wipe the suction cup. For stubborn spots (like dried grease), dampen the cloth with isopropyl alcohol and rub lightly—alcohol evaporates quickly and won't leave residue.
4. Dry Thoroughly : Use a clean microfiber cloth to dry the suction cup and the adjustment screw. Moisture trapped in the threads can lead to rust (on metal screws) or mold (in humid environments), so make sure everything is completely dry before lowering the equipment back down.
5. Test the Suction : Once clean, lower the equipment and press down gently on the corner to engage the suction cup. You should hear a soft "snap" or "pop" as the cup seals—this means it's working! If not, repeat the cleaning process (you might have missed a spot).

Lubrication: Keep Adjustments Smooth
Ever tried to twist a rusty screw? It's not fun—and it's avoidable with a little lubrication. The adjustment screw on your foot adjuster relies on smooth movement to let you level equipment easily. Over time, dust, moisture, and friction can make the threads gritty or even cause them to seize up. Lubricating regularly keeps things moving freely.
Choosing the Right Lubricant
Not all lubricants are created equal. Avoid heavy oils (like motor oil) or greases—they attract dust and can gum up the threads over time. Instead, opt for:
- Silicone spray : Works well for plastic or metal screws. It's lightweight, repels moisture, and won't degrade rubber (important for the suction cup).
- Dry lubricant (PTFE spray) : Ideal for high-dust environments. It dries to a thin, friction-resistant film that doesn't attract dirt.
- Graphite powder : A classic choice for metal threads. Apply a tiny amount with a brush—great for preventing rust.
How to Lubricate the Adjustment Screw
1. Clean the Screw First : Before lubricating, wipe the adjustment screw with a dry cloth to remove dust or old lubricant buildup. If it's really dirty, use a toothbrush dipped in isopropyl alcohol to scrub the threads gently.
2. Apply Lubricant Sparingly : Less is more here! Too much lubricant can drip onto the suction cup (damaging rubber) or attract dirt. For silicone or PTFE spray, hold the can 6–8 inches from the screw and spray for 1–2 seconds. For graphite powder, dab a small amount on a toothpick and apply directly to the threads.
3. Work the Screw : Twist the adjuster up and down several times to distribute the lubricant evenly across the threads. You should feel it get smoother with each turn. If it's still stiff, apply a tiny bit more lubricant and repeat.
4. Wipe Excess : After working the screw, use a clean cloth to wipe away any excess lubricant from the base or suction cup. This prevents drips and keeps dirt from sticking.
Avoid This Common Mistake: Never use WD-40 as a long-term lubricant! While it's great for loosening stuck screws, it's a solvent, not a lubricant—it will dry out over time and leave the threads more prone to seizing. Save it for emergencies, then follow up with a proper silicone or PTFE lubricant.

Adjustment and Calibration: Keep It Level
Even with clean, lubricated foot adjusters, your equipment might still wobble if it's not properly calibrated. Over time, floors can shift, equipment can settle, or caster wheels (if present) can wear unevenly—all of which throw off the level. Here's how to get things back in balance:
Tools You'll Need
You don't need fancy equipment—just a few basics:
- A spirit level (2-foot or longer works best for larger surfaces like workbenches)
- A wrench or pliers (for stubborn adjustment screws)
- A helper (optional, but useful for heavy equipment)
Step-by-Step Leveling
1. Clear the Surface : Remove any tools, materials, or debris from the equipment—you need a flat, empty surface to get an accurate level reading.
2. Check Initial Level : Place the spirit level on the equipment's surface, along the length (front to back) and width (side to side). Look at the bubble—if it's centered, that axis is level. If it's off to one side, that corner is higher than the opposite side.
3. Adjust the Foot Adjusters : Start with the lowest corner (the one where the bubble is leaning away from). Twist the adjustment screw counterclockwise to raise the foot, or clockwise to lower it. Make small adjustments (1/4 turn at a time) and recheck the level after each twist—over-adjusting can throw off other corners.
4. Repeat for All Corners : Work your way around the equipment, checking both length and width each time. For example, if the front left corner is low, raise it until the front axis is level, then check the left side (front to back) and adjust the back left foot if needed. It's a bit like solving a puzzle—patience is key!
5. Test Stability : Once level, give the equipment a gentle shake from side to side. It should feel solid, with no wobbling. If it still moves, check if any foot adjusters are slipping (the suction cup might need cleaning) or if the mounting screws are loose (tighten them gently with a screwdriver—don't overdo it, as this can crack the base).
6. Mark the Adjusters (Optional) : If you find the perfect adjustment, use a small dot of paint or a permanent marker to mark the position of the screw on the base. This makes it easy to reset if the adjuster gets bumped or moved later.
Troubleshooting Common Issues
Even with regular maintenance, problems can pop up. Here's how to diagnose and fix the most common suction cup anti-slip foot adjuster issues:
Problem 1: Suction Cup Won't Stick
Symptoms: The equipment slides easily, or the suction cup doesn't seal (no "snap" sound when lowered).
Possible Causes:
- Dirt or debris on the suction cup (most common!)
- Worn or cracked suction cup (rubber has degraded)
- Uneven floor surface (e.g., a crack, bump, or slope)
- Suction cup is too hard (exposure to extreme heat or chemicals)
Solutions:
- Clean the suction cup thoroughly (follow the cleaning steps above).
- If the cup is cracked or hardened, replace it. Most manufacturers sell replacement suction cups—check the model number on the base to find the right one.
- For uneven floors, use shims under the foot adjuster (but only as a temporary fix—long-term, consider leveling the floor or using a thicker suction cup).
- Avoid exposing the suction cup to temperatures above 120°F (49°C) or below 32°F (0°C), as extreme heat/cold can damage rubber.
Problem 2: Adjustment Screw Is Stuck
Symptoms: The screw won't twist, or it twists but the foot doesn't move up/down.
Possible Causes:
- Rust or corrosion (if the screw is metal and exposed to moisture)
- Dirt or debris trapped in the threads
- Over-tightening (the screw is stripped or cross-threaded)
Solutions:
- Apply penetrating oil (like PB Blaster) to the threads and let it sit for 10–15 minutes, then try twisting again. For severe rust, tap the screw gently with a hammer to loosen corrosion before twisting.
- Clean the threads with a small wire brush (toothbrush size) to remove debris, then lubricate with silicone spray.
- If the screw is stripped, replace the entire foot adjuster—stripped threads can't be repaired, and using a stripped adjuster is unsafe (it may fail under weight).
Problem 3: Base Is Cracked or Damaged
Symptoms: The foot adjuster wobbles even when the screw is tight, or you see cracks in the plastic/metal base.
Possible Causes:
- Over-tightening the mounting screws (stripping the plastic or bending metal)
- Impact damage (e.g., dropping heavy tools on the base, hitting it with a pallet jack)
- Cheap materials (low-quality bases may crack under heavy loads)
Solutions:
- replace the foot adjuster immediately—cracked bases can't support weight safely, and the foot may detach entirely.
- When installing the new adjuster, use a torque screwdriver to tighten mounting screws to the manufacturer's specs (usually 8–10 in-lbs for plastic bases, 12–15 in-lbs for metal).
- Choose a heavy-duty model if the equipment is particularly heavy (e.g., a material rack with multiple shelves) or moved often (to withstand bumps).
Long-Term Care: Extend Lifespan Beyond the Basics
Daily cleaning and lubrication will keep your foot adjusters working, but a few extra steps can add years to their lifespan. Think of it like caring for a car—regular oil changes are essential, but washing, waxing, and storing it properly make it last longer. Here's how to go the extra mile:
replace Worn Parts Proactively
Even with perfect maintenance, suction cups wear out. Rubber degrades over time, especially with frequent use. As a rule of thumb, replace suction cups every 6–12 months, depending on use: 6 months for heavy-use equipment (like assembly line workbenches) and 12 months for lighter use (like home workshop tables). Keep a few spare suction cups on hand so you can replace them immediately when needed—don't wait for a failure!
Store Equipment Properly (When Not in Use)
If you're storing equipment for an extended period (e.g., over the holidays, during a production shutdown), take steps to protect the foot adjusters:
- Raise the foot adjusters so the suction cups aren't in contact with the floor. This prevents the rubber from flattening or developing permanent indentations.
- Clean and lubricate before storing—this prevents dust buildup and rust during storage.
- Cover the suction cups with a plastic bag or cloth to keep dust off. Avoid plastic wrap, which can trap moisture and cause mold.
Avoid Chemical Exposure
Rubber suction cups are sensitive to certain chemicals, including oil, grease, solvents, and even some cleaning products. If your workspace uses harsh chemicals (e.g., degreasers in an auto shop), take steps to protect the foot adjusters:
- Wipe up spills immediately to prevent them from reaching the suction cups.
- Use chemical-resistant suction cups (made from Viton or neoprene) if exposure is unavoidable—check with the manufacturer for compatibility.
- Clean the suction cups more frequently in chemical-heavy areas to remove residue before it degrades the rubber.
Match Adjusters to the Job
Not all foot adjusters are created equal. Using the wrong type for your equipment is a common cause of premature failure. For example:
- Heavy equipment (e.g., loaded material racks) needs foot adjusters with metal bases and large suction cups (3 inches or more in diameter) to distribute weight.
- Mobile equipment (with caster wheels) should have foot adjusters that lock securely when lowered—look for models with a "positive stop" to prevent accidental lowering while moving.
- Aluminum profile frames often require adjusters with specific mounting plates that fit the profile's T-slots. Using a universal mount can lead to a loose fit and instability.
When in doubt, check the equipment's manual or contact the manufacturer to find the recommended foot adjuster model. It may cost a bit more upfront, but it's cheaper than replacing adjusters every few months.
Real-World Impact: Why It All Matters
At this point, you might be thinking, "Is all this really necessary for a tiny foot adjuster?" The answer is a resounding yes. Here's why:
Safety First
A wobbly workbench or unstable material rack is a safety hazard. Tools can fall, materials can shift, and workers can trip—all leading to injuries. In fact, the Occupational Safety and Health Administration (OSHA) reports that "unstable equipment" is a leading cause of workplace accidents. Properly maintained foot adjusters keep equipment stable, reducing the risk of accidents.
Cost Savings
Replacing foot adjusters is cheap, but replacing damaged equipment is not. A wobbly workbench can damage aluminum profile frames, crack tabletops, or even bend caster wheels. By maintaining foot adjusters, you're protecting the entire equipment investment. For example, a $10 replacement suction cup can prevent a $500 repair to a bent aluminum profile frame.
Productivity
Nothing kills productivity like a wobbly workbench. Workers waste time adjusting equipment, retrieving fallen tools, or fixing mistakes caused by unstable surfaces. A stable workspace is a productive workspace—maintaining foot adjusters ensures your team can focus on the job, not the equipment.
Conclusion: Small Parts, Big Difference
Suction cup anti-slip foot adjusters might be small, but they play a huge role in keeping your workspace safe, stable, and productive. By following these maintenance steps—daily inspections, regular cleaning, proper lubrication, careful adjustment, and proactive part replacement—you can extend their lifespan significantly, saving time, money, and frustration.
Remember: maintenance isn't just about fixing problems—it's about preventing them. A few minutes each week to clean a suction cup or lubricate a screw can mean the difference between a stable workbench and a costly accident. So next time you're in the workshop, take a moment to check those little feet—they'll thank you by keeping everything steady for years to come.