- Company Articles
- Products and Technology
- Installation And Maintenance
- How to Maintain Your Castor Install Base for Long-Term Durability

How to Maintain Your Castor Install Base for Long-Term Durability
Related Product
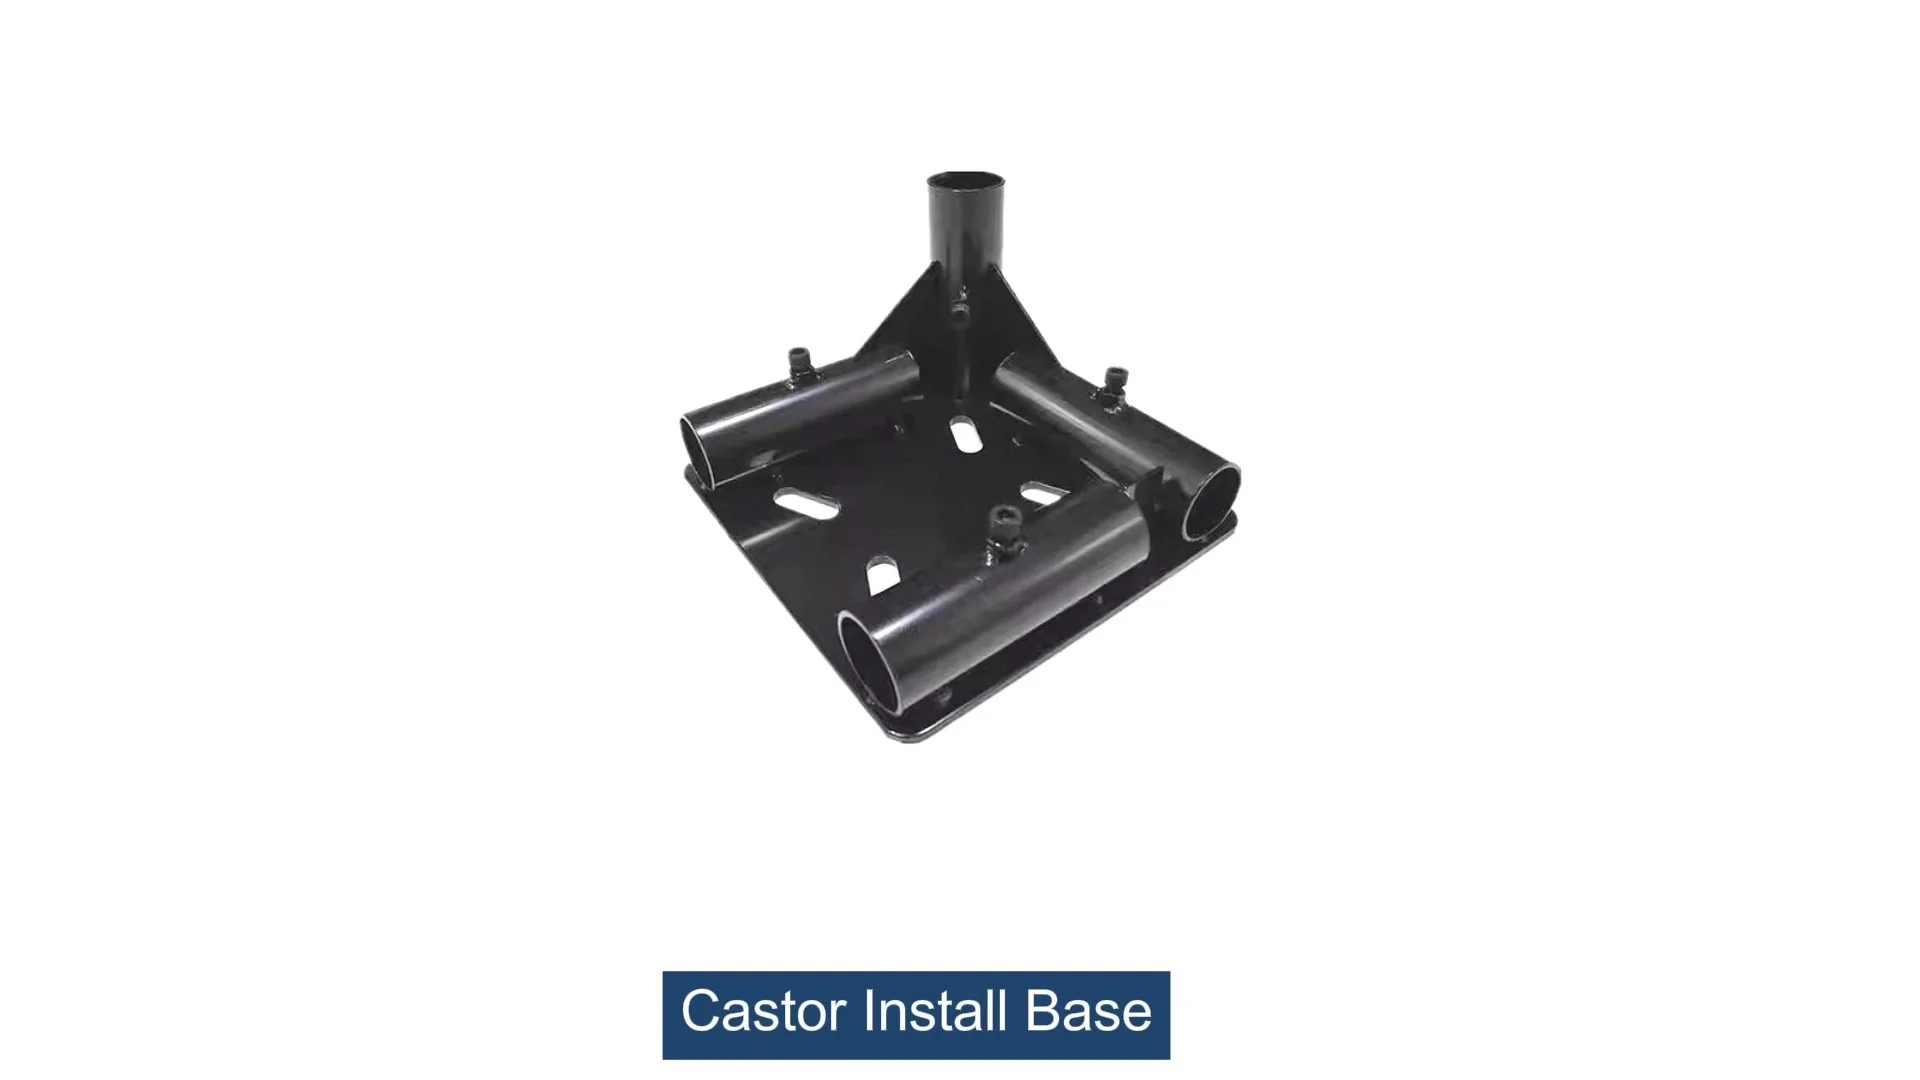
Castor Install Base
Castor install base, used for connection between pipe and castor, it can connect 4 pcs pipe by 1 pcs castor base, to make the structure strong and stable.
Walk into any busy warehouse, factory floor, or even a bustling retail stockroom, and you'll notice something that often goes unnoticed but keeps everything moving: the humble castor install base. It's the quiet workhorse that connects your carts, workbenches, and material racks to their caster wheels, ensuring that heavy loads glide smoothly instead of grinding to a halt. But here's the thing—like any hardworking team member, it needs a little care to keep performing at its best. Ignore it, and you'll soon be dealing with squeaky wheels, wobbly carts, and even safety hazards that throw a wrench into your workflow. Let's dive into how to give your castor install base the attention it deserves, so it can keep your operations rolling day in and day out.
Understanding the Castor Install Base: More Than Just a "Base"
Before we jump into maintenance, let's get to know the star of the show: the castor install base. At first glance, it might look like a simple metal plate or bracket, but it's actually a precision component designed to do three critical jobs. First, it anchors the caster wheel to your equipment—whether that's a turnover trolley, a workbench, or a heavy-duty material rack. Second, it distributes the weight of the load evenly across the caster wheel, preventing stress fractures or bending. And third, it allows the caster to swivel, rotate, or lock (depending on the type) without putting strain on the equipment frame.
These bases come in all shapes and sizes, tailored to different needs. You might find a small, lightweight castor install base on a utility cart in a retail store, or a beefy, reinforced version on a industrial trolley carrying 500kg of automotive parts. Materials matter too: steel bases are tough for heavy loads, while aluminum versions are lighter for applications where maneuverability is key. Some even have built-in features like brake mounts or corrosion-resistant coatings for damp environments.
But no matter the design, the castor install base has one Achilles' heel: neglect. Even the sturdiest base will fail prematurely if it's caked in grime, rusted, or held together by loose bolts. And when it fails, the consequences ripple out—delays as workers struggle with uncooperative carts, increased risk of back injuries from pushing stuck equipment, and even damaged goods if a wobbly cart tips. So, think of maintaining your castor install base as an investment in your team's productivity and safety.
The Hidden Costs of a Neglected Castor Install Base
Let's paint a picture: It's Monday morning at a electronics assembly plant. Maria, a line worker, is wheeling a cart stacked with circuit boards to Station 3. The cart has been acting up lately—squeaking, pulling to the left, and feeling heavier than usual. Today, as she rounds a corner, there's a loud *clunk*, and the cart lurches to a stop. She kneels down to check: the castor install base has cracked clean through, and the caster wheel is hanging at a weird angle. The circuit boards are fine, but now Maria can't finish her task until maintenance replaces the base. The line slows down, and by the end of the day, the team is behind schedule. All because a $20 part wasn't checked regularly.
This isn't just a story—it's a common scenario in workplaces that overlook small-part maintenance. The costs add up fast: unplanned downtime, overtime pay to catch up, replacement parts (which are pricier when bought in a rush), and even workers' compensation claims if someone gets hurt. And let's not forget the frustration—nothing kills morale like fighting with equipment that should work but doesn't.
So, what are the most common issues that plague neglected castor install bases? Let's break them down:
- Rust and Corrosion: Moisture, chemicals, or even just high humidity can cause metal bases to rust. Rust weakens the metal, making cracks more likely, and it can seize up moving parts like swivel joints.
- Loose or Stripped Bolts: Every time the cart moves, the bolts holding the base to the equipment vibrate. Over time, they loosen. If not tightened, they can fall out entirely, or strip the threads, making it impossible to secure the base properly.
- Grime Buildup: Dust, oil, and debris (think sawdust in a woodshop or grease in a kitchen) can get trapped between the base and the caster wheel, or in the swivel mechanism. This acts like sandpaper, wearing down parts and making movement stiff.
- Misalignment: If the base isn't mounted straight, or if the equipment frame is bent, the caster wheel will pull to one side. This puts extra stress on the base, leading to uneven wear and, eventually, failure.
The good news? All of these issues are preventable with a little regular care. Let's walk through a step-by-step maintenance routine that anyone on your team can follow—no fancy tools required.

Your Step-by-Step Castor Install Base Maintenance Routine
Maintaining a castor install base doesn't have to be complicated. In fact, it can be broken down into three simple phases: inspection, cleaning, and repair. Do this regularly, and you'll extend the life of your bases by years. Let's start with the first step: knowing what to look for during an inspection.
1. The Quick Daily Inspection (2 Minutes Per Cart)
You don't need to take equipment apart every day, but a quick visual and physical check can catch small problems before they escalate. Assign this to the person who uses the cart most (or the closing shift, to prep for the next day). Here's what to do:
- Give it a push: Roll the cart forward a few feet. Does it move smoothly, or does it pull to one side? A slight pull might mean a misaligned caster wheel or base.
- Listen for weird noises: Squeaks, grinding, or rattling are red flags. Squeaks often mean dry joints; grinding could be debris in the base or a damaged caster wheel.
- Check for looseness: Grab the caster wheel and wiggle it gently. If there's play (side-to-side movement) where the wheel meets the base, the bolts might be loose.
- Look for rust or damage: Scan the castor install base for rust spots, cracks, or bent metal. Pay attention to welds—if they're cracked, the base is compromised.
If any of these issues pop up, mark the cart for a deeper inspection (we'll get to that next). Most days, though, the cart will pass this check—quick and painless.
2. The Weekly Deep Dive (15–20 Minutes Per Cart)
Once a week, set aside time to give your castor install bases a more thorough once-over. You'll need a few basic tools: a wrench or socket set (to tighten bolts), a stiff brush, a rag, and some lubricant (like WD-40 or lithium grease). Here's how to do it:
Step 1: Clean the Base
Start by getting rid of dirt and grime. If the cart is light enough, flip it onto its side (always get help for heavy loads!) to expose the castor install base. Use the stiff brush to sweep away loose dirt, then wipe the base with a damp rag. For caked-on grease (common in kitchens or auto shops), use a degreaser spray and let it sit for 5 minutes before wiping. Pay extra attention to crevices—like where the base meets the caster wheel mount or around the swivel joint—since these are dust magnets.
Step 2: Tighten All Bolts
Loose bolts are the number one cause of castor install base failure. Using your wrench, check every bolt that holds the base to the equipment frame, and every bolt that connects the base to the caster wheel. Tighten them firmly, but don't overdo it—stripping the threads is worse than a slightly loose bolt. If a bolt is already stripped (it spins but doesn't tighten), replace it immediately with a new one of the same size and grade (look for markings like "8.8" for high-strength steel bolts).
Pro tip: If you're dealing with a cart that's used heavily, add a drop of thread locker (like Loctite) to the bolts after tightening. This prevents them from vibrating loose again.
Step 3: Lubricate Moving Parts
Dry joints cause squeaks and stiff movement. Apply lubricant to the swivel joint (if the caster swivels) and the axle where the caster wheel meets the base. For swivel joints, spray a little lubricant into the gap between the base and the swivel plate, then rotate the wheel back and forth a few times to work it in. For axles, wipe away old grease first, then apply a thin layer of lithium grease (it's water-resistant, so good for damp areas).
Step 4: Check the Caster Wheel and Accessories
The castor install base can't work well if the caster wheel is damaged. Spin the wheel—does it turn smoothly, or does it wobble? A wobbly wheel might have a bent axle or a damaged bearing. Check the tread too—if it's worn down or has chunks missing, replace the wheel. Don't forget caster accessories like brake pads: if the brake isn't holding, the pad might be worn or the linkage (connected to the base) might be bent.
3. The Monthly "Health Check" (30 Minutes Per Cart)
Once a month, go beyond cleaning and tightening to assess the overall health of the castor install base. Here's what to focus on:
- Rust prevention: If you found rust spots during the weekly clean, treat them now. Sand off the rust with fine-grit sandpaper, wipe away dust, and apply a rust-inhibiting paint or spray (like Rust-Oleum). For bases in wet areas (like food processing plants), consider adding a layer of wax after painting to repel moisture.
- Alignment check: Set the cart on a flat surface and let go—does it roll straight, or does it drift? If it drifts, the castor install base might be mounted crooked. Loosen the bolts, adjust the base until the wheel is straight, then retighten. If the frame is bent, you might need to shim the base with washers (part of your caster accessories stash!) to straighten it out.
- Load test: If the cart is supposed to carry 300kg, load it with 300kg of weight and roll it around. Does the castor install base flex or creak? If yes, it might be undersized for the job—upgrade to a heavier-duty base.
| Maintenance Task | Frequency | Tools Needed | What to Look For |
|---|---|---|---|
| Daily inspection | Every day | None (just your eyes and hands) | Pulling, squeaking, looseness, rust |
| Weekly cleaning & tightening | Once a week | Brush, rag, wrench, lubricant | Dirt buildup, loose bolts, dry joints |
| Monthly health check | Once a month | Sandpaper, rust treatment, shims (if needed) | Rust, misalignment, flexing under load |

Troubleshooting: Fixing Common Castor Install Base Headaches
Even with regular maintenance, you might run into issues. Here's how to diagnose and fix the most common problems:
Problem: The Cart Squeaks Like a Choir of Mice
Squeaking is usually a cry for lubrication. Start by lubricating the swivel joint and caster wheel axle (as in the weekly routine). If that doesn't work, check for rust—rusted metal rubbing together is noisy. Sand off the rust, treat with rust inhibitor, and relubricate. Still squeaking? The caster wheel might be worn unevenly—replace it.
Problem: The Cart Wobbles or Tips
Wobbling often means a loose or damaged castor install base. Tighten all bolts first. If that doesn't help, check if the base is bent—look at it from the side; it should be flat. A bent base needs to be replaced (don't try to bend it back—you'll weaken the metal). If the base is straight but the cart still wobbles, the caster wheels might be uneven in size (one is worn down more than the others). replace all wheels as a set for even wear.
Problem: The Caster Wheel Won't Swivel
Stiff swivel? Dirt or rust is probably jamming the joint. Clean the base thoroughly, then spray lubricant into the swivel mechanism. Rotate the wheel back and forth forcefully to work the lubricant in. If it's still stuck, the swivel bearing might be damaged—you'll need to replace the castor install base (bearings are often sealed and can't be repaired).
Problem: The Base Keeps Loosening Bolts
If bolts loosen immediately after tightening, try thread locker (as mentioned earlier). If the threads in the equipment frame are stripped, you have two options: use a larger bolt (if the hole can be drilled out slightly) or install a helicoil insert (a metal coil that creates new threads). For quick fixes, adding a washer between the bolt head and the base can sometimes help distribute pressure.

Long-Term Care: Making Your Castor Install Bases Last for Years
Regular maintenance will keep your castor install bases in good shape, but a few extra steps can extend their life even further:
Invest in Quality from the Start
You get what you pay for with castor install bases. Cheap bases might save money upfront, but they'll bend, rust, or crack within months. Look for bases with thick steel or aluminum construction, welded (not bolted) joints (stronger), and corrosion-resistant finishes (like zinc plating or powder coating). When buying, check the load rating—always choose a base rated for 20% more than your maximum load to account for bumps and uneven terrain.
Stock Spare Parts
Keep a stash of common caster accessories on hand: bolts, washers, lock nuts, and even a spare castor install base or two. This way, you can replace a damaged base immediately instead of waiting for a part to ship. Label the spares clearly (e.g., "3-inch steel base, 300kg rating") so you grab the right one quickly.
Train Your Team
Your maintenance routine only works if everyone follows it. Train workers to do the daily inspection and report issues. Show them how to tighten a loose bolt or apply lubricant (it's easier than you think!). When everyone takes ownership, small problems get fixed fast.
Adjust for the Environment
If you work in a harsh environment—like a freezer (cold, damp), a chemical plant (corrosive fumes), or a construction site (dust, debris)—your castor install bases need extra care. In freezers, use stainless steel bases to prevent rust. In chemical areas, clean bases daily and apply a protective coating. On construction sites, hose down bases weekly to remove concrete dust, which acts like sandpaper on moving parts.
Pair with Adjustable Leveling Feet for Uneven Floors
Uneven floors are a castor install base's worst enemy—constant rocking puts stress on the base and bolts. If your workspace has bumpy concrete or sloped floors, install adjustable leveling feet on your equipment. These feet can be screwed up or down to stabilize the cart when it's stationary, taking pressure off the castor install base. Just make sure the feet are rated for your load and made of non-slip material (like rubber) to prevent sliding.
Wrapping Up: The Little Part That Keeps Your World Turning
At the end of the day, the castor install base is one of those unsung heroes of the workplace—easy to overlook, but impossible to live without. It doesn't ask for much: a quick wipe, a bolt tightened here and there, a drop of lubricant when it squeaks. In return, it keeps your team moving, your products safe, and your operations running smoothly.
So, the next time you see a cart gliding across the warehouse floor, take a second to appreciate the castor install base doing its job. And when you do your weekly inspection, remember: you're not just maintaining a metal bracket—you're keeping your team productive, your workplace safe, and your business moving forward. After all, in the world of work, it's the small things that make the biggest difference.