- Company Articles
- Products and Technology
- Product knowledge
- How to Optimize Workflow with One Side Rotatory Chrome Parallel Lean Pipe Joints

How to Optimize Workflow with One Side Rotatory Chrome Parallel Lean Pipe Joints
Related Product
Parallel Lean Pipe Joint
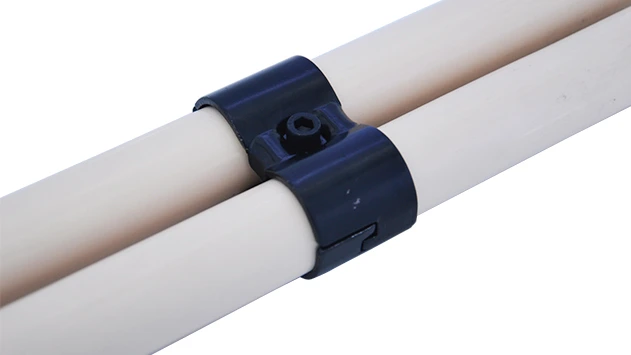
Parallel lean pipe joint used for 2 pcs 28MM lean pipe connection in parallel direction to enhance frame structure, usually for heavy payload requirement for workbench. flow rack, hand trolley.
Introduction: The Hidden Cost of Rigid Workflows
Walk into any manufacturing plant, assembly line, or warehouse, and you'll likely spot the same silent productivity killer: rigidity. Workstations that can't adjust to new product sizes, material racks that force workers to stretch or bend awkwardly, and conveyor systems that lock teams into a single process—these are the invisible drains on time, energy, and morale. In today's fast-paced production environments, where change is constant (new product launches, shifting demand, or sudden process tweaks), sticking with inflexible equipment isn't just inefficient—it's costly.
That's where lean manufacturing tools come into play. For decades, lean pipe systems have been the backbone of adaptable workspaces, allowing teams to build, modify, and repurpose everything from workbenches to flow racks with minimal hassle. But even within the world of lean pipes, not all components are created equal. One unsung hero, in particular, has been quietly transforming workflows for forward-thinking operations: the one side rotatory chrome parallel lean pipe joint .
This small but mighty component might not look like much at first glance—a chrome-plated joint with a rotating mechanism that connects parallel lean pipes—but its impact on workflow efficiency is profound. Unlike fixed joints that lock structures into place, this rotatory joint lets workers adjust angles, heights, and configurations on the fly, turning static workspaces into dynamic, responsive systems. In this article, we'll dive deep into how these joints work, why they matter, and how to leverage them (alongside tools like lean pipe workbenches and roller tracks ) to eliminate bottlenecks, reduce waste, and keep your team moving at peak performance.
That's where lean manufacturing tools come into play. For decades, lean pipe systems have been the backbone of adaptable workspaces, allowing teams to build, modify, and repurpose everything from workbenches to flow racks with minimal hassle. But even within the world of lean pipes, not all components are created equal. One unsung hero, in particular, has been quietly transforming workflows for forward-thinking operations: the one side rotatory chrome parallel lean pipe joint .
This small but mighty component might not look like much at first glance—a chrome-plated joint with a rotating mechanism that connects parallel lean pipes—but its impact on workflow efficiency is profound. Unlike fixed joints that lock structures into place, this rotatory joint lets workers adjust angles, heights, and configurations on the fly, turning static workspaces into dynamic, responsive systems. In this article, we'll dive deep into how these joints work, why they matter, and how to leverage them (alongside tools like lean pipe workbenches and roller tracks ) to eliminate bottlenecks, reduce waste, and keep your team moving at peak performance.
Understanding the One Side Rotatory Chrome Parallel Lean Pipe Joint: More Than Just a "Connector"
Before we jump into optimization strategies, let's get to know the star of the show. The one side rotatory chrome parallel lean pipe joint is a specialized connector designed to link two parallel lean pipes while allowing one side to rotate freely (usually up to 180 degrees) around a central axis. Its chrome plating isn't just for looks—it adds corrosion resistance, making it durable enough for busy shops with oils, coolants, or humidity. The rotatory mechanism, often equipped with a locking pin or friction bolt, lets users set a specific angle and lock it in place, then release and reposition as needed.
To put it simply: imagine building a shelf with traditional fixed joints. If you later need to tilt that shelf to feed parts into a roller track (for smoother material flow), you'd have to disassemble the entire structure, swap out joints, and rebuild. With a one side rotatory joint? Just unlock the pin, tilt the shelf to the desired angle, relock, and you're done. No disassembly, no downtime, no frustration.
But what makes this joint truly game-changing is its compatibility with existing lean pipe ecosystems. It works seamlessly with standard lean pipes (steel, aluminum, or stainless steel), as well as accessories like casters, brackets, and even aluminum profiles for added stability. This means you don't have to overhaul your entire workspace to benefit—you can upgrade incrementally, starting with the areas that need flexibility most.
To put it simply: imagine building a shelf with traditional fixed joints. If you later need to tilt that shelf to feed parts into a roller track (for smoother material flow), you'd have to disassemble the entire structure, swap out joints, and rebuild. With a one side rotatory joint? Just unlock the pin, tilt the shelf to the desired angle, relock, and you're done. No disassembly, no downtime, no frustration.
But what makes this joint truly game-changing is its compatibility with existing lean pipe ecosystems. It works seamlessly with standard lean pipes (steel, aluminum, or stainless steel), as well as accessories like casters, brackets, and even aluminum profiles for added stability. This means you don't have to overhaul your entire workspace to benefit—you can upgrade incrementally, starting with the areas that need flexibility most.

The Power of Integration: Pairing Rotatory Joints with Key Workflow Tools
A single joint, no matter how clever, can't optimize a workflow on its own. Its true value shines when combined with other lean tools to create holistic, adaptable systems. Let's break down three critical pairings that deliver the biggest workflow wins:
1. Rotatory Joints + Lean Pipe Workbenches: Ergonomics Meets Adaptability
The workbench is the heart of any assembly or packing station. But a "one-size-fits-all" bench often means compromise: too high for shorter workers, too low for taller ones, or with shelves that force users to reach across their bodies repeatedly. Over time, this leads to fatigue, errors, and even injuries.
Enter the adjustable lean pipe workbench, supercharged by one side rotatory joints. Here's how it works: Attach rotatory joints to the bench's side rails, then mount adjustable shelves or tool holders to the rotating side. Workers can tilt shelves to angle parts toward them (reducing neck strain), raise or lower tool hooks to shoulder height, or even pivot a secondary work surface (like a keyboard tray for quality control checks) out of the way when not needed.
A electronics manufacturer in Ohio recently shared how this setup transformed their line: After installing rotatory joints on 10 workbenches, they saw a 22% reduction in "reaching time" (measured via time-motion studies) and a 15% drop in reported shoulder pain among operators. The best part? When they launched a new, larger product, they simply adjusted the shelves' angles to accommodate the bigger components—no new benches required.
Enter the adjustable lean pipe workbench, supercharged by one side rotatory joints. Here's how it works: Attach rotatory joints to the bench's side rails, then mount adjustable shelves or tool holders to the rotating side. Workers can tilt shelves to angle parts toward them (reducing neck strain), raise or lower tool hooks to shoulder height, or even pivot a secondary work surface (like a keyboard tray for quality control checks) out of the way when not needed.
A electronics manufacturer in Ohio recently shared how this setup transformed their line: After installing rotatory joints on 10 workbenches, they saw a 22% reduction in "reaching time" (measured via time-motion studies) and a 15% drop in reported shoulder pain among operators. The best part? When they launched a new, larger product, they simply adjusted the shelves' angles to accommodate the bigger components—no new benches required.
2. Rotatory Joints + Flow Racks: Smoother Material Flow, Fewer Bottlenecks
Flow racks are the unsung heroes of material handling, using gravity to feed parts from the back to the front, so workers always grab the next item in line. But traditional flow racks have a flaw: they're built with fixed angles, which means if a part is too heavy, it might jam; if it's too light, it might not slide at all. This forces teams to either accept slow material flow or overcomplicate things with motorized conveyors.
One side rotatory joints solve this by letting you adjust the rack's incline in seconds. Mount the rack's side rails to rotatory joints, and you can tweak the angle based on the part's weight, size, or packaging. For example, a 5-degree tilt might work for small plastic components, while a 10-degree tilt could be better for metal parts. If a new batch of parts arrives in bulkier boxes, just unlock the joints, increase the angle, and the flow resumes smoothly.
A automotive parts distributor in Texas took this a step further by combining rotatory joints with roller tracks on their flow racks. By angling the roller tracks (using the joints), they eliminated the need for workers to "push" stuck parts—saving an average of 45 minutes per shift per worker. They also repurposed old racks for new part lines by adjusting the angles, avoiding a $15,000 investment in new equipment.
One side rotatory joints solve this by letting you adjust the rack's incline in seconds. Mount the rack's side rails to rotatory joints, and you can tweak the angle based on the part's weight, size, or packaging. For example, a 5-degree tilt might work for small plastic components, while a 10-degree tilt could be better for metal parts. If a new batch of parts arrives in bulkier boxes, just unlock the joints, increase the angle, and the flow resumes smoothly.
A automotive parts distributor in Texas took this a step further by combining rotatory joints with roller tracks on their flow racks. By angling the roller tracks (using the joints), they eliminated the need for workers to "push" stuck parts—saving an average of 45 minutes per shift per worker. They also repurposed old racks for new part lines by adjusting the angles, avoiding a $15,000 investment in new equipment.
3. Rotatory Joints + Aluminum Profiles: Stability Without Sacrificing Flexibility
For heavier-duty applications—like workbenches holding heavy machinery or material racks storing large components—standard lean pipes might need reinforcement. That's where
aluminum profiles
come in. These rigid, T-slot extrusions add strength, but they've historically been tricky to integrate with adjustable systems (their fixed mounting points limit reconfiguration).
One side rotatory joints bridge this gap. By attaching rotatory joints to aluminum profile brackets, you get the best of both worlds: the stability of aluminum and the adjustability of rotatory movement. For example, a manufacturer of industrial pumps used this combo to build a test station: the base frame (aluminum profiles) provided a rock-solid foundation, while rotatory joints mounted to the frame allowed the test fixture to swivel 90 degrees—so technicians could access the pump from all sides without moving the equipment itself.
The result? A 30% reduction in time spent repositioning pumps during testing, and a workspace that could adapt to 12 different pump models without modification.
One side rotatory joints bridge this gap. By attaching rotatory joints to aluminum profile brackets, you get the best of both worlds: the stability of aluminum and the adjustability of rotatory movement. For example, a manufacturer of industrial pumps used this combo to build a test station: the base frame (aluminum profiles) provided a rock-solid foundation, while rotatory joints mounted to the frame allowed the test fixture to swivel 90 degrees—so technicians could access the pump from all sides without moving the equipment itself.
The result? A 30% reduction in time spent repositioning pumps during testing, and a workspace that could adapt to 12 different pump models without modification.

Step-by-Step: Optimizing Your Workflow with Rotatory Joints
Ready to put these insights into action? Here's a practical, 5-step process to identify, design, and implement rotatory joint systems in your workspace:
Step 1: Map Your Current Workflow (and Identify Pain Points)
Grab a pen and paper (or a whiteboard) and walk through a typical day on the floor. Ask: Where do workers pause, hesitate, or repeat actions? Are there bottlenecks (e.g., a shelf that's always overflowing, a workbench that's too small for the new product)? Note ergonomic issues, too—do people bend, twist, or stretch excessively? These are your starting points.
Example pain point from a furniture assembly line: "Workers have to lift table legs from a fixed rack 3 feet away from the assembly bench, leading to 20+ trips per hour and frequent back strain."
Example pain point from a furniture assembly line: "Workers have to lift table legs from a fixed rack 3 feet away from the assembly bench, leading to 20+ trips per hour and frequent back strain."
Step 2: Design a "Flexible Fix" with Rotatory Joints
For each pain point, brainstorm how adjustability could help. For the furniture line example: Could a flow rack mounted to the bench (using rotatory joints) bring the legs directly to the worker? If the legs come in different lengths, could the rack's angle adjust to prevent tipping? Sketch a rough design, keeping in mind:
- Weight: Ensure the rotatory joints (and pipes/profiles) can support the load (check manufacturer specs!)
- Range of motion: How much rotation do you need? 90 degrees? 180? Locking positions?
- Integration: Will this system work with existing tools (e.g., a nearby conveyor or scanner)?
Step 3: Build, Test, and Tweak (Rapid Prototyping)
Lean principles emphasize "fail fast, learn faster," so don't over-engineer the first version. Use existing lean pipes, rotatory joints, and scrap materials to build a prototype. Test it with the team that will use it daily—their feedback is gold.
In the furniture example, the first prototype had a 30-degree tilt, which made legs slide too quickly. The team adjusted the rotatory joint to lock at 10 degrees instead, and added a small lip to the rack—problem solved.
In the furniture example, the first prototype had a 30-degree tilt, which made legs slide too quickly. The team adjusted the rotatory joint to lock at 10 degrees instead, and added a small lip to the rack—problem solved.
Step 4: Train the Team (and Encourage Ownership)
Even the best tool is useless if no one knows how to use it. Hold a short training session to show workers how to unlock, rotate, and relock the joints. More importantly, empower them to make adjustments on the fly—if a new part doesn't fit, they shouldn't have to wait for maintenance to tweak the setup.
A food packaging plant in California took this a step further: They labeled each rotatory joint with a simple "How-To" sticker (with diagrams) and designated "flexibility champions" on each shift to help teammates troubleshoot. Within a week, 90% of workers were adjusting the joints independently.
A food packaging plant in California took this a step further: They labeled each rotatory joint with a simple "How-To" sticker (with diagrams) and designated "flexibility champions" on each shift to help teammates troubleshoot. Within a week, 90% of workers were adjusting the joints independently.
Step 5: Measure, Iterate, and Scale
After implementation, track metrics to see if the fix is working. Did cycle time decrease? Did worker complaints about ergonomics drop? If the results are positive, scale the solution to other areas. If not, tweak the design (e.g., change the joint's position, add a sturdier pipe, or adjust the angle).
The furniture line saw a 35% drop in trips to the leg rack and a 50% reduction in reported back pain—so they rolled out the rotatory joint flow racks to all 12 assembly stations.
The furniture line saw a 35% drop in trips to the leg rack and a 50% reduction in reported back pain—so they rolled out the rotatory joint flow racks to all 12 assembly stations.
The Bottom Line: ROI That Goes Beyond Dollars
At this point, you might be wondering: "Are these joints worth the investment?" Let's crunch the numbers. A single one side rotatory chrome parallel lean pipe joint costs roughly $15–$30, depending on size and material. Compare that to the cost of a new fixed workbench ($500–$1,000) or a custom conveyor system ($10,000+), and the math is clear: adaptability is cheap.
But the real ROI isn't just financial. It's in the intangibles: Workers who feel valued because their workspace adapts to them, not the other way around. Teams that can pivot quickly when a customer's order changes. A culture of continuous improvement, where small tweaks (enabled by tools like rotatory joints) add up to big results.
In a world where "the only constant is change," rigid workflows are a liability. One side rotatory chrome parallel lean pipe joints aren't just connectors—they're enablers. They turn static workspaces into dynamic, people-centric environments where productivity, safety, and morale thrive. And in the end, that's the true measure of workflow optimization.
But the real ROI isn't just financial. It's in the intangibles: Workers who feel valued because their workspace adapts to them, not the other way around. Teams that can pivot quickly when a customer's order changes. A culture of continuous improvement, where small tweaks (enabled by tools like rotatory joints) add up to big results.
In a world where "the only constant is change," rigid workflows are a liability. One side rotatory chrome parallel lean pipe joints aren't just connectors—they're enablers. They turn static workspaces into dynamic, people-centric environments where productivity, safety, and morale thrive. And in the end, that's the true measure of workflow optimization.
Maintenance Tips to Keep Your Rotatory Joints (and Workflow) Running Smoothly
Like any tool, rotatory joints need a little care to last. Here are quick tips to keep them in top shape:
Clean Regularly:
Wipe joints with a dry cloth to remove dust, oil, or debris—grime can gum up the rotatory mechanism. For factory environments with heavy grease, use a mild degreaser (avoid harsh chemicals that damage chrome).
Lubricate the Rotation Point:
Every 3–6 months (more often for high-use joints), apply a small amount of light machine oil to the joint's pivot pin. This prevents squeaking and ensures smooth movement.
Check for Wear:
Inspect the locking mechanism (pins, bolts, or levers) monthly. If a lock feels loose or slips, replace the worn part immediately—compromised locks can lead to unstable structures.
Avoid Overloading:
Stay within the joint's weight capacity (listed on the product label). Overloading can bend the pin or crack the housing, ruining the joint.
Conclusion: From Rigid to Responsive—Your Workflow Deserves Better
Workflow optimization isn't about buying the fanciest equipment or overhauling everything at once. It's about solving small, daily frustrations with tools that adapt as your needs do. The one side rotatory chrome parallel lean pipe joint is a perfect example: a simple, affordable component that unlocks big gains in flexibility, ergonomics, and efficiency.
So the next time you walk your floor and spot a rigid workstation, a clunky material rack, or a process that "just works, but not well," remember: there's a better way. With rotatory joints, lean pipe workbenches , roller tracks , and a little creativity, you can turn those pain points into opportunities—for your team, your products, and your bottom line.
Your workflow doesn't have to be rigid. And neither should you.
So the next time you walk your floor and spot a rigid workstation, a clunky material rack, or a process that "just works, but not well," remember: there's a better way. With rotatory joints, lean pipe workbenches , roller tracks , and a little creativity, you can turn those pain points into opportunities—for your team, your products, and your bottom line.
Your workflow doesn't have to be rigid. And neither should you.
| Feature | Traditional Fixed Joints | One Side Rotatory Chrome Parallel Lean Pipe Joints |
|---|---|---|
| Adjustability | None—fixed angle/position | 180° rotation; lockable at multiple angles |
| Installation Time | Longer (requires precise alignment) | Faster (no alignment needed; rotate to adjust) |
| Durability | Good (but fixed points can loosen over time) | Excellent (chrome plating resists corrosion; locking mechanism reduces wear) |
| Cost Over Time | Higher (requires replacement for reconfiguration) | Lower (reusable across multiple setups) |
| Ergonomic Impact | Low (forces workers to adapt to the setup) | High (setup adapts to worker posture/needs) |