- Company Articles
- Products and Technology
- Product knowledge
- How to Paint 3030 National Standard Profile A: Adhesion Tips for Custom Colors

How to Paint 3030 National Standard Profile A: Adhesion Tips for Custom Colors
Related Product
3030 National Standard Profile A
Workbench, production line, logistic rack, warehouse rack Industry: Manufacturer workshop, Automobile, Electronic, Assembling, logistic
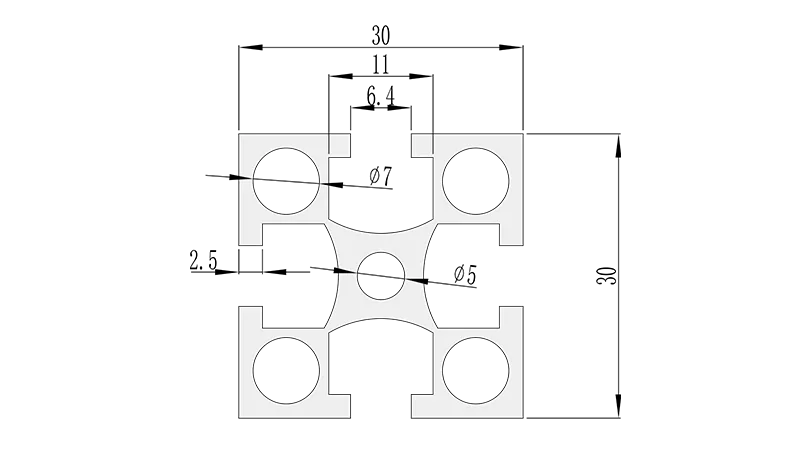
Walk into any modern workshop, manufacturing plant, or even a trendy co-working space, and you'll likely spot aluminum profiles hard at work. Sleek, versatile, and surprisingly strong, these metal frameworks are the unsung heroes of organization and efficiency. Among them, the 3030 National Standard Profile A stands out—a workhorse in the world of aluminum extrusion profiles. With its 30x30mm cross-section and T-slot design, it's used for everything from building workbenches and material racks to machine guards and custom furniture. But while its functionality is undeniable, there's one thing that can take this humble profile from "utilitarian" to "eye-catching": a custom paint job. Whether you're aiming for a bold brand color, a subtle matte finish, or something that blends into your workspace aesthetic, painting 3030 National Standard Profile A is a rewarding project. The catch? Aluminum is notoriously tricky to paint. Get it wrong, and you'll end up with peeling, chipping, or uneven color that ruins both the look and durability of your profile. The secret to success? Adhesion. In this guide, we'll break down everything you need to know to achieve a smooth, long-lasting custom color on your 3030 profile—from surface prep to curing, with pro tips to avoid common pitfalls.
Understanding 3030 National Standard Profile A: More Than Just a Metal Bar
Before we dive into painting, let's get to know the star of the show: the 3030 National Standard Profile A. As an aluminum extrusion profile, it's created by forcing heated aluminum through a die, resulting in a consistent, precise shape with integrated T-slots. These slots are what make it so versatile—they let you attach aluminum profile accessories like brackets, panels, and shelves without welding or drilling, using nothing more than bolts and nuts. The "3030" refers to its dimensions: 30mm in width and 30mm in height, making it sturdy enough for light to medium-duty applications but lightweight enough to handle easily. Unlike some other profiles, the "National Standard" designation means it adheres to strict size and quality guidelines, ensuring compatibility with standard aluminum profile accessories across brands.
But what makes aluminum extrusion profiles like 3030 so popular? For starters, aluminum is naturally resistant to corrosion, thanks to a thin oxide layer that forms on its surface when exposed to air. It's also non-magnetic, non-sparking, and conducts heat well—properties that make it ideal for industrial settings. However, that same oxide layer is one of the main reasons painting aluminum can be challenging. Think of it as a invisible shield: while it protects the metal from rust, it also creates a smooth, non-porous surface that paint struggles to grip. Add to that the fact that aluminum is often coated in oils or residues from the extrusion process, and you've got a recipe for adhesion issues if you skip the prep work.
Why Adhesion Matters: It's Not Just About Looks
You might be thinking, "So what if the paint peels a little? It's just a profile." But poor adhesion isn't just a cosmetic problem—it can compromise the profile's performance, too. A chipped or peeling finish exposes the aluminum to moisture, chemicals, and abrasion, accelerating wear and reducing its lifespan. In industrial settings, where profiles are often knocked, scraped, or exposed to oils and coolants, a durable paint job acts as a second layer of protection. And let's not underestimate the power of aesthetics: a well-painted profile can boost morale in a workshop, reinforce brand identity, or simply make your space feel more intentional. Whether you're building a customer-facing display or a back-of-house storage rack, a custom color that stays put sends a message: attention to detail matters.
Adhesion issues typically show up in a few ways: paint that flakes off with minimal pressure, bubbles or blisters forming under the surface, or a "patchy" finish where some areas bond and others don't. These problems almost always trace back to one (or more) of three mistakes: inadequate surface preparation, using the wrong primer, or rushing the curing process. The good news? All of these are avoidable with the right approach. Let's start with the first—and most critical—step: getting the surface ready for paint.
Surface Preparation: The Foundation of Good Adhesion
If you take only one thing away from this guide, let it be this: surface preparation is 90% of the battle . Aluminum's smooth, oxide-coated surface needs to be "roughed up" and cleaned thoroughly to give paint something to grip. Skipping even one step here can lead to disaster. Let's break it down into four key phases: cleaning, sanding, chemical treatment, and drying.
Step 1: Clean Like Your Paint Job Depends On It (Because It Does)
Aluminum profiles fresh from the factory are often covered in a layer of oil, grease, or release agents used during extrusion. Even if your profile looks clean, these invisible contaminants will prevent paint from sticking. Start by degreasing the surface. Use a heavy-duty degreaser (like trisodium phosphate, or TSP) or a solvent-based cleaner (isopropyl alcohol or mineral spirits). Avoid household cleaners with ammonia or citrus, as they can leave residues. Apply the cleaner with a lint-free cloth or a soft-bristle brush, focusing on the T-slots and any crevices where grime likes to hide. Wipe in one direction (not circular) to avoid spreading oil around. After degreasing, rinse the profile with clean water (if using TSP) or wipe with a fresh cloth dampened with alcohol to remove any remaining cleaner. Pro tip: Wear gloves during this step—fingerprints leave oil, too!
Step 2: Sand to Create "Tooth" (No, Not the Dental Kind)
Next, you need to create texture on the aluminum surface—a "tooth" that the paint can bite into. Sanding is the easiest way to do this. Start with 120-grit sandpaper for the initial pass. Sand in a crosshatch pattern (first horizontally, then vertically) to ensure even abrasion. Focus on the flat surfaces and the edges of the T-slots, but be careful not to sand too aggressively—you don't want to thin the profile or damage the T-slot edges (they need to still fit aluminum profile accessories, after all). After the first pass, switch to 220-grit sandpaper for a smoother finish. This removes any deep scratches left by the 120-grit and creates a finer texture that helps primer adhere. For curved edges or tight T-slots, use sanding sponges or folded sandpaper to get into hard-to-reach areas. Once you're done, wipe the profile with a tack cloth to remove all sanding dust—even a tiny speck can cause bumps in the paint.
Step 3: Chemical Treatment (Etching or Conversion Coating)
For extra adhesion (especially if you're using a high-performance topcoat), consider a chemical treatment. Aluminum's natural oxide layer is thin and uneven; chemical etching or conversion coating creates a thicker, more porous oxide layer that primer loves. Two common options are:
- Phosphoric Acid Etch: Available as a spray or liquid, this mild acid dissolves the existing oxide layer and creates a micro-rough surface. Apply it with a brush, let it sit for 5-10 minutes (don't let it dry!), then rinse thoroughly with water. Neutralize with a baking soda solution (1 tablespoon per gallon of water) to stop the etching process.
- Chromate Conversion Coating: Often sold as "alodine" or "iridite," this treatment forms a thin, corrosion-resistant layer that's golden or greenish in color. It's more durable than etching and works well for outdoor or high-moisture environments. Follow the manufacturer's instructions for application time and rinsing—over-application can leave a powdery residue.
Note: Both etching and conversion coating are optional for indoor, low-wear projects, but they're worth the extra step if you want maximum adhesion. Always wear eye protection and gloves when working with chemicals, and work in a well-ventilated area.
Step 4: Dry Completely (Moisture Is the Enemy)
Even after rinsing, aluminum can hold onto moisture—especially in the T-slots. Paint applied over damp surfaces will bubble or peel as the water evaporates. Dry the profile thoroughly with a clean, lint-free cloth, then let it air-dry for at least 24 hours in a cool, dry area (ideally with low humidity). If you're in a hurry, use a fan or a heat gun on the lowest setting (keep it 12 inches away to avoid overheating the aluminum). The surface should feel completely dry to the touch, with no water spots or dampness in the slots.
Primer: The Glue Between Aluminum and Paint
Now that your 3030 profile is clean, sanded, and dry, it's time for primer—the unsung hero of adhesion. Primer acts as a bridge between the aluminum surface and the topcoat, improving bonding and preventing corrosion. But not all primers are created equal, and using the wrong one is a common mistake. Aluminum requires a primer specifically formulated for non-ferrous metals. Let's compare the best options for 3030 National Standard Profile A.
Etch Primers: For Maximum Grip
Etch primers (also called self-etching primers) contain acid that micro-etch the aluminum surface, creating tiny pores for the primer to lock into. They're ideal for bare aluminum and work well if you skipped the chemical etching step. Look for a two-part etch primer (mixing paint and activator) for the strongest bond. Apply thin coats (too thick, and the acid won't etch properly) with a spray gun or a foam brush. Let it dry for 30-60 minutes before applying a second coat. Note: Etch primers have a short pot life once mixed, so only mix what you need.
Epoxy Primers: For Durability
Epoxy primers are tough, corrosion-resistant, and compatible with almost any topcoat (latex, enamel, urethane). They're a great choice if your profile will be exposed to moisture, chemicals, or heavy wear. Epoxy primers are usually two-part (resin + hardener) and require thorough mixing. They dry to a hard, smooth finish that provides an excellent base for custom colors. Apply with a spray gun for best results (epoxy can be thick, so thin it slightly with the manufacturer-recommended solvent if needed). Drying time is longer—typically 2-4 hours between coats, and 24 hours before topcoating.
Zinc-Rich Primers: For Extra Corrosion Protection
If your 3030 profile will be used outdoors or in a high-corrosion environment (like a workshop with oils or coolants), zinc-rich primers are worth considering. They contain zinc particles that act as a sacrificial anode, protecting the aluminum from rust. They're thicker than etch or epoxy primers, so they may require sanding between coats to avoid a rough finish. Best applied with a spray gun, as brushing can leave brush marks.
No matter which primer you choose, always test it on a scrap piece of 3030 profile first. Check for adhesion after 24 hours by pressing a piece of masking tape onto the dried primer and pulling it off quickly. If the primer comes off with the tape, it's not compatible—try a different type. Also, make sure the primer is compatible with your topcoat. For example, some etch primers don't work well with latex paints, so check the manufacturer's instructions.
Painting Techniques: Getting That Custom Color Just Right
With your primer dried and sanded (light sanding with 400-grit sandpaper removes any dust or imperfections), it's time for the fun part: applying your custom color. The goal here is even coverage, smooth finish, and no runs or drips—easier said than done, especially with the T-slots and edges of 3030 profile. Let's break down the best methods, tools, and tips for success.
Choosing the Right Paint: Custom Colors 101
For aluminum profiles, your topcoat options include acrylic enamel, urethane, or latex (water-based). Acrylic enamel is durable, dries quickly, and comes in a wide range of colors. Urethane is even tougher (great for high-wear areas) but requires a catalyst and has strong fumes. Latex is low-odor and easy to clean up, but it may not adhere as well as enamel or urethane (hence the importance of a good primer). For custom colors, you can either buy pre-mixed paint or have it mixed at a hardware store using a color sample or code. Pro tip: Always get extra paint—you'll need it for touch-ups later!
Spray Painting: The Best Method for T-Slots and Edges
Spray painting is hands down the best method for 3030 profile. It allows you to reach into T-slots, coat edges evenly, and avoid brush marks. Use a high-volume low-pressure (HVLP) spray gun for control, or aerosol spray cans for smaller projects. If using a spray gun, thin the paint according to the manufacturer's instructions (too thick, and you'll get runs; too thin, and it will dry too fast). Hold the gun 6-8 inches from the profile, moving in smooth, overlapping strokes (50% overlap ensures even coverage). Start and stop spraying off the profile to avoid blobs at the start/end of each pass. For T-slots, angle the gun slightly downward to ensure the paint reaches the bottom of the slot. Apply 2-3 thin coats, letting each dry 15-30 minutes before the next. Avoid painting in direct sunlight or windy conditions—temperature and humidity matter! Ideal conditions are 65-75°F (18-24°C) with 40-60% humidity.
Brushing or Rolling: For Small Areas or Textured Finishes
If you don't have a spray gun, you can brush or roll paint onto your profile, but it's trickier. Use a high-quality synthetic brush (for enamel/urethane) or a foam roller (for latex) to minimize brush marks. For T-slots, use a small artist's brush to coat the inside edges before rolling the flat surfaces. Work in small sections, and avoid over-brushing (this can cause streaks). Keep in mind that brushed paint may have a slightly textured finish compared to sprayed paint, which can be a design choice if you want a rustic look.
Curing: Patience Is a Virtue (and a Key to Adhesion)
You've prepped, primed, and painted—now it's time to let the paint cure. Curing is different from drying: drying is when the solvent evaporates, making the paint feel dry to the touch; curing is when the paint fully hardens and reaches maximum adhesion and durability. Rushing this step is a recipe for scratches, dents, or peeling. Here's how to do it right.
Air Drying: Slow and Steady
Most paints air-dry to a "tack-free" state in 1-2 hours, but full curing takes 7-14 days. During this time, keep the profile in a clean, dry area away from dust, moisture, and traffic. Avoid stacking profiles or attaching aluminum profile accessories until curing is complete—even a light bump can leave a mark. If you need to move the profile, handle it by the ends (not the painted surfaces) and use soft padding to protect it.
Oven Curing: For Faster Results (If You Have the Gear)
If you're working in a shop with an oven (or have a small toaster oven for small profiles), you can speed up curing with heat. Most paints cure best at 120-180°F (50-80°C). Place the painted profile on a rack (to allow air circulation) and bake for 1-2 hours, then let it cool slowly in the oven. Check the paint manufacturer's instructions first—some latex paints can't handle high heat.
Troubleshooting Common Issues: When Things Go Wrong (and How to Fix Them)
Even with careful prep, painting mishaps happen. Here's how to identify and fix the most common problems.
| Problem | Cause | Solution |
|---|---|---|
| Paint peeling or flaking | Inadequate surface prep (oils/residues left on aluminum) | Sand off the peeling paint, re-degrease, sand with 220-grit, and reapply primer + topcoat. |
| Bubbles or blisters | Moisture under the paint, or applying paint too thickly | Pop bubbles, sand the area smooth, clean, and repaint with thinner coats. Ensure surface is fully dry before painting. |
| Uneven color or "tiger stripes" | Inconsistent spray distance or overlapping strokes | Test spray on a scrap piece to practice distance (6-8 inches). Overlap strokes by 50% for even coverage. |
| Dust or debris in the finish | Painting in a dirty environment or not using a tack cloth before painting | Sand the affected area with 400-grit sandpaper, wipe with a tack cloth, and apply a fresh coat of paint. |
| Paint runs or drips | Paint too thick, or holding the spray gun too close | Sand the drip smooth with 400-grit, then repaint with thinner coats, holding the gun farther away (8-10 inches). |
Final Thoughts: From Raw Aluminum to Custom Masterpiece
Painting 3030 National Standard Profile A isn't rocket science, but it does require patience and attention to detail. By following these steps—thorough cleaning, strategic sanding, chemical treatment (if needed), the right primer, careful painting, and proper curing—you can achieve a custom color that looks professional and lasts for years. Remember, adhesion is everything, and it starts with surface prep. Don't skip steps, test your paint and primer on scrap first, and take your time curing. Whether you're building a branded workbench, a colorful material rack, or a custom display, a well-painted 3030 profile will not only function better but also bring a little personality to your space. And when you're done, don't forget to attach your aluminum profile accessories—after all, the best part of 3030 profile is how versatile it is. Now go forth and paint—your profile (and your workspace) will thank you.