- Company Articles
- Products and Technology
- Installation And Maintenance
- How to Remove a Damaged T-Slot Rubber Seal Cover: Safe and Efficient Replacement Steps

How to Remove a Damaged T-Slot Rubber Seal Cover: Safe and Efficient Replacement Steps
Related Product
T-slot Rubber Seal Cover
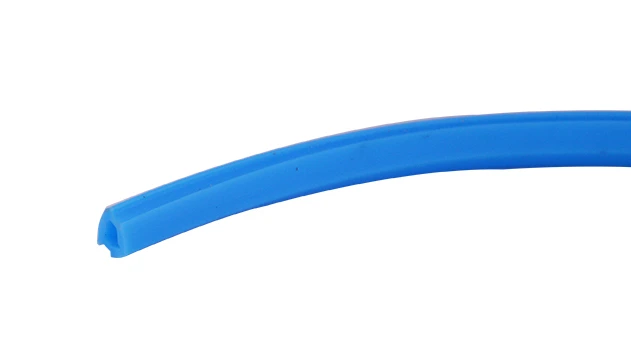
The rubber T-slot seal cover prevents dust and debris buildup, covers wires in the T-slot channel, and adds an extra layer of protection to applications. It rolls into the T-slot, making it easy to assemble.
Introduction: The Unsung Hero of Aluminum Profiles
If you've ever worked with aluminum profiles—whether building a workbench, assembling a material rack, or setting up a production line—you've probably encountered a small but mighty component: the T-slot rubber seal cover. These unassuming strips of rubber might not grab attention at first glance, but they play a critical role in keeping your aluminum profiles functional, safe, and looking their best. As part of the broader family of aluminum profile accessories, T-slot rubber seal covers are designed to fit snugly into the T-shaped grooves (or "slots") that run along aluminum profiles, acting as a barrier against debris, reducing noise from moving parts, and preventing accidental cuts from sharp edges.
Over time, though, even the most durable seal covers can wear out. Exposure to dust, moisture, temperature fluctuations, or frequent contact with tools and materials can lead to cracks, tears, or loosening. When that happens, the T-slot becomes vulnerable: dirt and grime can build up, making it harder to insert or adjust accessories like brackets or shelves. Sharp edges might become exposed, posing a safety risk to anyone handling the profile. And let's not forget aesthetics—damaged seal covers can make even the most well-maintained aluminum profile look unkempt.
The good news? Replacing a damaged T-slot rubber seal cover is a straightforward DIY task that doesn't require specialized skills or expensive tools. In this guide, we'll walk you through the entire process—from identifying when it's time for a replacement to installing the new seal cover with precision. We'll also share pro tips to ensure your new seal cover lasts, and troubleshoot common issues you might encounter along the way. Whether you're a seasoned facility manager, a small business owner maintaining lean pipe and accessories, or a hobbyist working on a home project, this step-by-step tutorial will help you get the job done safely and efficiently.
Signs Your T-Slot Rubber Seal Cover Needs Replacement
Before diving into removal and replacement, it's important to confirm that your T-slot rubber seal cover is actually damaged. Sometimes, what looks like a problem might just be a temporary issue—like a loose section that can be pressed back into place. But in most cases, certain telltale signs indicate it's time for a new one. Here's what to look for:
1. Visible Cracks or Tears
The most obvious sign is physical damage. Run your fingers along the seal cover—if you feel cracks, splits, or tears (even small ones), it's time to replace it. Cracks can start small but will only grow over time, especially if the seal is exposed to pressure or temperature changes. Tears, on the other hand, often occur when the seal gets caught on tools or materials, creating openings that let debris into the T-slot.
2. Loosening or Detachment
A properly installed T-slot rubber seal cover should fit tightly in the groove, with no gaps or lifting edges. If you notice sections of the seal starting to peel away from the T-slot, or if it slides around when touched, the rubber has likely lost its elasticity. This can happen due to age, UV exposure, or repeated flexing. A loose seal won't protect the T-slot effectively and may even get caught on moving parts, causing further damage.
3. Discoloration or Hardening
Rubber degrades over time, and one common sign is discoloration—think faded, yellowed, or darkened patches. Another red flag is hardening: if the seal cover feels stiff or brittle to the touch (instead of soft and pliable), it's no longer able to conform to the T-slot's shape, leaving gaps. Hardened rubber is also more prone to cracking, so replacing it sooner rather than later is key.
4. Debris Buildup in the T-Slot
If you've noticed an unusual amount of dirt, dust, or small particles collecting in the T-slot, even after cleaning, the seal cover might be failing. A intact seal should block most debris from entering the groove. If debris is getting through, check the seal for tiny holes or gaps you might have missed—these are often invisible to the naked eye but can still compromise protection.

Tools You'll Need: Gather These Supplies Before Starting
One of the best things about replacing a T-slot rubber seal cover is that you won't need a garage full of tools. Most of the items required are likely already in your toolbox or can be picked up at a local hardware store for a few dollars. Here's a handy checklist to ensure you're prepared:
| Tool/Supply | Purpose | Pro Tip |
|---|---|---|
| Plastic Pry Tool or Spudger | To gently lift and remove the damaged seal cover without scratching the aluminum profile. | Avoid metal tools—they can leave permanent marks on the profile's finish. |
| Isopropyl Alcohol (70% or higher) | To clean the T-slot, removing dirt, grease, or residual adhesive from the old seal. | Use a lint-free cloth to apply the alcohol—paper towels can leave fibers behind. |
| Microfiber Cloth or Lint-Free Rags | To wipe down the T-slot after cleaning and dry it thoroughly. | Keep extra cloths on hand—you may need more than one if the slot is heavily soiled. |
| Measuring Tape or Ruler | To measure the length and width of the T-slot, ensuring you buy the correct size replacement seal cover. | Measure twice to avoid mistakes! T-slot sizes can vary (e.g., 6mm, 8mm, 10mm width). |
| New T-Slot Rubber Seal Cover | The replacement part itself—ensure it matches the T-slot dimensions and is made of durable rubber (e.g., EPDM). | Buy a little extra length (2-3 inches) to account for trimming—better to have too much than too little. |
| Rubber Mallet (Optional) | To gently tap the new seal cover into place if it's tight-fitting. | Wrap the mallet head in a cloth to avoid damaging the seal cover's surface. |
| Hairdryer (Optional) | To soften a stubborn or brittle old seal cover, making it easier to peel away. | Use the low heat setting—high heat can melt or warp the rubber. |
| Gloves (Optional but Recommended) | To protect your hands from sharp edges on the aluminum profile or the old seal cover. | Nitrile gloves work best—they're puncture-resistant and won't slip. |
Once you've gathered these supplies, find a clean, well-lit workspace to tackle the project. If the aluminum profile is part of a larger structure (like a workbench or rack), make sure it's stable and won't move while you're working. If possible, disconnect any accessories attached to the T-slot (e.g., brackets, shelves) to give yourself full access to the seal cover.

Step 1: Safety First—Protect Yourself and the Aluminum Profile
Before you start prying or cleaning, take a moment to prioritize safety. While this is a low-risk task, it's easy to overlook small hazards that could lead to frustration (or worse). Here's what to keep in mind:
Wear Gloves to Avoid Cuts
Aluminum profiles are generally smooth, but damaged T-slot edges or a torn seal cover can have sharp, jagged sections. Even a small nick can draw blood, so slip on a pair of gloves before handling the profile. Nitrile or latex gloves work well—they provide grip and protect against minor cuts.
Secure the Profile to Prevent Movement
If the aluminum profile is part of a freestanding structure (like a mobile cart), lock the wheels or block the base to prevent it from rolling. If it's mounted to a wall or workbench, double-check that the fasteners are tight. A moving profile is not only dangerous but can also make it harder to remove the seal cover cleanly.
Work in a Well-Lit Area
You'll need to see small details, like tiny cracks in the seal cover or debris in the T-slot. A bright work light or natural sunlight will help you spot issues you might miss in dim conditions. If you're working indoors, position a lamp so the light shines directly on the T-slot.
Avoid Chemicals That Damage Rubber
While isopropyl alcohol is safe for cleaning, avoid harsh solvents like acetone or gasoline—they can degrade rubber, even in small amounts. Stick to alcohol or mild soap and water if the T-slot is extremely dirty (but dry thoroughly afterward, as moisture can affect adhesion).
Step 2: Remove the Damaged T-Slot Rubber Seal Cover
Now that you're prepped and safe, it's time to remove the old seal cover. This step requires patience—rushing can lead to tearing the seal into small pieces, making removal more difficult, or damaging the T-slot itself. Follow these sub-steps for a smooth process:
Sub-Step 2.1: Locate the End of the Seal Cover
Start by finding one end of the seal cover. In most cases, it will be near the edge of the aluminum profile, possibly overlapping with an aluminum profile end cap (another common aluminum profile accessory). If the seal cover is fully seated, you might need to feel for a slight gap or lift with your fingers to find the edge.
Sub-Step 2.2: Gently Lift the End with a Plastic Pry Tool
Once you've located the end, slide the plastic pry tool under the seal cover at a 45-degree angle. Apply gentle upward pressure to lift the edge. If it's stuck, don't force it—this is where the hairdryer comes in. Hold the hairdryer 6-8 inches from the seal cover on low heat for 10-15 seconds to soften the rubber. The heat will make it more pliable and easier to peel.
Sub-Step 2.3: Peel the Seal Cover Slowly Along the T-Slot
With the edge lifted, use your fingers (or the pry tool, if needed) to peel the seal cover away from the T-slot. Pull it slowly and evenly, keeping the seal as flat as possible. If it tears, don't panic—just start a new section by lifting the next intact edge. If the seal cover is brittle, it might crumble into pieces; use the pry tool to scrape out any remaining bits from the T-slot.
Sub-Step 2.4: Inspect for Residue or Adhesive
Once the old seal cover is removed, take a close look at the T-slot. Some seal covers are held in place by friction alone, while others might have a light adhesive backing. If you see sticky residue, don't leave it—this can prevent the new seal cover from seating properly. We'll tackle cleaning this in the next step.
Step 3: Clean the T-Slot Thoroughly
A clean T-slot is essential for a secure, long-lasting seal. Even small amounts of dirt or grease can create gaps between the new seal cover and the slot, leading to premature wear. Follow these steps to ensure the slot is spotless:
Sub-Step 3.1: Brush Away Loose Debris
Start by using a dry microfiber cloth or a soft-bristled brush (like a toothbrush) to sweep out loose dirt, dust, or bits of the old seal cover. Pay extra attention to the corners of the T-slot, where debris tends to hide. If the slot is very dirty, you can use compressed air (from a can or air compressor) to blow out stubborn particles—just be sure to wear safety glasses to protect your eyes from flying debris.
Sub-Step 3.2: Apply Isopropyl Alcohol to Clean the Slot
Moisten a microfiber cloth with isopropyl alcohol and wipe down the entire length of the T-slot. Focus on areas with residue or sticky spots—rub gently in a circular motion to dissolve the adhesive. For tough residue, soak a cloth in alcohol, place it over the spot, and let it sit for 30 seconds before wiping. Avoid pouring alcohol directly into the slot, as it can drip onto other parts of the aluminum profile.
Sub-Step 3.3: Dry the T-Slot Completely
After cleaning, use a dry microfiber cloth to wipe the T-slot again. It's critical that the slot is completely dry before installing the new seal cover—moisture can cause the rubber to degrade over time or prevent it from seating properly. If you're in a hurry, use the hairdryer on cool setting to speed up drying (high heat can damage the aluminum profile's finish).
Sub-Step 3.4: Inspect the T-Slot for Damage
With the slot clean and dry, inspect it for any physical damage. Look for dents, bent edges, or corrosion—these can prevent the new seal cover from fitting snugly. If you notice minor dents, use a small plastic mallet to gently tap the edges back into place (again, avoid metal tools). For deeper damage or corrosion, you may need to replace the section of aluminum profile—this is rare, but it's better to address it now than after installing the new seal cover.
Step 4: Measure and Prepare the New T-Slot Rubber Seal Cover
Now that the T-slot is clean and ready, it's time to prep the new seal cover. Getting the right size is crucial—if it's too narrow, it will fall out; too wide, and it won't fit into the slot. Here's how to measure and cut the new seal cover for a perfect fit:
Sub-Step 4.1: Measure the T-Slot Width and Length
Use a measuring tape or ruler to measure two key dimensions: the width of the T-slot (the opening at the top) and the length of the section you need to cover. For the width, measure from one inner edge of the slot to the other—common sizes are 6mm, 8mm, 10mm, and 12mm. For the length, measure from the start to the end of the area where the seal cover will go (e.g., from one aluminum profile end cap to the other).
Pro tip: If you're unsure about the width, take a small piece of the old seal cover to a hardware store or supplier of aluminum profile accessories—they can help you match it to the correct size.
Sub-Step 4.2: Cut the New Seal Cover to Length
Lay the new seal cover flat on a cutting mat or piece of cardboard. Use the measurements from Sub-Step 4.1 to mark the length with a pencil or marker. Add 1/2 inch to the measured length to account for any trimming needed later. Then, use sharp scissors or a utility knife to cut the seal cover straight along the mark. If using a utility knife, place a metal ruler along the mark to ensure a clean, straight cut—wobbly edges can make installation harder.
Sub-Step 4.3: Check the Seal Cover's Fit in the T-Slot
Before full installation, do a quick test fit. Take one end of the cut seal cover and press it into the T-slot about 1 inch from the edge. It should fit snugly—you should feel resistance when pushing it in, but it shouldn't require excessive force. If it slides in too easily, the width is too small; if it won't fit at all, the width is too large. If the size is wrong, don't try to stretch or trim the width—return it and get the correct size. A poor fit now will only lead to problems later.
Sub-Step 4.4: Soften the Seal Cover (If Needed)
New rubber seal covers can sometimes be stiff, especially if they've been stored in a cold area. If the seal cover feels rigid, warm it slightly with the hairdryer on low heat for 5-10 seconds (just like you did with the old seal). The warmth will make it more flexible and easier to press into the T-slot. Avoid overheating, though—too much heat can cause the rubber to warp.
Step 5: Install the New T-Slot Rubber Seal Cover
With the new seal cover cut and prepped, it's time for the final step: installation. This is where patience and precision pay off—taking the time to align and seat the seal cover properly will ensure it stays in place for years. Follow these steps:
Sub-Step 5.1: Align the Seal Cover with the T-Slot
Start by positioning one end of the seal cover at the edge of the T-slot (near the aluminum profile end cap, if applicable). Ensure the seal is centered in the slot—if it's off-kilter, it may not seat properly along the entire length. Hold the seal cover with one hand to keep it steady, leaving the other hand free to press it into place.
Sub-Step 5.2: Press the Seal Cover into the Slot, Starting at One End
Using your thumb, apply firm, even pressure to the top of the seal cover, pressing it into the T-slot. Start at the aligned end and work your way slowly toward the other end, moving 1-2 inches at a time. As you press, you should hear a soft "click" or feel the seal pop into place—that's the sound of it seating correctly in the groove.
Sub-Step 5.3: Use a Rubber Mallet for Tight Spots (If Needed)
If the seal cover is tight-fitting (which is a good thing!), you may need a little extra help to seat it fully. Wrap a rubber mallet in a soft cloth and tap gently along the top of the seal cover. Focus on areas that feel raised or uneven—this will help the seal settle into the T-slot. Be careful not to hit too hard, though—you don't want to damage the rubber or the aluminum profile.
Sub-Step 5.4: Trim Excess Length (If Necessary)
Once the seal cover is fully installed, check the ends. If there's extra length beyond the aluminum profile end cap or the edge of the T-slot, use sharp scissors to trim it flush. Make sure the cut is clean and straight—ragged edges can catch on tools or materials later.
Sub-Step 5.5: Inspect the Installation for Gaps or Bubbles
Finally, run your fingers along the entire length of the new seal cover. It should lie flat against the T-slot with no gaps, bubbles, or raised sections. If you find a gap, press down firmly with your thumb or tap gently with the rubber mallet to reseat that area. If a bubble forms, lift the seal cover slightly at that point, re-align it, and press back down.
Pro Tips for Long-Lasting T-Slot Rubber Seal Covers
You've successfully replaced the seal cover—now how do you make sure it stays in great shape? With a little maintenance and these pro tips, your new seal cover can last for years:
1. Clean the Seal Cover Regularly
Dust and grime can accumulate on the seal cover over time, making it look dirty and potentially causing it to harden. Wipe it down with a damp microfiber cloth every 1-2 months to remove surface debris. For deeper cleaning, use a mild soap and water solution—avoid harsh cleaners like bleach or abrasive sponges.
2. Avoid Excessive Heat or Cold
Rubber seal covers can degrade faster when exposed to extreme temperatures. If your aluminum profile is outdoors or in a facility with large temperature swings (e.g., a warehouse with uninsulated walls), consider using a heat-resistant seal cover (EPDM rubber is a good choice, as it withstands temperatures from -40°F to 240°F).
3. Protect the Seal Cover from Sharp Objects
Tools, metal brackets, or heavy materials can scratch or tear the seal cover. When working near the T-slot, be mindful of where you place tools—avoid dragging them across the seal. If you're using the profile for heavy-duty tasks, consider adding edge guards or bumpers to protect high-traffic areas.
4. Inspect During Routine Maintenance
Make seal cover inspection part of your regular maintenance routine for lean pipe and accessories. Every time you clean or adjust your aluminum profile setup, take a minute to check the seal cover for signs of wear. Catching small issues early (like a loose edge) can prevent the need for a full replacement later.
Troubleshooting Common Issues
Even with careful installation, you might run into a few hiccups. Here's how to troubleshoot the most common problems:
Issue: The New Seal Cover Keeps Popping Out of the T-Slot
Cause:
The seal cover is too narrow, or the T-slot is dirty or damaged.
Solution:
First, check the seal cover's width—if it's too small, replace it with the correct size. If the size is right, clean the T-slot again with isopropyl alcohol (residual grease might be causing slippage). If the T-slot is bent, use a plastic mallet to reshape the edges.
Issue: There Are Gaps Between the Seal Cover and T-Slot
Cause:
The seal cover wasn't aligned properly during installation, or the T-slot is warped.
Solution:
Lift the seal cover at the gap, re-align it with the T-slot, and press firmly. If the gap persists, check the T-slot for warping—if the profile is bent, you may need to replace that section.
Issue: The Old Seal Cover Broke into Tiny Pieces During Removal
Cause:
The seal cover was brittle from age or exposure.
Solution:
Use a plastic pry tool or toothbrush to scrape out remaining bits from the T-slot. Vacuum the slot afterward to remove small. If residue remains, clean with isopropyl alcohol and a cloth.
Issue: The New Seal Cover Is Too Stiff to Install
Cause:
The rubber is cold or the seal cover is oversized.
Solution:
Warm the seal cover with a hairdryer on low heat to soften it. If it's still too stiff, double-check the width—an oversized seal cover won't fit, even with heat.
Conclusion: Small Change, Big Impact
Replacing a damaged T-slot rubber seal cover might seem like a minor task, but its impact on the functionality and longevity of your aluminum profile is significant. A well-sealed T-slot keeps debris out, protects against safety hazards, and maintains the professional look of your setup—whether it's a production line, a workshop workbench, or a storage rack.
By following the steps in this guide, you've not only saved time and money by doing the job yourself but also gained the confidence to tackle future maintenance tasks on your aluminum profile and accessories. Remember, regular inspection and care are key to keeping your seal covers (and all your lean pipe and accessories) in top shape.
So the next time you notice a cracked or loose seal cover, don't put it off—grab your tools, follow these steps, and give your aluminum profile the attention it deserves. Your future self (and your workspace) will thank you!